center console CADILLAC ESCALADE 2015 4.G User Guide
[x] Cancel search | Manufacturer: CADILLAC, Model Year: 2015, Model line: ESCALADE, Model: CADILLAC ESCALADE 2015 4.GPages: 435, PDF Size: 4.59 MB
Page 122 of 435
Black plate (1,1)Cadillac Escalade Owner Manual (GMNA-Localizing-U.S./Canada/Mexico-
7063683) - 2015 - crc - 2/24/14
Storage 4-1
Storage
Storage Compartments
Storage Compartments . . . . . . . 4-1
Instrument Panel Storage . . . . . 4-1
Glove Box . . . . . . . . . . . . . . . . . . . . 4-1
Cupholders . . . . . . . . . . . . . . . . . . . 4-2
Sunglasses Storage . . . . . . . . . . 4-2
Armrest Storage . . . . . . . . . . . . . . 4-2
Rear Storage . . . . . . . . . . . . . . . . . 4-2
Center Console Storage . . . . . . 4-3
Additional Storage Features
Cargo Cover . . . . . . . . . . . . . . . . . . 4-3
Roof Rack System
Roof Rack System . . . . . . . . . . . . 4-4
Storage
Compartments
{Warning
Do not store heavy or sharp
objects in storage compartments.
In a crash, these objects may
cause the cover to open and
could result in injury.
Instrument Panel Storage
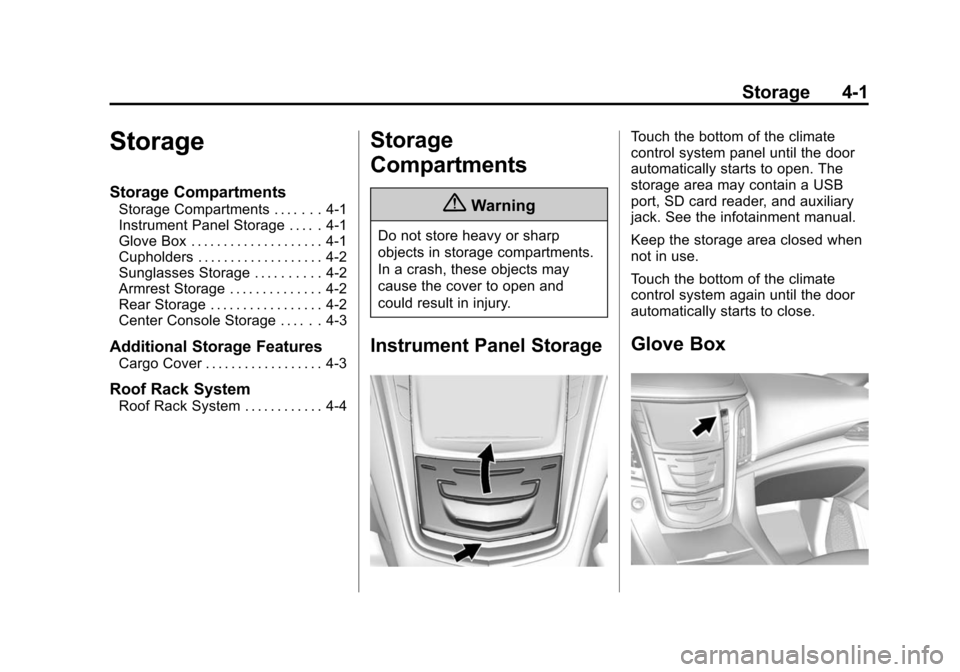
Touch the bottom of the climate
control system panel until the door
automatically starts to open. The
storage area may contain a USB
port, SD card reader, and auxiliary
jack. See the infotainment manual.
Keep the storage area closed when
not in use.
Touch the bottom of the climate
control system again until the door
automatically starts to close.
Glove Box
Page 124 of 435
Black plate (3,1)Cadillac Escalade Owner Manual (GMNA-Localizing-U.S./Canada/Mexico-
7063683) - 2015 - crc - 2/24/14
Storage 4-3
Center Console Storage
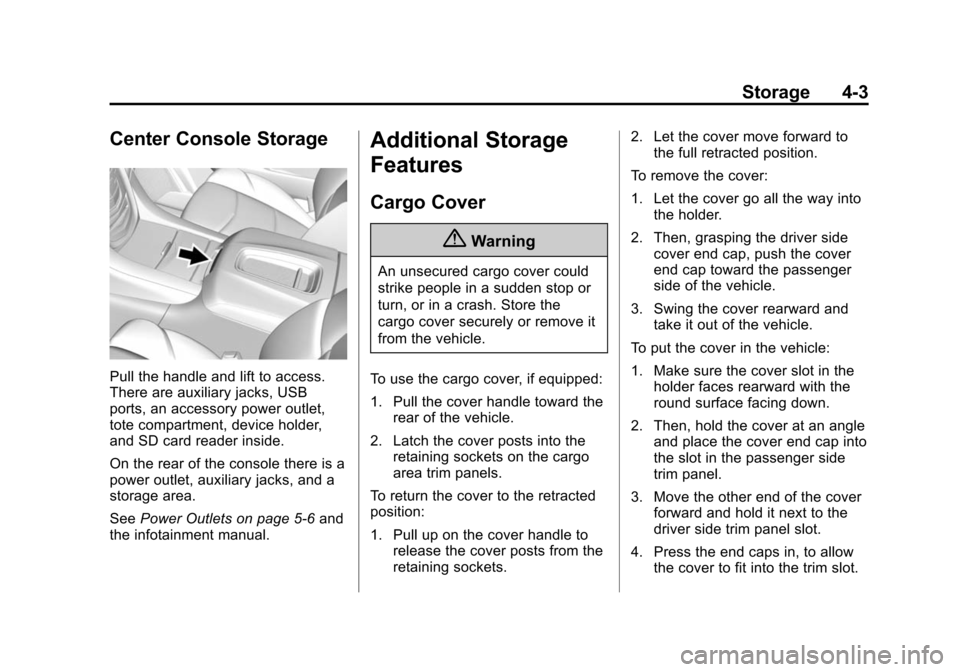
Pull the handle and lift to access.
There are auxiliary jacks, USB
ports, an accessory power outlet,
tote compartment, device holder,
and SD card reader inside.
On the rear of the console there is a
power outlet, auxiliary jacks, and a
storage area.
SeePower Outlets on page 5-6 and
the infotainment manual.
Additional Storage
Features
Cargo Cover
{Warning
An unsecured cargo cover could
strike people in a sudden stop or
turn, or in a crash. Store the
cargo cover securely or remove it
from the vehicle.
To use the cargo cover, if equipped:
1. Pull the cover handle toward the rear of the vehicle.
2. Latch the cover posts into the retaining sockets on the cargo
area trim panels.
To return the cover to the retracted
position:
1. Pull up on the cover handle to release the cover posts from the
retaining sockets. 2. Let the cover move forward to
the full retracted position.
To remove the cover:
1. Let the cover go all the way into the holder.
2. Then, grasping the driver side cover end cap, push the cover
end cap toward the passenger
side of the vehicle.
3. Swing the cover rearward and take it out of the vehicle.
To put the cover in the vehicle:
1. Make sure the cover slot in the holder faces rearward with the
round surface facing down.
2. Then, hold the cover at an angle and place the cover end cap into
the slot in the passenger side
trim panel.
3. Move the other end of the cover forward and hold it next to the
driver side trim panel slot.
4. Press the end caps in, to allow the cover to fit into the trim slot.
Page 133 of 435
Black plate (6,1)Cadillac Escalade Owner Manual (GMNA-Localizing-U.S./Canada/Mexico-
7063683) - 2015 - crc - 2/24/14
5-6 Instruments and Controls
3. Press 12-24Hr for a 12 or24 hour clock.
4. Press
[Back to go back to the
previous menu.
Date
To set the date:
1. Press the SETTINGS screen button and press Time and Date.
2. Press Set Date and press + or −
to increase or decrease month,
day, or year.
3. Press
[Back to go back to the
previous menu.
Auto Set
When on, the time and date will
automatically update.
To set auto set:
1. Press the SETTINGS screen button, then press Time
and Date.
2. Press Set Time or Set Date. 3. Press Auto Set, then select
On-Cell Network or Off-Manual
to manually set the time
and date.
4. Press
[Back to go back to the
previous menu.
If auto timing is set, the time
displayed on the clock may not
update immediately when driving
into a new time zone.
Clock Display
When on, the digital clock will
display on the infotainment screen.
To set the clock display:
1. Press the SETTINGS screen button and press Time and Date.
2. Press Clock Display, then select Off or On.
3. Press
[Back to go back to the
previous menu.
Power Outlets
Accessory power outlets can be
used to plug in electrical equipment,
such as a cell phone or MP3 player.
The vehicle has five accessory
power outlets:
.One near the cupholders on the
center console.
.One inside the center console.
.One on the rear of the center
console.
.One in the third row seat on the
driver side.
.One in the rear cargo area on
the passenger side.
Lift the cover to access and replace
when not in use.
The accessory power outlets are
powered as follows:
.The power outlet near the
cupholders on the center
console is powered in Retained
Accessory Power (RAP) mode.
This outlet can be configured to
Page 134 of 435
Black plate (7,1)Cadillac Escalade Owner Manual (GMNA-Localizing-U.S./Canada/Mexico-
7063683) - 2015 - crc - 2/24/14
Instruments and Controls 5-7
operate using RAP or battery
power. If the power outlet is
used while in the battery power
mode, this could cause
interference between the RKE
transmitter and the vehicle, and
the vehicle may not start. See
Ignition Positions on page 9-20.
.The power outlets inside the
center console and on the rear
of the center console are
powered when the ignition is in
ON/RUN/START or ACC/
ACCESSORY, or until the driver
door is opened within
10 minutes of turning off the
vehicle. SeeRetained
Accessory Power (RAP) on
page 9-23.
.The power outlets in the third
row seat and in the rear cargo
area are powered at all times.
{Warning
Power is always supplied to the
outlets. Do not leave electrical
equipment plugged in when the
vehicle is not in use because the
vehicle could catch fire and cause
injury or death.
{Caution
Leaving electrical equipment
plugged in for an extended period
of time while the vehicle is off will
drain the battery. Always unplug
electrical equipment when not in
use and do not plug in equipment
that exceeds the maximum
15 amp rating.
Certain power accessory plugs may
not be compatible with the
accessory power outlet and could overload vehicle or adapter fuses.
If a problem is experienced, see
your dealer.
When adding electrical equipment,
be sure to follow the proper
installation instructions included with
the equipment. See
Add-On
Electrical Equipment on page 9-80.
{Caution
Hanging heavy equipment from
the power outlet can cause
damage not covered by the
vehicle warranty. The power
outlets are designed for
accessory power plugs only, such
as cell phone charge cords.
Power Outlet 110 Volt
Alternating Current
This power outlet can be used to
plug in electrical equipment that
uses a maximum limit of 150 watts.
The 110 volt power outlet is on the
rear of the center console.
Page 135 of 435
Black plate (8,1)Cadillac Escalade Owner Manual (GMNA-Localizing-U.S./Canada/Mexico-
7063683) - 2015 - crc - 2/24/14
5-8 Instruments and Controls
An indicator light on the outlet turns
on to show it is in use. The light
comes on when the ignition is in
ON/RUN/START, equipment
requiring less than 150 watts is
plugged into the outlet, and no
system fault is detected.
The indicator light does not come on
when the ignition is in LOCK/OFF or
if the equipment is not fully seated
into the outlet.
If equipment is connected using
more than 150 watts or a system
fault is detected, a protection circuit
shuts off the power supply and the
indicator light turns off. To reset the
circuit, unplug the item and plug it
back in or turn the ignition off and
then back to ON/RUN. The power
restarts when equipment using 150
watts or less is plugged into the
outlet and a system fault is not
detected.The power outlet is not designed for
the following, and may not work
properly if they are plugged in:
.Equipment with high initial peak
wattage, such as
compressor-driven refrigerators
and electric power tools.
.Other equipment requiring an
extremely stable power supply,
such as
microcomputer-controlled
electric blankets and touch
sensor lamps.
Cigarette Lighter
For vehicles with a cigarette lighter,
it is located in the center console
near the cupholders. Press on the
access door to open it and use the
lighter.
To use the cigarette lighter, push it
in all the way, and let go. When it is
ready, it will pop back out by itself.
Holding a cigarette lighter in while
it is heating does not let the lighter
back away from the heating element when it is hot. Damage
from overheating can occur to the
lighter or heating element, or a
fuse could be blown. Do not hold
a cigarette lighter in while it is
heating.
Ashtrays
For vehicles with an ashtray, it is in
the center console cupholder.
{Caution
If papers, pins, or other
flammable items are put in the
ashtray, hot cigarettes or other
smoking materials could ignite
them and possibly damage the
vehicle. Never put flammable
items in the ashtray.
To remove the ashtray, pull it from
the cupholder. Push it back down to
be sure it is secure.
Page 143 of 435

Black plate (16,1)Cadillac Escalade Owner Manual (GMNA-Localizing-U.S./Canada/Mexico-
7063683) - 2015 - crc - 2/24/14
5-16 Instruments and Controls
The airbag readiness light comes on
for several seconds when the
vehicle is started. If the light does
not come on then, have it fixed
immediately.
{Warning
If the airbag readiness light stays
on after the vehicle is started or
comes on while driving, it means
the airbag system might not be
working properly. The airbags in
the vehicle might not inflate in a
crash, or they could even inflate
without a crash. To help avoid
injury, have the vehicle serviced
right away.
If there is a problem with the airbag
system, a Driver Information Center
(DIC) message may also come on.
See Airbag System Messages on
page 5-42.
Passenger Airbag Status
Indicator
The vehicle has a passenger
sensing system. See Passenger
Sensing System on page 3-32 for
important safety information. The
passenger airbag status indicator is
in the overhead console.
United States
Canada and Mexico
When the vehicle is started, the
passenger airbag status indicator
will light ON and OFF, or the symbol
for on and off, for several seconds as a system check. Then, after
several more seconds, the status
indicator will light either ON or OFF,
or the on or off symbol, to let you
know the status of the front
outboard passenger frontal airbag.
If the word ON or the on symbol is
lit on the passenger airbag status
indicator, it means that the front
outboard passenger frontal airbag is
allowed to inflate.
If the word OFF or the off symbol is
lit on the airbag status indicator, it
means that the passenger sensing
system has turned off the front
outboard passenger frontal airbag.
If, after several seconds, both status
indicator lights remain on, or if there
are no lights at all, there may be a
problem with the lights or the
passenger sensing system. See
your dealer for service.
Page 228 of 435
Black plate (23,1)Cadillac Escalade Owner Manual (GMNA-Localizing-U.S./Canada/Mexico-
7063683) - 2015 - crc - 2/24/14
Driving and Operating 9-23
try, to allow the cranking motor
to cool down. When the engine
starts, let go of the button, and
the accelerator. If the vehicle
starts briefly but then stops
again, do the same thing. This
clears the extra gasoline from
the engine. Do not race the
engine immediately after starting
it. Operate the engine and
transmission gently until the oil
warms up and lubricates all
moving parts.
Engine Heater
The engine coolant heater can
provide easier starting and better
fuel economy during engine
warm-up in cold weather conditions
at or below−18°C (0°F). Vehicles
with an engine heater should be
plugged in at least four hours before
starting. There may be an internal
thermostat in the plug end of the
cord, which will prevent engine
coolant heater operation at
temperatures above −18°C (0°F).
To Use the Engine Coolant
Heater
1. Turn off the engine.
2. Open the hood and unwrap the
electrical cord. The cord is by
the left front fender, next to the
engine compartment fuse block.
3. Plug the cord into a normal, grounded 110-volt AC outlet.
{Warning
Plugging the cord into an
ungrounded outlet could cause an
electrical shock. Also, the wrong
kind of extension cord could
overheat and cause a fire. You
could be seriously injured. Plug
the cord into a properly grounded
three-prong 110-volt AC outlet.
If the cord will not reach, use a
heavy-duty three-prong extension
cord rated for at least 15 amps. 4. Before starting the engine, be
sure to unplug and store the
cord as it was before to keep it
away from moving engine parts.
If you do not, it could be
damaged.
The length of time the heater should
remain plugged in depends on
several factors. Ask a dealer in the
area where you will be parking the
vehicle for the best advice on this.
Retained Accessory
Power (RAP)
The following vehicle accessories
can be used for up to 10 minutes
after the engine is turned off:
.Audio System
.Power Windows
.OnStar System (if equipped)
.Sunroof (if equipped)
.Accessory Power Outlets. The
console and center seat outlets
are RAP powered.
Page 423 of 435

Black plate (2,1)Cadillac Escalade Owner Manual (GMNA-Localizing-U.S./Canada/Mexico-
7063683) - 2015 - crc - 2/24/14
i-2 INDEX
B
Battery . . . . . . . . . . . . . . . . . . . . . . . 10-23Jump Starting . . . . . . . . . . . . . . . 10-73
Load Management . . . . . . . . . . . . . 6-9
Power Protection . . . . . . . . . . . . . . 6-9
Voltage and ChargingMessages . . . . . . . . . . . . . . . . . . . 5-34
Blade Replacement, Wiper . . . 10-27
Blind Spot Mirrors . . . . . . . . . . . . . 2-23
Brake Parking, Electric . . . . . . . . . . . . . . 9-36
Pedal and Adjustable
Throttle . . . . . . . . . . . . . . . . . . . . . . 9-19
System Warning Light . . . . . . . . 5-20
Brakes . . . . . . . . . . . . . . . . . . . . . . . . 10-20 Antilock . . . . . . . . . . . . . . . . . . . . . . . 9-34
Assist . . . . . . . . . . . . . . . . . . . . . . . . . 9-37
Fluid . . . . . . . . . . . . . . . . . . . . . . . . 10-21
Parking . . . . . . . . . . . . . . . . . . . . . . . 9-35
System Messages . . . . . . . . . . . . 5-34
Braking . . . . . . . . . . . . . . . . . . . . . . . . . 9-3
Braking System Active Emergency . . . . . . . . . . . . 1-19
Break-In, New Vehicle . . . . . . . . . 9-19 Bulb Replacement . . . . . . . . . . . . 10-30
Headlamp Aiming . . . . . . . . . . . 10-28
Headlamps . . . . . . . . . . . . . . . . . 10-29
License Plate Lamps . . . . . . . 10-29
Buying New Tires . . . . . . . . . . . . . 10-57
C
Cadillac Premium Care Maintenance . . . . . . . . . . . . . . . . . 11-3
Calibration . . . . . . . . . . . . . . . . . . . . . . 5-5
California Fuel Requirements . . . . . . . . . . . 9-67
Perchlorate MaterialsRequirements . . . . . . . . . . . . . . . 10-2
Warning . . . . . . . . . . . . . . . . . . . . . . 10-2
Canadian Vehicle Owners . . . . . . . . iii
Capacities and Specifications . . . . . . . . . . . . . . . . 12-2
Carbon Monoxide Engine Exhaust . . . . . . . . . . . . . . . 9-26
Liftgate . . . . . . . . . . . . . . . . . . . . . . . 2-13
Winter Driving . . . . . . . . . . . . . . . . 9-11
Cargo
Cover . . . . . . . . . . . . . . . . . . . . . . . . . . 4-3
Cautions, Danger, and Warnings . . . . . . . . . . . . . . . . . . . . . . . . iv Center Console Storage . . . . . . . . 4-3
Chains, Tire . . . . . . . . . . . . . . . . . . 10-62
Charging System Light . . . . . . . . 5-17
Check
Engine Light . . . . . . . . . . . . . . . . . . 5-17
Child Restraints Infants and Young
Children . . . . . . . . . . . . . . . . . . . . . 3-41
Lower Anchors and Tethers for Children . . . . . . . . . 3-46
Older Children . . . . . . . . . . . . . . . . 3-39
Securing . . . . . . . . . . . . . . . . 3-55, 3-58
Systems . . . . . . . . . . . . . . . . . . . . . . 3-43
Child-View Mirror . . . . . . . . . . . . . . 2-25
Cigarette Lighter . . . . . . . . . . . . . . . . 5-8
Cleaning Exterior Care . . . . . . . . . . . . . . . 10-81
Interior Care . . . . . . . . . . . . . . . . 10-85
Climate Control Systems Dual Automatic . . . . . . . . . . . . . . . . 8-1
Rear . . . . . . . . . . . . . . . . . . . . . . . . . . . 8-6
Clock . . . . . . . . . . . . . . . . . . . . . . . . . . . 5-5
Cluster, Instrument . . . . . . . . . . . . 5-10
Collision Damage Repair . . . . . . 13-8
Compartments Storage . . . . . . . . . . . . . . . . . . . . . . . . 4-1
Page 432 of 435

Black plate (11,1)Cadillac Escalade Owner Manual (GMNA-Localizing-U.S./Canada/Mexico-
7063683) - 2015 - crc - 2/24/14
INDEX i-11
Storage AreasArmrest . . . . . . . . . . . . . . . . . . . . . . . . 4-2
Cargo Cover . . . . . . . . . . . . . . . . . . . 4-3
Center Console . . . . . . . . . . . . . . . . 4-3
Glove Box . . . . . . . . . . . . . . . . . . . . . 4-1
Instrument Panel . . . . . . . . . . . . . . 4-1
Roof Rack System . . . . . . . . . . . . . 4-4
Sunglasses . . . . . . . . . . . . . . . . . . . . 4-2
Storage Compartments . . . . . . . . . 4-1
Stuck Vehicle . . . . . . . . . . . . . . . . . . 9-13
Sun Visors . . . . . . . . . . . . . . . . . . . . . 2-28
Sunglass Storage . . . . . . . . . . . . . . . 4-2
Sunroof . . . . . . . . . . . . . . . . . . . . . . . . 2-28
Symbols . . . . . . . . . . . . . . . . . . . . . . . . . . iv
System Active Emergency Braking . . . . 9-59
Forward Collision
Alert (FCA) . . . . . . . . . . . . . . . . . . 9-57
Infotainment . . . . . . . . . . . . 7-1, 13-15
Roof Rack . . . . . . . . . . . . . . . . . . . . . 4-4
Systems
Driver Assistance . . . . . . . . . . . . . 9-52T
Tachometer . . . . . . . . . . . . . . . . . . . . 5-13
Text Telephone (TTY) Users . . . 13-4
Theft-Deterrent Systems . . . . . . . 2-21Immobilizer . . . . . . . . . . . . . . . . . . . 2-21
Third-Row Seats . . . . . . . . . . . . . . . 3-14
Throttle, Adjustable . . . . . . . . . . . . 9-19
Time . . . . . . . . . . . . . . . . . . . . . . . . . . . . 5-5
Tires . . . . . . . . . . . . . . . . . . . . . . . . . . 10-41 All-Season . . . . . . . . . . . . . . . . . . 10-42
All-Terrain . . . . . . . . . . . . . . . . . . 10-43
Buying New Tires . . . . . . . . . . . 10-57
Chains . . . . . . . . . . . . . . . . . . . . . . 10-62
Changing . . . . . . . . . . . . . . . . . . . 10-63
Designations . . . . . . . . . . . . . . . 10-45
Different Size . . . . . . . . . . . . . . . 10-58
Full-Size Spare . . . . . . . . . . . . . 10-72
If a Tire Goes Flat . . . . . . . . . . 10-62
Inflation Monitor System . . . . 10-51
Inspection . . . . . . . . . . . . . . . . . . 10-54
Low Profile . . . . . . . . . . . . . . . . . 10-43
Messages . . . . . . . . . . . . . . . . . . . . 5-43
Pressure . . . . . . . . . . . . . . . . . . . . 10-50
Pressure Light . . . . . . . . . . . . . . . . 5-24
Pressure Monitor System . . . 10-50
Rotation . . . . . . . . . . . . . . . . . . . . 10-55 Tires (cont'd)
Sidewall Labeling . . . . . . . . . . . 10-43
Terminology and
Definitions . . . . . . . . . . . . . . . . . 10-46
Uniform Tire Quality Grading . . . . . . . . . . . . . . . . . . . 10-59
Wheel Alignment and Tire Balance . . . . . . . . . . . . . . . . . . . 10-60
Wheel Replacement . . . . . . . . 10-61
When It Is Time for New
Tires . . . . . . . . . . . . . . . . . . . . . . 10-56
Winter . . . . . . . . . . . . . . . . . . . . . . 10-42
Tow/Haul Mode . . . . . . . . . . . . . . . . 9-31
Tow/Haul Mode Light . . . . . . . . . . 5-21
Towing Driving Characteristics . . . . . . . . 9-70
Equipment . . . . . . . . . . . . . . . . . . . . 9-77
General Information . . . . . . . . . . 9-70
Recreational Vehicle . . . . . . . . 10-76
Trailer . . . . . . . . . . . . . . . . . . . . . . . . 9-73
Trailer Sway Control (TSC) . . . 9-79
Vehicle . . . . . . . . . . . . . . . . . . . . . 10-76
Traction
Control System (TCS)/StabiliTrak
®Light . . . . . . . . . . . . 5-23
Off Light . . . . . . . . . . . . . . . . . . . . . . 5-22