headlamp CADILLAC ESCALADE 2015 4.G Owner's Manual
[x] Cancel search | Manufacturer: CADILLAC, Model Year: 2015, Model line: ESCALADE, Model: CADILLAC ESCALADE 2015 4.GPages: 435, PDF Size: 4.59 MB
Page 263 of 435
Black plate (58,1)Cadillac Escalade Owner Manual (GMNA-Localizing-U.S./Canada/Mexico-
7063683) - 2015 - crc - 2/24/14
9-58 Driving and Operating
Warning (Continued)
or ice, or if the windshield is
damaged. It may also not detect a
vehicle on winding or hilly roads,
or in conditions that can limit
visibility such as fog, rain,
or snow, or if the headlamps or
windshield are not cleaned or in
proper condition. Keep the
windshield, headlamps, and FCA
sensors clean and in good repair.
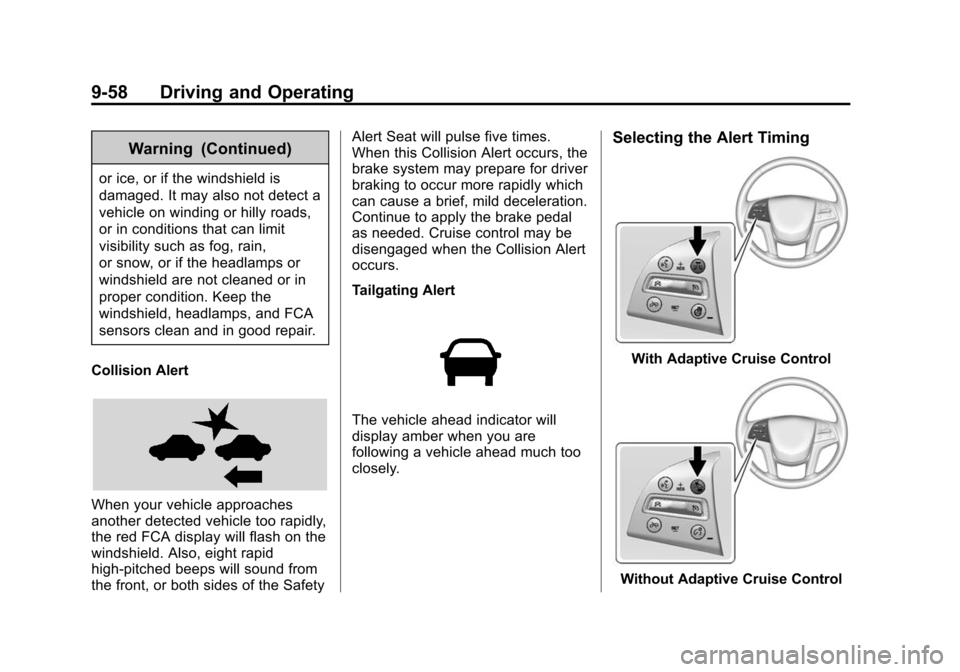
Collision Alert
When your vehicle approaches
another detected vehicle too rapidly,
the red FCA display will flash on the
windshield. Also, eight rapid
high-pitched beeps will sound from
the front, or both sides of the Safety Alert Seat will pulse five times.
When this Collision Alert occurs, the
brake system may prepare for driver
braking to occur more rapidly which
can cause a brief, mild deceleration.
Continue to apply the brake pedal
as needed. Cruise control may be
disengaged when the Collision Alert
occurs.
Tailgating Alert
The vehicle ahead indicator will
display amber when you are
following a vehicle ahead much too
closely.
Selecting the Alert Timing
With Adaptive Cruise Control
Without Adaptive Cruise Control
Page 270 of 435

Black plate (65,1)Cadillac Escalade Owner Manual (GMNA-Localizing-U.S./Canada/Mexico-
7063683) - 2015 - crc - 2/24/14
Driving and Operating 9-65
If LDW is on, the LDW indicator will
appear green if the system detects
a left or right lane marking while the
vehicle is traveling at 56 km/h (35
mph) or greater. If the vehicle
crosses a detected lane marking
without using the turn signal in the
lane departure direction, this
indicator will change to amber and
flash. In addition, three beeps will
be sounded from the left or right
side, or the Safety Alert Seat will
pulse three times on either the left
or right side of the seat, depending
on the lane departure direction.
When the System Does Not
Seem to Work Properly
If the LDW symbol does not appear
when the system is on and the
vehicle is traveling at least 56 km/h
(35 mph):
.The lane markings on the road
may not be seen.
.The camera sensor may be
blocked by dirt, snow, or ice.
.The windshield may be
damaged.
.The weather may be limiting
visibility.
This is normal operation; the vehicle
does not need service. Clean the
windshield.
Lane markings may not be detected
on curves, highway exit ramps,
or hills; or due to poor visibility.
If the LDW camera system does not
seem to operate properly, cleaning
the outside of the windshield in front
of the camera sensor may correct
the issue.
{Warning
LDW does not provide a warning
to help avoid a crash, unless it
detects the lane markings. LDW
may not detect the lane markings
if the camera sensor is blocked
by dirt, snow, or ice, or if the
windshield is damaged. It may (Continued)
Warning (Continued)
also not detect a lane on winding
or hilly roads, or in conditions that
can limit visibility such as fog,
rain, or snow, or if the headlamps
or windshield are not cleaned or
in proper condition. Keep the
windshield, headlamps, and
camera sensors clean and in
good repair.
LDW warnings may occur due to tar
marks, shadows, cracks in the road,
or other road imperfections. This is
normal system operation; the
vehicle does not need service.
Page 283 of 435
Black plate (78,1)Cadillac Escalade Owner Manual (GMNA-Localizing-U.S./Canada/Mexico-
7063683) - 2015 - crc - 2/24/14
9-78 Driving and Operating
the trailer to help prevent the tongue
from contacting the road if it
becomes separated from the hitch.
Instructions about safety chains
may be provided by the hitch
manufacturer or by the trailer
manufacturer. If the trailer being
towed weighs up to 2 271 kg
(5,000 lb) with a factory-installed
step bumper, safety chains may be
attached to the attaching points on
the bumper, otherwise, safety
chains should be attached to holes
on the trailer hitch platform. Always
leave just enough slack so the
combination can turn. Never allow
safety chains to drag on the ground.
Trailer Brakes
A loaded trailer that weighs more
than 900 kg (2,000 lb) needs to have
its own brake system that is
adequate for the weight of the
trailer. Be sure to read and follow
the instructions for the trailer brakes
so they are installed, adjusted, and
maintained properly.Since the vehicle is equipped with
StabiliTrak, the trailer brakes cannot
tap into the vehicle's hydraulic
system.
Trailer Wiring Harness
The seven-pin trailer connector is
mounted in the bumper. This
connector can be plugged into a
seven-pin universal heavy-duty
trailer connector available through
your dealer.
The seven-wire harness contains
the following trailer circuits:
.Yellow: Left Stop/Turn Signal
.Green/Violet: Right Stop/Turn
Signal
.Brown: Taillamps
.White: Ground
.Light Green: Back-up Lamps
.Red/Green: Battery Feed
.Dark Blue: Trailer Brake
If charging a remote (non-vehicle)
battery, press the Tow/Haul mode
button at the end of the shift lever. This will boost the vehicle system
voltage and properly charge the
battery. If the trailer is too light for
Tow/Haul mode, turn on the
headlamps as a second way to
boost the vehicle system and
charge the battery.
Electric Brake Control Wiring
Provisions
These wiring provisions are
included with the vehicle as part of
the trailer wiring package. These
provisions are for an electric brake
controller.
The harness should be installed by
your dealer or a qualified service
center.
Page 286 of 435
Black plate (1,1)Cadillac Escalade Owner Manual (GMNA-Localizing-U.S./Canada/Mexico-
7063683) - 2015 - crc - 2/24/14
Vehicle Care 10-1
Vehicle Care
General Information
General Information . . . . . . . . . . 10-2
California Proposition65 Warning . . . . . . . . . . . . . . . . . 10-2
California Perchlorate Materials Requirements . . . . 10-2
Accessories and Modifications . . . . . . . . . . . . . . . 10-2
Vehicle Checks
Doing Your OwnService Work . . . . . . . . . . . . . . . 10-3
Hood . . . . . . . . . . . . . . . . . . . . . . . . 10-4
Engine Compartment Overview . . . . . . . . . . . . . . . . . . . 10-5
Engine Oil . . . . . . . . . . . . . . . . . . . 10-6
Engine Oil Life System . . . . . . 10-8
Automatic Transmission Fluid . . . . . . . . . . . . . . . . . . . . . . 10-10
Engine Air Cleaner/Filter . . . . 10-13
Cooling System . . . . . . . . . . . . 10-14
Engine Coolant . . . . . . . . . . . . . 10-15
Engine Overheating . . . . . . . . 10-18
Engine Fan . . . . . . . . . . . . . . . . . 10-19
Washer Fluid . . . . . . . . . . . . . . . 10-20
Brakes . . . . . . . . . . . . . . . . . . . . . 10-20 Brake Fluid . . . . . . . . . . . . . . . . . 10-21
Battery . . . . . . . . . . . . . . . . . . . . . 10-23
Four-Wheel Drive . . . . . . . . . . . 10-24
Front Axle . . . . . . . . . . . . . . . . . . 10-24
Rear Axle . . . . . . . . . . . . . . . . . . 10-25
Starter Switch Check . . . . . . . 10-26
Automatic Transmission Shift
Lock Control Function
Check . . . . . . . . . . . . . . . . . . . . . 10-26
Park Brake and P (Park) Mechanism Check . . . . . . . . 10-26
Wiper Blade Replacement . . . . . . . . . . . . . . 10-27
Glass Replacement . . . . . . . . 10-28
Windshield Replacement . . . 10-28
Headlamp Aiming
Headlamp Aiming . . . . . . . . . . 10-28
Bulb Replacement
Bulb Replacement . . . . . . . . . . 10-29
LED Lighting . . . . . . . . . . . . . . . 10-29
License Plate Lamp . . . . . . . . 10-29
Replacement Bulbs . . . . . . . . . 10-30
Electrical System
Electrical System Overload . . . . . . . . . . . . . . . . . . 10-30
Fuses . . . . . . . . . . . . . . . . . . . . . . 10-31 Engine Compartment Fuse
Block . . . . . . . . . . . . . . . . . . . . . 10-31
Instrument Panel Fuse Block (Left) . . . . . . . . . . . . . . . 10-35
Instrument Panel Fuse Block
(Right) . . . . . . . . . . . . . . . . . . . . 10-37
Rear Compartment Fuse Block . . . . . . . . . . . . . . . . . . . . . 10-40
Wheels and Tires
Tires . . . . . . . . . . . . . . . . . . . . . . . . 10-41
All-Season Tires . . . . . . . . . . . . 10-42
Winter Tires . . . . . . . . . . . . . . . . 10-42
Low-Profile Tires . . . . . . . . . . . 10-43
All-Terrain Tires . . . . . . . . . . . . 10-43
Tire Sidewall Labeling . . . . . . 10-43
Tire Designations . . . . . . . . . . . 10-45
Tire Terminology andDefinitions . . . . . . . . . . . . . . . . 10-46
Tire Pressure . . . . . . . . . . . . . . . 10-48
Tire Pressure for High-Speed Operation . . . . . . . . . . . . . . . . . 10-50
Tire Pressure Monitor System . . . . . . . . . . . . . . . . . . . 10-50
Tire Pressure Monitor Operation . . . . . . . . . . . . . . . . . 10-51
Tire Inspection . . . . . . . . . . . . . . 10-54
Tire Rotation . . . . . . . . . . . . . . . 10-55
Page 313 of 435
Black plate (28,1)Cadillac Escalade Owner Manual (GMNA-Localizing-U.S./Canada/Mexico-
7063683) - 2015 - crc - 2/24/14
10-28 Vehicle Care
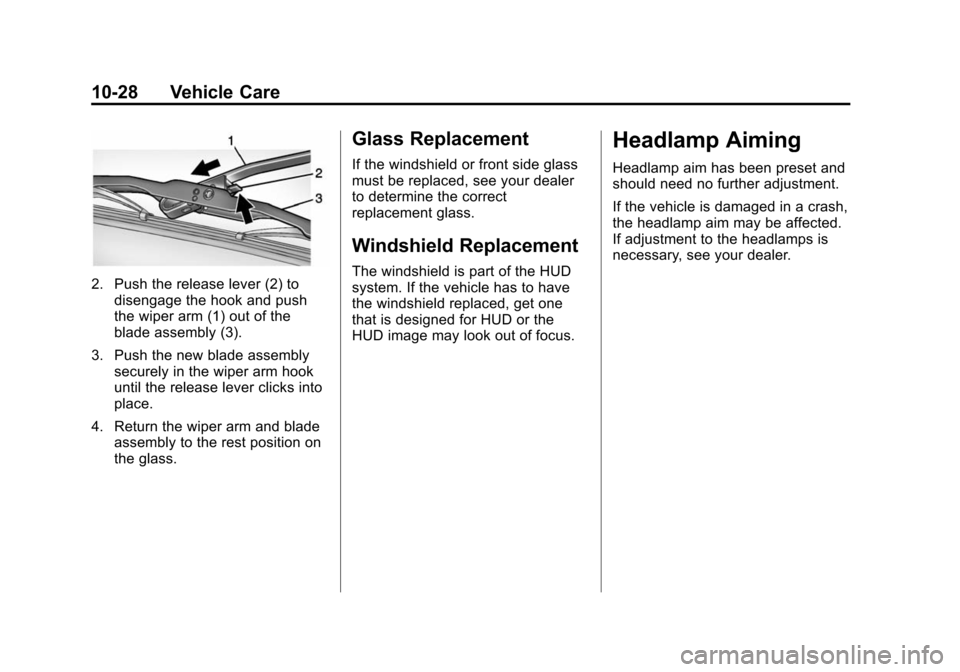
2. Push the release lever (2) todisengage the hook and push
the wiper arm (1) out of the
blade assembly (3).
3. Push the new blade assembly securely in the wiper arm hook
until the release lever clicks into
place.
4. Return the wiper arm and blade assembly to the rest position on
the glass.
Glass Replacement
If the windshield or front side glass
must be replaced, see your dealer
to determine the correct
replacement glass.
Windshield Replacement
The windshield is part of the HUD
system. If the vehicle has to have
the windshield replaced, get one
that is designed for HUD or the
HUD image may look out of focus.
Headlamp Aiming
Headlamp aim has been preset and
should need no further adjustment.
If the vehicle is damaged in a crash,
the headlamp aim may be affected.
If adjustment to the headlamps is
necessary, see your dealer.
Page 315 of 435
Black plate (30,1)Cadillac Escalade Owner Manual (GMNA-Localizing-U.S./Canada/Mexico-
7063683) - 2015 - crc - 2/24/14
10-30 Vehicle Care
5. Push the replacement bulbstraight into the bulb socket and
turn the bulb socket clockwise to
install it into the lamp assembly.
6. Push the lamp assembly back into position until the release tab
locks into place.
Replacement Bulbs
Exterior Lamp Bulb
Number
License Plate Lamp W5W LL
For replacement bulbs not listed
here, contact your dealer.
Electrical System
Electrical System
Overload
The vehicle has fuses to protect
against an electrical system
overload. Fuses also protect power
devices in the vehicle.
Replace a bad fuse with a new one
of the identical size and rating.
If there is a problem on the road and
a fuse needs to be replaced, there
are some spare fuses and a fuse
puller in the Instrument Panel Fuse
Block. The same amperage fuse
can also be borrowed. Choose
some feature of the vehicle that is
not needed to use and replace it as
soon as possible.
Headlamp Wiring
An electrical overload may cause
the lamps to go on and off, or in
some cases to remain off. Have the
headlamp wiring checked right away
if the lamps go on and off or
remain off.
Windshield Wipers
If the wiper motor overheats due to
heavy snow or ice, the windshield
wipers will stop until the motor cools
and will then restart.
Although the circuit is protected
from electrical overload, overload
due to heavy snow or ice may
cause wiper linkage damage.
Always clear ice and heavy snow
from the windshield before using the
windshield wipers.
If the overload is caused by an
electrical problem and not snow or
ice, be sure to get it fixed.
Page 319 of 435
Black plate (34,1)Cadillac Escalade Owner Manual (GMNA-Localizing-U.S./Canada/Mexico-
7063683) - 2015 - crc - 2/24/14
10-34 Vehicle Care
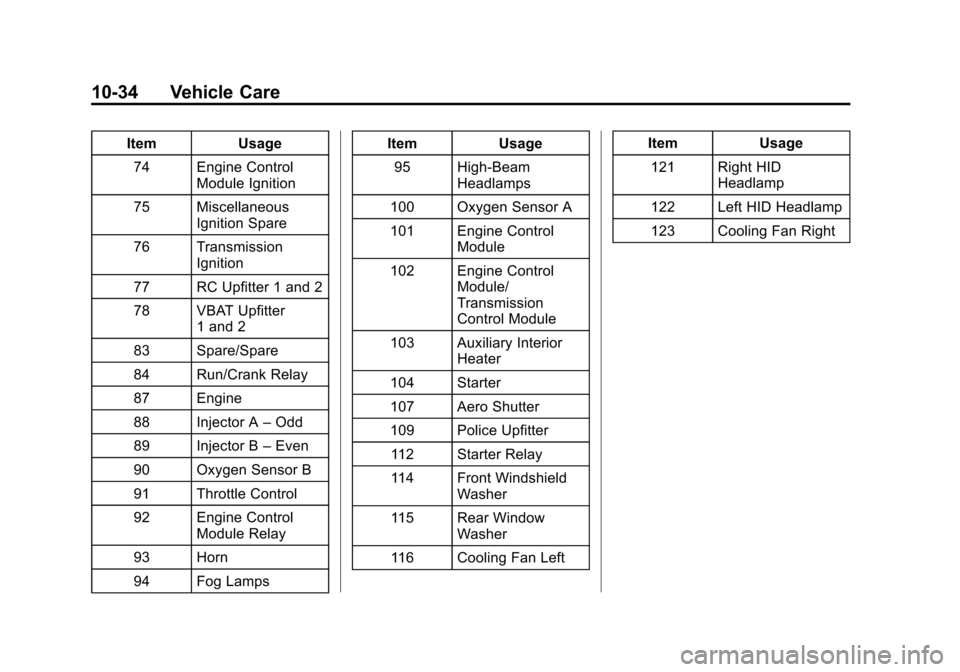
ItemUsage
74 Engine Control Module Ignition
75 Miscellaneous Ignition Spare
76 Transmission Ignition
77 RC Upfitter 1 and 2
78 VBAT Upfitter 1 and 2
83 Spare/Spare
84 Run/Crank Relay
87 Engine
88 Injector A –Odd
89 Injector B –Even
90 Oxygen Sensor B
91 Throttle Control
92 Engine Control Module Relay
93 Horn
94 Fog Lamps Item
Usage
95 High-Beam Headlamps
100 Oxygen Sensor A
101 Engine Control Module
102 Engine Control Module/
Transmission
Control Module
103 Auxiliary Interior Heater
104 Starter
107 Aero Shutter
109 Police Upfitter 112 Starter Relay
114 Front Windshield Washer
115 Rear Window Washer
116 Cooling Fan Left Item
Usage
121 Right HID Headlamp
122 Left HID Headlamp
123 Cooling Fan Right
Page 346 of 435
Black plate (61,1)Cadillac Escalade Owner Manual (GMNA-Localizing-U.S./Canada/Mexico-
7063683) - 2015 - crc - 2/24/14
Vehicle Care 10-61
surface variations such as troughs
or ruts, is normal. If the vehicle is
vibrating when driving on a smooth
road, the tires and wheels may need
to be rebalanced. See your dealer
for proper diagnosis.
Wheel Replacement
Replace any wheel that is bent,
cracked, or badly rusted or
corroded. If wheel nuts keep coming
loose, the wheel, wheel bolts, and
wheel nuts should be replaced.
If the wheel leaks air, replace it.
Some aluminum wheels can be
repaired. See your dealer if any of
these conditions exist.
Your dealer will know the kind of
wheel that is needed.
Each new wheel should have the
same load-carrying capacity,
diameter, width, offset, and be
mounted the same way as the one it
replaces.Replace wheels, wheel bolts, wheel
nuts, or Tire Pressure Monitor
System (TPMS) sensors with new
GM original equipment parts.
{Warning
Using the wrong replacement
wheels, wheel bolts, or wheel
nuts can be dangerous. It could
affect the braking and handling of
the vehicle. Tires can lose air,
and cause loss of control, causing
a crash. Always use the correct
wheel, wheel bolts, and wheel
nuts for replacement.
{Caution
The wrong wheel can also cause
problems with bearing life, brake
cooling, speedometer or
odometer calibration, headlamp
aim, bumper height, vehicle
(Continued)
Caution (Continued)
ground clearance, and tire or tire
chain clearance to the body and
chassis.
Used Replacement Wheels
{Warning
Replacing a wheel with a used
one is dangerous. How it has
been used or how far it has been
driven may be unknown. It could
fail suddenly and cause a crash.
When replacing wheels, use a
new GM original equipment
wheel.
Page 384 of 435
Black plate (9,1)Cadillac Escalade Owner Manual (GMNA-Localizing-U.S./Canada/Mexico-
7063683) - 2015 - crc - 2/24/14
Service and Maintenance 11-9
Battery
The battery supplies power to start
the engine and operate any
additional electrical accessories.
.To avoid break-down or failure to
start the vehicle, maintain a
battery with full cranking power.
.Trained dealer technicians have
the diagnostic equipment to test
the battery and ensure that the
connections and cables are
corrosion-free.
Belts
.Belts may need replacing if they
squeak or show signs of
cracking or splitting.
.Trained dealer technicians have
access to tools and equipment
to inspect the belts and
recommend adjustment or
replacement when necessary.
Brakes
Brakes stop the vehicle and are
crucial to safe driving.
.Signs of brake wear may include
chirping, grinding, or squealing
noises, or difficulty stopping.
.Trained dealer technicians have
access to tools and equipment
to inspect the brakes and
recommend quality parts
engineered for the vehicle.
Fluids
Proper fluid levels and approved
fluids protect the vehicle’s systems
and components. See
Recommended Fluids and
Lubricants on page 11-11 for GM
approved fluids.
.Engine oil and windshield
washer fluid levels should be
checked at every fuel fill.
.Instrument cluster lights may
come on to indicate that fluids
may be low and need to be
filled.
Hoses
Hoses transport fluids and should
be regularly inspected to ensure
that there are no cracks or leaks. With a multi-point inspection, your
dealer can inspect the hoses and
advise if replacement is needed.
Lamps
Properly working headlamps,
taillamps, and brake lamps are
important to see and be seen on
the road.
.Signs that the headlamps need
attention include dimming, failure
to light, cracking, or damage.
The brake lamps need to be
checked periodically to ensure
that they light when braking.
.With a multi-point inspection,
your dealer can check the lamps
and note any concerns.
Shocks and Struts
Shocks and struts help aid in control
for a smoother ride.
.Signs of wear may include
steering wheel vibration, bounce/
sway while braking, longer
stopping distance, or uneven
tire wear.
Page 422 of 435

Black plate (1,1)Cadillac Escalade Owner Manual (GMNA-Localizing-U.S./Canada/Mexico-
7063683) - 2015 - crc - 2/24/14
INDEX i-1
A
Accessories andModifications . . . . . . . . . . . . . . . . . 10-2
Accessory Power . . . . . . . . . . . . . . 9-23
Active Emergency Braking System . . . . . . . . 1-19, 9-59
Active Fuel Management
®. . . . . 9-26
Adaptive Cruise Control . . . . . . . 9-44
Add-On Electrical Equipment . . . . . . . . . . . . . . . . . . . 9-80
Additional Information
OnStar
®. . . . . . . . . . . . . . . . . . . . . . 14-6
Additional Maintenance and Care . . . . . . . . . . . . . . . . . . . . . 11-8
Adjustable Throttle and Brake Pedal . . . . . . . . . . . . . . . . . . 9-19
Adjustments Lumbar, Front Seats . . . . . . . . . . . 3-4
Air Cleaner/Filter, Engine . . . . . 10-13
Air Filter, Passenger Compartment . . . . . . . . . . . . . . . . . 8-8
Air Vents . . . . . . . . . . . . . . . . . . . . . . . 8-7 Airbag System
Check . . . . . . . . . . . . . . . . . . . . . . . . 3-38
How Does an Airbag
Restrain? . . . . . . . . . . . . . . . . . . . 3-30
Passenger Sensing System . . . . . . . . . . . . . . . . . . . . . . 3-32
What Makes an Airbag
Inflate? . . . . . . . . . . . . . . . . . . . . . . 3-30
What Will You See after an Airbag Inflates? . . . . . . . . . . . . . 3-31
When Should an Airbag
Inflate? . . . . . . . . . . . . . . . . . . . . . . 3-29
Where Are the Airbags? . . . . . . 3-27
Airbags Adding Equipment to theVehicle . . . . . . . . . . . . . . . . . . . . . . 3-37
Passenger Status Indicator . . . 5-16
Readiness Light . . . . . . . . . . . . . . 5-15
Servicing Airbag-Equipped Vehicles . . . . . . . . . . . . . . . . . . . . . 3-36
System Check . . . . . . . . . . . . . . . . 3-25
Alarm Vehicle Security . . . . . . . . . . . . . . 2-18
Alert Lane Change . . . . . . . . . . . . . . . . . 9-61
Side Blind Zone (SBZA) . . . . . . 9-61 All-Season Tires . . . . . . . . . . . . . . 10-42
All-Terrain Tires . . . . . . . . . . . . . . . 10-43
Antilock Brake
System (ABS) . . . . . . . . . . . . . . . . 9-34
Warning Light . . . . . . . . . . . . . . . . . 5-21
Appearance Care Exterior . . . . . . . . . . . . . . . . . . . . . 10-81
Interior . . . . . . . . . . . . . . . . . . . . . . 10-85
Armrest Storage . . . . . . . . . . . . . . . . 4-2
Ashtrays . . . . . . . . . . . . . . . . . . . . . . . . 5-8
Assistance Systems for Driving . . . . . . . . . . . . . . . . . . . . . . . 9-56
Assistance Systems for Parking and Backing . . . . . . . . . 9-52
Automatic Door Locks . . . . . . . . . . . . . . . . . . . 2-12
Headlamp System . . . . . . . . . . . . . 6-4
Level Control . . . . . . . . . . . . . . . . . 9-40
Transmission . . . . . . . . . . . . . . . . . 9-27
Transmission Fluid . . . . . . . . . 10-10
Automatic Transmission
Manual Mode . . . . . . . . . . . . . . . . . 9-30
Shift Lock ControlFunction Check . . . . . . . . . . . 10-26
Axle, Front . . . . . . . . . . . . . . . . . . . . 10-24
Axle, Rear . . . . . . . . . . . . . . . . . . . . 10-25