steering CADILLAC ESCALADE 2018 Repair Manual
[x] Cancel search | Manufacturer: CADILLAC, Model Year: 2018, Model line: ESCALADE, Model: CADILLAC ESCALADE 2018Pages: 399, PDF Size: 6.23 MB
Page 298 of 399
Cadillac Escalade Owner Manual (GMNA-Localizing-U.S./Canada/Mexico-
11349344) - 2018 - crc - 11/7/17
VEHICLE CARE 297
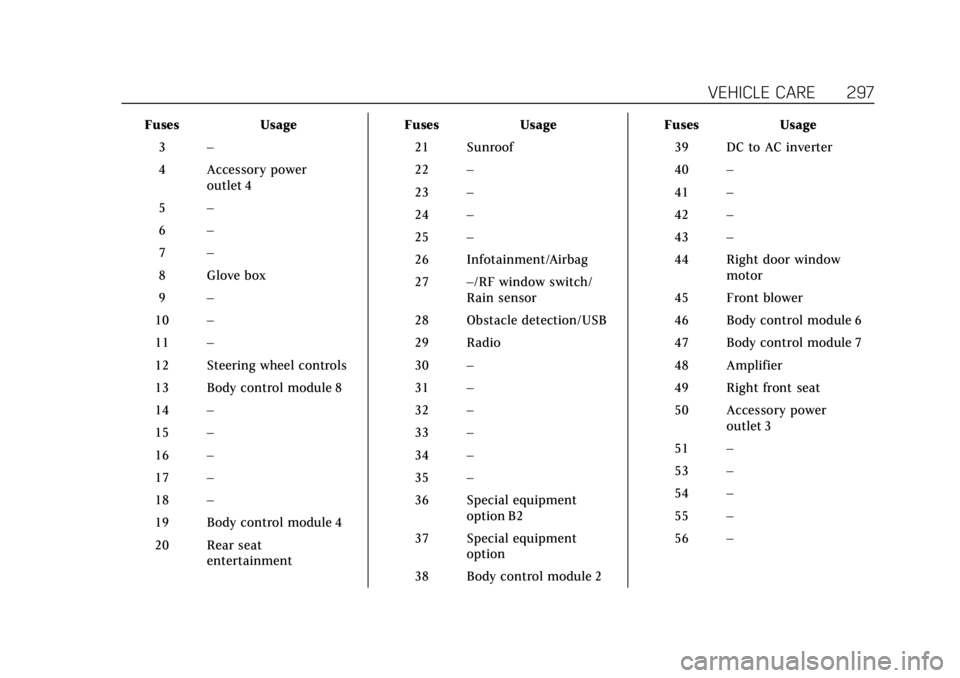
FusesUsage
3 –
4 Accessory power outlet 4
5 –
6 –
7 –
8 Glove box
9 –
10 –
11 –
12 Steering wheel controls
13 Body control module 8
14 –
15 –
16 –
17 –
18 –
19 Body control module 4
20 Rear seat entertainment Fuses
Usage
21 Sunroof
22 –
23 –
24 –
25 –
26 Infotainment/Airbag
27 –/RF window switch/
Rain sensor
28 Obstacle detection/USB
29 Radio
30 –
31 –
32 –
33 –
34 –
35 –
36 Special equipment option B2
37 Special equipment option
38 Body control module 2 Fuses
Usage
39 DC to AC inverter
40 –
41 –
42 –
43 –
44 Right door window motor
45 Front blower
46 Body control module 6
47 Body control module 7
48 Amplifier
49 Right front seat
50 Accessory power outlet 3
51 –
53 –
54 –
55 –
56 –
Page 312 of 399
Cadillac Escalade Owner Manual (GMNA-Localizing-U.S./Canada/Mexico-
11349344) - 2018 - crc - 11/7/17
VEHICLE CARE 311
the next ignition cycle. The sensors
are matched to the tire/wheel
positions, using a TPMS relearn tool,
in the following order: driver side
front tire, passenger side front tire,
passenger side rear tire, and driver
side rear tire. See your dealer for
service or to purchase a relearn tool.
A TPMS relearn tool can also be
purchased. See Tire Pressure Monitor
Sensor Activation Tool at
www.gmtoolsandequipment.com or
call 1-800-GM TOOLS
(1-800-468-6657).
There are two minutes to match the
first tire/wheel position, and
five minutes overall to match all four
tire/wheel positions. If it takes longer,
the matching process stops and must
be restarted.
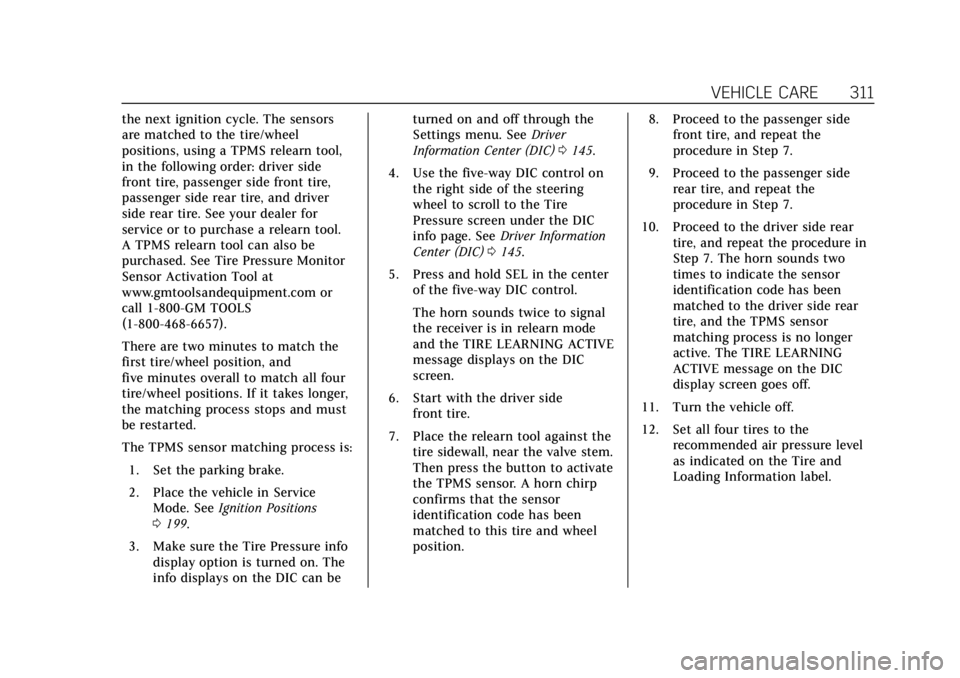
The TPMS sensor matching process is:1. Set the parking brake.
2. Place the vehicle in Service Mode. See Ignition Positions
0 199.
3. Make sure the Tire Pressure info display option is turned on. The
info displays on the DIC can be turned on and off through the
Settings menu. See
Driver
Information Center (DIC) 0145.
4. Use the five-way DIC control on the right side of the steering
wheel to scroll to the Tire
Pressure screen under the DIC
info page. See Driver Information
Center (DIC) 0145.
5. Press and hold SEL in the center of the five-way DIC control.
The horn sounds twice to signal
the receiver is in relearn mode
and the TIRE LEARNING ACTIVE
message displays on the DIC
screen.
6. Start with the driver side front tire.
7. Place the relearn tool against the tire sidewall, near the valve stem.
Then press the button to activate
the TPMS sensor. A horn chirp
confirms that the sensor
identification code has been
matched to this tire and wheel
position. 8. Proceed to the passenger side
front tire, and repeat the
procedure in Step 7.
9. Proceed to the passenger side rear tire, and repeat the
procedure in Step 7.
10. Proceed to the driver side rear tire, and repeat the procedure in
Step 7. The horn sounds two
times to indicate the sensor
identification code has been
matched to the driver side rear
tire, and the TPMS sensor
matching process is no longer
active. The TIRE LEARNING
ACTIVE message on the DIC
display screen goes off.
11. Turn the vehicle off.
12. Set all four tires to the recommended air pressure level
as indicated on the Tire and
Loading Information label.
Page 319 of 399
Cadillac Escalade Owner Manual (GMNA-Localizing-U.S./Canada/Mexico-
11349344) - 2018 - crc - 11/7/17
318 VEHICLE CARE
{Warning
Using the wrong replacement
wheels, wheel bolts, or wheel nuts
can be dangerous. It could affect
the braking and handling of the
vehicle. Tires can lose air, and
cause loss of control, causing a
crash. Always use the correct wheel,
wheel bolts, and wheel nuts for
replacement.
Caution
The wrong wheel can also cause
problems with bearing life, brake
cooling, speedometer or odometer
calibration, headlamp aim, bumper
height, vehicle ground clearance,
and tire or tire chain clearance to
the body and chassis.
Used Replacement Wheels
{Warning
Replacing a wheel with a used one
is dangerous. How it has been used
or how far it has been driven may
be unknown. It could fail suddenly
and cause a crash. When replacing
wheels, use a new GM original
equipment wheel.
Tire Chains
{Warning
Do not use tire chains. There is not
enough clearance. Tire chains used
on a vehicle without the proper
amount of clearance can cause
damage to the brakes, suspension,
or other vehicle parts. The area
damaged by the tire chains could
cause loss of control and a crash.
Use another type of traction device
only if its manufacturer(Continued)
Warning (Continued)
recommends it for the vehicle's tire
size combination and road
conditions. Follow that
manufacturer's instructions. To
avoid vehicle damage, drive slowly
and readjust or remove the traction
device if it contacts the vehicle. Do
not spin the wheels. If traction
devices are used, install them on
the rear tires.
If a Tire Goes Flat
It is unusual for a tire to blowout
while driving, especially if the tires are
maintained properly. If air goes out of
a tire, it is much more likely to leak
out slowly. But if there ever is a
blowout, here are a few tips about
what to expect and what to do:
If a front tire fails, the flat tire creates
a drag that pulls the vehicle toward
that side. Take your foot off the
accelerator pedal and grip the steering
Page 335 of 399
Cadillac Escalade Owner Manual (GMNA-Localizing-U.S./Canada/Mexico-
11349344) - 2018 - crc - 11/7/17
334 VEHICLE CARE
To dinghy tow:1. Position the vehicle being towed behind the tow vehicle, facing
forward and on a level surface.
2. Securely attach the vehicle being towed to the tow vehicle.
3. Apply the parking brake and start the engine.
For vehicles with Electric Parking
Brakes (EPB), the EPB cannot be
applied and the tires must be
chocked.
4. Shift the transfer case to N (Neutral). See “Shifting into
N (Neutral)” underFour-Wheel
Drive 0211. Check that the
vehicle is in N (Neutral) by
shifting the transmission to
R (Reverse) and then to D
(Drive). There should be no
movement of the vehicle while
shifting.
5. Shift the transmission into D (Drive). Turn the engine off.Caution
Failure to disconnect the negative
battery cable or to have it contact
the terminals can cause damage to
the vehicle.
6. Disconnect the negative battery cable at the battery and secure
the nut and bolt. Cover the
negative battery post with a
non-conductive material to
prevent any contact with the
negative battery terminal.
7. Shift the transmission to P (Park).
Caution
If the steering column is locked,
vehicle damage may occur.
8. Move the steering wheel to make sure the steering column is
unlocked. 9. With a foot on the brake pedal,
release the parking brake.
10. If equipped with Keyless Access, keep the RKE transmitter outside
of the vehicle, and manually lock
the doors. Access the vehicle as
if it has a dead RKE transmitter
battery, by using the key in the
door lock.
Disconnecting the Towed Vehicle
Before disconnecting the towed
vehicle: 1. Park on a level surface.
2. Set the parking brake, then shift the transmission to P (Park).
3. Connect the battery.
4. Apply the brake pedal.
5. Turn the ignition to ON/RUN with the engine off. Shift the
transfer case out of N (Neutral)
to 2
m. See “Shifting out of
N (Neutral)” underFour-Wheel
Drive 0211. See your dealer if
the transfer case cannot be
shifted out of N (Neutral).
Page 341 of 399
Cadillac Escalade Owner Manual (GMNA-Localizing-U.S./Canada/Mexico-
11349344) - 2018 - crc - 11/7/17
340 VEHICLE CARE
Caution (Continued)
that have been sprayed with
magnesium, calcium, or sodium
chloride. These chlorides are used
on roads for conditions such as ice
and dust. Always wash the chrome
with soap and water after exposure.
Caution
To avoid surface damage, do not
use strong soaps, chemicals,
abrasive polishes, cleaners, brushes,
or cleaners that contain acid on
aluminum or chrome-plated wheels.
Use only approved cleaners. Also,
never drive a vehicle with
aluminum or chrome-plated wheels
through an automatic car wash that
uses silicone carbide tire cleaning
brushes. Damage could occur and
the repairs would not be covered by
the vehicle warranty.
Brake System
Visually inspect brake lines and hoses
for proper hook-up, binding, leaks,
cracks, chafing, etc. Inspect disc brake
pads for wear and rotors for surface
condition. Inspect drum brake linings/
shoes for wear or cracks. Inspect all
other brake parts.
Steering, Suspension, and
Chassis Components
Visually inspect steering, suspension,
and chassis components for damaged,
loose, or missing parts or signs of
wear at least once a year.
Inspect power steering for proper
attachment, connections, binding,
leaks, cracks, chafing, etc.
Visually check constant velocity joint
boots and axle seals for leaks.
For 1500 Series vehicles, at least every
other oil change lubricate the outer tie
rod ends.
Control arm ball joints on 1500 Series
vehicles are maintenance-free.
Caution
Lubrication of applicable steering/
suspension points should not be
done unless the temperature is
−12 °C (10 °F) or higher, or damage
could result.
Body Component Lubrication
Lubricate all key lock cylinders, hood
hinges, liftgate hinges, steel fuel door
hinge and power assist step hinges,
unless the components are plastic.
Applying silicone grease on
weatherstrips with a clean cloth will
make them last longer, seal better,
and not stick or squeak.
Underbody Maintenance
At least twice a year, spring and fall,
use plain water to flush any corrosive
materials from the underbody. Take
care to thoroughly clean any areas
where mud and other debris can
collect. If equipped with power assist
steps, extend them and then use a
high pressure wash to clean all joints
and gaps.
Page 349 of 399

Cadillac Escalade Owner Manual (GMNA-Localizing-U.S./Canada/Mexico-
11349344) - 2018 - crc - 11/7/17
348 SERVICE AND MAINTENANCE
.Check windshield washer fluid
level. See Washer Fluid 0278.
. Visually inspect windshield wiper
blades for wear, cracking,
or contamination. See Exterior
Care 0337. Replace worn or
damaged wiper blades. See Wiper
Blade Replacement 0284.
. Check tire inflation pressures. See
Tire Pressure 0305.
. Inspect tire wear. See Tire
Inspection 0312.
. Visually check for fluid leaks.
. Inspect engine air cleaner filter.
See Engine Air Cleaner/Filter 0272.
. Inspect brake system. See Exterior
Care 0337.
. Visually inspect steering,
suspension, and chassis
components for damaged, loose,
or missing parts or signs of wear.
See Exterior Care 0337.
. Lubricate the suspension and
steering components at least every
other oil change (if equipped with
grease fittings). .
Check restraint system
components. See Safety System
Check 083.
. Visually inspect fuel system for
damage or leaks.
. Visually inspect exhaust system
and nearby heat shields for loose
or damaged parts.
. Lubricate body components. See
Exterior Care 0337.
. Check starter switch. See Starter
Switch Check 0283.
. Check automatic transmission
shift lock control function. See
Automatic Transmission Shift Lock
Control Function Check 0283.
. Check parking brake and
automatic transmission park
mechanism. See Park Brake and
P (Park) Mechanism Check 0284.
. Check accelerator pedal for
damage, high effort, or binding.
Replace if needed. .
Visually inspect gas strut for signs
of wear, cracks, or other damage.
Check the hold open ability of the
strut. If the hold open is low,
service the gas strut. See Gas
Strut(s) 0285.
. Inspect sunroof track and seal,
if equipped. See Sunroof056.
. Verify spare tire key lock operation
and lubricate as needed. See Tire
Changing 0320.
Page 354 of 399
Cadillac Escalade Owner Manual (GMNA-Localizing-U.S./Canada/Mexico-
11349344) - 2018 - crc - 11/7/17
SERVICE AND MAINTENANCE 353
.To avoid break-down or failure to
start the vehicle, maintain a
battery with full cranking power.
. Trained dealer technicians have
the diagnostic equipment to test
the battery and ensure that the
connections and cables are
corrosion-free.
Belts
. Belts may need replacing if they
squeak or show signs of cracking
or splitting.
. Trained dealer technicians have
access to tools and equipment to
inspect the belts and recommend
adjustment or replacement when
necessary.
Brakes
Brakes stop the vehicle and are crucial
to safe driving.
. Signs of brake wear may include
chirping, grinding, or squealing
noises, or difficulty stopping. .
Trained dealer technicians have
access to tools and equipment to
inspect the brakes and recommend
quality parts engineered for the
vehicle.
Fluids
Proper fluid levels and approved fluids
protect the vehicle’s systems and
components. See Recommended Fluids
and Lubricants 0355 for GM approved
fluids.
. Engine oil and windshield washer
fluid levels should be checked at
every fuel fill.
. Instrument cluster lights may
come on to indicate that fluids
may be low and need to be filled.
Hoses
Hoses transport fluids and should be
regularly inspected to ensure that
there are no cracks or leaks. With a
multi-point inspection, your dealer
can inspect the hoses and advise if
replacement is needed. Lamps
Properly working headlamps,
taillamps, and brake lamps are
important to see and be seen on
the road.
.
Signs that the headlamps need
attention include dimming, failure
to light, cracking, or damage. The
brake lamps need to be checked
periodically to ensure that they
light when braking.
. With a multi-point inspection,
your dealer can check the lamps
and note any concerns.
Shocks and Struts
Shocks and struts help aid in control
for a smoother ride.
. Signs of wear may include steering
wheel vibration, bounce/sway
while braking, longer stopping
distance, or uneven tire wear.
. As part of the multi-point
inspection, trained dealer
technicians can visually inspect
the shocks and struts for signs of
Page 372 of 399
Cadillac Escalade Owner Manual (GMNA-Localizing-U.S./Canada/Mexico-
11349344) - 2018 - crc - 11/7/17
CUSTOMER INFORMATION 371
Managing the Vehicle Damage
Repair Process
In the event that the vehicle requires
damage repairs, GM recommends that
you take an active role in its repair.
If you have a pre-determined repair
facility of choice, take the vehicle
there, or have it towed there. Specify
to the facility that any required
replacement collision parts be original
equipment parts, either new Genuine
GM parts or recycled original GM
parts. Remember, recycled parts will
not be covered by the GM vehicle
warranty.
Insurance pays the bill for the repair,
but you must live with the repair.
Depending on your policy limits, your
insurance company may initially value
the repair using aftermarket parts.
Discuss this with the repair
professional, and insist on Genuine
GM parts. Remember, if the vehicle is
leased, you may be obligated to have
the vehicle repaired with Genuine GM
parts, even if your insurance coverage
does not pay the full cost.If another party's insurance company
is paying for the repairs, you are not
obligated to accept a repair valuation
based on that insurance company's
collision policy repair limits, as you
have no contractual limits with that
company. In such cases, you can have
control of the repair and parts choices
as long as the cost stays within
reasonable limits.
Service Publications
Ordering Information
Service Manuals
Service Manuals have the diagnosis
and repair information on the engines,
transmission, axle, suspension, brakes,
electrical, steering, body, etc.
Owner Information
Owner publications are written
specifically for owners and intended
to provide basic operational
information about the vehicle. The
Owner’s Manual includes the
Maintenance Schedule for all models.
In-Portfolio: Includes a Portfolio,
Owner’s Manual, and Warranty
Manual.
RETAIL SELL PRICE: $35.00
–
$40.00 (U.S.) plus handling and
shipping fees.
Without Pouch: Owner’s Manual only.
RETAIL SELL PRICE:
$25.00 (U.S.) plus handling and
shipping fees.
Current and Past Models
Service and Owner publications are
available for many current and past
model year GM vehicles.
ORDER TOLL FREE: 1-800-551-4123
Monday –Friday 8:00 AM –6:00 PM
Eastern Time
For Credit Card Orders Only
(VISA-MasterCard-Discover), see Helm,
Inc. at: www.helminc.com.
Or write to:
Helm, Incorporated
Attention: Customer Service
47911 Halyard Drive
Plymouth, MI 48170
Page 392 of 399

Cadillac Escalade Owner Manual (GMNA-Localizing-U.S./Canada/Mexico-
11349344) - 2018 - crc - 11/7/17
INDEX 391
Full-Size Spare Tire . . . . . . . . . . . . . . . . . 328
FusesEngine Compartment FuseBlock . . . . . . . . . . . . . . . . . . . . . . . . . . . . . 289
Fuses and Circuit Breakers . . . . . . . 288
Instrument Panel Fuse Block . . . . . . . . . . . . . . . . . . . . . . . . 293, 296
Rear Compartment Fuse Block . . . . . . . . . . . . . . . . . . . . . . . . . . . . . 298
G
Garage Door Opener . . . . . . . . . . . . . . . . 160Programming . . . . . . . . . . . . . . . . . . . . . . 160
Gas Strut(s) . . . . . . . . . . . . . . . . . . . . . . . . . 285
Gauges Engine Coolant Temperature . . . . 134
Fuel . . . . . . . . . . . . . . . . . . . . . . . . . . . . . . . . 133
Odometer . . . . . . . . . . . . . . . . . . . . . . . . . . 132
Speedometer . . . . . . . . . . . . . . . . . . . . . . 132
Tachometer . . . . . . . . . . . . . . . . . . . . . . . 133
Trip Odometer . . . . . . . . . . . . . . . . . . . . 133
Warning Lights andIndicators . . . . . . . . . . . . . . . . . . . . . . . . 129
General Information Service and Maintenance . . . . . . . . 345
Towing . . . . . . . . . . . . . . . . . . . . . . . . . . . . 252
Vehicle Care . . . . . . . . . . . . . . . . . . . . . . . 264
Glass Replacement . . . . . . . . . . . . . . . . . 285 Glove Box . . . . . . . . . . . . . . . . . . . . . . . . . . . 116
GM Mobility Reimbursement
Program . . . . . . . . . . . . . . . . . . . . . . . . . . . . 365
H
Hazard Warning Flashers . . . . . . . . . . 168
Head Restraints . . . . . . . . . . . . . . . . . . . . . . 59
Head-up Display . . . . . . . . . . . . . . . . . . . . 147
HeadlampsAiming . . . . . . . . . . . . . . . . . . . . . . . . . . . . . 287
Automatic . . . . . . . . . . . . . . . . . . . . . . . . . 167
Bulb Replacement . . . . . . . . . . . . . . . . 287
Daytime RunningLamps (DRL) . . . . . . . . . . . . . . . . . . . . 166
Flash-to-Pass . . . . . . . . . . . . . . . . . . . . . . 166
High-Beam On Light . . . . . . . . . . . . . . 144
High/Low Beam Changer . . . . . . . . . 166
Lamps On Reminder . . . . . . . . . . . . . . 144
Heated Rear Seats . . . . . . . . . . . . . . . . . . . . . . . . . . . 68
Steering Wheel . . . . . . . . . . . . . . . . . . . . 121
Heated and Cooled Front Seats . . . . . 67
Heated Mirrors . . . . . . . . . . . . . . . . . . . . . . . 51
Heater Engine . . . . . . . . . . . . . . . . . . . . . . . . . . . . . 201
Heating . . . . . . . . . . . . . . . . . . . . . . . . .173, 178
High-Beam On Light . . . . . . . . . . . . . . . . 144
High-Speed Operation . . . . . . . . . . . . . . 307 Hill and Mountain Roads . . . . . . . . . . 191
Hill Start Assist (HSA) . . . . . . . . . . . . . 218
Hood . . . . . . . . . . . . . . . . . . . . . . . . . . . . . . . . . 266
Horn . . . . . . . . . . . . . . . . . . . . . . . . . . . . . . . . . 121
How to Wear Seat Belts Properly . . . 76
HVAC . . . . . . . . . . . . . . . . . . . . . . . . . . .173, 178
I
Ignition Positions . . . . . . . . . . . . . . . . . . . 199
Immobilizer . . . . . . . . . . . . . . . . . . . . . . . . . . 48
Indicator
Vehicle Ahead . . . . . . . . . . . . . . . . . . . . . 141
Infants and Young Children, Restraints . . . . . . . . . . . . . . . . . . . . . . . . . . . 98
Infotainment . . . . . . . . . . . . . . . . . . . . . . . . 172
Infotainment System . . . . . . . . . . . . . . . 375
Instrument Cluster . . . . . . . . . . . . . . . . . 130
Instrument Panel Storage Area . . . . . . . . . . . . . . . . . . . . . . 116
Interior Rearview Mirrors . . . . . . . . . . . 51
Introduction . . . . . . . . . . . . . . . . . . . . . . . . . . . . 2
J
Jump Starting - North America . . . . 329
K
Keyless Entry Remote (RKE) System . . . . . . . . . . . . . . 29
Keys . . . . . . . . . . . . . . . . . . . . . . . . . . . . . . . . . . 28
Page 396 of 399

Cadillac Escalade Owner Manual (GMNA-Localizing-U.S./Canada/Mexico-
11349344) - 2018 - crc - 11/7/17
INDEX 395
S
Safety Defects ReportingCanadian Government . . . . . . . . . . . . 373
General Motors . . . . . . . . . . . . . . . . . . . 373
U.S. Government . . . . . . . . . . . . . . . . . . 372
Safety Locks . . . . . . . . . . . . . . . . . . . . . . . . . . 40
Safety System Check . . . . . . . . . . . . . . . . 83
Scheduling Appointments . . . . . . . . . . 368
Seat Belts . . . . . . . . . . . . . . . . . . . . . . . . . . . . . 75 Care . . . . . . . . . . . . . . . . . . . . . . . . . . . . . . . . . . 83
Extender . . . . . . . . . . . . . . . . . . . . . . . . . . . . . 82
How to Wear Seat Belts
Properly . . . . . . . . . . . . . . . . . . . . . . . . . . . . 76
Lap-Shoulder Belt . . . . . . . . . . . . . . . . . . . 77
Reminders . . . . . . . . . . . . . . . . . . . . . . . . . 134
Replacing after a Crash . . . . . . . . . . . . . 83
Use During Pregnancy . . . . . . . . . . . . . . 82
Seats Head Restraints . . . . . . . . . . . . . . . . . . . . . 59
Heated, Rear . . . . . . . . . . . . . . . . . . . . . . . . 68
Lumbar Adjustment, Front . . . . . . . . . 61
Memory . . . . . . . . . . . . . . . . . . . . . . . . . . . . . 63
Power Adjustment, Front . . . . . . . . . . 60
Rear . . . . . . . . . . . . . . . . . . . . . . . . . . . . . . . . . . 68
Reclining Seatbacks . . . . . . . . . . . . . . . . 63
Second Row . . . . . . . . . . . . . . . . . . . . . . . . . 69
Third Row Seat . . . . . . . . . . . . . . . . . . . . . 73
Second Row Seats . . . . . . . . . . . . . . . . . . . 69 Securing Child Restraints . . . . .111, 113
Security
Light . . . . . . . . . . . . . . . . . . . . . . . . . . . . . . . 143
OnStar . . . . . . . . . . . . . . . . . . . . . . . . . . . . . 378
Vehicle . . . . . . . . . . . . . . . . . . . . . . . . . . . . . . . 46
Vehicle Alarm . . . . . . . . . . . . . . . . . . . . . . . 46
Service
Accessories andModifications . . . . . . . . . . . . . . . . . . . . 265
Doing Your Own Work . . . . . . . . . . . 265
Maintenance Records . . . . . . . . . . . . 357
Maintenance, General Information . . . . . . . . . . . . . . . . . . . . . . 345
Parts Identification Label . . . . . . . . 358
Publications Ordering Information . . . . . . . . . . . . . . . . . . . . . . 371
Scheduling Appointments . . . . . . . . 368
Service Electric Parking Brake Light . . . . . . . . . . . . . . . . . . . . . . . . . . . . . . . 139
Services Special Application . . . . . . . . . . . . . . . 352
Servicing the Airbag . . . . . . . . . . . . . . . . . 94
Shift Lock Control Function Check, Automatic
Transmission . . . . . . . . . . . . . . . . . . . . . . 283
Shifting Into Park . . . . . . . . . . . . . . . . . . . . . . . . . . 203
Out of Park . . . . . . . . . . . . . . . . . . . . . . . . 204 Side Blind Zone Alert (SBZA) . . . . . . 244
Signals, Turn and Lane-Change . . . . 168
Special Application Services . . . . . . . 352
Specifications and Capacities . . . . . . 359
Speedometer . . . . . . . . . . . . . . . . . . . . . . . . 132
Sport Mode Light . . . . . . . . . . . . . . . . . . . 140
StabiliTrak
OFF Light . . . . . . . . . . . . . . . . . . . . . . . . . . 141
Start Assist, Hill . . . . . . . . . . . . . . . . . . . . 218
Start Vehicle, Remote . . . . . . . . . . . . . . . 36
Starter Switch Check . . . . . . . . . . . . . . . 283
Starting the Engine . . . . . . . . . . . . . . . . . 200
Steering . . . . . . . . . . . . . . . . . . . . . . . . . . . . . . 185 Heated Wheel . . . . . . . . . . . . . . . . . . . . . 121
Wheel Adjustment . . . . . . . . . . . . . . . . 121
Wheel Controls . . . . . . . . . . . . . . . . . . . 121
Steps Power Assist . . . . . . . . . . . . . . . . . . . . . . . . 45
Storage Rear . . . . . . . . . . . . . . . . . . . . . . . . . . . . . . . . 117
Storage Areas
Armrest . . . . . . . . . . . . . . . . . . . . . . . . . . . . 117
Center Console . . . . . . . . . . . . . . . . . . . . 118
Convenience Net . . . . . . . . . . . . . . . . . . 118
Glove Box . . . . . . . . . . . . . . . . . . . . . . . . . 116
Instrument Panel . . . . . . . . . . . . . . . . . 116
Roof Rack System . . . . . . . . . . . . . . . . 119
Sunglasses . . . . . . . . . . . . . . . . . . . . . . . . . 117