ad blue CADILLAC ESCALADE 2018 Owner's Manual
[x] Cancel search | Manufacturer: CADILLAC, Model Year: 2018, Model line: ESCALADE, Model: CADILLAC ESCALADE 2018Pages: 399, PDF Size: 6.23 MB
Page 54 of 399
Cadillac Escalade Owner Manual (GMNA-Localizing-U.S./Canada/Mexico-
11349344) - 2018 - crc - 11/7/17
KEYS, DOORS, AND WINDOWS 53
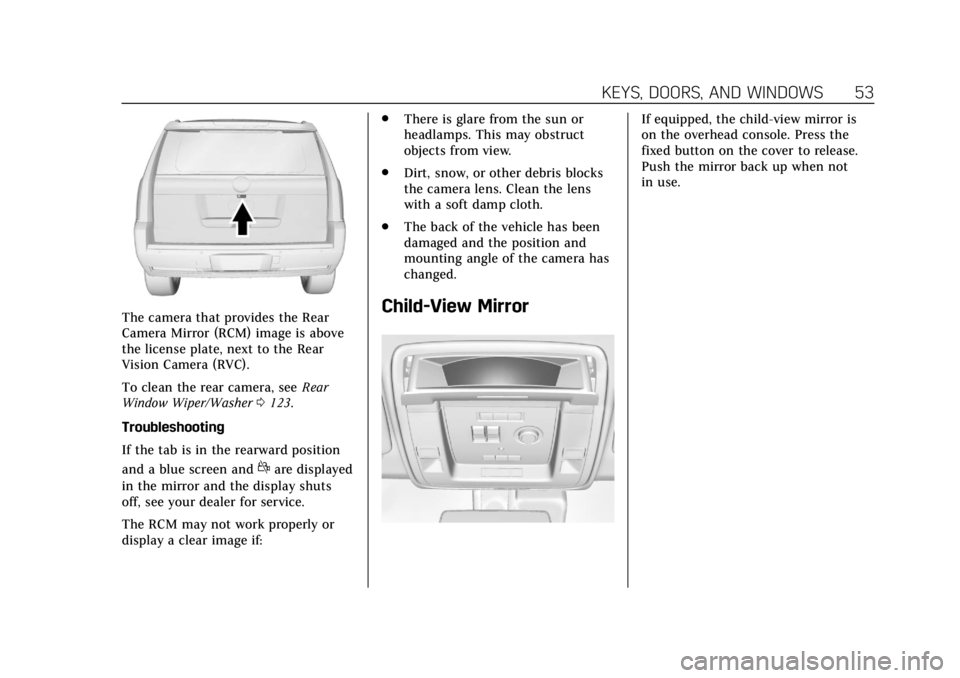
The camera that provides the Rear
Camera Mirror (RCM) image is above
the license plate, next to the Rear
Vision Camera (RVC).
To clean the rear camera, seeRear
Window Wiper/Washer 0123.
Troubleshooting
If the tab is in the rearward position
and a blue screen and
dare displayed
in the mirror and the display shuts
off, see your dealer for service.
The RCM may not work properly or
display a clear image if: .
There is glare from the sun or
headlamps. This may obstruct
objects from view.
. Dirt, snow, or other debris blocks
the camera lens. Clean the lens
with a soft damp cloth.
. The back of the vehicle has been
damaged and the position and
mounting angle of the camera has
changed.
Child-View Mirror
If equipped, the child-view mirror is
on the overhead console. Press the
fixed button on the cover to release.
Push the mirror back up when not
in use.
Page 68 of 399
Cadillac Escalade Owner Manual (GMNA-Localizing-U.S./Canada/Mexico-
11349344) - 2018 - crc - 11/7/17
SEATS AND RESTRAINTS 67
5. To activate massage at lastmassage type and intensity
settings or to turn massage off,
press the massage On/Off
control (2).
Heated and Cooled Front
Seats
{Warning
If temperature change or pain to
the skin cannot be felt, the seat
heater may cause burns. To reduce
the risk of burns, use care when
using the seat heater, especially for
long periods of time. Do not place
anything on the seat that insulates
against heat, such as a blanket,
cushion, cover, or similar item. This
may cause the seat heater to
overheat. An overheated seat heater
may cause a burn or may damage
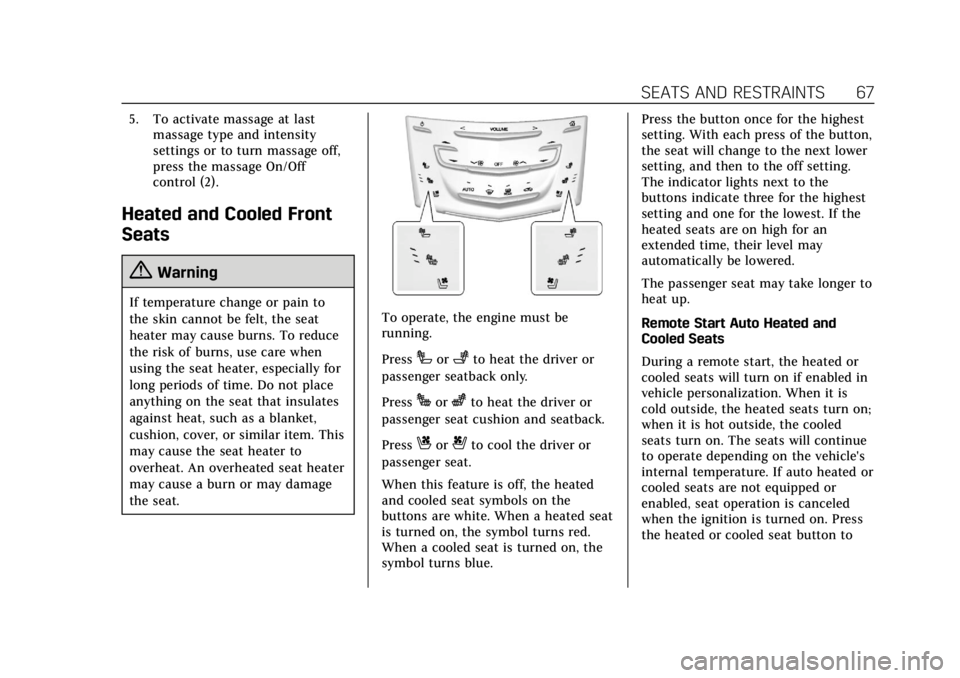
the seat.To operate, the engine must be
running.
Press
Ior+to heat the driver or
passenger seatback only.
Press
Jorzto heat the driver or
passenger seat cushion and seatback.
Press
Cor{to cool the driver or
passenger seat.
When this feature is off, the heated
and cooled seat symbols on the
buttons are white. When a heated seat
is turned on, the symbol turns red.
When a cooled seat is turned on, the
symbol turns blue. Press the button once for the highest
setting. With each press of the button,
the seat will change to the next lower
setting, and then to the off setting.
The indicator lights next to the
buttons indicate three for the highest
setting and one for the lowest. If the
heated seats are on high for an
extended time, their level may
automatically be lowered.
The passenger seat may take longer to
heat up.
Remote Start Auto Heated and
Cooled Seats
During a remote start, the heated or
cooled seats will turn on if enabled in
vehicle personalization. When it is
cold outside, the heated seats turn on;
when it is hot outside, the cooled
seats turn on. The seats will continue
to operate depending on the vehicle's
internal temperature. If auto heated or
cooled seats are not equipped or
enabled, seat operation is canceled
when the ignition is turned on. Press
the heated or cooled seat button to
Page 153 of 399
Cadillac Escalade Owner Manual (GMNA-Localizing-U.S./Canada/Mexico-
11349344) - 2018 - crc - 11/7/17
152 INSTRUMENTS AND CONTROLS
on, but maximum acceleration and
speed may be reduced. Anytime this
message stays on, or displays
repeatedly, the vehicle should be
taken to your dealer for service as
soon as possible.
Vehicle Speed Messages
SPEED LIMITED TO XXX
KM/H (MPH)
This message shows that the vehicle
speed has been limited to the speed
displayed. The limited speed is a
protection for various propulsion and
vehicle systems, such as lubrication,
thermal, suspension, Teen Driver if
equipped, or tires.
Vehicle Personalization
Use the audio system controls to
access the personalization menus for
customizing vehicle features.
The following are all possible
personalization features. Depending
on the vehicle, some may not be
available.
Audio System Controls1. Touch the desired feature to display a list of available options.
2. Touch to select the desired feature setting.
3. Touch
SBack to return to the
previous menu or exit.
Touch SETTINGS from the Home Page
on the infotainment display.
Personalization Menus
The following list of menu items may
be available:
. Time and Date
. Rear Seat Reminder
. Language .
Video Voice-Over
. Valet Mode
. Teen Driver
. Radio
. Vehicle
. Bluetooth
. Apple CarPlay
. Android Auto
. Voice
. Display
. Rear Camera
. Return to Factory Settings
. Software Information
. Wi-Fi
Detailed information for each menu
follows.
Time and Date
Manually set the time and date. See
Clock 0124.
Page 159 of 399
Cadillac Escalade Owner Manual (GMNA-Localizing-U.S./Canada/Mexico-
11349344) - 2018 - crc - 11/7/17
158 INSTRUMENTS AND CONTROLS
Remote Left in Vehicle Alert
This feature sounds an alert when the
RKE transmitter is left in the vehicle.
This menu also enables Remote No
Longer in Vehicle Alert.
Select Off or On.
Bluetooth
Select and the following may display:
.Pair New Device
. Device Management
. Ringtones
. Voice Mail Numbers
. Text Message Alerts
Pair New Device
Select to pair a new device. See
“Pairing” under“Bluetooth
(Infotainment Controls)” in the
infotainment manual.
Device Management
Select to connect to a different phone
source, disconnect a phone, or delete
a phone. Ringtones
Select to change the ring tone for the
specific phone. The phone does not
need to be connected to change the
ring tone.
Voice Mail Numbers
This feature displays the voice mail
number for all connected phones. To
change the voice mail number, select
EDIT. Type a new number, then
select SAVE.
Text Message Alerts
This feature allows text messages to
be received. See
“Text Messaging”
under “Phone ”in the infotainment
manual.
Select Off or On.
Apple CarPlay
Select and the following may display:
. Apple CarPlay
. Manage Apple CarPlay Devices Apple CarPlay
This feature allows Apple devices to
be connected to the infotainment
system through a USB port.
Select Off or On.
Manage Apple CarPlay Devices
Select to manage Apple devices. Apple
CarPlay must be on for this feature to
be accessed.
Android Auto
Select and the following may display:
.
Android Auto
. Manage Android Auto Devices
Android Auto
This feature allows Android devices to
be connected to the infotainment
system through a USB port.
Select Off or On.
Manage Android Auto Devices
Select to manage Android devices.
Android Auto must be on for this
feature to be accessed.
Page 166 of 399
Cadillac Escalade Owner Manual (GMNA-Localizing-U.S./Canada/Mexico-
11349344) - 2018 - crc - 11/7/17
LIGHTING 165
IntelliBeam®System
If equipped, this system turns the
vehicle's high-beam headlamps on and
off according to surrounding traffic
conditions.
The system turns the high-beam
headlamps on when it is dark enough
and there is no other traffic present.
This
blight comes on in the
instrument cluster when the
IntelliBeam system is enabled.
Turning On and Enabling IntelliBeam
To enable the IntelliBeam system,
with the turn signal lever in the
neutral position, turn the exterior
lamp control to AUTO. The blue
high-beam on light appears on the
instrument cluster when the high
beams are on.
Driving with IntelliBeam
The system only activates the high
beams when driving over 40 km/h
(25 mph).
There is a sensor near the top center
of the windshield, which automatically
controls the system. Keep this area of the windshield clear of debris to allow
for best system performance.
The high-beam headlamps remain on,
under the automatic control, until one
of the following situations occurs:
.
The system detects an
approaching vehicle's headlamps.
. The system detects a preceding
vehicle's taillamps.
. The outside light is bright enough
that high-beam headlamps are not
required.
. The vehicle's speed drops below
20 km/h (12 mph).
. The IntelliBeam system can be
disabled by the high/low-beam
changer or the flash-to-pass
feature. If this happens, the
high/low-beam changer must be
activated on then off within
two seconds to reactivate the
IntelliBeam system. The
instrument cluster light will come
on to indicate the IntelliBeam is
reactivated. See
Headlamp High/Low-Beam
Changer 0166 and Flash-to-Pass
0 166.
The high beams may not turn off
automatically if the system cannot
detect other vehicle's lamps because
of any of the following:
. The other vehicle's lamps are
missing, damaged, obstructed from
view, or otherwise undetected.
. The other vehicle's lamps are
covered with dirt, snow, and/or
road spray.
. The other vehicle's lamps cannot
be detected due to dense exhaust,
smoke, fog, snow, road spray, mist,
or other airborne obstructions.
. The vehicle's windshield is dirty,
cracked, or obstructed by
something that blocks the view of
the light sensor.
. The vehicle is loaded such that the
front end points upward, causing
the light sensor to aim high and
not detect headlamps and
taillamps.
Page 229 of 399
Cadillac Escalade Owner Manual (GMNA-Localizing-U.S./Canada/Mexico-
11349344) - 2018 - crc - 11/7/17
228 DRIVING AND OPERATING
When the accelerator pedal is
pressed, ACC will not brake
because it is overridden. The ACC
indicator will turn blue on the
instrument cluster.
. Press and hold +RES up until the
desired set speed appears on the
display, then release it.
. To increase speed in small
increments, briefly press +RES up.
For each press, the vehicle speed
increases by 1 km/h (1 mph).
. To increase speed in larger
increments, press and briefly hold
+RES up. For each press, the
vehicle speed increases by
5 km/h (5 mph).
When it is determined there is no
vehicle ahead or the vehicle ahead is
beyond the selected following gap, the
vehicle speed will increase to the set
speed.
The set speed can also be increased
while the vehicle is stopped.
. If stopped with the brake applied,
press RES+ until the desired set
speed is displayed. .
If ACC is holding the vehicle at a
stop and there is another vehicle
directly ahead, pressing RES+ will
increase the set speed. Pressing
RES+ when there is no longer a
vehicle ahead will cause ACC to
resume.
Reducing Speed While ACC is at a
Set Speed
Do one of the following:
. Use the brake to get to the desired
lower speed. Release the brake and
press SET– . The vehicle will now
cruise at the lower speed.
. Press and hold SET– down until
the desired lower speed is reached,
then release it.
. To decrease speed in smaller
increments, briefly press SET−
down. For each press, the vehicle
speed increases by 1 km/h (1 mph).
. To decrease speed in larger
increments, press and briefly hold
SET− down. For each press, the
vehicle speed decreases by
5 km/h (5 mph). .
To decrease speed while the
vehicle is stopped, press SET−
until the desired set speed is
displayed.
Selecting the Follow Distance Gap
When a slower moving vehicle is
detected ahead within the selected
following gap, ACC will adjust the
vehicle's speed and attempt to
maintain the follow distance gap
selected.
Press
[on the steering wheel to
adjust the following gap. Each press
cycles the gap button through three
settings: Far, Medium, or Near.
When pressed, the current gap setting
displays briefly on the DIC and HUD.
The gap setting will be maintained
until it is changed.
Since each gap setting corresponds to
a following time (Far, Medium,
or Near), the following distance will
vary based on vehicle speed. The
faster the vehicle speed, the further
back your vehicle will follow a vehicle
detected ahead. Consider traffic and
weather conditions when selecting the
Page 232 of 399
Cadillac Escalade Owner Manual (GMNA-Localizing-U.S./Canada/Mexico-
11349344) - 2018 - crc - 11/7/17
DRIVING AND OPERATING 231
ACC Override
If using the accelerator pedal while
ACC is active, the ACC indicator turns
blue on the instrument cluster. ACC
will resume operation when the
accelerator pedal is not being pressed.
{Warning
The ACC will not automatically
apply the brakes if your foot is
resting on the accelerator pedal.
You could crash into a vehicle
ahead of you.
Curves in the Road
{Warning
On curves, ACC may not detect a
vehicle ahead in your lane. You
could be startled if the vehicle
accelerates up to the set speed,
especially when following a vehicle
exiting or entering exit ramps. You
could lose control of the vehicle or
crash. Do not use ACC while driving (Continued)
Warning (Continued)
on an entrance or exit ramp. Always
be ready to use the brakes if
necessary.
{Warning
On curves, ACC may respond to a
vehicle in another lane, or may not
have time to react to a vehicle in
your lane. You could crash into a
vehicle ahead of you, or lose control
of your vehicle. Give extra attention
in curves and be ready to use the
brakes if necessary. Select an
appropriate speed while driving in
curves.
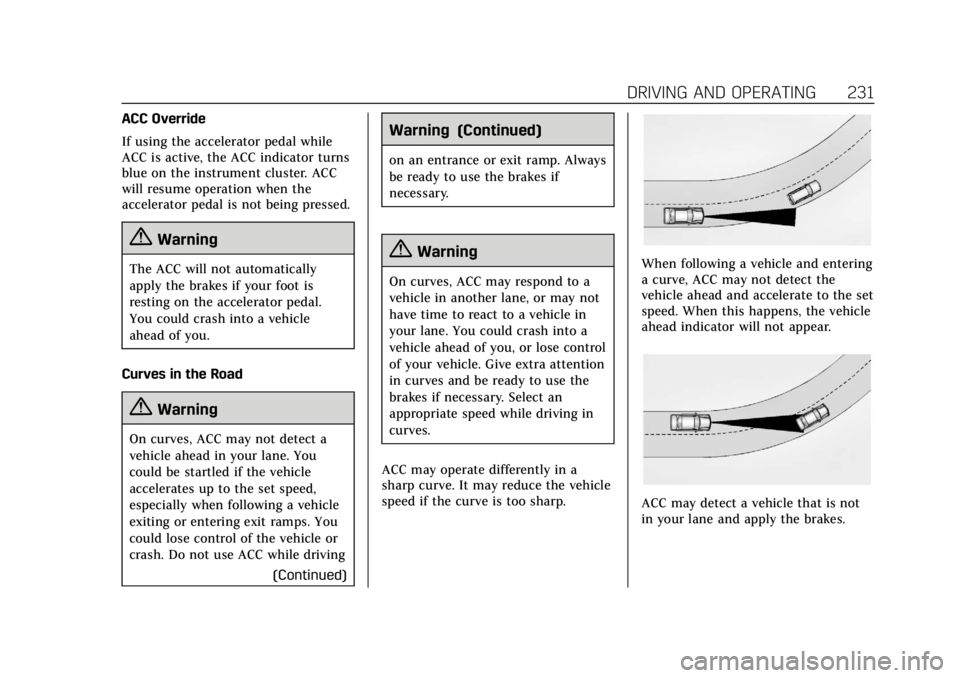
ACC may operate differently in a
sharp curve. It may reduce the vehicle
speed if the curve is too sharp.
When following a vehicle and entering
a curve, ACC may not detect the
vehicle ahead and accelerate to the set
speed. When this happens, the vehicle
ahead indicator will not appear.
ACC may detect a vehicle that is not
in your lane and apply the brakes.
Page 261 of 399
Cadillac Escalade Owner Manual (GMNA-Localizing-U.S./Canada/Mexico-
11349344) - 2018 - crc - 11/7/17
260 DRIVING AND OPERATING
Be sure to read and follow the
instructions for the trailer brakes so
they are installed, adjusted, and
maintained properly.
Do not tap into the vehicle's hydraulic
system.
Since the vehicle is equipped with
StabiliTrak, the trailer brakes cannot
tap into the vehicle's hydraulic
system.
Trailer Wiring Harness
The seven-pin trailer connector is
mounted in the bumper. This
connector can be plugged into a
seven-pin universal heavy-duty trailer
connector available through your
dealer.
Use only a round, seven-wire
connector with flat blade terminals
meeting SAE J2863 specifications for
proper electrical connectivity.
The seven-wire harness contains the
following trailer circuits:
.Yellow/Grey: Left Stop/Turn Signal
. Green/Violet: Right Stop/Turn
Signal .
Grey/Brown: Taillamps
. White: Ground
. White/Green: Back-up Lamps
. Red/Green: Battery Feed
. Dark Blue: Trailer Brake
To help charge a remote (non-vehicle)
battery, press the Tow/Haul Mode
button at the end of the shift lever.
If the trailer is too light for Tow/Haul
Mode, turn on the headlamps to help
charge the battery.Electric Brake Control Wiring
Provisions
These wiring provisions are included
with the vehicle as part of the trailer
wiring package. These provisions are
for an electric brake controller.
The harness should be installed by
your dealer or a qualified service
center.
Trailer Sway Control (TSC)
Vehicles with StabiliTrak have a
Trailer Sway Control (TSC) feature.
Trailer sway is unintended side-to-side
motion of a trailer while being towed. If the vehicle is towing a trailer and
the TSC detects that sway is
increasing, the vehicle brakes are
selectively applied at each wheel, to
help reduce excessive trailer sway.
If TSC is enabled, the Traction Control
System (TCS)/StabiliTrak warning
light will flash on the instrument
cluster. Vehicle speed must be
reduced. If trailer sway continues,
StabiliTrak can reduce engine torque
to help slow the vehicle. See
Traction
Control/Electronic Stability Control
0 218.
{Warning
Even if the vehicle is equipped with
TSC, trailer sway could result in
loss of control and the vehicle could
crash. If excessive trailer sway is
detected, slow down to a safe speed.
Check the trailer and vehicle to help
correct possible causes. These could
include an improperly or overloaded
trailer, unrestrained cargo, improper
trailer hitch configuration, excessive
(Continued)
Page 377 of 399
Cadillac Escalade Owner Manual (GMNA-Localizing-U.S./Canada/Mexico-
11349344) - 2018 - crc - 11/7/17
376 ONSTAR
OnStar
OnStar Overview
OnStar Overview . . . . . . . . . . . . . . . . . . 376
OnStar Services
Emergency . . . . . . . . . . . . . . . . . . . . . . . . 377
Security . . . . . . . . . . . . . . . . . . . . . . . . . . . 378
Navigation . . . . . . . . . . . . . . . . . . . . . . . . 378
Connections . . . . . . . . . . . . . . . . . . . . . . 379
Diagnostics . . . . . . . . . . . . . . . . . . . . . . . 381
OnStar Additional Information
OnStar AdditionalInformation . . . . . . . . . . . . . . . . . . . . . 382
OnStar Overview
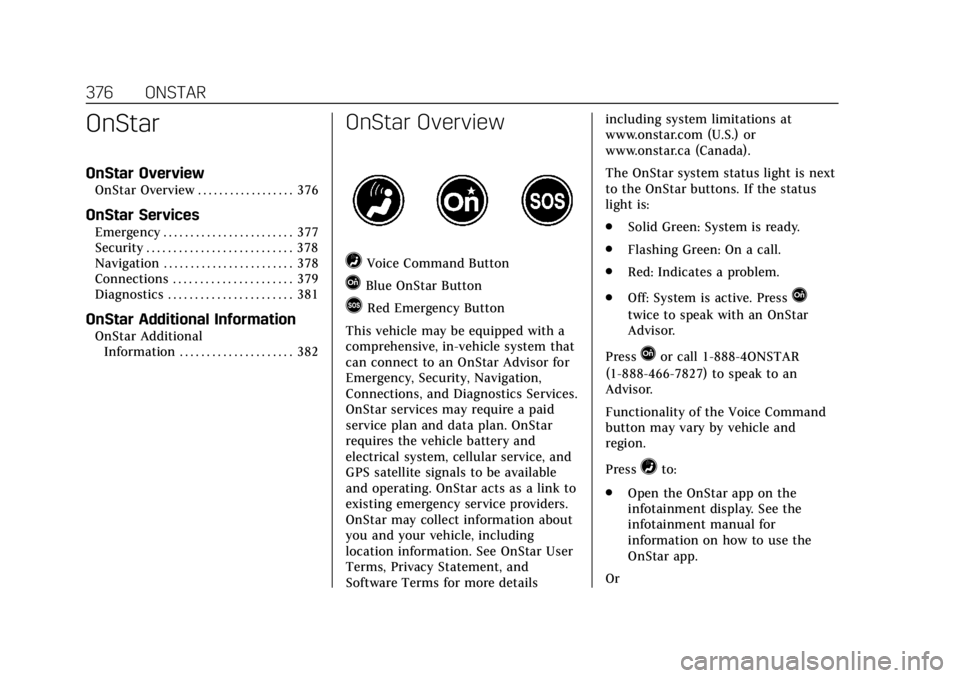
=Voice Command Button
QBlue OnStar Button
>Red Emergency Button
This vehicle may be equipped with a
comprehensive, in-vehicle system that
can connect to an OnStar Advisor for
Emergency, Security, Navigation,
Connections, and Diagnostics Services.
OnStar services may require a paid
service plan and data plan. OnStar
requires the vehicle battery and
electrical system, cellular service, and
GPS satellite signals to be available
and operating. OnStar acts as a link to
existing emergency service providers.
OnStar may collect information about
you and your vehicle, including
location information. See OnStar User
Terms, Privacy Statement, and
Software Terms for more details including system limitations at
www.onstar.com (U.S.) or
www.onstar.ca (Canada).
The OnStar system status light is next
to the OnStar buttons. If the status
light is:
.
Solid Green: System is ready.
. Flashing Green: On a call.
. Red: Indicates a problem.
. Off: System is active. PressQ
twice to speak with an OnStar
Advisor.
Press
Qor call 1-888-4ONSTAR
(1-888-466-7827) to speak to an
Advisor.
Functionality of the Voice Command
button may vary by vehicle and
region.
Press
=to:
. Open the OnStar app on the
infotainment display. See the
infotainment manual for
information on how to use the
OnStar app.
Or