center console CADILLAC ESCALADE 2021 Convenience & Personalization Guide
[x] Cancel search | Manufacturer: CADILLAC, Model Year: 2021, Model line: ESCALADE, Model: CADILLAC ESCALADE 2021Pages: 20, PDF Size: 3.66 MB
Page 3 of 20
3
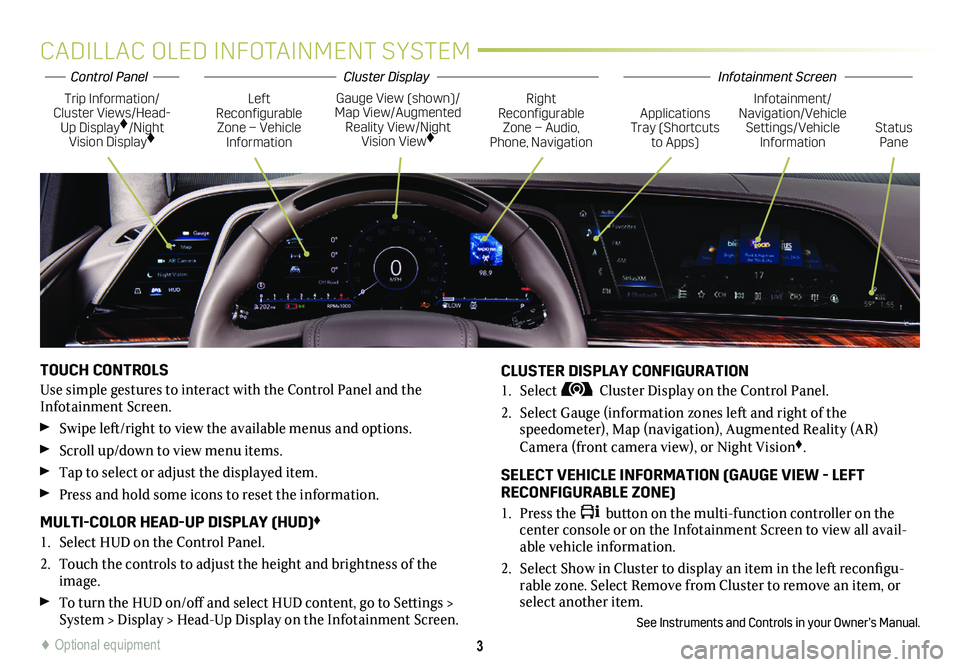
CADILLAC OLED INFOTAINMENT SYSTEM
TOUCH CONTROLS
Use simple gestures to interact with the Control Panel and the Infotainment Screen.
Swipe left/right to view the available menus and options.
Scroll up/down to view menu items.
Tap to select or adjust the displayed item.
Press and hold some icons to reset the information.
MULTI-COLOR HEAD-UP DISPLAY (HUD)♦
1. Select HUD on the Control Panel.
2. Touch the controls to adjust the height and brightness of the image.
To turn the HUD on/off and select HUD content, go to Settings > System > Display > Head-Up Display on the Infotainment Screen.
CLUSTER DISPLAY CONFIGURATION
1. Select Cluster Display on the Control Panel.
2. Select Gauge (information zones left and right of the
speedometer), Map (navigation), Augmented Reality (AR) Camera (front camera view), or Night Vision♦.
SELECT VEHICLE INFORMATION (GAUGE VIEW - LEFT RECONFIGURABLE ZONE)
1. Press the button on the multi-function controller on the center console or on the Infotainment Screen to view all avail-able vehicle information.
2. Select Show in Cluster to display an item in the left reconfigu-rable zone. Select Remove from Cluster to remove an item, or select another item.
See Instruments and Controls in your Owner’s Manual.
Trip Information/Cluster Views/Head-Up Display♦/Night Vision Display♦
Gauge View (shown)/Map View/Augmented Reality View/Night Vision View♦
Left Reconfigurable Zone – Vehicle Information
Right Reconfigurable Zone – Audio, Phone, NavigationStatus Pane
Infotainment/Navigation/Vehicle Settings/Vehicle Information
Applications Tray (Shortcuts to Apps)
♦ Optional equipment
Infotainment ScreenControl PanelCluster Display
Page 5 of 20
5
KEYLESS START
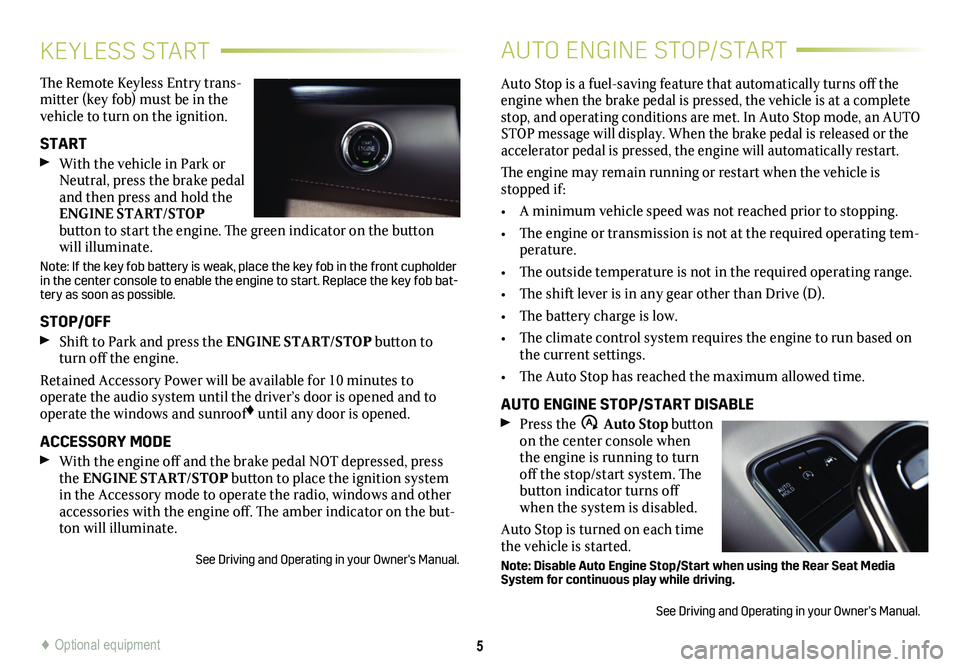
The Remote Keyless Entry trans-mitter (key fob) must be in the vehicle to turn on the ignition.
START
With the vehicle in Park or Neutral, press the brake pedal and then press and hold the ENGINE START/STOP
button to start the engine. The green indicator on the button will illuminate.
Note: If the key fob battery is weak, place the key fob in the front cupholder in the center console to enable the engine to start. Replace the key fob\
bat-tery as soon as possible.
STOP/OFF
Shift to Park and press the ENGINE START/STOP button to turn off the engine.
Retained Accessory Power will be available for 10 minutes to
operate the audio system until the driver’s door is opened and to operate the windows and sunroof♦ until any door is opened.
ACCESSORY MODE
With the engine off and the brake pedal NOT depressed, press the ENGINE START/STOP button to place the ignition system in the Accessory mode to operate the radio, windows and other accessories with the engine off. The amber indicator on the but-ton will illuminate.
See Driving and Operating in your Owner's Manual.
AUTO ENGINE STOP/START
Auto Stop is a fuel-saving feature that automatically turns off the engine when the brake pedal is pressed, the vehicle is at a complete stop, and operating conditions are met. In Auto Stop mode, an AUTO STOP message will display. When the brake pedal is released or the accelerator pedal is pressed, the engine will automatically restart.
The engine may remain running or restart when the vehicle is stopped if:
• A minimum vehicle speed was not reached prior to stopping.
• The engine or transmission is not at the required operating tem-perature.
• The outside temperature is not in the required operating range.
• The shift lever is in any gear other than Drive (D).
• The battery charge is low.
• The climate control system requires the engine to run based on the current settings.
• The Auto Stop has reached the maximum allowed time.
AUTO ENGINE STOP/START DISABLE
Press the �$ Auto Stop button on the center console when the engine is running to turn off the stop/start system. The button indicator turns off when the system is disabled.
Auto Stop is turned on each time the vehicle is started.
Note: Disable Auto Engine Stop/Start when using the Rear Seat Media System for continuous play while driving.
See Driving and Operating in your Owner’s Manual.
♦ Optional equipment
Page 9 of 20
9
WIRELESS CHARGING
4G LTE WI-FI® HOTSPOT
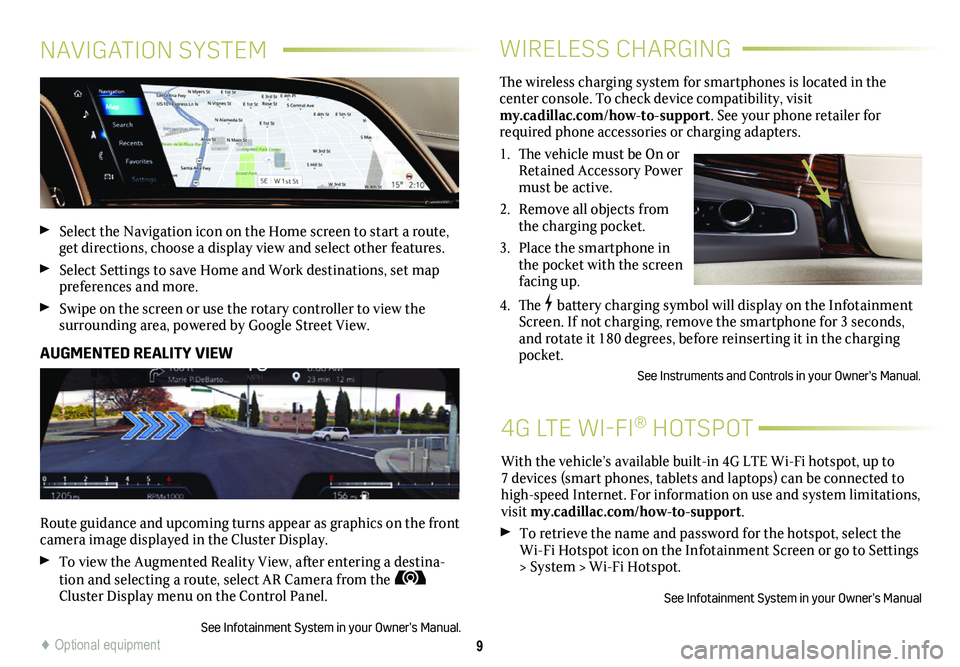
The wireless charging system for smartphones is located in the
center console. To check device compatibility, visit my.cadillac.com/how-to-support. See your phone retailer for required phone accessories or charging adapters.
1. The vehicle must be On or Retained Accessory Power must be active.
2. Remove all objects from the charging pocket.
3. Place the smartphone in the pocket with the screen facing up.
4. The battery charging symbol will display on the Infotainment Screen. If not charging, remove the smartphone for 3 seconds, and rotate it 180 degrees, before reinserting it in the charging pocket.
See Instruments and Controls in your Owner’s Manual.
With the vehicle’s available built-in 4G LTE Wi-Fi hotspot, up to 7 devices (smart phones, tablets and laptops) can be connected to high-speed Internet. For information on use and system limitations, visit my.cadillac.com/how-to-support.
To retrieve the name and password for the hotspot, select the Wi-Fi Hotspot icon on the Infotainment Screen or go to Settings > System > Wi-Fi Hotspot.
See Infotainment System in your Owner’s Manual
NAVIGATION SYSTEM
Select the Navigation icon on the Home screen to start a route, get directions, choose a display view and select other features.
Select Settings to save Home and Work destinations, set map preferences and more.
Swipe on the screen or use the rotary controller to view the
surrounding area, powered by Google Street View.
AUGMENTED REALITY VIEW
Route guidance and upcoming turns appear as graphics on the front camera image displayed in the Cluster Display.
To view the Augmented Reality View, after entering a destina-tion and selecting a route, select AR Camera from the Cluster Display menu on the Control Panel.
See Infotainment System in your Owner’s Manual.♦ Optional equipment
Page 10 of 20
10
REAR SEAT MEDIA SYSTEM♦
CENTER CONSOLE POWER OUTLET
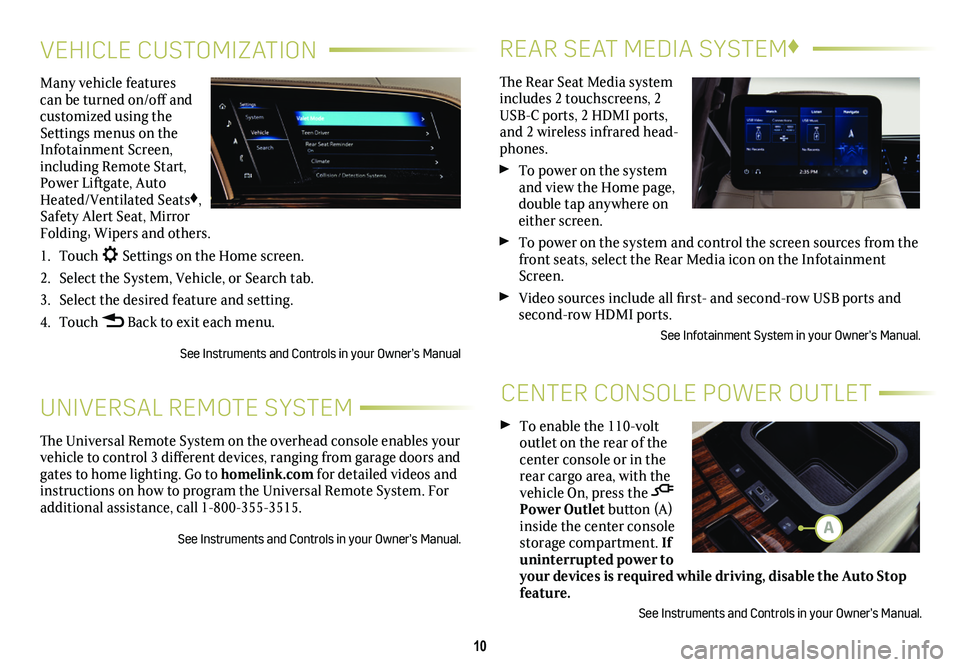
The Rear Seat Media system includes 2 touchscreens, 2 USB-C ports, 2 HDMI ports, and 2 wireless infrared head-phones.
To power on the system and view the Home page, double tap anywhere on either screen.
To power on the system and control the screen sources from the front seats, select the Rear Media icon on the Infotainment Screen.
Video sources include all first- and second-row USB ports and second-row HDMI ports.
See Infotainment System in your Owner’s Manual.
To enable the 110-volt outlet on the rear of the center console or in the rear cargo area, with the vehicle On, press the Power Outlet button (A) inside the center console storage compartment. If uninterrupted power to your devices is required while driving, disable the Auto Stop feature.
See Instruments and Controls in your Owner’s Manual.
VEHICLE CUSTOMIZATION
UNIVERSAL REMOTE SYSTEM
Many vehicle features can be turned on/off and customized using the Settings menus on the Infotainment Screen, including Remote Start, Power Liftgate, Auto Heated/Ventilated Seats♦, Safety Alert Seat, Mirror Folding, Wipers and others.
1. Touch Settings on the Home screen.
2. Select the System, Vehicle, or Search tab.
3. Select the desired feature and setting.
4. Touch Back to exit each menu.
See Instruments and Controls in your Owner’s Manual
The Universal Remote System on the overhead console enables your vehicle to control 3 different devices, ranging from garage doors and gates to home lighting. Go to homelink.com for detailed videos and instructions on how to program the Universal Remote System. For additional assistance, call 1-800-355-3515.
See Instruments and Controls in your Owner’s Manual.A
Page 14 of 20
14
SEAT FEATURESPOWER LIFTGATE
POWER RELEASE 2ND-ROW SEATS
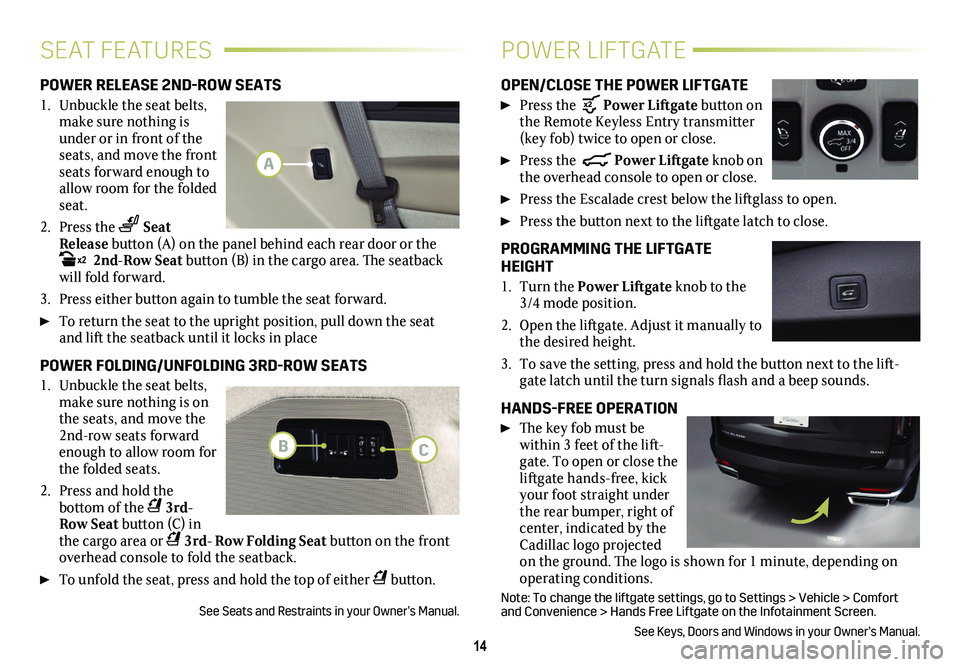
1. Unbuckle the seat belts, make sure nothing is under or in front of the seats, and move the front seats forward enough to allow room for the folded seat.
2. Press the Seat Release button (A) on the panel behind each rear door or the x2 2nd-Row Seat button (B) in the cargo area. The seatback will fold forward.
3. Press either button again to tumble the seat forward.
To return the seat to the upright position, pull down the seat and lift the seatback until it locks in place
POWER FOLDING/UNFOLDING 3RD-ROW SEATS
1. Unbuckle the seat belts, make sure nothing is on the seats, and move the 2nd-row seats forward enough to allow room for the folded seats.
2. Press and hold the
bottom of the 3rd- Row Seat button (C) in the cargo area or 3rd- Row Folding Seat button on the front overhead console to fold the seatback.
To unfold the seat, press and hold the top of either button.
See Seats and Restraints in your Owner’s Manual.
OPEN/CLOSE THE POWER LIFTGATE
Press the Power Liftgate button on the Remote Keyless Entry transmitter (key fob) twice to open or close.
Press the Power Liftgate knob on the overhead console to open or close.
Press the Escalade crest below the liftglass to open.
Press the button next to the liftgate latch to close.
PROGRAMMING THE LIFTGATE HEIGHT
1. Turn the Power Liftgate knob to the 3/4 mode position.
2. Open the liftgate. Adjust it manually to the desired height.
3. To save the setting, press and hold the button next to the lift-gate latch until the turn signals flash and a beep sounds.
HANDS-FREE OPERATION
The key fob must be within 3 feet of the lift-gate. To open or close the liftgate hands-free, kick your foot straight under the rear bumper, right of center, indicated by the Cadillac logo projected on the ground. The logo is shown for 1 minute, depending on operating conditions.
Note: To change the liftgate settings, go to Settings > Vehicle > Comfor\
t and Convenience > Hands Free Liftgate on the Infotainment Screen.
See Keys, Doors and Windows in your Owner’s Manual.
A
BC
Page 17 of 20
17
DRIVER ASSISTANCE SYSTEMS
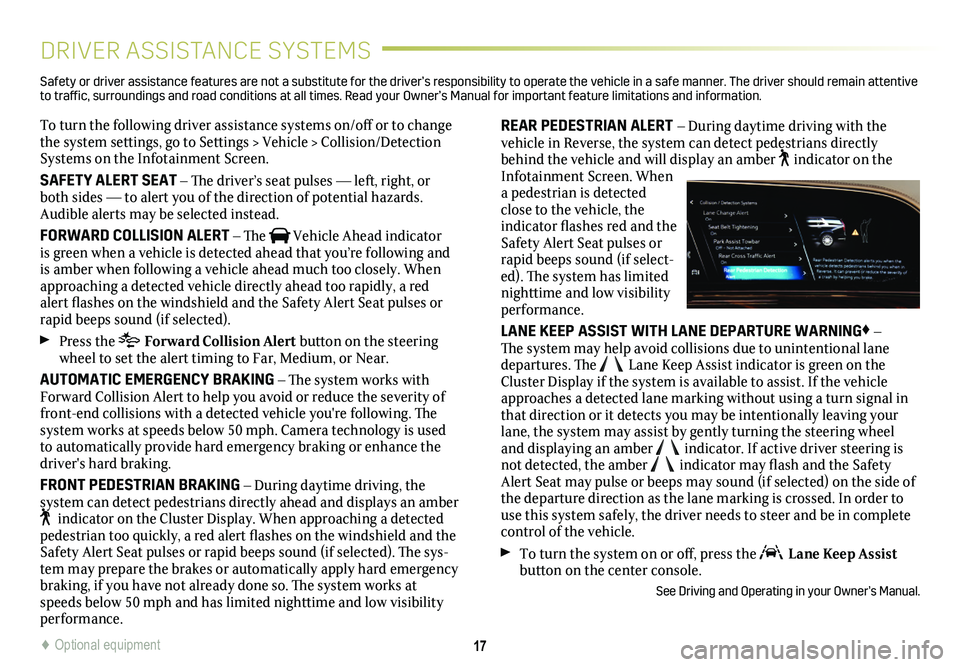
To turn the following driver assistance systems on/off or to change the system settings, go to Settings > Vehicle > Collision/Detection Systems on the Infotainment Screen.
SAFETY ALERT SEAT – The driver’s seat pulses — left, right, or both sides — to alert you of the direction of potential hazards. Audible alerts may be selected instead.
FORWARD COLLISION ALERT – The Vehicle Ahead indicator is green when a vehicle is detected ahead that you’re following and is amber when following a vehicle ahead much too closely. When approaching a detected vehicle directly ahead too rapidly, a red alert flashes on the windshield and the Safety Alert Seat pulses or rapid beeps sound (if selected).
Press the Forward Collision Alert button on the steering wheel to set the alert timing to Far, Medium, or Near.
AUTOMATIC EMERGENCY BRAKING – The system works with Forward Collision Alert to help you avoid or reduce the severity of front-end collisions with a detected vehicle you're following. The system works at speeds below 50 mph. Camera technology is used to automatically provide hard emergency braking or enhance the driver's hard braking.
FRONT PEDESTRIAN BRAKING – During daytime driving, the
system can detect pedestrians directly ahead and displays an amber indicator on the Cluster Display. When approaching a detected pedestrian too quickly, a red alert flashes on the windshield and the Safety Alert Seat pulses or rapid beeps sound (if selected). The sys-tem may prepare the brakes or automatically apply hard emergency braking, if you have not already done so. The system works at speeds below 50 mph and has limited nighttime and low visibility performance.
REAR PEDESTRIAN ALERT – During daytime driving with the vehicle in Reverse, the system can detect pedestrians directly behind the vehicle and will display an amber indicator on the Infotainment Screen. When a pedestrian is detected close to the vehicle, the indicator flashes red and the Safety Alert Seat pulses or rapid beeps sound (if select-ed). The system has limited nighttime and low visibility performance.
LANE KEEP ASSIST WITH LANE DEPARTURE WARNING♦ – The system may help avoid collisions due to unintentional lane departures. The Lane Keep Assist indicator is green on the Cluster Display if the system is available to assist. If the vehicle approaches a detected lane marking without using a turn signal in that direction or it detects you may be intentionally leaving your lane, the system may assist by gently turning the steering wheel and displaying an amber indicator. If active driver steering is not detected, the amber indicator may flash and the Safety Alert Seat may pulse or beeps may sound (if selected) on the side of the departure direction as the lane marking is crossed. In order to use this system safely, the driver needs to steer and be in complete control of the vehicle.
To turn the system on or off, press the Lane Keep Assist button on the center console.
See Driving and Operating in your Owner’s Manual.
Safety or driver assistance features are not a substitute for the driver’s r\
esponsibility to operate the vehicle in a safe manner. The driver should remain attentive to traffic, surroundings and road conditions at all times. Read your Owner’s Manual for import\
ant feature limitations and information.
♦ Optional equipment