buttons CADILLAC ESCALADE 2023 Owners Manual
[x] Cancel search | Manufacturer: CADILLAC, Model Year: 2023, Model line: ESCALADE, Model: CADILLAC ESCALADE 2023Pages: 461, PDF Size: 7.99 MB
Page 47 of 461

Cadillac Escalade Owner Manual (GMNA-Localizing-U.S./Canada/Mexico-
16417396) - 2023 - CRC - 5/9/22
Seats and Restraints 45
Recall”later in this section. To enable
automatic recalls, turn on Seat Entry
Memory and/or Seat Exit Memory. See
“Enabling Automatic Recalls” later in this
section. The memory recalls may be
cancelled at any time during the recall. See
“Cancel Memory Seating Recalls” later in this
section.
Identifying Driver Number
The vehicle identifies the current driver by
their remote key number 1–8. The current
remote key number may be identified by
Driver Information Center (DIC) welcome
message, “You are driver x for memory
recalls.” This message is displayed the first
few times the vehicle is turned on when a
different remote key is used. For Seat Entry
Memory to work properly, save positions to
the 1 or 2 memory button matching the
driver number of this welcome message. To
aid in identifying remote key IDs, it is
recommended to only carry one remote key
when entering the vehicle. Perform the
following if the welcome message is not
displayed:
1. Move all keys and remote keys away from the vehicle. 2. Start the vehicle with another remote
key. A DIC welcome message should
display indicating the driver number of
the other remote key. Turn the vehicle
off and remove the other key or remote
key from the vehicle.
3. Start the vehicle with the initial key or remote key. The DIC welcome message
should display the driver number of the
initial remote key.
Saving Seating Positions
Read these instructions completely before
saving memory positions.
To save preferred driving positions to
1 and 2: 1. Turn the vehicle on or to accessory mode. A DIC welcome message may
indicate the driver number of the current
remote key. See “Identifying Driver
Number” previously in this section.
2. Adjust all available memory features to the desired driving position.
3. Press and release SET; a beep will sound.
4. Immediately upon releasing SET, press and hold memory button 1 or 2 matching
the current Driver’s remote key number
until two beeps sound. If too much time
passes between releasing SET and pressing 1 or 2, the two beeps will not
sound indicating memory position were
not saved. Repeat Steps 3 and 4 to try
again.
5. Repeat Steps 1–4 for the other remote key 1 or 2 using the other 1 or 2 memory
button.
It is recommended to save the preferred
driving positions to both 1 and 2 if you are
the only driver.
To save the common exit seating position to
Bthat is used by all drivers for Manually
Recalling Seating Positions and Auto Seat
Exit Memory Recall features, repeat Steps 1–
4 using
B, the exit button.
Manually Recalling Seating Positions
Press and hold 1, 2, or
Bbutton until the
recall is complete, to recall the positions
previously saved to that button.
Manual Memory recall movement for 1, 2 or
Bbuttons may be initiated and will
complete to the saved memory position if
the vehicle is in or out of P (Park).
Page 48 of 461

Cadillac Escalade Owner Manual (GMNA-Localizing-U.S./Canada/Mexico-
16417396) - 2023 - CRC - 5/9/22
46 Seats and Restraints
Enabling Automatic Recalls
.Seat Entry Memory moves the driver seat
to the selected 1 or 2 position when the
vehicle is started. Select Settings > Vehicle
> Seating Position > Seat Entry Memory >
ON or OFF. See“Auto Seat Entry Memory
Recall” later in this section.
.Seat Exit Memory moves the driver seat
to the preferred exit position of the
B
button when the vehicle is turned off and
the door is opened. Select Settings >
Vehicle > Seating Position > Seat Exit
Memory > Select ON or OFF. See “Auto
Seat Exit Memory Recall” later in this
section.
Auto Seat Entry Memory Recall
Seat Entry Memory will automatically begin
movement to the seating positions of the 1
or 2 button corresponding to the driver’s
remote key number 1 or 2 detected by the
vehicle when:
.The vehicle is turned ON.
.Seating positions have been previously
saved to the same 1 or 2 button. See
“Saving Seating Positions” previously in
this section.
.Seat Entry Memory is enabled. See
“Enabling Automatic Recalls” previously in
this section.
.The vehicle is in P (Park).
Seat Entry Memory Recall will continue if
the vehicle is shifted out of P (Park) prior to
reaching the saved memory position.
If the saved memory seat position does not
automatically recall, verify the recall is
enabled. See “Enabling Automatic Recalls”
previously in this section.
If the memory seat recalls to the wrong
position, the driver’s remote key number 1
or 2 may not match the memory button
number positions they were saved to. Try
the other remote key or try saving the
positions to the other 1 or 2 memory
button. See “Saving Seating Positions”
previously in this section.
Automatic Seat Entry Memory recalls are
only available for driver’s remote key
numbers 1 and 2. Remote keys 3–8 will not
provide Seat Entry Memory recalls.
Auto Seat Exit Memory Recall
Seat Exit Memory will begin movement to
the seating position of the
B
button when:
.The vehicle is turned off and the driver
door is open or opened within a
short time.
.A seating position has been previously
been saved to the
Bmemory button.
See “Saving Seating Positions” previously
in this section.
.Seat Exit Memory is enabled. See
“Enabling Automatic Recalls” previously in
this section.
.The vehicle is in P (Park).
Seat Exit Memory recall will continue if the
vehicle is shifted out of P (Park) prior to
reaching the saved memory position.
Seat Exit Memory is not linked to the
driver’s remote key. The seating position
saved to
Bis used for all drivers.
Cancel Memory Seating Recalls
.During any memory recall:
Press a power seat control
Press SET memory button
.During Manual memory recall:
Release 1, 2, or
Bmemory button
.During Auto Seat Entry Memory Recall:
Turn vehicle off
Press SET, 1, 2, or
Bmemory buttons
Page 49 of 461
Cadillac Escalade Owner Manual (GMNA-Localizing-U.S./Canada/Mexico-
16417396) - 2023 - CRC - 5/9/22
Seats and Restraints 47
.During Auto Seat Exit Memory Recall:
Press SET, 1, 2, or
Bmemory buttons
Obstructions
If something has blocked the seat while
recalling a memory position, the recall may
stop. Remove the obstruction and try the
recall again. If the memory position still
does not recall, see your dealer.
Heated and Ventilated Front
Seats
{Warning
If temperature change or pain to the skin
cannot be felt, the seat heater may cause
burns. To reduce the risk of burns, use
care when using the seat heater,
especially for long periods of time. Do
not place anything on the seat that
insulates against heat, such as a blanket,
cushion, cover, or similar item. This may
cause the seat heater to overheat. An
overheated seat heater may cause a burn
or may damage the seat.
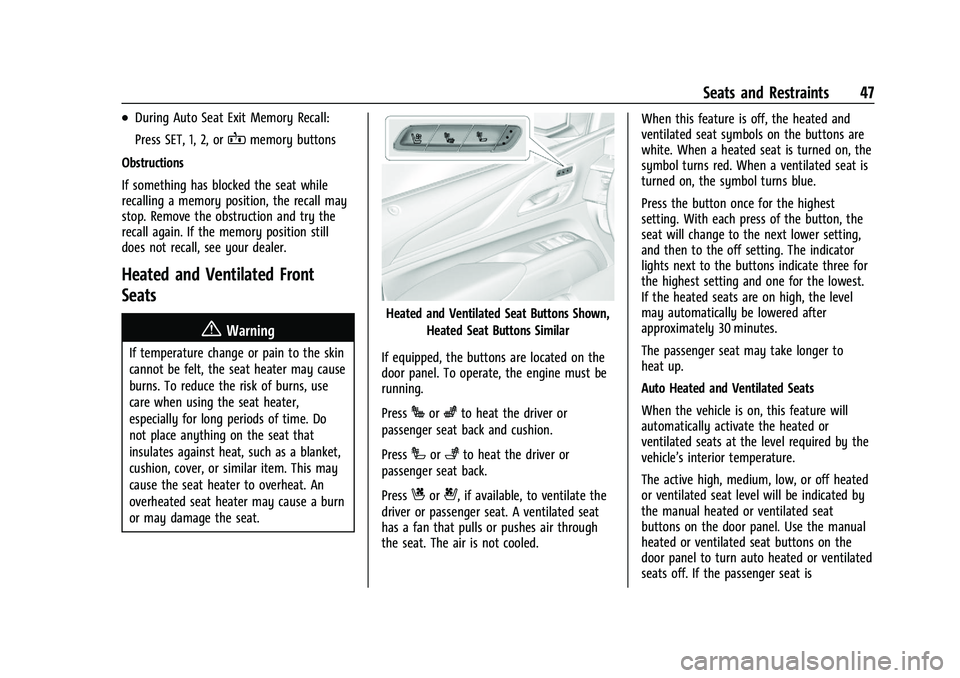
Heated and Ventilated Seat Buttons Shown, Heated Seat Buttons Similar
If equipped, the buttons are located on the
door panel. To operate, the engine must be
running.
Press
Jorzto heat the driver or
passenger seat back and cushion.
Press
Ior+to heat the driver or
passenger seat back.
Press
Cor{, if available, to ventilate the
driver or passenger seat. A ventilated seat
has a fan that pulls or pushes air through
the seat. The air is not cooled. When this feature is off, the heated and
ventilated seat symbols on the buttons are
white. When a heated seat is turned on, the
symbol turns red. When a ventilated seat is
turned on, the symbol turns blue.
Press the button once for the highest
setting. With each press of the button, the
seat will change to the next lower setting,
and then to the off setting. The indicator
lights next to the buttons indicate three for
the highest setting and one for the lowest.
If the heated seats are on high, the level
may automatically be lowered after
approximately 30 minutes.
The passenger seat may take longer to
heat up.
Auto Heated and Ventilated Seats
When the vehicle is on, this feature will
automatically activate the heated or
ventilated seats at the level required by the
vehicle’s interior temperature.
The active high, medium, low, or off heated
or ventilated seat level will be indicated by
the manual heated or ventilated seat
buttons on the door panel. Use the manual
heated or ventilated seat buttons on the
door panel to turn auto heated or ventilated
seats off. If the passenger seat is
Page 54 of 461
Cadillac Escalade Owner Manual (GMNA-Localizing-U.S./Canada/Mexico-
16417396) - 2023 - CRC - 5/9/22
52 Seats and Restraints
Folding and Tumbling the Second Row Seat
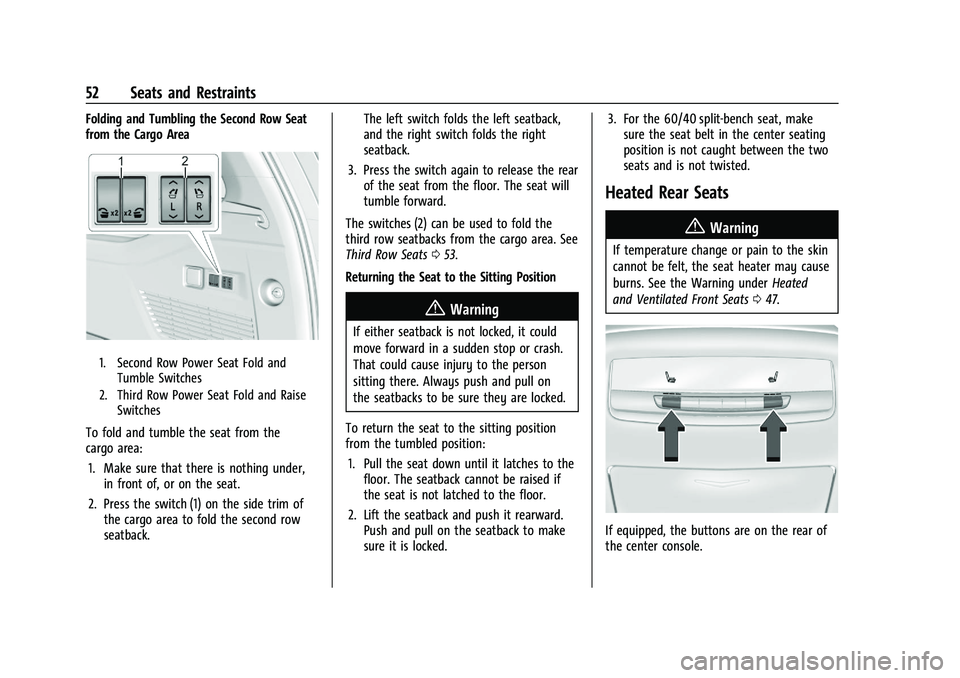
from the Cargo Area
1. Second Row Power Seat Fold andTumble Switches
2. Third Row Power Seat Fold and Raise Switches
To fold and tumble the seat from the
cargo area:
1. Make sure that there is nothing under, in front of, or on the seat.
2. Press the switch (1) on the side trim of the cargo area to fold the second row
seatback. The left switch folds the left seatback,
and the right switch folds the right
seatback.
3. Press the switch again to release the rear of the seat from the floor. The seat will
tumble forward.
The switches (2) can be used to fold the
third row seatbacks from the cargo area. See
Third Row Seats 053.
Returning the Seat to the Sitting Position
{Warning
If either seatback is not locked, it could
move forward in a sudden stop or crash.
That could cause injury to the person
sitting there. Always push and pull on
the seatbacks to be sure they are locked.
To return the seat to the sitting position
from the tumbled position: 1. Pull the seat down until it latches to the floor. The seatback cannot be raised if
the seat is not latched to the floor.
2. Lift the seatback and push it rearward. Push and pull on the seatback to make
sure it is locked. 3. For the 60/40 split-bench seat, make
sure the seat belt in the center seating
position is not caught between the two
seats and is not twisted.
Heated Rear Seats
{Warning
If temperature change or pain to the skin
cannot be felt, the seat heater may cause
burns. See the Warning under Heated
and Ventilated Front Seats 047.
If equipped, the buttons are on the rear of
the center console.
Page 55 of 461
Cadillac Escalade Owner Manual (GMNA-Localizing-U.S./Canada/Mexico-
16417396) - 2023 - CRC - 5/9/22
Seats and Restraints 53
With the engine running, pressMorLto
heat the left or right outboard seat cushion.
An indicator on the rear climate control
display appears when this feature is on.
Press the button once for the highest
setting. With each press of the button, the
seat will change to the next lower setting,
and then to the off setting. The indicator
lights next to the buttons indicate three for
the highest setting and one for the lowest.
If the heated seats are on high for
30 minutes, their level may automatically be
lowered.
Third Row Seats
Caution
Folding a rear seat with the seat belts
still fastened may cause damage to the
seat or the seat belts. Always unbuckle
the seat belts and return them to their
normal stowed position before folding a
rear seat.
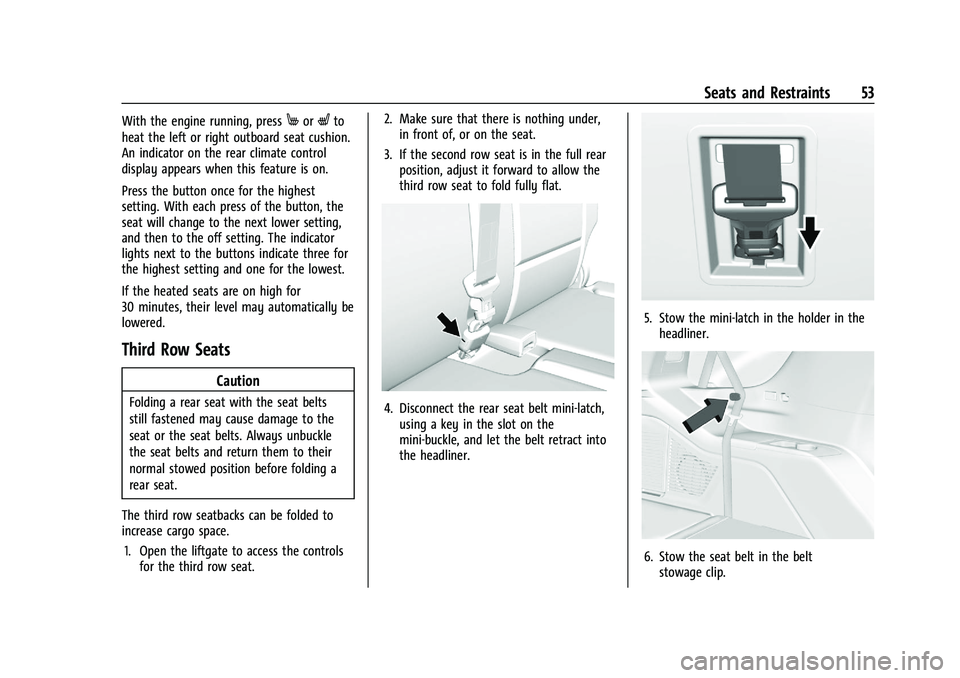
The third row seatbacks can be folded to
increase cargo space. 1. Open the liftgate to access the controls for the third row seat. 2. Make sure that there is nothing under,
in front of, or on the seat.
3. If the second row seat is in the full rear position, adjust it forward to allow the
third row seat to fold fully flat.4. Disconnect the rear seat belt mini-latch,using a key in the slot on the
mini-buckle, and let the belt retract into
the headliner.
5. Stow the mini-latch in the holder in theheadliner.
6. Stow the seat belt in the beltstowage clip.
Page 133 of 461

Cadillac Escalade Owner Manual (GMNA-Localizing-U.S./Canada/Mexico-
16417396) - 2023 - CRC - 5/9/22
Instruments and Controls 131
Under certain operating conditions,
propulsion will be disabled. Try restarting
after the ignition has been off for
two minutes.
Vehicle Speed Messages
SPEED LIMITED TO XXX KM/H (MPH)
This message shows that the vehicle speed
has been limited to the speed displayed. The
limited speed is a protection for various
propulsion and vehicle systems, such as
lubrication, thermal, brakes, suspension,
Teen Driver if equipped, or tires.
(If equipped with a diesel engine, see the
Duramax Diesel supplement.)–For Diesel
Universal Remote System
See Radio Frequency Statement 0435.
Universal Remote System
Programming
If equipped, these buttons are in the
overhead console.
This system can replace up to three remote
control transmitters used to activate devices
such as garage door openers, security
systems, and home automation devices.
These instructions refer to a garage door
opener, but can be used for other devices.
Do not use the Universal Remote system
with any garage door opener that does not
have the stop and reverse feature. This
includes any garage door opener model
manufactured before April 1, 1982. Keep the original hand-held transmitter for
use in other vehicles as well as for future
programming. Erase the programming when
vehicle ownership is terminated. See
“Erasing Universal Remote System Buttons”
later in this section.
To program a garage door opener, park
outside directly in line with and facing the
garage door opener receiver. Clear all people
and objects near the garage door.
Make sure the hand-held transmitter has a
new battery for quick and accurate
transmission of the radio-frequency signal.
Programming the Universal Remote
System
The Universal Remote system is compatible
with radio-frequency devices operating
between 433-434 MHz.
Programming involves time-sensitive actions
and may time out, requiring the procedure
to be repeated. Read these instructions
completely before programming the
Universal Remote system. It may help to
have another person assist with the
programming process.
Page 134 of 461

Cadillac Escalade Owner Manual (GMNA-Localizing-U.S./Canada/Mexico-
16417396) - 2023 - CRC - 5/9/22
132 Instruments and Controls
1. Hold the end of the hand-heldtransmitter about 3 to 8 cm (1 to 3 in)
away from the Universal Remote system
buttons with the indicator light in view.
The hand-held transmitter was supplied
by the manufacturer of the garage door
opener receiver.
2. Press and release one of the three Universal Remote system buttons to be
programmed. Press and hold the
hand-held transmitter button. Do not
release the hand-held transmitter button
until the indicator light changes from a
slow to a rapid flash or continuous light.
Then release the hand-held transmitter
button.
Some garage door openers may require
substitution of Step 2 with the procedure
under “Radio Signals for Some Gate
Operators” later in this section.
3. Press and hold the newly programmed Universal Remote system button for
five seconds while watching the indicator
light and garage door activation.
.If the indicator light stays on
continuously or the garage door
moves when the button is pressed,
then programming is complete. There
is no need to complete Steps 4–6.
.If the indicator light does not come
on or the garage door does not
move, a second button press may be
required. For a second time, press
and hold the newly programmed
button for five seconds. If the
indicator light stays on continuously
or the garage door moves when the
button is pressed, then programming
is complete. There is no need to
complete Steps 4–6.
.If the garage door does not move,
continue with programming
Steps 4–6.
Learn or Smart Button
4. After completing Steps 1–3, locate the Learn or Smart button inside garage on
the garage door opener receiver. The
name and color of the button may vary
by manufacturer. 5. Press and release the Learn or Smart
button. Step 6 must be completed within
30 seconds of pressing this button.
6. Return to the vehicle and firmly press and hold the trained Universal Remote
system button for two seconds and
release. Repeat the “press/hold/release”
sequence up to three times to complete
the training process.
The Universal Remote system should now
activate the garage door. Repeat the process
for programming the remaining two
buttons.
For questions or programming help, see
www.homelink.com/gm or call
1-800-355-3515. For calls placed outside the
U.S., Canada, or Puerto Rico, international
rates will apply and may differ based on
landline or mobile phone.
Radio Signals for Some Gate Operators
Some gate operators and radio-frequency
laws require transmitter signals to time out
or quit after several seconds of transmission.
This may not be long enough for the
Universal Remote system to pick up the
signal during programming.
Page 135 of 461

Cadillac Escalade Owner Manual (GMNA-Localizing-U.S./Canada/Mexico-
16417396) - 2023 - CRC - 5/9/22
Instruments and Controls 133
If the programming did not work, replace
Step 2 under“Programming the Universal
Remote System” with the following:
Press and hold the Universal Remote system
button while pressing and releasing the
hand-held transmitter button every
two seconds until the signal has been
successfully accepted by the Universal
Remote system. The Universal Remote
system indicator light will flash slowly at
first and then change to a rapid flash or
continuous solid-light. Proceed with Step 3
under “Programming the Universal Remote
System” to complete.
Universal Remote System
Operation
Using the Universal Remote System
Press and hold the appropriate Universal
Remote system button for at least one-half
second. The indicator light will come on
while the signal is being transmitted.
Erasing Universal Remote System
Buttons
Erase all programmed buttons when vehicle
ownership is terminated.
To erase:
1. Press and hold the two outside buttons until the indicator light begins to flash.
This should take about 10 seconds.
2. Release both buttons.
Reprogramming a Single Universal
Remote System Button
To reprogram any of the system buttons: 1. Press and hold any one of the buttons. Do not release the button.
2. The indicator light will begin to flash after 20 seconds. Without releasing the
button, proceed with Step 1 under
“Programming the Universal Remote
System.”
Page 162 of 461
Cadillac Escalade Owner Manual (GMNA-Localizing-U.S./Canada/Mexico-
16417396) - 2023 - CRC - 5/9/22
160 Infotainment System
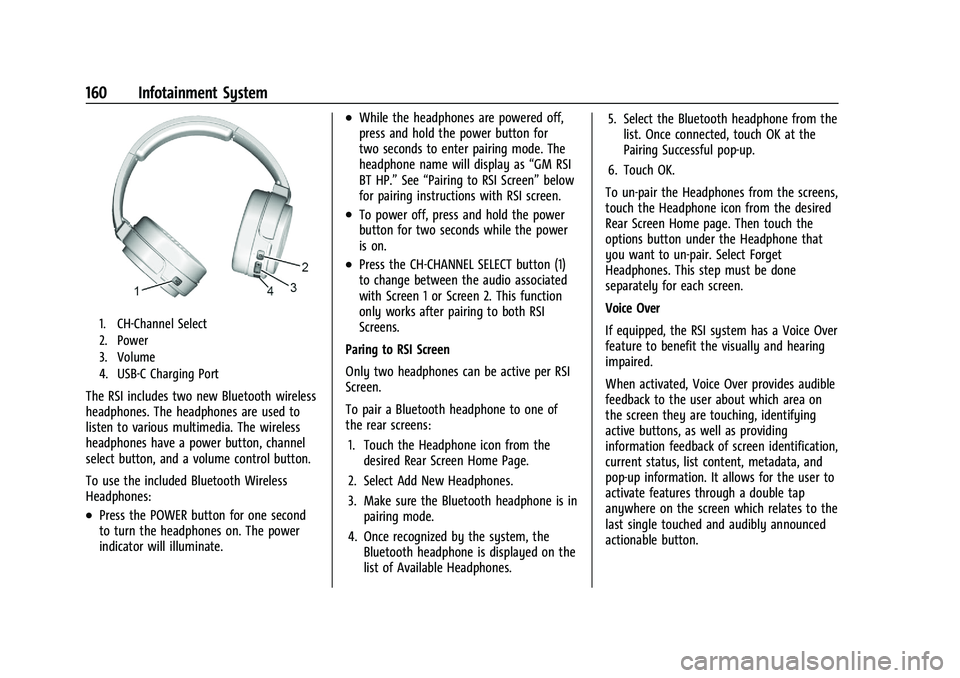
1. CH-Channel Select
2. Power
3. Volume
4. USB-C Charging Port
The RSI includes two new Bluetooth wireless
headphones. The headphones are used to
listen to various multimedia. The wireless
headphones have a power button, channel
select button, and a volume control button.
To use the included Bluetooth Wireless
Headphones:
.Press the POWER button for one second
to turn the headphones on. The power
indicator will illuminate.
.While the headphones are powered off,
press and hold the power button for
two seconds to enter pairing mode. The
headphone name will display as“GM RSI
BT HP.” See“Pairing to RSI Screen” below
for pairing instructions with RSI screen.
.To power off, press and hold the power
button for two seconds while the power
is on.
.Press the CH-CHANNEL SELECT button (1)
to change between the audio associated
with Screen 1 or Screen 2. This function
only works after pairing to both RSI
Screens.
Paring to RSI Screen
Only two headphones can be active per RSI
Screen.
To pair a Bluetooth headphone to one of
the rear screens: 1. Touch the Headphone icon from the desired Rear Screen Home Page.
2. Select Add New Headphones.
3. Make sure the Bluetooth headphone is in pairing mode.
4. Once recognized by the system, the Bluetooth headphone is displayed on the
list of Available Headphones. 5. Select the Bluetooth headphone from the
list. Once connected, touch OK at the
Pairing Successful pop-up.
6. Touch OK.
To un-pair the Headphones from the screens,
touch the Headphone icon from the desired
Rear Screen Home page. Then touch the
options button under the Headphone that
you want to un-pair. Select Forget
Headphones. This step must be done
separately for each screen.
Voice Over
If equipped, the RSI system has a Voice Over
feature to benefit the visually and hearing
impaired.
When activated, Voice Over provides audible
feedback to the user about which area on
the screen they are touching, identifying
active buttons, as well as providing
information feedback of screen identification,
current status, list content, metadata, and
pop-up information. It allows for the user to
activate features through a double tap
anywhere on the screen which relates to the
last single touched and audibly announced
actionable button.
Page 170 of 461
Cadillac Escalade Owner Manual (GMNA-Localizing-U.S./Canada/Mexico-
16417396) - 2023 - CRC - 5/9/22
168 Infotainment System
.An application downloaded to the vehicle
that can send destinations to the
navigation system.
Waypoints
Add up to five waypoints, which are
additional destinations, along the route. To
add an additional stop or waypoint:1. From active guidance, touch Add a Stop.
2. Search for the destination using One-Box, Voice search, or the Quick Category
icons.
3. Choose search results Along Route, Nearby, or Near Destination.
4. Choose the desired waypoint and touch Add to Trip.
Route options are not available for
waypoints.
Arriving at a Waypoint
When approaching a waypoint, the system
will display a Destination Arrival view. To
continue on to the next destination touch
the Done message on the infotainment
display. Editing a Waypoint
When waypoints are added during active
guidance, the system allows a stop to be
deleted or the order to be changed.
To edit a waypoint, touch Destinations. The
following options will be available:
.Modify destination order by touching the
arrow buttons on the waypoint
destinations list.
.Delete a waypoint by touching the trash
can icon. The icon can be selected again
to re-add the waypoint in case it was
accidentally selected. Touch
zon the top
right corner so the system can recalculate
the route.
If there is only one address in the
destinations list, the system will disable
the move and delete functions. The
system will not allow the final destination
to be deleted.
Map Information
Road network attributes are contained in the
map database for map information.
Attributes include information such as street
names, street addresses, and turn
restrictions. A detailed area includes all
major highways, service roads, and residential roads. The detailed areas include
Places of Interest (POIs) such as restaurants,
airports, banks, hospitals, police stations, gas
stations, tourist attractions, and historical
monuments.
If the vehicle does not have an applicable
service plan, the map database may not
include data for newly constructed areas or
map database corrections that are
completed after production. The navigation
system provides full route guidance in the
detailed map areas.
Zoom Control
To zoom in or out, perform one of the
following:
.Rotate the Multifunction Controller (MFC)
to zoom in or out on the map.
.Double tap with one finger to zoom in or
single tap with two fingers to zoom out
on the map.
.Use the index finger and thumb to zoom
out by pinching and then zoom in by
spreading those two fingers on the map.
Map Gestures and Map Scale
Use the following gestures on the
infotainment display to adjust the map scale
and display options.