language CADILLAC ESCALADE ESV 2005 2.G Owners Manual
[x] Cancel search | Manufacturer: CADILLAC, Model Year: 2005, Model line: ESCALADE ESV, Model: CADILLAC ESCALADE ESV 2005 2.GPages: 470, PDF Size: 2.86 MB
Page 2 of 470
GENERAL MOTORS, GM, the GM Emblem, CADILLAC,
the CADILLAC Crest & Wreath, and the names
ESCALADE ESCALADE/ESV are registered trademarks
of General Motors Corporation.
This manual includes the latest information at the time it
was printed. We reserve the right to make changes
after that time without notice. For vehicles �rst sold in
Canada, substitute the name “General Motors of Canada
Limited” for Cadillac Motor Car Division whenever it
appears in this manual.
Keep this manual in the vehicle, so it will be there if it is
ever needed while you are on the road. If the vehicle
is sold, leave the manual in the vehicle.
Canadian Owners
A French language copy of this manual can be obtained
from your dealer or from:
Helm, Incorporated
P.O. Box 07130
Detroit, MI 48207
How to Use This Manual
Many people read the owner manual from beginning to
end when they �rst receive their new vehicle. If this
is done, it can help you learn about the features
and controls for the vehicle. Pictures and words work
together in the owner manual to explain things.
Index
A good place to quickly locate information about the
vehicle is the Index in the back of the manual. It is an
alphabetical list of what is in the manual and the
page number where it can be found.
Litho in U.S.A.
Part No. 05ESCALADE B First Edition
©2004 General Motors Corporation. All Rights Reserved.
ii
Page 191 of 470
Customization Button
4
(Customization):Press the customization button to
access the VEHICLE SETTINGS menu and customize
the settings to your vehicle. SeeDIC Vehicle
Customization on page 3-63for more information.
Select Button
r
(Select):Press the select button to reset certain
DIC functions and set your customization settings.
For example, this button will reset the trip odometers
and scroll through the languages in which you can select
the DIC to display information.
DIC Warnings and Messages
Warning messages are displayed on the Driver
Information Center (DIC) to notify the driver that the
status of the vehicle has changed and that some action
may be needed by the driver to correct the condition.
If there is more than one message that needs to
be displayed they will appear one after another. Some
messages may not require immediate action, but
you should press any of the four DIC buttons on the
steering wheel, if equipped, to acknowledge that
you received the messages and clear them from thedisplay. If your vehicle is not equipped with DIC buttons
on the steering wheel, press the trip odometer reset
stem located on the instrument panel cluster to
acknowledge messages and clear them from the display.
Some messages cannot be cleared from the display
because they are more urgent. These messages require
action before they can be removed from the DIC
display. You should take any messages that appear on
the display seriously and remember that clearing the
messages will only make the messages disappear, not
correct the problem. The following are the possible
messages that can be displayed and some information
about them.
BATTERY NOT CHARGING
On some vehicles, if the battery is not charging during
operation, this message will appear on the DIC.
Driving with this problem could drain your battery. Have
the electrical system checked by your GM dealer as
soon as possible. Pressing any of the four DIC buttons,
if equipped, will clear the message from the DIC
display. If your vehicle is not equipped with the four DIC
buttons, pressing the trip odometer reset stem will
clear the message from the DIC display. SeeCharging
System Light on page 3-37andVoltmeter Gage on
page 3-37.
3-53
Page 206 of 470
CURB VIEW: BOTH:The driver’s and passenger’s
outside mirrors will be tilted down when the vehicle is
shifted into REVERSE (R).
Choose one of the available options and press the
customization button while it is displayed on the DIC to
select it and move on to the next feature. For more
information on tilt mirror in reverse, seeOutside
Automatic Dimming Mirror with Curb View Assist on
page 2-34.
Alarm Warning
Press the customization button until ALARM WARNING
appears in the display. To select your preference for
alarm warning, press the select button while ALARM
WARNING is displayed on the DIC. Pressing the select
button will scroll through the following choices:
ALARM WARNING: BOTH (default):The headlamps
will �ash and the horn will chirp when the alarm is
active.
ALARM WARNING: OFF:There will be no alarm
warning on activation.
ALARM WARNING: HORN:The horn will chirp when
the alarm is active.
ALARM WARNING: LAMPS:The headlamps will �ash
when the alarm is active.Choose one of the available options and press the
customization button while your choice is displayed on
the DIC to select it and move on to the next feature.
For more information on alarm warning type, see
Content Theft-Deterrent on page 2-16.
Language
To select your preference for display language, press
the select button while LANGUAGE is displayed on the
DIC. Pressing the select button will scroll through the
following languages:
ENGLISH
FRANCAIS (French)
ESPANOL (Spanish)
Choose one of the available options and press the
customization button while it is displayed on the DIC to
select it.
If you accidentally choose a language that you do not
want or understand, press and hold the customization
button and the trip information button at the same
time. The DIC will begin scrolling through the languages
in their particular language. English will be in English,
Francais will be in French and Espanol will be in
Spanish. When you see the language that you would
like, release both buttons. The DIC will then display the
information in the language you chose.
3-68
Page 207 of 470
You can also scroll through the different languages
by pressing and holding the trip reset stem for
four seconds, as long as you are in the odometer mode.
Display Units
Press the customization button until DISPLAY UNITS
appears in the display. To select English or metric, press
the select button while DISPLAY UNITS is displayed
on the DIC. Pressing the select button will scroll through
the following choices:
DISPLAY UNITS: ENGLISH
DISPLAY UNITS: METRIC
If you choose English, all information will be displayed
in English units. For example, distance in miles and fuel
economy in miles per gallon.
Choose one of the available options and press the
customization button while it is displayed on the DIC to
select it and end out of the customizable options.
Audio System(s)
Notice:Before adding any sound equipment to
your vehicle, such as an audio system, CD player,
CB radio, mobile telephone, or two-way radio, make
sure that it can be added by checking with your
dealer. Also, check federal rules covering mobile
radio and telephone units. If sound equipment can
be added, it is very important to do it properly.
Added sound equipment may interfere with
the operation of your vehicle’s engine, radio, or
other systems, and even damage them. Your
vehicle’s systems may interfere with the operation
of sound equipment that has been added.
Figure out which audio system is in your vehicle, �nd
out what your audio system can do, and how to operate
all of its controls.
Your vehicle has a feature called Retained Accessory
Power (RAP). With RAP, the audio system can be
played even after the ignition is turned off. SeeRetained
Accessory Power (RAP) on page 2-19for more
information.
3-69
Page 215 of 470
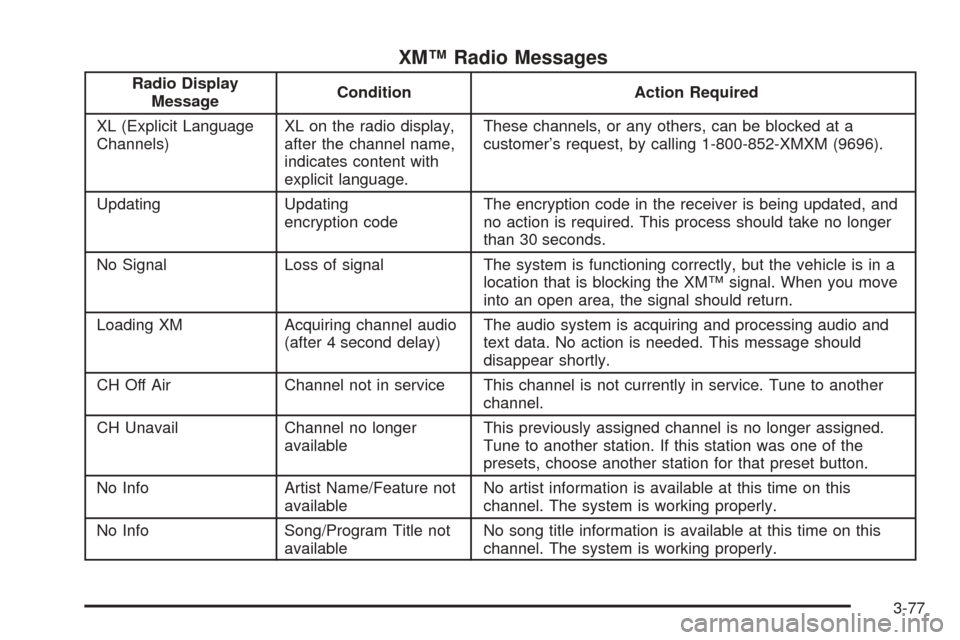
XM™ Radio Messages
Radio Display
MessageCondition Action Required
XL (Explicit Language
Channels)XL on the radio display,
after the channel name,
indicates content with
explicit language.These channels, or any others, can be blocked at a
customer’s request, by calling 1-800-852-XMXM (9696).
Updating Updating
encryption codeThe encryption code in the receiver is being updated, and
no action is required. This process should take no longer
than 30 seconds.
No Signal Loss of signal The system is functioning correctly, but the vehicle is in a
location that is blocking the XM™ signal. When you move
into an open area, the signal should return.
Loading XM Acquiring channel audio
(after 4 second delay)The audio system is acquiring and processing audio and
text data. No action is needed. This message should
disappear shortly.
CH Off Air Channel not in service This channel is not currently in service. Tune to another
channel.
CH Unavail Channel no longer
availableThis previously assigned channel is no longer assigned.
Tune to another station. If this station was one of the
presets, choose another station for that preset button.
No Info Artist Name/Feature not
availableNo artist information is available at this time on this
channel. The system is working properly.
No Info Song/Program Title not
availableNo song title information is available at this time on this
channel. The system is working properly.
3-77
Page 232 of 470
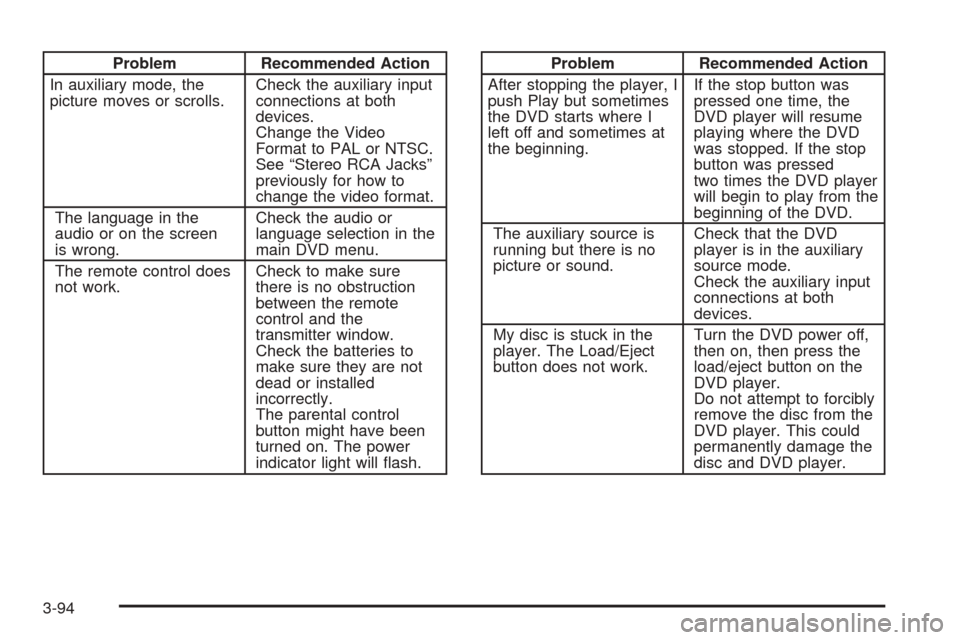
Problem Recommended Action
In auxiliary mode, the
picture moves or scrolls.Check the auxiliary input
connections at both
devices.
Change the Video
Format to PAL or NTSC.
See “Stereo RCA Jacks”
previously for how to
change the video format.
The language in the
audio or on the screen
is wrong.Check the audio or
language selection in the
main DVD menu.
The remote control does
not work.Check to make sure
there is no obstruction
between the remote
control and the
transmitter window.
Check the batteries to
make sure they are not
dead or installed
incorrectly.
The parental control
button might have been
turned on. The power
indicator light will �ash.Problem Recommended Action
After stopping the player, I
push Play but sometimes
the DVD starts where I
left off and sometimes at
the beginning.If the stop button was
pressed one time, the
DVD player will resume
playing where the DVD
was stopped. If the stop
button was pressed
two times the DVD player
will begin to play from the
beginning of the DVD.
The auxiliary source is
running but there is no
picture or sound.Check that the DVD
player is in the auxiliary
source mode.
Check the auxiliary input
connections at both
devices.
My disc is stuck in the
player. The Load/Eject
button does not work.Turn the DVD power off,
then on, then press the
load/eject button on the
DVD player.
Do not attempt to forcibly
remove the disc from the
DVD player. This could
permanently damage the
disc and DVD player.
3-94