service indicator CADILLAC ESCALADE ESV 2006 2.G Owners Manual
[x] Cancel search | Manufacturer: CADILLAC, Model Year: 2006, Model line: ESCALADE ESV, Model: CADILLAC ESCALADE ESV 2006 2.GPages: 484, PDF Size: 2.84 MB
Page 1 of 484

Seats and Restraint Systems........................... 1-1
Front Seats
............................................... 1-3
Rear Seats
............................................... 1-9
Safety Belts
.............................................1-29
Child Restraints
.......................................1-49
Airbag System
.........................................1-76
Restraint System Check
............................1-89
Features and Controls..................................... 2-1
Keys
........................................................ 2-3
Doors and Locks
....................................... 2-8
Windows
.................................................2-12
Theft-Deterrent Systems
............................2-14
Starting and Operating Your Vehicle
...........2-16
Mirrors
....................................................2-28
OnStar
®System
......................................2-36
Universal Home Remote System
................2-38
Storage Areas
.........................................2-42
Sunroof
..................................................2-46
Vehicle Personalization
.............................2-47
Instrument Panel............................................. 3-1
Instrument Panel Overview
.......................... 3-4
Climate Controls
......................................3-24
Warning Lights, Gages, and Indicators
........3-32
Driver Information Center (DIC)
..................3-50
Audio System(s)
.......................................3-69Driving Your Vehicle....................................... 4-1
Your Driving, the Road, and Your Vehicle
..... 4-2
Towing
...................................................4-53
Service and Appearance Care.......................... 5-1
Service
..................................................... 5-3
Fuel
......................................................... 5-4
Checking Things Under the Hood
................. 5-8
All-Wheel Drive
........................................5-43
Rear Axle
...............................................5-44
Front Axle
...............................................5-45
Headlamp Aiming
.....................................5-46
Bulb Replacement
....................................5-49
Windshield Wiper Blade Replacement
.........5-56
Tires
......................................................5-57
Appearance Care
.....................................5-97
Vehicle Identi�cation
...............................5-105
Electrical System
....................................5-106
Capacities and Speci�cations
...................5-116
Maintenance Schedule..................................... 6-1
Maintenance Schedule
................................ 6-2
Customer Assistance and Information.............. 7-1
Customer Assistance and Information
........... 7-2
Reporting Safety Defects
...........................7-14
Index.................................................................1
2006 Cadillac Escalade, Escalade ESV Owner ManualM
Page 135 of 484

This device complies with RSS-210 of Industry Canada.
Operation is subject to the following two conditions:
1. This device may not cause interference.
2. This device must accept any interference received,
including interference that may cause undesired
operation of the device.
Changes and modi�cations to this system by other than
an authorized service facility could void authorization
to use this equipment.
Universal Home Remote System
Operation
Do not use the Universal Home Remote with any
garage door opener that does not have the stop and
reverse feature. This includes any garage door opener
model manufactured before April 1, 1982. If you
have a newer garage door opener with rolling codes,
please be sure to follow Steps 6 through 8 to complete
the programming of your Universal Home Remote
Transmitter.
Read the instructions completely before attempting to
program the Universal Home Remote. Because of
the steps involved, it may be helpful to have another
person available to assist you in the programming steps.Keep the original hand-held transmitter for use in other
vehicles as well as for future Universal Home Remote
programming. It is also recommended that upon the
sale of the vehicle, the programmed Universal Home
Remote buttons should be erased for security purposes.
See “Erasing Universal Home Remote Buttons” later
in this section or, for assistance, seeCustomer
Assistance Offices on page 7-4.
Be sure that people and objects are clear of the garage
door or gate operator you are programming. When
programming a garage door, it is advised to park outside
of the garage.
It is recommended that a new battery be installed in
your hand-held transmitter for quicker and more
accurate transmission of the radio-frequency signal.
Programming Universal Home Remote
Follow these steps to program up to three channels:
1. Press and hold down the two outside Universal
Home Remote buttons, releasing only when the
Universal Home Remote indicator light begins
to �ash, after 20 seconds. Do not hold down the
buttons for longer than 30 seconds and do not
repeat this step to program a second and/or
third hand-held transmitter to the remaining
two Universal Home Remote buttons.
2-39
Page 181 of 484

Your vehicle has a rear seat that will accommodate a
rear-facing child restraint. A label on your sun visor says,
“Never put a rear-facing child seat in the front.” This
is because the risk to the rear-facing child is so great, if
the airbag deploys.
{CAUTION:
Even though the passenger sensing system is
designed to turn off the passenger’s frontal
airbag if the system detects a rear-facing child
restraint, no system is failsafe, and no one can
guarantee that an airbag will not deploy under
some unusual circumstance, even though it is
turned off. We recommend that rear-facing
child restraints be secured in the rear seat,
even if the airbag is off.If the word OFF or the off symbol is lit on the airbag
status indicator, it means that the passenger sensing
system has turned off the right front passenger’s frontal
airbag. SeePassenger Sensing System on page 1-84
for more on this, including important safety information.
If, after several seconds, all status indicator lights
remain on, or if there are no lights at all, there may be
a problem with the lights or the passenger sensing
system. See your dealer for service.
{CAUTION:
If the off indicator and the airbag readiness
light ever come on together, it means that
something may be wrong with the airbag
system. If this ever happens, have the vehicle
serviced promptly, because an adult-size
person sitting in the right front passenger seat
may not have the protection of the frontal
airbag. SeeAirbag Readiness Light on
page 3-35.
3-37
Page 188 of 484

Malfunction Indicator Lamp
Check Engine Light
Your vehicle has a
computer which monitors
operation of the fuel,
ignition, and emission
control systems.
This system is called OBD II (On-Board
Diagnostics-Second Generation) and is intended to
assure that emissions are at acceptable levels for the
life of the vehicle, helping to produce a cleaner
environment. The check engine light comes on to
indicate that there is a problem and service is required.
Malfunctions often will be indicated by the system
before any problem is apparent. This may prevent more
serious damage to your vehicle. This system is also
designed to assist your service technician in correctly
diagnosing any malfunction.
Notice:If you keep driving your vehicle with this
light on, after awhile, your emission controls
may not work as well, your fuel economy may not
be as good, and your engine may not run as
smoothly. This could lead to costly repairs that may
not be covered by your warranty.Notice:Modi�cations made to the engine,
transmission, exhaust, intake, or fuel system of
your vehicle or the replacement of the original tires
with other than those of the same Tire Performance
Criteria (TPC) can affect your vehicle’s emission
controls and may cause this light to come on.
Modi�cations to these systems could lead to costly
repairs not covered by your warranty. This may
also result in a failure to pass a required Emission
Inspection/Maintenance test. SeeAccessories
and Modifications on page 5-3.
This light should come on, as a check to show you it is
working, when the ignition is on and the engine is
not running. If the light does not come on, have it
repaired. This light will also come on during a
malfunction in one of two ways:
Light Flashing— A mis�re condition has been
detected. A mis�re increases vehicle emissions
and may damage the emission control system on
your vehicle. Diagnosis and service may be
required.
Light On Steady— An emission control system
malfunction has been detected on your vehicle.
Diagnosis and service may be required.
3-44
Page 205 of 484

STABILITY SYS (System) DISABLED
The STABILITY SYS DISABLED message will turn on
when you press the StabiliTrak®button, or when
the stability control has been automatically disabled.
There are four conditions that can cause this message
to appear.
One condition is overheating, which could occur if
StabiliTrak®activates continuously for an extended
period of time.
The message will also be displayed if the brake
system warning light is on. SeeBrake System
Warning Light on page 3-39.
The message could be displayed if the stability
system takes longer than usual to complete its
diagnostic checks due to driving conditions.
Also, if an engine or vehicle related problem has
been detected, and the vehicle needs service,
the message will appear. See your GM dealer.
The message will turn off as soon as the conditions that
caused the message to be displayed are no longer
present.
For more information on the StabiliTrak
®system, see
StabiliTrak®System on page 4-9.
TIGHTEN FUEL CAP
If the vehicle’s fuel cap is not tightened properly this
message may appear along with the check engine light
on the instrument panel. SeeMalfunction Indicator
Lamp on page 3-44. Reinstall the fuel cap, making
sure to fully install the cap. SeeFilling the Tank
on page 5-6. The diagnostic system can determine if
the fuel cap has been left off or improperly installed.
A loose or missing fuel cap will allow fuel to evaporate
into the atmosphere. A few driving trips with the cap
properly installed should turn the light and message off.
TRACTION ACTIVE
When the traction control system has detected that
any of the vehicle’s wheels are slipping, the traction
control system will activate and this message will appear
on the DIC. SeeStabiliTrak
®System on page 4-9for
more information.
TRACTION SYS (System) LIMITED
If the brake traction control system activates constantly
or if the brakes have heated up due to high-speed
braking, brake traction control will be disabled and the
TRACTION SYS LIMITED message will be displayed.
The system will return to normal operation after the
brakes have cooled. SeeStabiliTrak
®System on
page 4-9for more information.
3-61
Page 249 of 484

When cleaning the cassette tape player with the
recommended non-abrasive cleaning cassette, it is
possible that the cassette may eject, because the cut
tape detection feature on the radio may recognize it as a
broken tape, in error. To prevent the cleaning cassette
from being ejected, use the following steps:
1. Turn the ignition on.
2. Turn the radio off.
3. Press and hold the TAPE DISC button for �ve
seconds. READY will appear on the display and
the cassette symbol will �ash for �ve seconds.
4. Insert the scrubbing action cleaning cassette.
5. Eject the cleaning cassette after the manufacturer’s
recommended cleaning time.
When the cleaning cassette has been ejected, the
cut tape detection feature will be active again.
A non-scrubbing action, wet-type cleaner which uses a
cassette with a fabric belt to clean the tape head
can be used. This type of cleaning cassette will not
eject on its own. A non-scrubbing action cleaner may not
clean as thoroughly as the scrubbing type cleaner.
The use of a non-scrubbing action, dry-type cleaning
cassette is not recommended.
After the player is cleaned, press and hold the eject
button for �ve seconds to reset the CLEAN indicator.
The radio will display --- or CLEANED to show the
indicator was reset.Cassettes are subject to wear and the sound quality
may degrade over time. Always make sure the cassette
tape is in good condition before the tape player is
serviced.
Care of Your CDs and DVDs
Handle CDs carefully. Store them in their original cases
or other protective cases and away from direct
sunlight and dust. The CD player scans the bottom
surface of the disc. If the surface of a CD is damaged,
such as cracked, broken, or scratched, the CD will
not play properly or not at all. If the surface of a CD is
soiled, take a soft, lint free cloth or dampen a clean, soft
cloth in a mild, neutral detergent solution mixed with
water, and clean it. Make sure the wiping process starts
from the center to the edge.
Do not touch the bottom side of a CD while handling it;
this could damage the surface. Pick up CDs by
grasping the outer edges or the edge of the hole and
the outer edge.
Care of the CD and DVD Player
The use of CD lens cleaners for CDs is not advised,
due to the risk of contaminating the lens of the CD optics
with lubricants internal to the CD mechanism.
3-105
Page 323 of 484

Otherwise, you might damage your engine. If you are
using gasoline rated at 87 octane or higher and you hear
heavy knocking, your engine needs service.
Gasoline Speci�cations
At a minimum, gasoline should meet ASTM
speci�cation D 4814 in the United States or
CAN/CGSB-3.5 in Canada. Some gasolines may
contain an octane-enhancing additive called
methylcyclopentadienyl manganese tricarbonyl (MMT).
General Motors recommends against the use of
gasolines containing MMT. SeeAdditives on page 5-5
for additional information.
California Fuel
If your vehicle is certi�ed to meet California Emissions
Standards, it is designed to operate on fuels that meet
California speci�cations. See the underhood emission
control label. If this fuel is not available in states adopting
California emissions standards, your vehicle will operate
satisfactorily on fuels meeting federal speci�cations,
but emission control system performance may be
affected. The malfunction indicator lamp may turn on
and your vehicle may fail a smog-check test.
SeeMalfunction Indicator Lamp on page 3-44.If this occurs, return to your authorized GM dealer for
diagnosis. If it is determined that the condition is caused
by the type of fuel used, repairs may not be covered by
your warranty.
Additives
To provide cleaner air, all gasolines in the United States
are now required to contain additives that will help
prevent engine and fuel system deposits from forming,
allowing your emission control system to work
properly. In most cases, you should not have to add
anything to your fuel. However, some gasolines contain
only the minimum amount of additive required to
meet U.S. Environmental Protection Agency regulations.
To help keep fuel injectors and intake valves clean,
or if your vehicle experiences problems due to
dirty injectors or valves, look for gasoline that is
advertised as TOP TIER Detergent Gasoline. Also, your
GM dealer has additives that will help correct and
prevent most deposit-related problems.
Gasolines containing oxygenates, such as ethers and
ethanol, and reformulated gasolines may be available in
your area. General Motors recommends that you use
these gasolines if they comply with the speci�cations
described earlier. However, E85 (85% ethanol)
and other fuels containing more than 10% ethanol must
not be used in vehicles that were not designed for
those fuels.
5-5
Page 324 of 484

Notice:Your vehicle was not designed for fuel that
contains methanol. Do not use fuel containing
methanol. It can corrode metal parts in your fuel
system and also damage the plastic and rubber
parts. That damage would not be covered under
your warranty.
Some gasolines that are not reformulated for low
emissions may contain an octane-enhancing additive
called methylcyclopentadienyl manganese tricarbonyl
(MMT); ask the attendant where you buy gasoline
whether the fuel contains MMT. General Motors
recommends against the use of such gasolines. Fuels
containing MMT can reduce the life of spark plugs
and the performance of the emission control system may
be affected. The malfunction indicator lamp may turn
on. If this occurs, return to your authorized GM dealer for
service.
Fuels in Foreign Countries
If you plan on driving in another country outside the
United States or Canada, the proper fuel may be hard
to �nd. Never use leaded gasoline or any other fuel
not recommended in the previous text on fuel. Costly
repairs caused by use of improper fuel would not
be covered by your warranty.
To check the fuel availability, ask an auto club, or
contact a major oil company that does business in the
country where you will be driving.
Filling the Tank
{CAUTION:
Fuel vapor burns violently and a fuel �re can
cause bad injuries. To help avoid injuries to
you and others, read and follow all the
instructions on the pump island. Turn off your
engine when you are refueling. Do not smoke
if you are near fuel or refueling your vehicle.
Keep sparks, �ames, and smoking materials
away from fuel. Do not leave the fuel pump
unattended when refueling your vehicle — this
is against the law in some places. Keep
children away from the fuel pump; never let
children pump fuel.
The tethered fuel cap is located behind a hinged fuel
door on the driver’s side of the vehicle.
To remove the fuel cap, turn it slowly counterclockwise.
It will require more effort to turn the fuel cap on the
last turn as you loosen it.
5-6
Page 354 of 484

Brake Wear
Your vehicle has four-wheel disc brakes.
Disc brake pads have built-in wear indicators that make
a high-pitched warning sound when the brake pads
are worn and new pads are needed. The sound
may come and go or be heard all the time your vehicle
is moving, except when you are pushing on the
brake pedal �rmly.
{CAUTION:
The brake wear warning sound means that
soon your brakes will not work well. That
could lead to an accident. When you hear the
brake wear warning sound, have your vehicle
serviced.
Notice:Continuing to drive with worn-out brake
pads could result in costly brake repair.Some driving conditions or climates may cause a brake
squeal when the brakes are �rst applied or lightly
applied. This does not mean something is wrong with
your brakes.
Properly torqued wheel nuts are necessary to help
prevent brake pulsation. When tires are rotated, inspect
brake pads for wear and evenly tighten wheel nuts in
the proper sequence to GM torque speci�cations.
Brake linings should always be replaced as complete
axle sets.
Brake Pedal Travel
See your dealer if the brake pedal does not return to
normal height, or if there is a rapid increase in
pedal travel. This could be a sign of brake trouble.
Brake Adjustment
Every time you make a brake stop, your disc brakes
adjust for wear.
5-36
Page 364 of 484

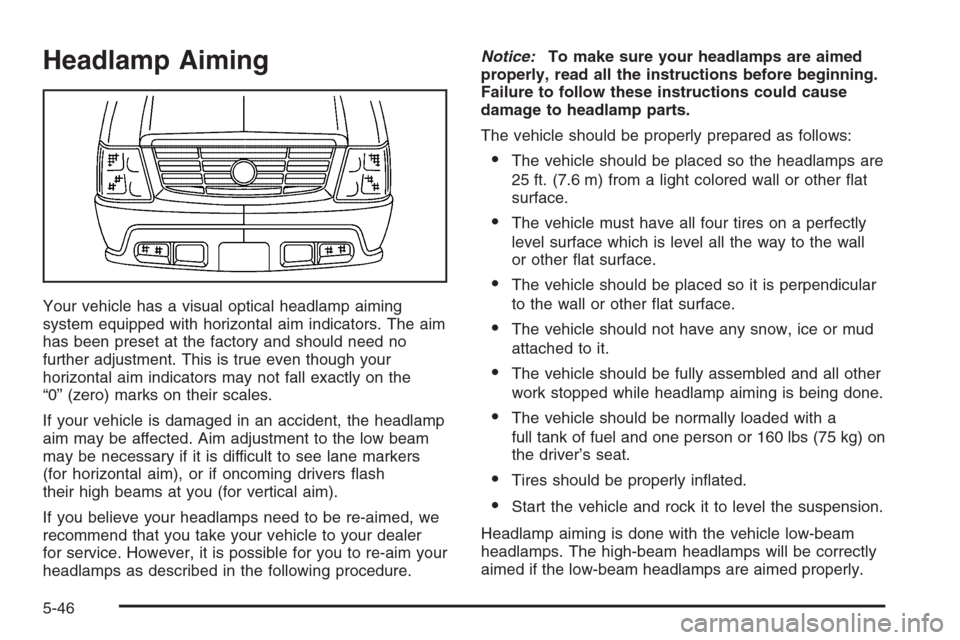
Headlamp Aiming
Your vehicle has a visual optical headlamp aiming
system equipped with horizontal aim indicators. The aim
has been preset at the factory and should need no
further adjustment. This is true even though your
horizontal aim indicators may not fall exactly on the
“0” (zero) marks on their scales.
If your vehicle is damaged in an accident, the headlamp
aim may be affected. Aim adjustment to the low beam
may be necessary if it is difficult to see lane markers
(for horizontal aim), or if oncoming drivers �ash
their high beams at you (for vertical aim).
If you believe your headlamps need to be re-aimed, we
recommend that you take your vehicle to your dealer
for service. However, it is possible for you to re-aim your
headlamps as described in the following procedure.Notice:To make sure your headlamps are aimed
properly, read all the instructions before beginning.
Failure to follow these instructions could cause
damage to headlamp parts.
The vehicle should be properly prepared as follows:
The vehicle should be placed so the headlamps are
25 ft. (7.6 m) from a light colored wall or other �at
surface.
The vehicle must have all four tires on a perfectly
level surface which is level all the way to the wall
or other �at surface.
The vehicle should be placed so it is perpendicular
to the wall or other �at surface.
The vehicle should not have any snow, ice or mud
attached to it.
The vehicle should be fully assembled and all other
work stopped while headlamp aiming is being done.
The vehicle should be normally loaded with a
full tank of fuel and one person or 160 lbs (75 kg) on
the driver’s seat.
Tires should be properly in�ated.
Start the vehicle and rock it to level the suspension.
Headlamp aiming is done with the vehicle low-beam
headlamps. The high-beam headlamps will be correctly
aimed if the low-beam headlamps are aimed properly.
5-46