buttons CADILLAC ESCALADE ESV 2007 2.G Owner's Guide
[x] Cancel search | Manufacturer: CADILLAC, Model Year: 2007, Model line: ESCALADE ESV, Model: CADILLAC ESCALADE ESV 2007 2.GPages: 574, PDF Size: 2.89 MB
Page 292 of 574
F6 DISP (Display):Press this pushbutton to
display the time of the track. Press this pushbutton
again to display CD PLAY MODE.
©or¨(Seek):Press the left single arrow
button to go to the start of the current track. Press
it again to go to the previous track, or press the
right single arrow button to go to the next
track. Press the right arrow to go to the start of
the next track. Pressing either arrow for more than
two seconds will search the previous or next
tracks at two tracks per second. Release
the button to stop searching and to play the track.
©¨(Scan):Press the double arrow button
to scan the tracks in each folder. The radio will go
to the next track, play for 10 seconds, and then
go on to the next track. Press this button again to
stop scanning.
w(Tune):Turning the tune knob will fast track
reverse or advance through the tracks in all
folders or playlists. The track number and �le
name will appear on the display for each track.
Turning this knob while in random will fast
track reverse or advance the tracks in sequential
order.
4(Information):Press this button, while an MP3
CD is loaded, to view the Title, Artist, Album,
or Folder names. To view this information, perform
the following:
1. Press the tune/sel knob to enter the
main menu.
2. Turn the tune/sel knob until INFO appears on
the display.
3. Press the tune/sel knob to select INFO. The
display will change to show the additional
MP3 information.
4. Press one of the following pushbuttons to
view that speci�c information.
F1 TTLE (Title):To display the title name.
F2 ATST (Artist):To display the artist name.
F3 ALBM (Album):To display the
album name.
F4 FLDR (Folder):To display the
folder name.
5. Press the BACK (F6) button to exit the
display. To return to the original display,
repeatedly press the BACK (F6) button or
wait for the display to time out.
292
Page 294 of 574

Using the DVD Player
Insert a disc partway into the slot, label side up.
The player will pull it in. If the ignition and the radio
are on, the CD or DVD will begin playing. A
DVD may be loaded with the radio off, but it will
not start playing until the radio is on, and sourced
to DVD. The DVD player can be controlled by
the buttons on the radio, the rear seat audio
system, and the remote control, if your vehicle has
this feature. See theRear Seat Entertainment
System on page 303for more information. A DVD
icon will display whenever a disc is loaded. The
DVD player can also be run for passengers in
the rear seat with the radio off. The rear seat
passenger can power on the video screen and
use the remote control to navigate the disc.
SeeRear Seat Entertainment System on page 303
for more information.
Z(Eject):Press this button to eject the DVD or
CD. Eject may be activated with the ignition or
radio off. If the disc is not removed after a
short time, the disc will be pulled back into the
DVD player for storage.The DVD player is only compatible with DVDs of
the appropriate region code. The region code
is printed on the jacket of most DVDs.
DVD video, DVD audio, DVD-R/RW, and
DVD + R/RW are fully supported by this DVD
player. In addition, standard audio CDs, CD-R,
CD-RW, video CD, SACD, MP3, and WMA
formatted discs are fully supported. If a disc is
inserted that is not supported, an error message
will display and the disc will be ejected.
When a DVD is inserted, the DVD functions will
appear on the display above the pushbuttons,
in place of the preset stations. These functions
vary based on the type of disc that is inserted.
Loading the disc can take some time as the DVD
player reads the disc and determines the type.
DVD Messages
If the disc comes out, it could be for one of the
following reasons:
It is very hot. When the temperature returns to
normal, the disc should play.
You are driving on a very rough road.
When the road becomes smoother, the disc
should play.
294
Page 296 of 574
Press and hold this pushbutton, if the DVD is
playing, to enter slow forward mode. Holding the
pushbutton will play at half the normal speed. After
holding it for more than four seconds it will play
at an eighth the normal speed. Release the
pushbutton to return to the pause state.
F6 (Menu):Press this pushbutton to go to the
DVD root menu and to bring up the menu
navigation arrows. Pressing keys F1 through F4
will move the cursor to navigate the DVD
menu. Press F6 to enter your selection.
©or¨(Seek):Press the left single arrow
button to go to the start of the current chapter.
Press it again to go to the previous chapter,
or press the right single arrow button to go to the
next chapter. Press and hold these buttons to
change chapter at a rate of one per second.
TUNE/SEL knob:Turn to the left one notch to go
to the start of the current chapter. Turn it again
to go to the previous chapter, or turn to the
right one notch to go to the next chapter.
INFO:Press the programmed INFO soft key, or
press the TUNE/SEL knob and rotate until INFO is
shown, and then press the TUNE/SEL knob.Pressing INFO brings up the Information display.
It shows the current Title number, Chapter
number and elapsed time of the DVD, and
additional menu items.
F1 SUB:Press this pushbutton to view the
Subtitle Language Menu.
F2 ANGLE:Press this pushbutton to view the
Angle Menu.
F6 BACK:Press this pushbutton to return to
the previous screen.
Playing a DVD Audio Disc
Not all DVD audio discs are recorded to industry
standards and for this reason may not play
properly in your vehicle.
F1 (Play/Pause):Press this pushbutton to pause
the DVD if it is playing. Press Play (F1) to
restart the DVD if it is paused.
F2 (Stop):Press this pushbutton once to stop the
DVD and retain your current position. Press it
again from the stopped state to return to the
beginning of the disc.
296
Page 297 of 574
F3 (Reverse):Press and hold this pushbutton, if
the DVD player is playing, to enter fast reverse
mode. Holding the pushbutton will play in reverse
at four times the normal speed. After holding it
for more than four seconds it will play in reverse at
32 times the normal speed. Release the
pushbutton to return to normal play mode.
F4 (Forward):Press and hold this pushbutton, if
the DVD player is playing, to enter fast forward
mode. Holding the pushbutton will play at
four times the normal speed. After holding it for
more than four seconds it will play in reverse
at 32 times the normal speed. Release the
pushbutton to return to normal play mode.
F5 MODE:Press this pushbutton to select from
NORMAL, and RPT TRCK.
Normal:Sets the system for normal play of
the DVD.
RPT TRCK (Repeat Track):Repeats the
track over again. RPT TRCK will appear on the
display. Press the MODE pushbutton again
to turn off repeat play and advance to the
next mode.F6 DISP (Display):Press this pushbutton to
display the time of the track. Press this pushbutton
again to display DVD PLAY MODE.
©or¨(Seek):Press the left single arrow
button to go to the start of the current track. Press
it again to go to the previous track, or press the
right single arrow button to go to the next
track. Press and hold these buttons to change
tracks at a rate of one per second.
TUNE/SEL knob:Turn to the left one notch to go
to the start of the current track. Turn it again to
go to the previous track, or turn to the right
one notch to go to the next track.
If your vehicle has rear seat entertainment,
you can view the menu and playlist from your
DVD audio disc on the video screen. Turn on
the video screen with the power button on
the remote control to view and navigate the menu
and playlists. SeeRear Seat Entertainment
System on page 303for more information.
297
Page 298 of 574
Playing a CD in the DVD Drive
F3 (Reverse):Press and hold this pushbutton to
enter fast reverse mode. Holding the pushbutton
will play in reverse at four times the normal speed.
After holding it for more than four seconds it will
play in reverse at 32 times the normal speed.
Release the pushbutton to return to normal
play mode.
F4 (Forward):Press and hold this pushbutton to
enter fast forward mode. Holding the pushbutton
will play at four times the normal speed. After
holding it for more than four seconds it will play
at 32 times the normal speed. Release the
pushbutton to return to normal play mode.
F5 MODE:Press this pushbutton to select from
NORMAL, RPT TRCK, and RDM TRCK.
Normal:Sets the system for normal play of
the DVD.
RPT TRCK (Repeat Track):Repeats the
track over again. RPT TRCK will appear on the
display. Press the MODE pushbutton again
to turn off repeat play and advance to the
next mode.
RDM TRCK (Random Track):Plays the
tracks on the current DVD in random,
rather than sequential order. RDM TRCK will
appear on the display. Press the MODE
pushbutton again to turn off random play and
advance to the next mode.
F6 DISP (Display):Press this pushbutton to
display the time of the track. Press this pushbutton
again to display CD PLAY MODE.
©or¨(Seek):Press the left single arrow
button to go to the start of the current track. Press
it again to go to the previous track, or press the
right single arrow button to go to the next
track. Press and hold these buttons to change
tracks at a rate of one per second.
TUNE/SEL knob:Turn to the left one notch to go
to the start of the current track. Turn it again to
go to the previous track, or turn to the right
one notch to go to the next track.
©¨(Scan):Press this double arrow button to
listen to each track for 10 seconds. The CD will go
to a track, play for 10 seconds, and then go on
to the next track. Press this button again to
stop scanning.
298
Page 300 of 574
©or¨(Seek):Press the left single arrow
button to go to the start of the current track. Press
it again to go to the previous track, or press
the right single arrow button to go to the next track.
Press and hold these buttons to change tracks
at a rate of one per second.
TUNE/SEL knob:Turn to the left one notch to go
to the start of the current track. Turn it again to
go to the previous track, or turn to the right
one notch to go to the next track.
©¨(Scan):Press this double arrow button to
listen to each track for 10 seconds. The CD will go
to a track, play for 10 seconds, and then go on
to the next track. Press this button again to
stop scanning.
If your vehicle is equipped with rear seat
entertainment, you can view the menu and playlist
from your CD on the video screen. Turn on the
video screen with the power button on the remote
control to view and navigate the menu and
playlists. SeeRear Seat Entertainment System on
page 303for more information.
Using the AUX Display (If Equipped)
If your vehicle has rear seat entertainment, you
will see an AUX screen as you press through the
SRCE key. When AUX is selected in the front,
the audio from the device plugged into the auxiliary
jacks in the rear will be played over the vehicle
speakers. You have the ability to select between
AUX and DVD video on the video screen while
listening to AUX audio. SeeRear Seat
Entertainment System on page 303for more
information on the auxiliary jacks.
SRCE (Source):Press this pushbutton to select
the AUX display.
F2 (DVD):Press this pushbutton to select DVD
video on the video screen in the rear, with
AUX audio on the vehicle speakers.
F5 (AUX):Press this pushbutton to select AUX
video on the video screen in the rear, with
AUX audio on the vehicle speakers.
300
Page 309 of 574

Remote Control
To use the remote control, aim it at the transmitter
window at the rear of the RSE overhead console
and press the desired button. Direct sunlight
or very bright light may affect the ability of the RSE
transmitter to receive signals from the remote
control. If the remote control does not seem to be
working, the batteries may need to be replaced.
See “Battery Replacement” later in this section.
Objects blocking the line of sight may also affect
the function of the remote control.
If a CD or DVD is in the Radio DVD slot, the
remote control power button can be used to turn
on the video screen display and start the disc. The
radio can also turn on the video screen display.
SeeRadio with CD and DVD on page 273
for more information.
If the remote control becomes lost or damaged, a
new universal remote control can be purchased.
If this happens, make sure the universal
remote control uses a code set of Toshiba
®.
Notice:Storing the remote control in a hot
area or in direct sunlight may damage it,
and the repairs will not be covered by your
warranty. Keep the remote control stored in a
cool, dry place.
Remote Control Buttons
O(Power):Press this button to turn the video
screen on and off.
P(Illumination):Press this button to turn the
remote control backlight on. The backlight will
automatically time out after 7 to 10 seconds if no
other button is pressed while the backlight is on.
v(Title):Press this button to return the DVD to
the main menu of the DVD. This function may
vary for each disc.
309
Page 310 of 574
y(Main Menu):Press this button to access the
DVD menu. The DVD menu is different on every
DVD. Use the up, down, left, and right arrow
buttons to move the cursor around the DVD menu.
After making a selection press the enter button.
This button only operates when using a DVD.
Q,R,q,r(Menu Navigation Arrows):Use
the arrow buttons to navigate through a menu.
r(Enter):Press this button to select the choice
that is highlighted in any menu.
z(Display Menu):Press this button to adjust
the brightness, screen display mode (normal,
full, or zoom), and display the language menu.
q(Return):Press this button to exit the current
active menu and return to the previous menu.
This button will operate only when the display
menu or a DVD menu is active.
c(Stop):Press this button to stop playing,
rewinding, or fast forwarding a DVD. Press this
button twice to return to the beginning of the DVD.
s(Play/Pause):Press this button to start
playing a DVD. Press this button while a DVD is
playing to pause it. Press it again to continue
playing the DVD.
When the DVD is playing, depending on the radio,
you may be able to do slow play by pressing
the pause button then pressing the fast forward
button. The DVD will continue playing in a
slow play mode. You may also, depending on the
radio, perform reverse slow play by pressing
the pause button and then pressing the fast
reverse button. To cancel slow play mode, press
the play/pause button.
t(Previous Track/Chapter):Press this button
to return to the start of the current track or
chapter. Press this button again to go to the
previous track or chapter. This button may
not work when the DVD is playing the copyright
information or the previews.
u(Next Track/Chapter):Press this button to go
to the beginning of the next chapter or track.
This button may not work when the DVD is playing
the copyright information or the previews.
310
Page 315 of 574
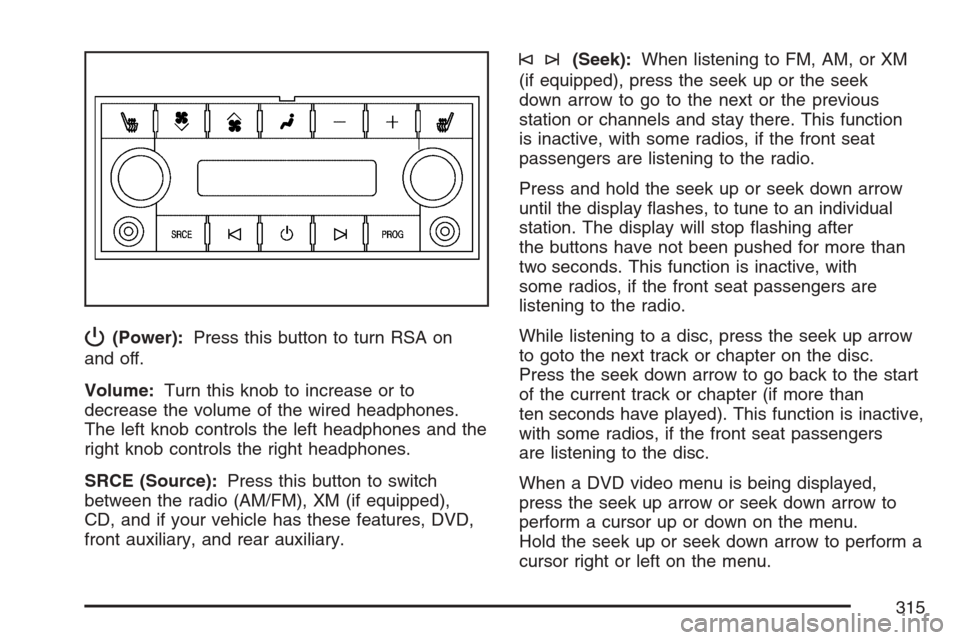
P(Power):Press this button to turn RSA on
and off.
Volume:Turn this knob to increase or to
decrease the volume of the wired headphones.
The left knob controls the left headphones and the
right knob controls the right headphones.
SRCE (Source):Press this button to switch
between the radio (AM/FM), XM (if equipped),
CD, and if your vehicle has these features, DVD,
front auxiliary, and rear auxiliary.
©¨(Seek):When listening to FM, AM, or XM
(if equipped), press the seek up or the seek
down arrow to go to the next or the previous
station or channels and stay there. This function
is inactive, with some radios, if the front seat
passengers are listening to the radio.
Press and hold the seek up or seek down arrow
until the display �ashes, to tune to an individual
station. The display will stop �ashing after
the buttons have not been pushed for more than
two seconds. This function is inactive, with
some radios, if the front seat passengers are
listening to the radio.
While listening to a disc, press the seek up arrow
to goto the next track or chapter on the disc.
Press the seek down arrow to go back to the start
of the current track or chapter (if more than
ten seconds have played). This function is inactive,
with some radios, if the front seat passengers
are listening to the disc.
When a DVD video menu is being displayed,
press the seek up arrow or seek down arrow to
perform a cursor up or down on the menu.
Hold the seek up or seek down arrow to perform a
cursor right or left on the menu.
315
Page 496 of 574
Appearance Care
Cleaning the Inside of Your Vehicle
Your vehicle’s interior will continue to look its
best if it is cleaned often. Although not always
visible, dust and dirt can accumulate on your
upholstery. Dirt can damage carpet, fabric, leather,
and plastic surfaces. Regular vacuuming is
recommended to remove particles from your
upholstery. It is important to keep your upholstery
from becoming and remaining heavily soiled.
Soils should be removed as quickly as possible.
Your vehicle’s interior may experience extremes of
heat that could cause stains to set rapidly.
Lighter colored interiors may require more frequent
cleaning. Use care because newspapers and
garments that transfer color to your home
furnishings may also transfer color to your
vehicle’s interior.
When cleaning your vehicle’s interior, only use
cleaners speci�cally designed for the surfaces
being cleaned. Permanent damage may result from
using cleaners on surfaces for which they were not
intended. Use glass cleaner only on glass. Remove
any accidental over-spray from other surfaces
immediately. To prevent over-spray, apply cleaner
directly to the cleaning cloth.Notice:If you use abrasive cleaners when
cleaning glass surfaces on your vehicle, you
could scratch the glass and/or cause damage
to the integrated radio antenna and the
rear window defogger. When cleaning the
glass on your vehicle, use only a soft cloth and
glass cleaner.
Many cleaners contain solvents that may become
concentrated in your vehicle’s breathing space.
Before using cleaners, read and adhere to
all safety instructions on the label. While cleaning
your vehicle’s interior, maintain adequate
ventilation by opening your vehicle’s doors and
windows.
Dust may be removed from small buttons and
knobs using a small brush with soft bristles.
Your GM dealer has a product for cleaning your
vehicle’s glass. Should it become necessary,
you can also obtain a product from your GM dealer
to remove odors from your vehicle’s upholstery.
496