fuse CADILLAC ESCALADE ESV 2011 Owners Manual
[x] Cancel search | Manufacturer: CADILLAC, Model Year: 2011, Model line: ESCALADE ESV, Model: CADILLAC ESCALADE ESV 2011Pages: 548, PDF Size: 8.45 MB
Page 5 of 548
Black plate (5,1)Cadillac Escalade/Escalade ESV Owner Manual - 2011
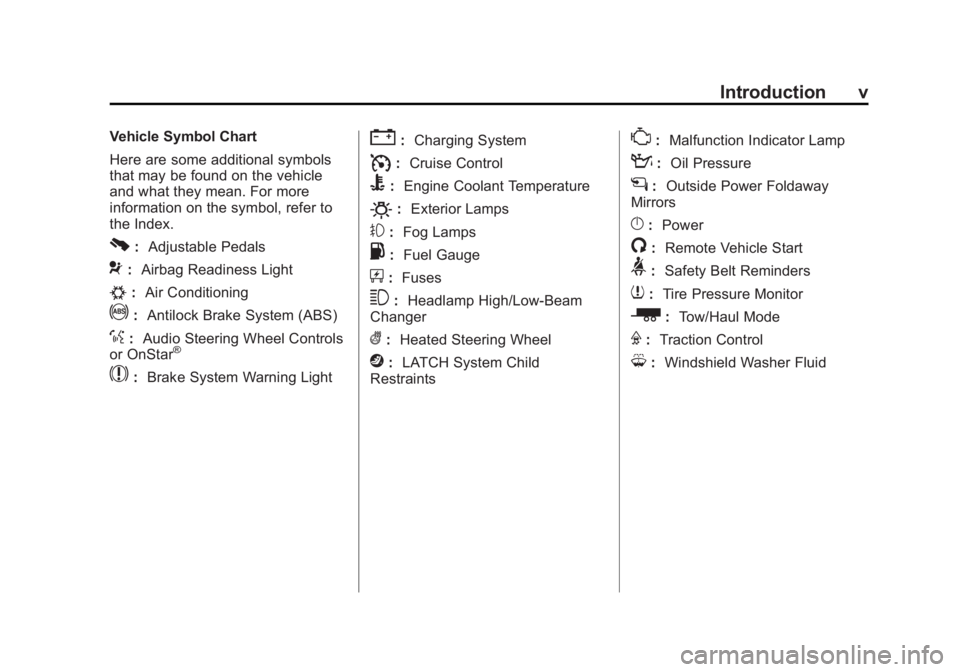
Introduction vVehicle Symbol Chart
Here are some additional symbols
that may be found on the vehicle
and what they mean. For more
information on the symbol, refer to
the Index.
0 : Adjustable Pedals
9 : Airbag Readiness Light
# : Air Conditioning
! : Antilock Brake System (ABS)
% : Audio Steering Wheel Controls
or OnStar ®
$ : Brake System Warning Light " : Charging System
I : Cruise Control
B : Engine Coolant Temperature
O : Exterior Lamps
# : Fog Lamps
. : Fuel Gauge
+ : Fuses
3 : Headlamp High/Low-Beam
Changer
( : Heated Steering Wheel
j : LATCH System Child
Restraints * : Malfunction Indicator Lamp
: : Oil Pressure
g : Outside Power Foldaway
Mirrors
} : Power
/ : Remote Vehicle Start
> : Safety Belt Reminders
7 : Tire Pressure Monitor
_ : Tow/Haul Mode
F : Traction Control
M : Windshield Washer Fluid
Page 46 of 548
Black plate (14,1)Cadillac Escalade/Escalade ESV Owner Manual - 2011
2-14 Keys, Doors and Windows Your vehicle's headlamps will flash
and the horn will sound for about
30 seconds, then will turn off to save
the battery power.
The theft-deterrent system will not
activate if the doors are locked with
the vehicle's key or the manual door
lock. It activates only if you use the
power door lock switch with the door
open or the RKE transmitter. You
should also remember that you can
start your vehicle with the correct
ignition key if the alarm has been
set off.
To avoid setting off the alarm by
accident: .
If you do not want to activate
the theft-deterrent system, the
vehicle should be locked with
the door key after the doors are
closed. .
Always unlock the doors with
the RKE transmitter. Unlocking a
door any other way will set off
the alarm if it is armed. If you set off the alarm by accident,
press unlock on the RKE transmitter
or place the key in the ignition and
turn it to START to turn off the
alarm. The alarm will not stop if you
try to unlock a door any other way.
Testing the Alarm To test the alarm:
1. From inside the vehicle, lower
the driver window and open the
driver door.
2. Activate the system by locking
the doors with the power door
lock switch while the door is
open, or with the RKE
transmitter.
3. Get out of the vehicle, close the
door and wait for the security
light to go out.
4. Then reach in through the
window, unlock the door with
the manual door lock and open
the door. This should set off the
alarm. While the alarm is set, the power
door unlock switch will not work.
If the alarm does not sound when
it should but the headlamps flash,
check to see if the horn works. The
horn fuse may be blown. To replace
the fuse, see Fuses and Circuit
Breakers on page 10 ‑ 39 .
If the alarm does not sound or the
headlamps do not flash, the vehicle
should be serviced by your dealer.
Immobilizer See Radio Frequency Statement on
page 13 ‑ 19 for information
regarding Part 15 of the Federal
Communications Commission (FCC)
rules and Industry Canada
Standards RSS-210/220/310.
Page 47 of 548

Black plate (15,1)Cadillac Escalade/Escalade ESV Owner Manual - 2011
Keys, Doors and Windows 2-15
Immobilizer Operation This vehicle has PASS-Key ®
III+
(Personalized Automotive Security
System) theft-deterrent system.
PASS-Key III+ is a passive
theft-deterrent system.
The system is automatically armed
when the key is removed from the
ignition.
The system is automatically
disarmed when the key is turned
to ON/RUN, ACC/ACCESSORY,
or START from the LOCK/OFF
position.
You do not have to manually arm or
disarm the system.
The security light will come on if
there is a problem with arming or
disarming the theft-deterrent
system.
When the PASS-Key III+ system
senses that someone is using the
wrong key, it prevents the vehicle
from starting. Anyone using a trial-and-error method to start the
vehicle will be discouraged because
of the high number of electrical key
codes.
If the engine does not start and the
security light on the instrument
panel cluster comes on when trying
to start the vehicle, there may be a
problem with the theft-deterrent
system. Turn the ignition off and try
again.
If the engine still does not start, and
the key appears to be undamaged,
try another ignition key. At this time,
you may also want to check the
fuse. See Fuses and Circuit
Breakers on page 10 ‑ 39 . If the
engine still does not start with the
other key, the vehicle needs service.
If the vehicle does start, the first key
may be faulty. See your dealer who
can service the PASS-Key III+ to
have a new key made.
It is possible for the PASS-Key III+
decoder to learn the transponder
value of a new or replacement key. Up to 10 keys may be programmed
for the vehicle. The following
procedure is for programming
additional keys only. If all the
currently programmed keys are lost
or do not operate, you must see
your dealer or a locksmith who can
service PASS-Key III+ to have keys
made and programmed to the
system.
See your dealer or a locksmith who
can service PASS-Key III+ to get a
new key blank cut exactly as the
ignition key that operates the
system.
To program the new additional key:
1. Verify that the new key has
a
1 stamped on it.
2. Insert the original, already
programmed key in the ignition
and start the engine. If the
engine will not start, see your
dealer for service.
Page 62 of 548
Black plate (6,1)Cadillac Escalade/Escalade ESV Owner Manual - 2011
3-6 Seats and Restraints A single beep sounds. The driver
seat moves back approximately
8 cm (3 in) and the power steering
column moves up and forward. To
move the seat back farther, press
the easy exit button again until the
seat is all the way back.
If something has blocked the driver
seat while recalling the exit position,
the recall may stop. Remove the
obstruction; then press and hold
the power seat control rearward for
two seconds. Try recalling the exit
position again. If the exit position is
still not recalling, see your dealer for
service.
See “ Easy Exit Recall ” and
“ Easy Exit Setup ” under Vehicle
Personalization on page 5 ‑ 40 for
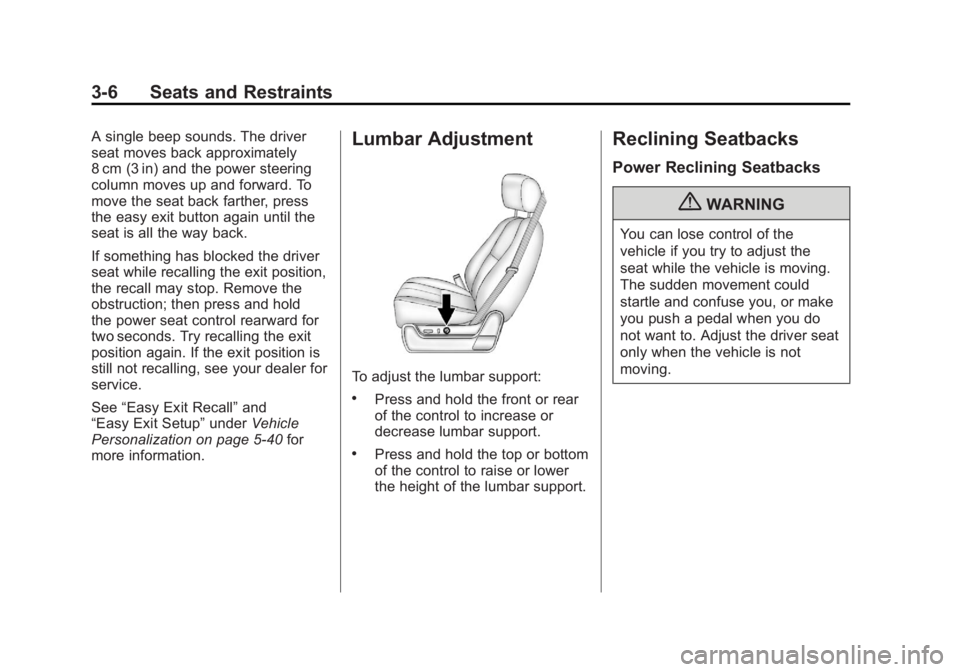
more information. Lumbar Adjustment
To adjust the lumbar support: .
Press and hold the front or rear
of the control to increase or
decrease lumbar support. .
Press and hold the top or bottom
of the control to raise or lower
the height of the lumbar support. Reclining Seatbacks Power Reclining Seatbacks
{ WARNINGYou can lose control of the
vehicle if you try to adjust the
seat while the vehicle is moving.
The sudden movement could
startle and confuse you, or make
you push a pedal when you do
not want to. Adjust the driver seat
only when the vehicle is not
moving.
Page 143 of 548

Black plate (9,1)Cadillac Escalade/Escalade ESV Owner Manual - 2011
Instruments and Controls 5-9
Power Outlets The accessory power outlets can be
used to plug in electrical equipment,
such as a cell phone or MP3 player.
The vehicle has three accessory
power outlets located: .
Inside the floor console
storage bin. .
On the rear of the floor console. .
In the rear cargo area on the
passenger side.
Remove the cover to use and
replace when not in use.
The accessory power outlets are
powered, even when the ignition is
in LOCK/OFF. Continuing to use
power outlets while the ignition is in
LOCK/OFF may cause the vehicle's
battery to run down. { WARNINGPower is always supplied to the
outlets. Do not leave electrical
equipment plugged in when the
vehicle is not in use because the
vehicle could catch fire and cause
injury or death.
Notice: Leaving electrical
equipment plugged in for an
extended period of time while
the vehicle is off will drain the
battery. Always unplug electrical
equipment when not in use and
do not plug in equipment that
exceeds the maximum 20 ampere
rating. Certain power accessory plugs
may not be compatible with the
accessory power outlet and could
overload adapter or vehicle fuses.
If a problem is experienced, see
your dealer.
When adding electrical equipment,
be sure to follow the proper
installation instructions included
with the equipment. Do not use
equipment exceeding the
maximum amperage rating of
20 amperes. See Add-On Electrical
Equipment on page 9 ‑ 82 .
Notice: Hanging heavy
equipment from the power outlet
can cause damage not covered
by the vehicle warranty. The
power outlets are designed for
accessory power plugs only, such
as cell phone charge cords.
Page 144 of 548

Black plate (10,1)Cadillac Escalade/Escalade ESV Owner Manual - 2011
5-10 Instruments and Controls Power Outlet 110 Volt
Alternative Current The vehicle may have a power
outlet that can be used to plug in
electrical equipment that uses a
maximum limit of 150 watts.
The power outlet is located on the
rear of the center console. An indicator light on the outlet turns
on to show it is in use. The light
comes on when the ignition is in
ON/RUN and equipment requiring
less than 150 watts is plugged into
the outlet, and no system fault is
detected.
If equipment is connected using
more than 150 watts or a system
fault is detected, a protection circuit
shuts off the power supply and the
indicator light turns off. To reset
the circuit, unplug the item and
plug it back in or turn the Remote
Accessory Power (RAP) off and
then back on. See Retained
Accessory Power (RAP) on
page 9 ‑ 35
The power outlet is not designed for
and may not work properly, if the
following are plugged in: .
Equipment with high initial
peak wattage such as:
compressor-driven refrigerators
and electric power tools. .
Other equipment requiring
an extremely stable
power supply such as:
microcomputer-controlled
electric blankets, touch
sensor lamps, etc.
Cigarette Lighter The cigarette lighter is located in the
center console near the cupholders.
Press on the access door to open it
and use the lighter.
To use the cigarette lighter, push it
in all the way, and let go. When it is
ready, it will pop back out by itself.
Notice: Holding a cigarette lighter
in while it is heating does not let
the lighter back away from the
heating element when it is hot.
Damage from overheating can
occur to the lighter or heating
element, or a fuse could be
blown. Do not hold a cigarette
lighter in while it is heating.
Page 199 of 548
Black plate (9,1)Cadillac Escalade/Escalade ESV Owner Manual - 2011
Lighting 6-9
Turn and Lane-Change
Signals
An arrow on the instrument panel
cluster flashes in the direction of the
turn or lane change.
Move the lever all the way up or
down to signal a turn.
Raise or lower the lever for less
than one second until the arrow
starts to flash to signal a lane
change. This causes the turn
signals to automatically flash three
times. It will flash six times if
tow-haul mode is active. Holding
the turn signal lever for more than
one second will cause the turn
signals to flash until you release
the lever. The lever returns to its starting
position whenever it is released.
If after signaling a turn or a lane
change the arrows flash rapidly or
do not come on, a signal bulb could
be burned out.
Have the bulbs replaced. If the bulb
is not burned out, check the fuse.
See Fuses and Circuit Breakers on
page 10 ‑ 39 .
Turn Signal On Chime
If the turn signal is left on for more
than 1.2 km (0.75 miles), a chime
will sound at each flash of the turn
signal and the message TURN
SIGNAL ON will also appear in the
Driver Information Control (DIC). To
turn the chime and message off,
move the turn signal lever to the off
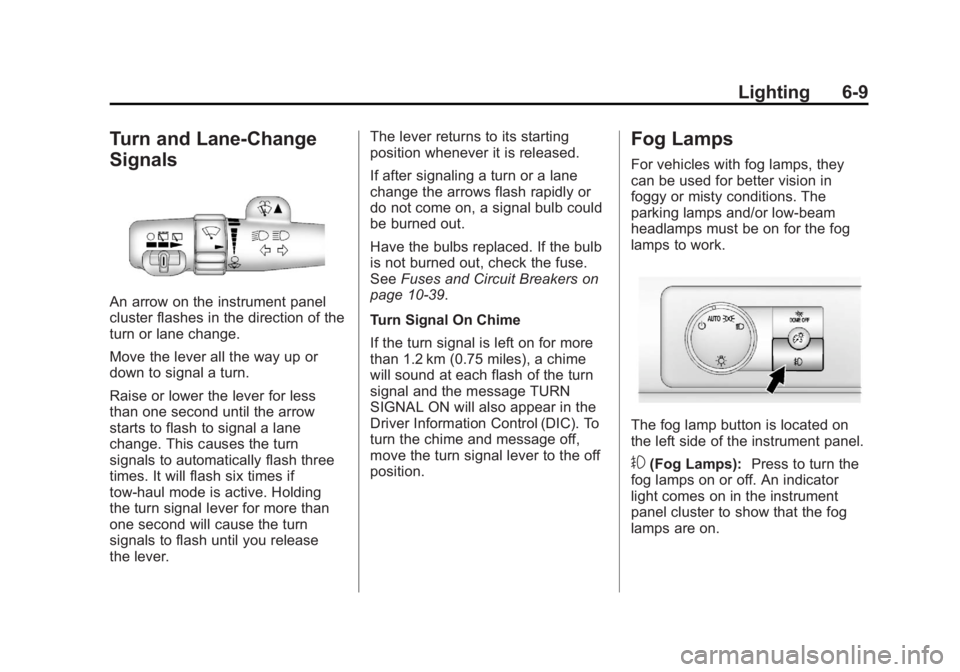
position. Fog Lamps For vehicles with fog lamps, they
can be used for better vision in
foggy or misty conditions. The
parking lamps and/or low-beam
headlamps must be on for the fog
lamps to work.
The fog lamp button is located on
the left side of the instrument panel.
# (Fog Lamps): Press to turn the
fog lamps on or off. An indicator
light comes on in the instrument
panel cluster to show that the fog
lamps are on.
Page 330 of 548

Black plate (10,1)Cadillac Escalade/Escalade ESV Owner Manual - 2011
9-10 Driving and Operating and urge every off-roader to follow
these basic rules for protecting the
environment: .
Always use established trails,
roads, and areas that have been
specially set aside for public
off-road recreational driving
and obey all posted regulations. .
Avoid any driving practice that
could damage shrubs, flowers,
trees, or grasses or disturb
wildlife. This includes
wheel-spinning, breaking
down trees, or unnecessary
driving through streams or
over soft ground. .
Always carry a litter bag and
make sure all refuse is removed
from any campsite before
leaving. .
Take extreme care with open
fires (where permitted), camp
stoves, and lanterns. .
Never park your vehicle over
dry grass or other combustible
materials that could catch fire
from the heat of the vehicle's
exhaust system.
Traveling to Remote Areas It makes sense to plan your trip,
especially when going to a remote
area. Know the terrain and plan
your route. Get accurate maps of
trails and terrain. Check to see if
there are any blocked or closed
roads.
It is also a good idea to travel with
at least one other vehicle in case
something happens to one of them.
For vehicles with a winch, be sure
to read the winch instructions. In a
remote area, a winch can be handy
if you get stuck but you will want to
know how to use it properly. Getting Familiar with Off-Road
Driving It is a good idea to practice in an
area that is safe and close to home
before you go into the wilderness.
Off-roading requires some new and
different skills.
Tune your senses to different kinds
of signals. Your eyes need to
constantly sweep the terrain for
unexpected obstacles. Your ears
need to listen for unusual tire or
engine sounds. Use your arms,
hands, feet, and body to respond
to vibrations and vehicle bounce.
Controlling the vehicle is the key to
successful off-road driving. One of
the best ways to control the vehicle
is to control the speed. At higher
speeds: .
You approach things faster and
have less time to react. .
There is less time to scan the
terrain for obstacles.
Page 355 of 548

Black plate (35,1)Cadillac Escalade/Escalade ESV Owner Manual - 2011
Driving and Operating 9-35
Engine Heater The engine coolant heater can
provide easier starting and better
fuel economy during engine
warm-up in cold weather conditions
at or below − 18°C (0°F). Vehicles
with an engine heater should be
plugged in at least four hours before
starting. An internal thermostat in
the plug-end of the cord may exist
which will prevent engine coolant
heater operation at temperatures
above − 18°C (0°F).
To Use the Engine Coolant
Heater 1. Turn off the engine.
2. Open the hood and unwrap
the electrical cord. The cord
is secured to the Engine
Compartment Fuse Block with a
clip. Carefully remove the wire
tie which secures the electrical
cord. Do not cut the
electrical cord.
3. Plug the cord into a normal,
grounded 110-volt AC outlet. { WARNINGPlugging the cord into an
ungrounded outlet could cause
an electrical shock. Also, the
wrong kind of extension cord
could overheat and cause a fire.
You could be seriously injured.
Plug the cord into a properly
grounded three-prong 110-volt
AC outlet. If the cord will not
reach, use a heavy-duty
three-prong extension cord rated
for at least 15 amps.
4. Before starting the engine, be
sure to unplug and store the
cord as it was before to keep it
away from moving engine parts.
If you do not, it could be
damaged.
The length of time the heater should
remain plugged in depends on
several factors. Ask a dealer in the
area where you will be parking the
vehicle for the best advice on this. Retained Accessory
Power (RAP) The following vehicle accessories
can be used for up to 10 minutes
after the engine is turned off: .
Audio System .
Power Windows .
OnStar System (if equipped) .
Sunroof (if equipped)
These features work when the key
is in ON/RUN or ACC/
ACCESSORY. Once the key is
turned from ON/RUN to LOCK/OFF,
the windows and sunroof continue
to work up to 10 minutes until any
door is opened. The radio continues
to work for up to 10 minutes or until
the driver door is opened.
Page 400 of 548
Black plate (80,1)Cadillac Escalade/Escalade ESV Owner Manual - 2011
9-80 Driving and Operating Safety Chains Always attach chains between the
vehicle and the trailer. Cross the
safety chains under the tongue
of the trailer to help prevent the
tongue from contacting the road
if it becomes separated from the
hitch. Instructions about safety
chains may be provided by the
hitch manufacturer or by the trailer
manufacturer. Safety chains should
be attached to holes on the trailer
hitch platform. Always leave just
enough slack so the combination
can turn. Never allow safety chains
to drag on the ground.
Trailer Brakes A loaded trailer that weighs more
than 900 kg (2,000 lbs) needs to
have its own brake system that is
adequate for the weight of the
trailer. Be sure to read and follow
the instructions for the trailer brakes
so they are installed, adjusted and
maintained properly. Since the vehicle is equipped with
StabiliTrak, the trailer brakes cannot
tap into the vehicle's hydraulic
system.
Trailer Wiring Harness Heavy-Duty Trailer Wiring Harness
Package
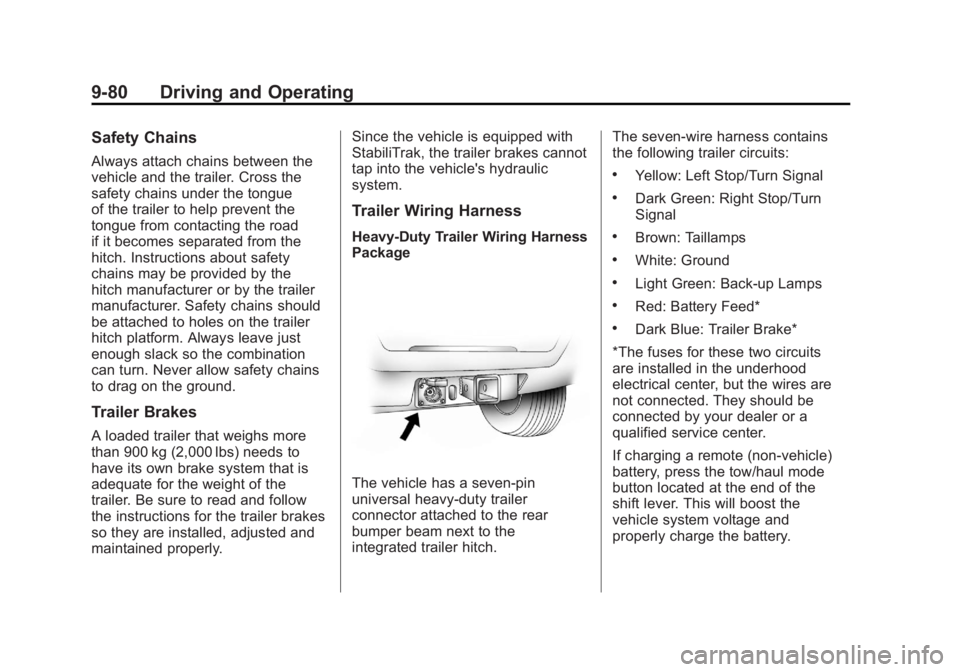
The vehicle has a seven-pin
universal heavy-duty trailer
connector attached to the rear
bumper beam next to the
integrated trailer hitch. The seven-wire harness contains
the following trailer circuits: .
Yellow: Left Stop/Turn Signal .
Dark Green: Right Stop/Turn
Signal .
Brown: Taillamps .
White: Ground .
Light Green: Back-up Lamps .
Red: Battery Feed* .
Dark Blue: Trailer Brake*
*The fuses for these two circuits
are installed in the underhood
electrical center, but the wires are
not connected. They should be
connected by your dealer or a
qualified service center.
If charging a remote (non-vehicle)
battery, press the tow/haul mode
button located at the end of the
shift lever. This will boost the
vehicle system voltage and
properly charge the battery.