change wheel CADILLAC ESCALADE ESV 2012 User Guide
[x] Cancel search | Manufacturer: CADILLAC, Model Year: 2012, Model line: ESCALADE ESV, Model: CADILLAC ESCALADE ESV 2012Pages: 538, PDF Size: 8.42 MB
Page 306 of 538
Black plate (6,1)Cadillac Escalade/Escalade ESV Owner Manual - 2012 - 2nd CRC - 11/29/11
9-6 Driving and Operating Remember: Antilock brakes help
avoid only the braking skid.
Off-Road Driving All-wheel-drive vehicles can be
used for off-road driving. Vehicles
without all-wheel drive and vehicles
not equipped with All Terrain (AT) or
On-Off Road (OOR) tires must not
be driven off-road except on a level,
solid surface. To contact the tire
manufacturer for more information
about the original equipment tires,
see the Limited Warranty and
Owner Assistance Information
manual.
Controlling the vehicle is the key to
successful off-road driving. One of
the best ways to control the vehicle
is to control the speed. { WARNINGWhen driving off-road, bouncing
and quick changes in direction
can easily throw you out of
position. This could cause you to
lose control and crash. You and
your passengers should always
wear safety belts.
Before Driving Off-Road .
Have all necessary maintenance
and service work completed. .
Fuel the vehicle, fill fluid levels,
and check inflation pressure in
all tires, including the spare,
if equipped. .
Read all the information about
all-wheel-drive vehicles in this
manual. .
Make sure all underbody
shields, if equipped, are properly
attached. .
Know the local laws that apply to
off-road driving.
To gain more ground clearance if
needed, it may be necessary to
remove the front fascia lower
air dam.
Notice: Operating the vehicle for
extended periods without the
front fascia lower air dam
installed can cause improper air
flow to the engine. Re ‐ attach the
front fascia air dam after off-road
driving.
Page 310 of 538
Black plate (10,1)Cadillac Escalade/Escalade ESV Owner Manual - 2012 - 2nd CRC - 11/29/11
9-10 Driving and Operating Driving in Mud, Sand, Snow,
or Ice Use a low gear when driving in
mud – the deeper the mud, the
lower the gear. Keep the vehicle
moving to avoid getting stuck.
Traction changes when driving on
sand. On loose sand, such as on
beaches or sand dunes, the tires
tend to sink into the sand. This
affects steering, accelerating, and
braking. Drive at a reduced speed
and avoid sharp turns or abrupt
maneuvers.
Traction is reduced on hard packed
snow and ice and it is easy to lose
control. Reduce vehicle speed when
driving on hard packed snow
and ice.
{ WARNING
Driving on frozen lakes, ponds,
or rivers can be dangerous. Ice
conditions vary greatly and the
(Continued) WARNING (Continued) vehicle could fall through the ice;
you and your passengers could
drown. Drive your vehicle on safe
surfaces only.
Driving in Water
{ WARNINGDriving through rushing water can
be dangerous. Deep water can
sweep your vehicle downstream
and you and your passengers
could drown. If it is only shallow
water, it can still wash away the
ground from under your tires.
Traction could be lost, and the
vehicle could roll over. Do not
drive through rushing water. Notice: Do not drive through
standing water if it is deep
enough to cover the wheel hubs,
axles or exhaust pipe. Deep water
can damage the axle and other
vehicle parts.
If the standing water is not too deep,
drive slowly through it. At faster
speeds, water splashes on the
ignition system and the vehicle can
stall. Stalling can also occur if you
get the exhaust pipe under water.
While the exhaust pipe is under
water, you will not be able to start
the engine. When going through
water, the brakes get wet, and it
might take longer to stop. See
Driving on Wet Roads on page 9 ‑ 11 .
After Off-Road Driving
Remove any brush or debris that
has collected on the underbody or
chassis, or under the hood. These
accumulations can be a fire hazard.
After operation in mud or sand,
have the brake linings cleaned and
checked. These substances can
cause glazing and uneven braking.
Page 335 of 538

Black plate (35,1)Cadillac Escalade/Escalade ESV Owner Manual - 2012 - 2nd CRC - 11/29/11
Driving and Operating 9-35
Brakes Antilock Brake
System (ABS) This vehicle has the Antilock Brake
System (ABS), an advanced
electronic braking system that helps
prevent a braking skid.
When the engine is started and the
vehicle begins to drive away, ABS
checks itself. A momentary motor or
clicking noise might be heard while
this test is going on, and it might
even be noticed that the brake
pedal moves a little. This is normal.
If there is a problem with ABS, this
warning light stays on. See Antilock
Brake System (ABS) Warning Light
on page 5 ‑ 20 . If driving safely on a wet road and it
becomes necessary to slam on the
brakes and continue braking to
avoid a sudden obstacle, a
computer senses that the wheels
are slowing down. If one of the
wheels is about to stop rolling, the
computer will separately work the
brakes at each wheel.
ABS can change the brake pressure
to each wheel, as required, faster
than any driver could. This can help
the driver steer around the obstacle
while braking hard.
As the brakes are applied, the
computer keeps receiving updates
on wheel speed and controls
braking pressure accordingly.
Remember: ABS does not change
the time needed to get a foot up to
the brake pedal or always decrease
stopping distance. If you get too
close to the vehicle in front of you,
there will not be enough time to
apply the brakes if that vehicle suddenly slows or stops. Always
leave enough room up ahead to
stop, even with ABS.
Using ABS Do not pump the brakes. Just hold
the brake pedal down firmly and let
ABS work. You might hear the ABS
pump or motor operating and feel
the brake pedal pulsate, but this is
normal.
Braking in Emergencies ABS allows the driver to steer and
brake at the same time. In many
emergencies, steering can help
more than even the very best
braking.
Page 341 of 538

Black plate (41,1)Cadillac Escalade/Escalade ESV Owner Manual - 2012 - 2nd CRC - 11/29/11
Driving and Operating 9-41better handling under a variety of
passenger and loading conditions.
An air compressor connected to the
rear shocks will raise or lower the
rear of the vehicle to maintain
proper vehicle height. The system is
activated when the ignition key is
turned to ON/RUN and will
automatically adjust vehicle height
thereafter. The system may exhaust
(lower vehicle height) for up to
ten minutes after the ignition key
has been turned off. You may hear
the air compressor operating when
the height is being adjusted.
If a weight ‐ distributing hitch is being
used, it is recommended to allow
the shocks to inflate, thereby
leveling the vehicle prior to adjusting
the hitch. Cruise Control
{ WARNINGCruise control can be dangerous
where you cannot drive safely at
a steady speed. So, do not use
the cruise control on winding
roads or in heavy traffic.
Cruise control can be dangerous
on slippery roads. On such roads,
fast changes in tire traction can
cause excessive wheel slip, and
you could lose control. Do not use
cruise control on slippery roads.
With cruise control, a speed of
about 40 km/h (25 mph) or more can
be maintained without keeping your
foot on the accelerator. Cruise
control does not work at speeds
below about 40 km/h (25 mph). When the brakes are applied, cruise
control is turned off.
This vehicle has a Hydra ‐ Matic
6 ‐ speed automatic transmission,
see Grade Braking under Tow/Haul
Mode on page 9 ‑ 33 for an
explanation of how cruise control
interacts with the Range Selection
Mode, tow/haul and grade braking
systems.
This vehicle has StabiliTrak and
when the system begins to limit
wheel spin, the cruise control will
automatically disengage. See
StabiliTrak ®
System on page 9 ‑ 37 .
When road conditions allow the
cruise control to be safely used
again, it can be turned back on.
Page 429 of 538
Black plate (59,1)Cadillac Escalade/Escalade ESV Owner Manual - 2012 - 2nd CRC - 11/29/11
Vehicle Care 10-59Reset the Tire Pressure Monitor
System. See Tire Pressure
Monitor Operation on
page 10 ‑ 55 .
Check that all wheel nuts are
properly tightened. See “ Wheel
Nut Torque ” under Capacities
and Specifications on
page 12 ‑ 2 .
{ WARNINGRust or dirt on a wheel, or on the
parts to which it is fastened, can
make wheel nuts become loose
after time. The wheel could come
off and cause an accident. When
changing a wheel, remove any
rust or dirt from places where the
wheel attaches to the vehicle. In
an emergency, a cloth or a paper
towel can be used; however, use
a scraper or wire brush later to
remove all rust or dirt. Lightly coat the center of the
wheel hub with wheel bearing
grease after a wheel change or
tire rotation to prevent corrosion
or rust build-up. Do not get
grease on the flat wheel
mounting surface or on the
wheel nuts or bolts.
When It Is Time for New
Tires Factors, such as maintenance,
temperatures, driving speeds,
vehicle loading, and road conditions
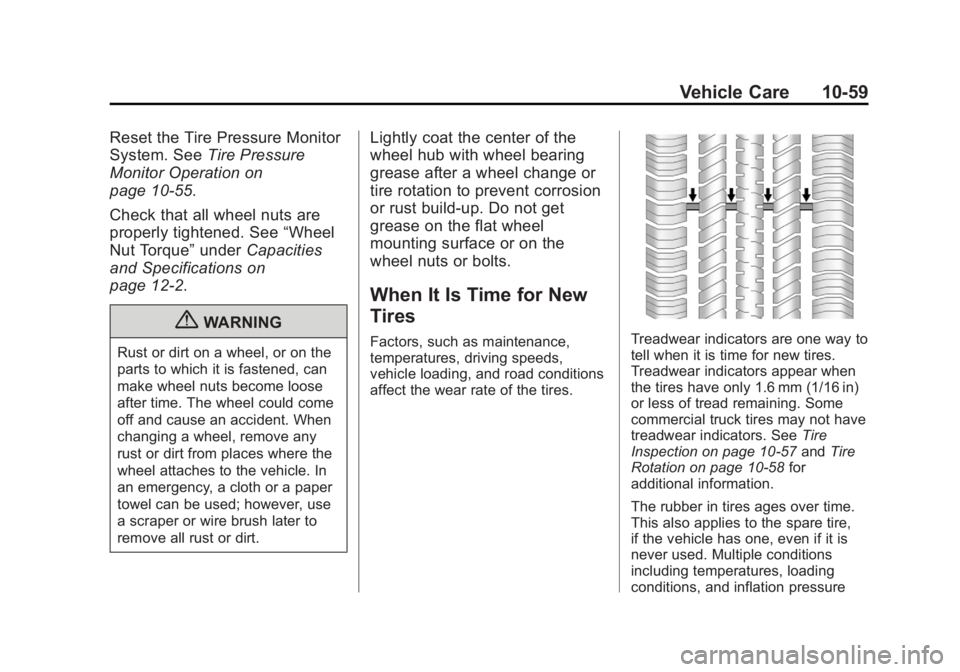
affect the wear rate of the tires. Treadwear indicators are one way to
tell when it is time for new tires.
Treadwear indicators appear when
the tires have only 1.6 mm (1/16 in)
or less of tread remaining. Some
commercial truck tires may not have
treadwear indicators. See Tire
Inspection on page 10 ‑ 57 and Tire
Rotation on page 10 ‑ 58 for
additional information.
The rubber in tires ages over time.
This also applies to the spare tire,
if the vehicle has one, even if it is
never used. Multiple conditions
including temperatures, loading
conditions, and inflation pressure
Page 436 of 538

Black plate (66,1)Cadillac Escalade/Escalade ESV Owner Manual - 2012 - 2nd CRC - 11/29/11
10-66 Vehicle Care
{ WARNINGLifting a vehicle and getting under
it to do maintenance or repairs is
dangerous without the
appropriate safety equipment and
training. If a jack is provided with
the vehicle, it is designed only for
changing a flat tire. If it is used for
anything else, you or others could
be badly injured or killed if the
vehicle slips off the jack. If a jack
is provided with the vehicle, only
use it for changing a flat tire.
If a tire goes flat, avoid further tire
and wheel damage by driving slowly
to a level place, well off the road,
if possible. Turn on the hazard
warning flashers. See Hazard
Warning Flashers on page 6 ‑ 7 .{ WARNINGChanging a tire can be
dangerous. The vehicle can slip
off the jack and roll over or fall
causing injury or death. Find a
level place to change the tire. To
help prevent the vehicle from
moving:
1. Set the parking brake firmly.
2. Put an automatic
transmission in P (Park) or a
manual transmission in
1 (First) or R (Reverse).
3. Turn off the engine and do
not restart while the vehicle
is raised.
4. Do not allow passengers to
remain in the vehicle.
5. Place wheel blocks on both
sides of the tire at the
opposite corner of the tire
being changed. This vehicle may come with a jack
and spare tire or a tire sealant and
compressor kit. To use the jacking
equipment to change a spare tire
safely, follow the instructions below.
Then see Tire Changing on
page 10 ‑ 74 . To use the tire sealant
and compressor kit, see Tire
Sealant and Compressor Kit on
page 10 ‑ 67 .
When the vehicle has a flat tire (B),
use the following example as a
guide to assist you in the placement
of wheel blocks (A).
A. Wheel Block
B. Flat Tire
Page 437 of 538

Black plate (67,1)Cadillac Escalade/Escalade ESV Owner Manual - 2012 - 2nd CRC - 11/29/11
Vehicle Care 10-67The following information explains
how to repair or change a tire.
Tire Sealant and
Compressor Kit
{ WARNINGIdling a vehicle in an enclosed
area with poor ventilation is
dangerous. Engine exhaust may
enter the vehicle. Engine exhaust
contains carbon monoxide (CO)
which cannot be seen or smelled.
It can cause unconsciousness
and even death. Never run the
engine in an enclosed area that
has no fresh air ventilation. For
more information, see Engine
Exhaust on page 9 ‑ 29 .{ WARNINGOverinflating a tire could cause
the tire to rupture and you or
others could be injured. Be sure
to read and follow the tire sealant
and compressor kit instructions
and inflate the tire to its
recommended pressure. Do not
exceed the recommended
pressure.
{ WARNINGStoring the tire sealant and
compressor kit or other
equipment in the passenger
compartment of the vehicle could
cause injury. In a sudden stop or
collision, loose equipment could
strike someone. Store the tire
sealant and compressor kit in its
original location. If this vehicle has a tire sealant and
compressor kit, there may not be a
spare tire, tire changing equipment,
and on some vehicles there may not
be a place to store a tire.
The tire sealant and compressor
can be used to temporarily seal
punctures up to 6 mm (¼ inch) in
the tread area of the tire. It can also
be used to inflate an under
inflated tire.
If the tire has been separated from
the wheel, has damaged sidewalls,
or has a large puncture, the tire is
too severely damaged for the tire
sealant and compressor kit to be
effective. See Roadside Service
(U.S. and Canada) on page 13 ‑ 7 or
Roadside Service (Mexico) on
page 13 ‑ 9 .
Page 444 of 538
Black plate (74,1)Cadillac Escalade/Escalade ESV Owner Manual - 2012 - 2nd CRC - 11/29/11
10-74 Vehicle Care
2. Locate the tire sealant and
compressor kit.
3. Remove the sealant and
compressor kit by pulling the
velcro strip up and back.
4. Remove the sealant and
compressor kit from its plastic
tray assembly.
To store the tire sealant and
compressor kit, reverse the steps. Tire Changing Removing the Spare Tire and
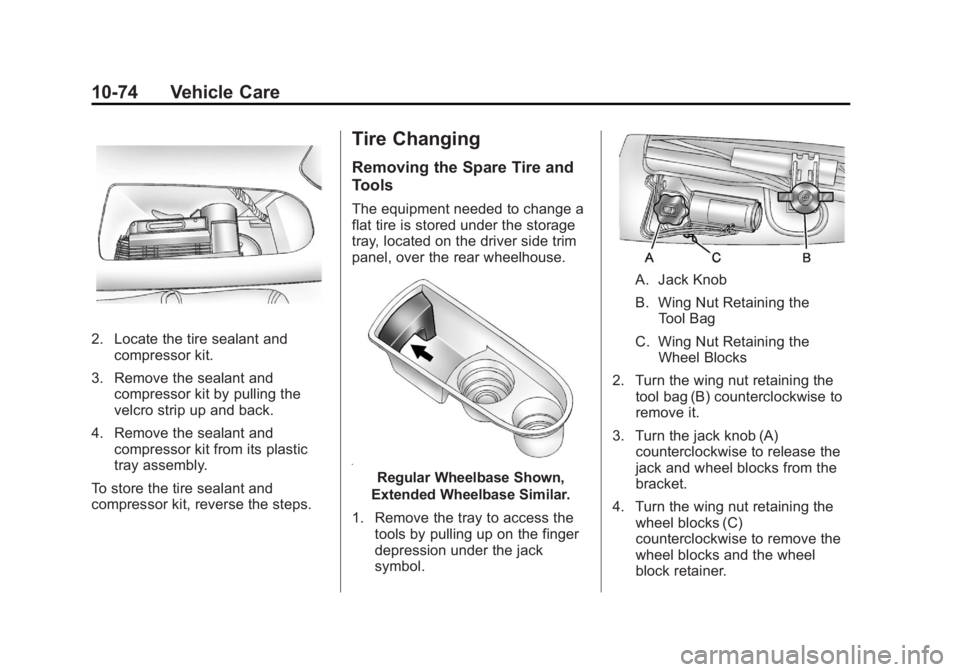
Tools The equipment needed to change a
flat tire is stored under the storage
tray, located on the driver side trim
panel, over the rear wheelhouse.
Regular Wheelbase Shown,
Extended Wheelbase Similar.
1. Remove the tray to access the
tools by pulling up on the finger
depression under the jack
symbol. A. Jack Knob
B. Wing Nut Retaining the
Tool Bag
C. Wing Nut Retaining the
Wheel Blocks
2. Turn the wing nut retaining the
tool bag (B) counterclockwise to
remove it.
3. Turn the jack knob (A)
counterclockwise to release the
jack and wheel blocks from the
bracket.
4. Turn the wing nut retaining the
wheel blocks (C)
counterclockwise to remove the
wheel blocks and the wheel
block retainer.
Page 492 of 538
Black plate (2,1)Cadillac Escalade/Escalade ESV Owner Manual - 2012 - 2nd CRC - 11/29/11
12-2 Technical Data
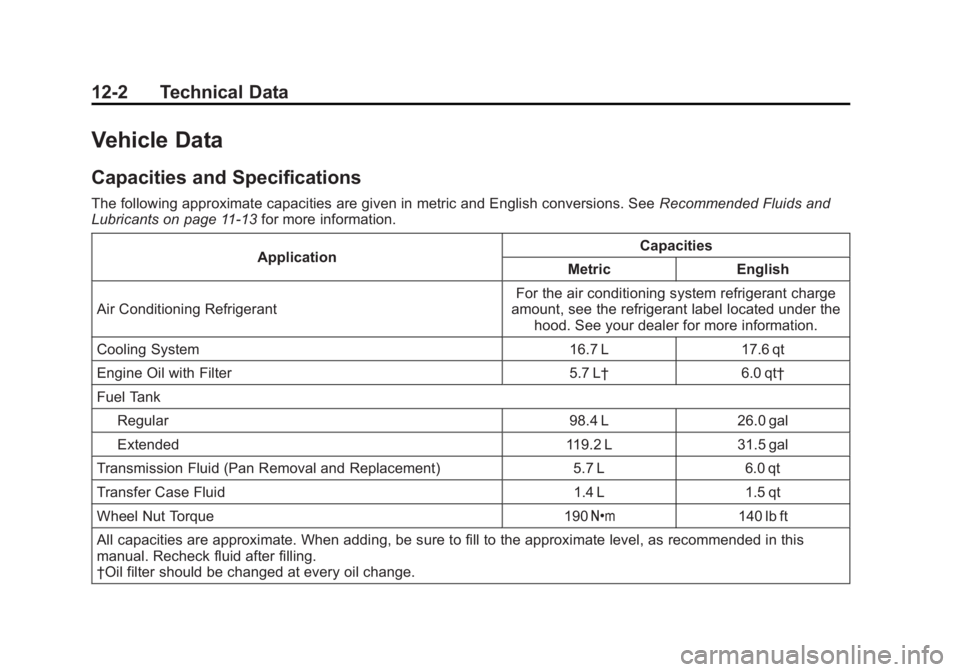
Vehicle Data Capacities and Specifications The following approximate capacities are given in metric and English conversions. See Recommended Fluids and
Lubricants on page 11 ‑ 13 for more information.
Application Capacities
Metric English
Air Conditioning Refrigerant For the air conditioning system refrigerant charge
amount, see the refrigerant label located under the
hood. See your dealer for more information.
Cooling System 16.7 L 17.6 qt
Engine Oil with Filter 5.7 L † 6.0 qt †
Fuel Tank
Regular 98.4 L 26.0 gal
Extended 119.2 L 31.5 gal
Transmission Fluid (Pan Removal and Replacement) 5.7 L 6.0 qt
Transfer Case Fluid 1.4 L 1.5 qt
Wheel Nut Torque 190 Y 140 lb ft
All capacities are approximate. When adding, be sure to fill to the approximate level, as recommended in this
manual. Recheck fluid after filling.
† Oil filter should be changed at every oil change.
Page 530 of 538

Black plate (6,1)Cadillac Escalade/Escalade ESV Owner Manual - 2012 - 2nd CRC - 11/29/11
i-6 INDEX
HHazard Warning Flashers . . . . . . . 6-7
Head Restraints . . . . . . . . . . . . . . . . 3-2
Headlamps
Aiming . . . . . . . . . . . . . . . . . . . . . . 10-33
Automatic . . . . . . . . . . . . . . . . . . . . . . 6-6
Bulb Replacement . . . . . . . . . . 10-35
Daytime Running
Lamps (DRL) . . . . . . . . . . . . . . . . . 6-5
Flash-to-Pass . . . . . . . . . . . . . . . . . . 6-5
High Intensity Discharge
(HID) Lighting . . . . . . . . . . . . . 10-36
High-Beam On Light . . . . . . . . . . 5-22
High/Low Beam Changer . . . . . . 6-5
Lamps On Reminder . . . . . . . . . 5-23
Heated
Rear Seats . . . . . . . . . . . . . . . . . . . . 3-8
Steering Wheel . . . . . . . . . . . . . . . . 5-4
Heated and Ventilated Front
Seats . . . . . . . . . . . . . . . . . . . . . . . . . 3-7
Heated Mirrors . . . . . . . . . . . . . . . . . 2-17
Heater
Engine . . . . . . . . . . . . . . . . . . . . . . . . 9-25
High-Beam On Light . . . . . . . . . . . 5-22 High-Speed Operation . . . . . . . . 10-53
Highway Hypnosis . . . . . . . . . . . . . 9-12
Hill and Mountain Roads . . . . . . . 9-12
Hill Start Assist (HSA) . . . . . . . . . 9-36
Hood . . . . . . . . . . . . . . . . . . . . . . . . . . 10-4
Horn . . . . . . . . . . . . . . . . . . . . . . . . . . . . 5-4
How to Wear Safety Belts
Properly . . . . . . . . . . . . . . . . . . . . . . 3-16
I Ignition Positions . . . . . . . . . . . . . . 9-22
Ignition Transmission Lock
Check . . . . . . . . . . . . . . . . . . . . . . . 10-31
Immobilizer . . . . . . . . . . . . . . . . . . . . 2-14
Infants and Young Children,
Restraints . . . . . . . . . . . . . . . . . . . . 3-43
Infotainment . . . . . . . . . . . . . . . . . . . . 7-2
Instrument Cluster . . . . . . . . . . . . . 5-11
Introduction . . . . . . . . . . . . . . . . . . . . . . . iii
J Jump Starting . . . . . . . . . . . . . . . . . 10-88 K Key and Lock Messages . . . . . . . 5-32
Keyless Entry
Remote (RKE) System . . . . . . . . 2-3
Keys . . . . . . . . . . . . . . . . . . . . . . . . . . . . 2-2
L Labeling, Tire Sidewall . . . . . . . . 10-47
Lamps
Daytime Running (DRL) . . . . . . . 6-5
Dome . . . . . . . . . . . . . . . . . . . . . . . . . . 6-9
Exterior Controls . . . . . . . . . . . . . . . 6-1
Exterior Lamps Off
Reminder . . . . . . . . . . . . . . . . . . . . 6-5
License Plate . . . . . . . . . . . . . . . 10-37
Malfunction Indicator . . . . . . . . . 5-16
Messages . . . . . . . . . . . . . . . . . . . . 5-32
On Reminder . . . . . . . . . . . . . . . . . 5-23
Reading . . . . . . . . . . . . . . . . . . . . . . . 6-9
Lap Belt . . . . . . . . . . . . . . . . . . . . . . . 3-23
Lap-Shoulder Belt . . . . . . . . . . . . . 3-17