inflation pressure CADILLAC ESCALADE ESV 2012 User Guide
[x] Cancel search | Manufacturer: CADILLAC, Model Year: 2012, Model line: ESCALADE ESV, Model: CADILLAC ESCALADE ESV 2012Pages: 538, PDF Size: 8.42 MB
Page 424 of 538
Black plate (54,1)Cadillac Escalade/Escalade ESV Owner Manual - 2012 - 2nd CRC - 11/29/11
10-54 Vehicle Care Each tire, including the spare
(if provided), should be checked
monthly when cold and inflated to
the inflation pressure recommended
by the vehicle manufacturer on the
vehicle placard or tire inflation
pressure label. (If your vehicle has
tires of a different size than the size
indicated on the vehicle placard or
tire inflation pressure label, you
should determine the proper tire
inflation pressure for those tires.)
As an added safety feature, your
vehicle has been equipped with a
tire pressure monitoring system
(TPMS) that illuminates a low tire
pressure telltale when one or more
of your tires is significantly under ‐
inflated.
Accordingly, when the low tire
pressure telltale illuminates, you
should stop and check your tires as
soon as possible, and inflate them
to the proper pressure. Driving on a
significantly under ‐ inflated tire
causes the tire to overheat and can
lead to tire failure. Under ‐ inflation
also reduces fuel efficiency and tire tread life, and may affect the
vehicle's handling and stopping
ability.
Please note that the TPMS is not a
substitute for proper tire
maintenance, and it is the driver's
responsibility to maintain correct tire
pressure, even if under ‐ inflation has
not reached the level to trigger
illumination of the TPMS low tire
pressure telltale.
Your vehicle has also been
equipped with a TPMS malfunction
indicator to indicate when the
system is not operating properly.
The TPMS malfunction indicator is
combined with the low tire pressure
telltale. When the system detects a
malfunction, the telltale will flash for
approximately one minute and then
remain continuously illuminated.
This sequence will continue upon
subsequent vehicle start ‐ ups as
long as the malfunction exists.
When the malfunction indicator is
illuminated, the system may not be
able to detect or signal low tire pressure as intended. TPMS
malfunctions may occur for a variety
of reasons, including the installation
of replacement or alternate tires or
wheels on the vehicle that prevent
the TPMS from functioning properly.
Always check the TPMS malfunction
telltale after replacing one or more
tires or wheels on your vehicle to
ensure that the replacement or
alternate tires and wheels allow the
TPMS to continue to function
properly.
See Tire Pressure Monitor
Operation on page 10 ‑ 55 for
additional information.
Federal Communications
Commission (FCC) Rules and
with Industry Canada
Standards
See Radio Frequency Statement on
page 13 ‑ 21 for information
regarding Part 15 of the Federal
Communications Commission (FCC)
Rules and with Industry Canada
Standards RSS-GEN/210/220/310.
Page 425 of 538

Black plate (55,1)Cadillac Escalade/Escalade ESV Owner Manual - 2012 - 2nd CRC - 11/29/11
Vehicle Care 10-55
Tire Pressure Monitor
Operation This vehicle may have a Tire
Pressure Monitor System (TPMS).
The TPMS is designed to warn the
driver when a low tire pressure
condition exists. TPMS sensors are
mounted onto each tire and wheel
assembly, excluding the spare tire
and wheel assembly. The TPMS
sensors monitor the air pressure in
the tires and transmit the tire
pressure readings to a receiver
located in the vehicle.
When a low tire pressure condition
is detected, the TPMS illuminates
the low tire pressure warning light
located on the instrument cluster.
If the warning light comes on, stop
as soon as possible and inflate the tires to the recommended pressure
shown on the tire loading
information label. See Vehicle Load
Limits on page 9 ‑ 16 .
A message to check the pressure in
a specific tire displays in the Driver
Information Center (DIC). The low
tire pressure warning light and the
DIC warning message come on at
each ignition cycle until the tires are
inflated to the correct inflation
pressure. Using the DIC, tire
pressure levels can be viewed. For
additional information and details
about the DIC operation and
displays see Driver Information
Center (DIC) on page 5 ‑ 23 and Tire
Messages on page 5 ‑ 36 .
The low tire pressure warning light
may come on in cool weather when
the vehicle is first started, and then
turn off as the vehicle is driven. This
could be an early indicator that the
air pressure is getting low and
needs to be inflated to the proper
pressure. A Tire and Loading Information label
shows the size of the original
equipment tires and the correct
inflation pressure for the tires when
they are cold. See Vehicle Load
Limits on page 9 ‑ 16 , for an example
of the Tire and Loading Information
label and its location. Also see Tire
Pressure on page 10 ‑ 52 .
The TPMS can warn about a low
tire pressure condition but it does
not replace normal tire
maintenance. See Tire Inspection
on page 10 ‑ 57 , Tire Rotation on
page 10 ‑ 58 and Tires on
page 10 ‑ 46 .
Notice: Tire sealant materials are
not all the same. A non-approved
tire sealant could damage the
TPMS sensors. TPMS sensor
damage caused by using an
incorrect tire sealant is not
covered by the vehicle warranty.
Always use only the
GM-approved tire sealant
available through your dealer or
included in the vehicle.
Page 428 of 538
Black plate (58,1)Cadillac Escalade/Escalade ESV Owner Manual - 2012 - 2nd CRC - 11/29/11
10-58 Vehicle Care Replace the tire if: .
The indicators at three or
more places around the tire
can be seen. .
There is cord or fabric
showing through the tire's
rubber. .
The tread or sidewall is
cracked, cut, or snagged
deep enough to show cord or
fabric. .
The tire has a bump, bulge,
or split. .
The tire has a puncture, cut,
or other damage that cannot
be repaired well because of
the size or location of the
damage. Tire Rotation Tires should be rotated every
12 000 km (7,500 mi). See
Maintenance Schedule on
page 11 ‑ 3 .
Tires are rotated to achieve a
uniform wear for all tires. The
first rotation is the most
important.
Any time unusual wear is
noticed, rotate the tires as soon
as possible and check the wheel
alignment. Also check for
damaged tires or wheels. See
When It Is Time for New Tires
on page 10 ‑ 59 and Wheel
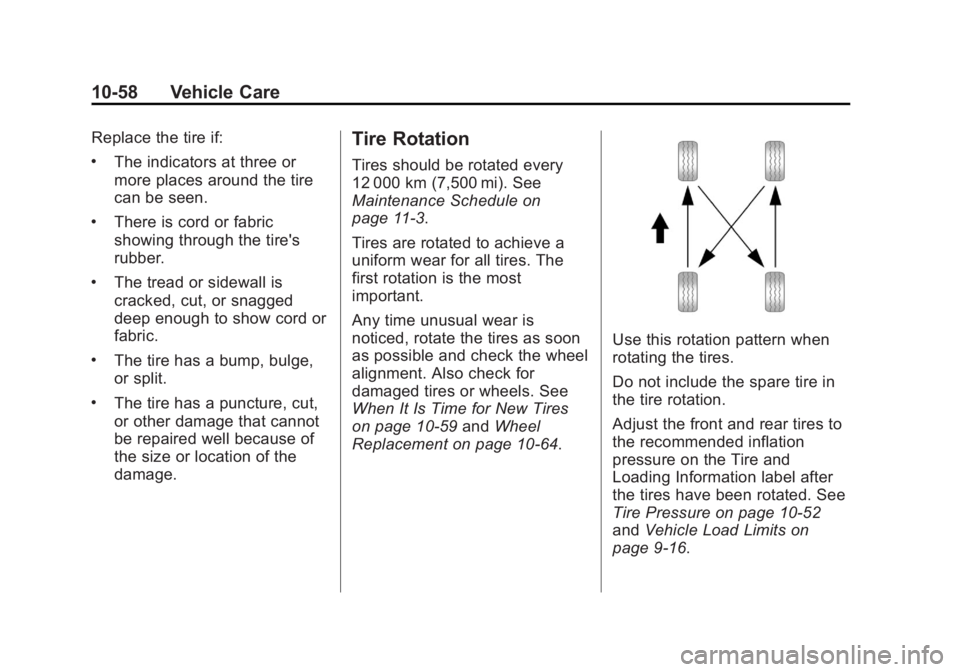
Replacement on page 10 ‑ 64 . Use this rotation pattern when
rotating the tires.
Do not include the spare tire in
the tire rotation.
Adjust the front and rear tires to
the recommended inflation
pressure on the Tire and
Loading Information label after
the tires have been rotated. See
Tire Pressure on page 10 ‑ 52
and Vehicle Load Limits on
page 9 ‑ 16 .
Page 429 of 538
Black plate (59,1)Cadillac Escalade/Escalade ESV Owner Manual - 2012 - 2nd CRC - 11/29/11
Vehicle Care 10-59Reset the Tire Pressure Monitor
System. See Tire Pressure
Monitor Operation on
page 10 ‑ 55 .
Check that all wheel nuts are
properly tightened. See “ Wheel
Nut Torque ” under Capacities
and Specifications on
page 12 ‑ 2 .
{ WARNINGRust or dirt on a wheel, or on the
parts to which it is fastened, can
make wheel nuts become loose
after time. The wheel could come
off and cause an accident. When
changing a wheel, remove any
rust or dirt from places where the
wheel attaches to the vehicle. In
an emergency, a cloth or a paper
towel can be used; however, use
a scraper or wire brush later to
remove all rust or dirt. Lightly coat the center of the
wheel hub with wheel bearing
grease after a wheel change or
tire rotation to prevent corrosion
or rust build-up. Do not get
grease on the flat wheel
mounting surface or on the
wheel nuts or bolts.
When It Is Time for New
Tires Factors, such as maintenance,
temperatures, driving speeds,
vehicle loading, and road conditions
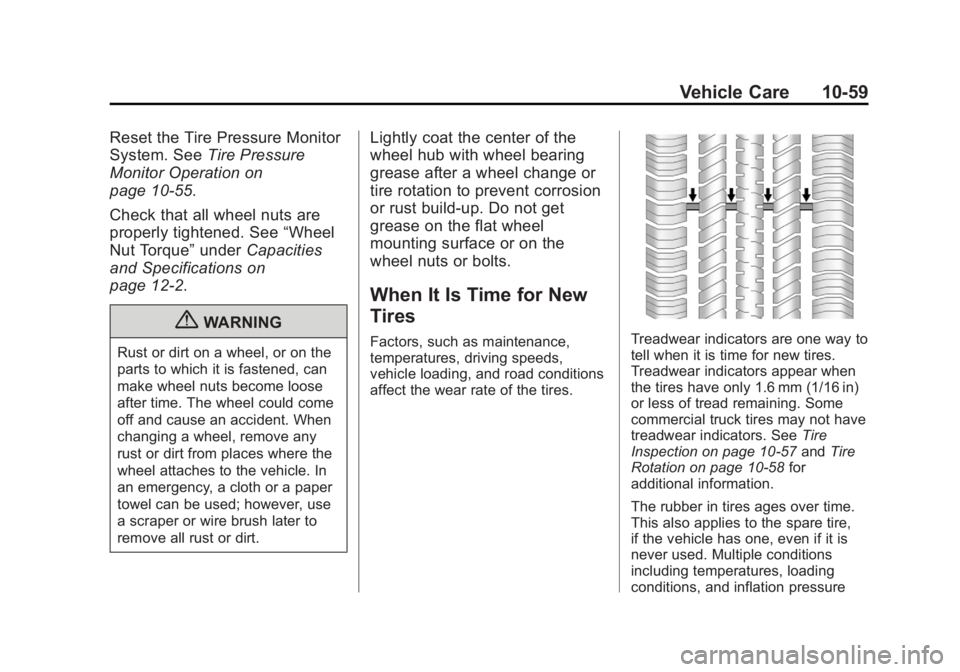
affect the wear rate of the tires. Treadwear indicators are one way to
tell when it is time for new tires.
Treadwear indicators appear when
the tires have only 1.6 mm (1/16 in)
or less of tread remaining. Some
commercial truck tires may not have
treadwear indicators. See Tire
Inspection on page 10 ‑ 57 and Tire
Rotation on page 10 ‑ 58 for
additional information.
The rubber in tires ages over time.
This also applies to the spare tire,
if the vehicle has one, even if it is
never used. Multiple conditions
including temperatures, loading
conditions, and inflation pressure
Page 439 of 538

Black plate (69,1)Cadillac Escalade/Escalade ESV Owner Manual - 2012 - 2nd CRC - 11/29/11
Vehicle Care 10-69If a tire goes flat, avoid further tire
and wheel damage by driving slowly
to a level place. Turn on the hazard
warning flashers.
See If a Tire Goes Flat on
page 10 ‑ 65 for other important
safety warnings.
Do not remove any objects that
have penetrated the tire.
1. Remove the tire sealant and
compressor kit from its storage
location. See Storing the Tire
Sealant and Compressor Kit on
page 10 ‑ 73 .
Make sure the on/off button (D)
is in the off (O) position.
2. Unwrap the sealant/air hose (G)
and the power plug (C).
3. Place the kit on the ground.
Make sure the tire valve stem is
positioned close to the ground
so the hose will reach it.
4. Remove the valve stem cap from
the flat tire by turning it
counterclockwise. 5. Attach the sealant/air hose (G)
onto the tire valve stem. Turn it
clockwise until it is tight.
6. Plug the power plug (C) into the
accessory power outlet in the
vehicle. Unplug all items from
other accessory power outlets.
See Power Outlets on page 5 ‑ 8
in the owner manual.
If the vehicle has an accessory
power outlet, do not use the
cigarette lighter.
If the vehicle only has a cigarette
lighter, use the cigarette lighter.
Do not pinch the power plug
cord in the door or window.
7. Start the vehicle. The vehicle
must be running while using the
air compressor.
8. Press the on/off (D) button to
turn the tire sealant and
compressor kit on.
The compressor will inject
sealant and air into the tire. The pressure gauge (E) will
initially show a high pressure
while the compressor pushes the
sealant into the tire. Once the
sealant is completely dispersed
into the tire, the pressure will
quickly drop and start to rise
again as the tire inflates with
air only.
9. Inflate the tire to the
recommended inflation pressure
using the pressure gauge (E).
The recommended inflation
pressure can be found on the
Tire and Loading Information
label. See Tire Pressure on
page 10 ‑ 52 .
The pressure gauge (E) may
read higher than the actual tire
pressure while the compressor is
on. Turn the compressor off to
get an accurate pressure
reading. The compressor may
be turned on/off until the correct
pressure is reached.
Page 440 of 538

Black plate (70,1)Cadillac Escalade/Escalade ESV Owner Manual - 2012 - 2nd CRC - 11/29/11
10-70 Vehicle Care Notice: If the recommended
pressure cannot be reached after
approximately 25 minutes, the
vehicle should not be driven
farther. The tire is too severely
damaged and the tire sealant and
compressor kit cannot inflate the
tire. Remove the power plug from
the accessory power outlet and
unscrew the inflating hose from
the tire valve. See Roadside
Service (U.S. and Canada) on
page 13 ‑ 7 or Roadside Service
(Mexico) on page 13 ‑ 9 .
10. Press the on/off button (D) to
turn the tire sealant and
compressor kit off.
The tire is not sealed and will
continue to leak air until the
vehicle is driven and the
sealant is distributed in the tire,
therefore, Steps 11 through
17 must be done immediately
after Step 10. Be careful while handling the
tire sealant and compressor kit
as it could be warm after
usage.
11. Unplug the power plug (C) from
the accessory power outlet in
the vehicle.
12. Turn the sealant/air hose (G)
counterclockwise to remove it
from the tire valve stem.
13. Replace the tire valve
stem cap.
14. Replace the sealant/air hose
(G), and the power plug (C)
back in their original location.
15. If the flat tire was able to inflate
to the recommended inflation
pressure, remove the
maximum speed label from the tire sealant canister (B) and
place it in a highly visible
location.
Do not exceed the speed on
this label until the damaged tire
is repaired or replaced.
16. Return the equipment to its
original storage location in the
vehicle.
17. Immediately drive the vehicle
8 km (5 mi) to distribute the
sealant in the tire.
18. Stop at a safe location and
check the tire pressure. Refer
to Steps 1 through 11 under
“ Using the Tire Sealant and
Compressor Kit without Sealant
to Inflate a Tire (Not
Punctured). ”
If the tire pressure has fallen
more than 68 kPa (10 psi)
below the recommended
inflation pressure, stop driving
the vehicle. The tire is too
severely damaged and the tire
sealant cannot seal the tire.
Page 441 of 538
Black plate (71,1)Cadillac Escalade/Escalade ESV Owner Manual - 2012 - 2nd CRC - 11/29/11
Vehicle Care 10-71See Roadside Service (U.S.
and Canada) on page 13 ‑ 7 or
Roadside Service (Mexico) on
page 13 ‑ 9 .
If the tire pressure has not
dropped more than 68 kPa
(10 psi) from the recommended
inflation pressure, inflate the
tire to the recommended
inflation pressure.
19. Wipe off any sealant from the
wheel, tire or vehicle.
20. Dispose of the used tire
sealant canister (B) and
sealant/air hose (G) assembly
at a local dealer or in
accordance with local
regulations and practices.
21. Replace it with a new canister
available from your dealer.
22. After temporarily sealing a tire
using the tire sealant and
compressor kit, take the
vehicle to an authorized dealer within a 161 km (100 mi) of
driving to have the tire repaired
or replaced.
Using the Tire Sealant and
Compressor Kit without
Sealant to Inflate a Tire (Not
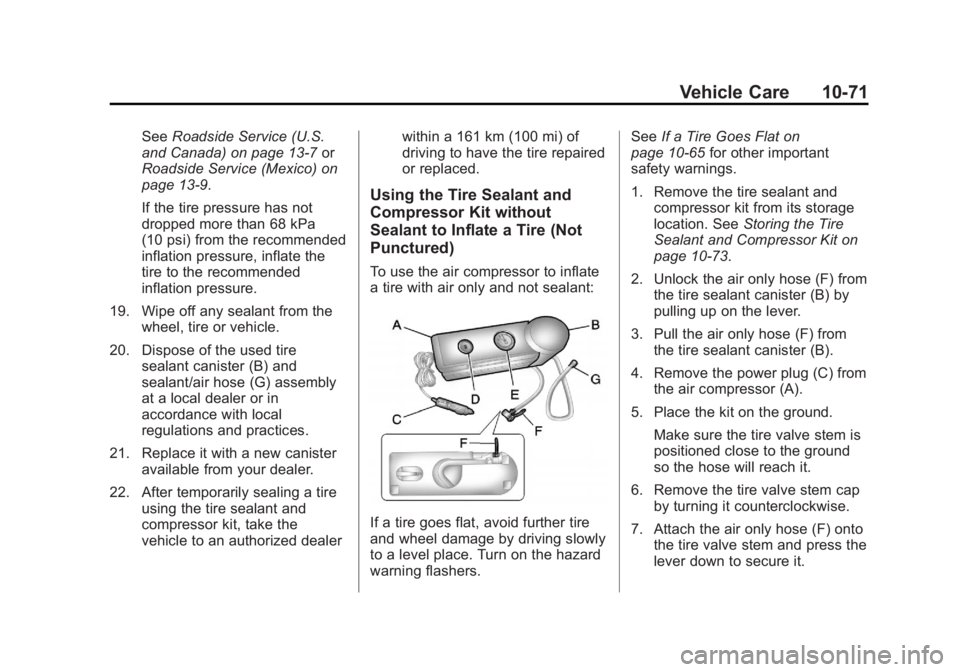
Punctured) To use the air compressor to inflate
a tire with air only and not sealant:
If a tire goes flat, avoid further tire
and wheel damage by driving slowly
to a level place. Turn on the hazard
warning flashers. See If a Tire Goes Flat on
page 10 ‑ 65 for other important
safety warnings.
1. Remove the tire sealant and
compressor kit from its storage
location. See Storing the Tire
Sealant and Compressor Kit on
page 10 ‑ 73 .
2. Unlock the air only hose (F) from
the tire sealant canister (B) by
pulling up on the lever.
3. Pull the air only hose (F) from
the tire sealant canister (B).
4. Remove the power plug (C) from
the air compressor (A).
5. Place the kit on the ground.
Make sure the tire valve stem is
positioned close to the ground
so the hose will reach it.
6. Remove the tire valve stem cap
by turning it counterclockwise.
7. Attach the air only hose (F) onto
the tire valve stem and press the
lever down to secure it.
Page 442 of 538
Black plate (72,1)Cadillac Escalade/Escalade ESV Owner Manual - 2012 - 2nd CRC - 11/29/11
10-72 Vehicle Care 8. Plug the power plug (C) into the
accessory power outlet in the
vehicle. Unplug all items from
other accessory power outlets.
See Power Outlets on page 5 ‑ 8
in the owner manual.
If the vehicle has an accessory
power outlet, do not use the
cigarette lighter.
If the vehicle only has a cigarette
lighter, use the cigarette lighter.
Do not pinch the power plug
cord in the door or window.
9. Start the vehicle. The vehicle
must be running while using the
air compressor.
10. Press the on/off (D) button to
turn the compressor on.
The compressor will inflate the
tire with air only.
11. Inflate the tire to the
recommended inflation
pressure using the pressure
gauge (E). The recommended
inflation pressure can be found on the Tire and Loading
Information label. See Tire
Pressure on page 10 ‑ 52 .
The pressure gauge (E) may
read higher than the actual tire
pressure while the compressor
is on. Turn the compressor off
to get an accurate reading. The
compressor may be turned on/
off until the correct pressure is
reached.
12. Press the on/off button (D) to
turn the tire sealant and
compressor kit off.
Be careful while handling the
tire sealant and compressor kit
as it could be warm after
usage.
13. Unplug the power plug (C) from
the accessory power outlet in
the vehicle.
14. Disconnect the air only
hose (F) from the tire valve
stem, by turning it
counterclockwise, and replace
the tire valve stem cap. 15. Replace the air only hose (F)
and the power plug (C) back in
its original location.
16. Place the equipment in the
original storage location in the
vehicle.
Removal and Installation of the
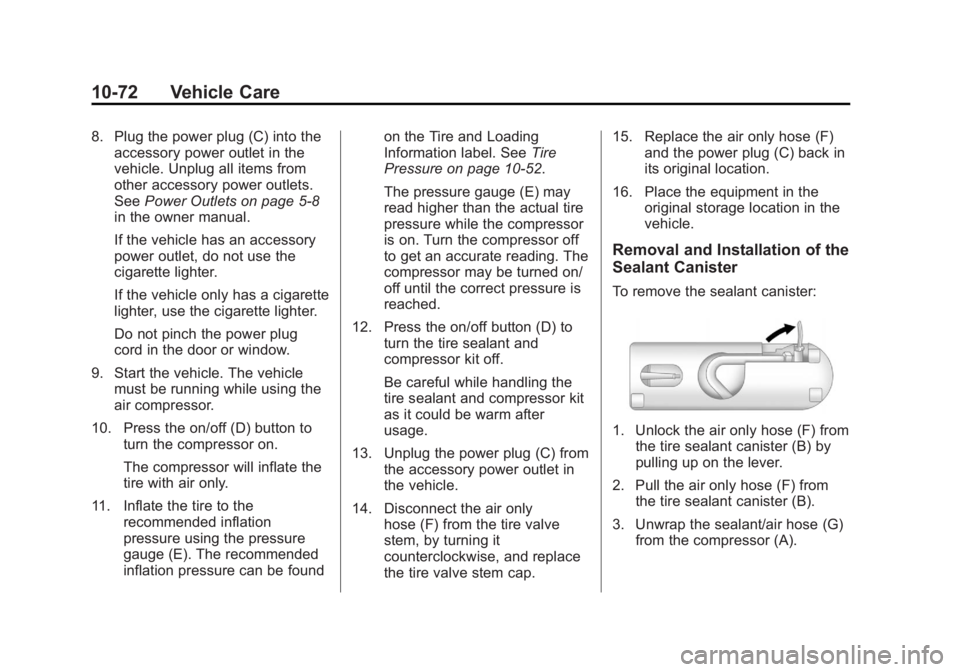
Sealant Canister To remove the sealant canister:
1. Unlock the air only hose (F) from
the tire sealant canister (B) by
pulling up on the lever.
2. Pull the air only hose (F) from
the tire sealant canister (B).
3. Unwrap the sealant/air hose (G)
from the compressor (A).
Page 457 of 538

Black plate (87,1)Cadillac Escalade/Escalade ESV Owner Manual - 2012 - 2nd CRC - 11/29/11
Vehicle Care 10-8712. Lower the jack by turning
the wheel wrench
counterclockwise. Keep
lowering the jack until the
spare tire slides off the jack or
is hanging by the cable.
{ WARNINGSomeone standing too close
during the procedure could be
injured by the jack. If the spare
tire does not slide off the jack
completely, make sure no one is
behind you or on either side of
you as you pull the jack out from
under the spare.
13. Disconnect the jack handle
from the jack and carefully
remove the jack. Use one hand
to push against the spare while
firmly pulling the jack out from
under the spare tire with the
other hand. If the spare tire is hanging from
the cable, insert the hoist end
of extension, and wheel
wrench into the hoist shaft hole
in the bumper and turn the
wheel wrench counterclockwise
to lower the spare the rest of
the way.
14. Turn the wheel wrench in the
hoist shaft hole in the bumper
clockwise to raise the cable
back up if the cable is hanging
under the vehicle.
Have the hoist assembly inspected
as soon as you can. You will not be
able to store a spare or flat tire
using the hoist assembly until it has
been inspected and/or replaced.
To continue changing the flat tire,
see “ Removing the Flat Tire and
Installing the Spare Tire ” under Tire
Changing on page 10 ‑ 74 .Full-Size Spare Tire If this vehicle came with a full-size
spare tire, it was fully inflated when
new, however, it can lose air over
time. Check the inflation pressure
regularly. See Tire Pressure on
page 10 ‑ 52 and Vehicle Load Limits
on page 9 ‑ 16 for information
regarding proper tire inflation and
loading the vehicle. For instructions
on how to remove, install, or store a
spare tire, see Tire Changing on
page 10 ‑ 74 .
Page 458 of 538

Black plate (88,1)Cadillac Escalade/Escalade ESV Owner Manual - 2012 - 2nd CRC - 11/29/11
10-88 Vehicle Care After installing the spare tire on the
vehicle, stop as soon as possible
and check that the spare is correctly
inflated. The spare tire is made to
perform well at speeds up to
112 km/h (70 mph) at the
recommended inflation pressure, so
you can finish your trip.
Have the damaged or flat road tire
repaired or replaced and installed
back onto the vehicle as soon as
possible so the spare tire will be
available in case it is needed again.
Do not mix tires and wheels of
different sizes, because they will not
fit. Keep the spare tire and its wheel
together. Jump Starting For more information about the
vehicle battery, see Battery on
page 10 ‑ 27 .
If the vehicle is a hybrid, see the
hybrid supplement for more
information.
If the vehicle's battery has run
down, you may want to use another
vehicle and some jumper cables to
start your vehicle. Be sure to use
the following steps to do it safely.
{ WARNING
Batteries can hurt you. They can
be dangerous because: .
They contain acid that can
burn you. .
They contain gas that can
explode or ignite. .
They contain enough
electricity to burn you.
(Continued) WARNING (Continued) If you do not follow these steps
exactly, some or all of these
things can hurt you.
Notice: Ignoring these steps
could result in costly damage to
the vehicle that would not be
covered by the warranty.
Trying to start the vehicle by
pushing or pulling it will not
work, and it could damage the
vehicle.
1. Check the other vehicle. It must
have a 12-volt battery with a
negative ground system.
Notice: Only use a vehicle that
has a 12-volt system with a
negative ground for jump
starting. If the other vehicle does
not have a 12-volt system with a
negative ground, both vehicles
can be damaged.