key CADILLAC ESCALADE ESV 2012 Workshop Manual
[x] Cancel search | Manufacturer: CADILLAC, Model Year: 2012, Model line: ESCALADE ESV, Model: CADILLAC ESCALADE ESV 2012Pages: 538, PDF Size: 8.42 MB
Page 235 of 538

Black plate (53,1)Cadillac Escalade/Escalade ESV Owner Manual - 2012 - 2nd CRC - 11/29/11
Infotainment System 7-53To create a six digit password, use
the numeric keypad on the remote
control. Press the ENTER button to
confirm. The default password is
136900.
To change the Parental Control
Password:
1. Press the SETUP button on the
remote control
2. Navigate to the Password
sub-menu under the Preference
Menu and press enter.
3. At the Old Password option,
enter the old password or the
default password (136900).
4. At the New Password option,
enter the new password (six
digits) using numeric buttons.
5. At the Confirm PWD option,
confirm the new password by
entering the new password
again.
6. Scroll to the OK button and
press ENTER. The message
“ Your password has been
changed ” displays. To reset the system back to the
factory default settings:
1. Press the SETUP button on the
remote control.
2. Use the left/right and down
navigation arrows on the remote
control to select the Default
sub-menu under the Preference
Page and press the ENTER
button to reset the settings. The
parental settings will not be
affected.
Vehicle Speakers Audio from the DVD player or an
auxiliary device can be heard
through the vehicle speakers or the
wireless/wired headphones, while
the radio is tuned to one of the six
frequencies selected on the Sound
Around portion of the system ’ s
remote control. See “ Remote
Control ” later in this section.
Only one audio source can be heard
through the vehicle ’ s speakers at a
time. The audio source being used is specified by the A/V (audio/video)
source selected on the driver side
head restraint video display screen.
To turn the RSE system audio
output to the vehicle ’ s speakers,
press Sound Around ON, on the
system ’ s remote control. The audio
from the RSE system can be heard
through the wireless/wired
headphones and the vehicle ’ s
speakers at the same time. The
volume on the radio can vary when
switching between the radio, CD,
DVD, MP3, or an auxiliary device.
Wireless Headphones The two wireless headphones
included with the Headrest DVD
RSE system will only work with the
Headrest DVD RSE system and are
marked for channel 3 and 4. The
wireless headphones must be used
within a line of sight of the
transmitter that is located above the
video display screen.
Page 245 of 538

Black plate (63,1)Cadillac Escalade/Escalade ESV Owner Manual - 2012 - 2nd CRC - 11/29/11
Infotainment System 7-63button cycles through Full Map and
the tab that displays the current
audio source (AM, FM, XM (if
equipped), CD, etc.). Full Map
displays the screen in full map view.
Selecting the audio tab splits the
screen between the map screen and
the current audio source
screen menu.
RPT (Repeat): Press to repeat the
last voice guidance prompt.
DEST (Destination): Press to
access the Destination Entry
screen. From this screen, you can
select from several options to plan a
route by entering destination points.
CONFIG (Configure): Press to
adjust several of the system's
features and preferences.
Touch-Sensitive Screen
Buttons
Touch-sensitive screen buttons are
located on the screen. When a
screen button has been selected, a beep sounds. Screen buttons are
highlighted when a feature is
available.
Alpha-Numeric Keyboard Letters of the alphabet, symbols,
punctuation, and numbers, when
available, displays on the navigation
screen as an alpha or numeric
keyboard. The alpha keyboard
displays when the system requires
entry of a city or street name.
All characters are touch-sensitive
screen buttons. Press a character to
select it.
A-Y (Accent Alphabet): Select to
enter letters with accent symbols.
This button may toggle to A-Z.
A-Z (Alphabet): Select to enter
letters from the alphabet. This
button may toggle to A-Y.
0-9 (Numbers): Select to enter
numbers.
U (Space): Select to enter a
space between characters or the
words of a name. Backspace: Select if an incorrect
character has been entered.
To make name entries easier, the
system only highlights the
characters that can follow the last
one entered. For example, if a Z is
entered, a T may not be available
for selection.
If a name does not display after
entry, it may need to be entered
differently or the map DVD disc may
not contain that information. See
Maps on page 7 ‑ 63 for more
information.
Maps This section includes basic
information that you need to know
about the map database.
The maps are stored on a compact
flash drive that is built into the
navigation system.
Detailed Areas
Road network attributes are
contained in the map database for
detailed areas. Attributes include
Page 253 of 538
Black plate (71,1)Cadillac Escalade/Escalade ESV Owner Manual - 2012 - 2nd CRC - 11/29/11
Infotainment System 7-71Enter the City Name or press the
Last 5 Cities screen button.
The Last 5 Cities screen
displays a list of the last five city
names that had been entered.
Select a city from the list and it
appears in the City name area.
If using the alpha keyboard,
finish entering the city name.
If five or fewer names are
available, a list displays. If more
than five are available, the List
screen button displays a
number. This number represents
the number of available cities.
Press this button to view the list
and select a city.
5. Once a city has been selected
the Street name category is
automatically selected for entry.
Start entering the street name.
If five or fewer names are
available, a list displays. If more
than five are available, the List
screen button displays a number. This number represents
the number of available streets.
Press this button to view the list.
6. Once a street has been
selected, press House to enter
the house number. The system
displays the house number
range that is available for the
street.
7. Press GO. The map screen, with
the destination marked displays.
8. Select the route preference for
Fastest, Shortest, or Other. The
system calculates and highlights
the route.
9. Press Start Guidance. The route
is now ready to be started.
See “ Getting Started on Your
Route ” in this section for more
information.
To enter a destination by entering
the street name first:
1. Press DEST.
2. Select
2 . 3. Select the state/province screen
button, if needed, to change the
current state or province. A list
of all of the available states and
provinces appear. Select the
state or province.
4. Select Street and start entering
the street name or press the
Last 5 Streets screen button.
If the street name is common,
the city might need to be entered
first.
The Last 5 Streets screen
displays a list of the last five
street names that had been
entered. Select a street from the
list and it appears in the Street
name area.
If using the alpha keyboard,
finish entering the street name.
If five or fewer names are
available, a list displays. If more
than five are available, the List
screen button displays a
number. This number represents
Page 254 of 538
Black plate (72,1)Cadillac Escalade/Escalade ESV Owner Manual - 2012 - 2nd CRC - 11/29/11
7-72 Infotainment System the number of available streets.
Press this button to view the list
and select a street.
5. Once a street has been
selected, select House to enter
the house number. The system
displays the house number
range that is available for the
street.
6. Once the house number is
selected, the city name
automatically populates. If there
is more than one city available
for selection, a list of cities
display. Select the city.
7. Press GO. The map screen, with
the destination marked displays.
8. Select the route preference for
Fastest, Shortest, or Other. The
system calculates and highlights
the route.
9. Press Start Guidance. The route
is now ready to be started.
See “ Getting Started on Your
Route ” in this section for more
information. To enter a destination by entering a
cross street:
1. Press DEST.
2. Press
2 .
3. Select the state/province screen
button, if needed, to change the
current state or province. A list
of all of the available states and
provinces appear. Select the
state or province.
4. Select Street and start entering
the street name or press the
Last 5 Streets screen button.
If the street name is common,
the city might need to be entered
first.
The Last 5 Streets screen
displays a list of the last five
street names that had been
entered. Select a street from the
list and it appears in the Street
name area.
If using the alpha keyboard,
finish entering the street name.
If five or fewer names are available, a list displays. If more
than five are available, the List
screen button displays a
number. This number represents
the number of available streets.
Press this button to view the list
and select a street.
5. Once a street has been
selected, select Cross Street
and start entering the cross
street name. If five or fewer
names are available, a list
displays. If more than five are
available, the List screen button
displays a number. This number
represents the number of
available streets. Press this
button to view the list and select
a street.
6. Press GO. The map screen, with
the destination marked displays.
7. Select the route preference for
Fastest, Shortest, or Other. The
system calculates and highlights
the route.
8. Press Start Guidance. The route
is now ready to be started.
Page 255 of 538
Black plate (73,1)Cadillac Escalade/Escalade ESV Owner Manual - 2012 - 2nd CRC - 11/29/11
Infotainment System 7-73See “ Getting Started on Your
Route ” in this section for more
information.
Point of Interest (POI)
The Point of Interest (POI)
destination entry method lets you
select a destination from the
POI list.
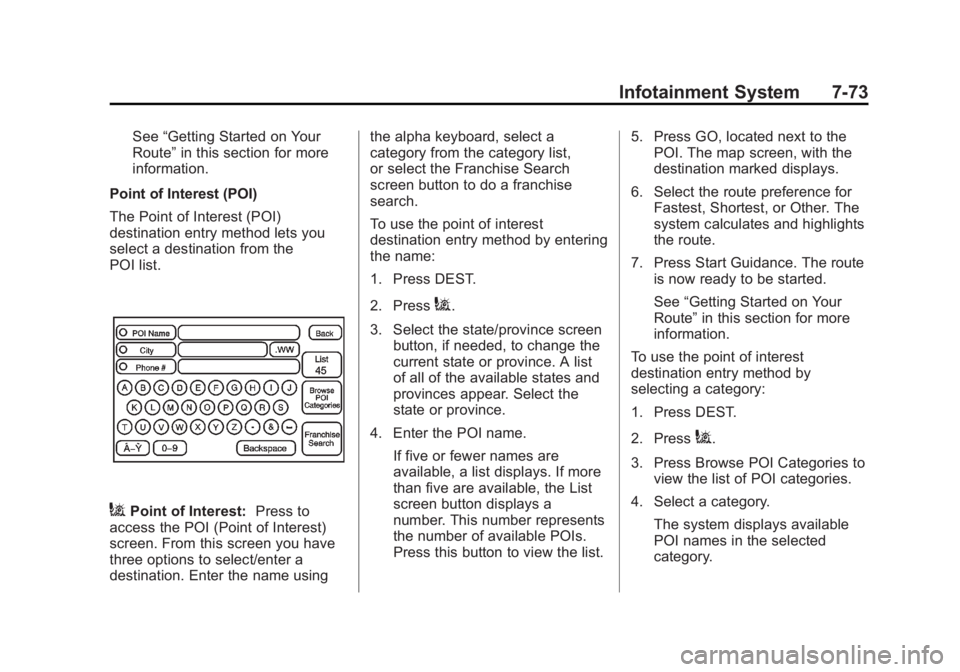
i Point of Interest: Press to
access the POI (Point of Interest)
screen. From this screen you have
three options to select/enter a
destination. Enter the name using the alpha keyboard, select a
category from the category list,
or select the Franchise Search
screen button to do a franchise
search.
To use the point of interest
destination entry method by entering
the name:
1. Press DEST.
2. Press
i .
3. Select the state/province screen
button, if needed, to change the
current state or province. A list
of all of the available states and
provinces appear. Select the
state or province.
4. Enter the POI name.
If five or fewer names are
available, a list displays. If more
than five are available, the List
screen button displays a
number. This number represents
the number of available POIs.
Press this button to view the list. 5. Press GO, located next to the
POI. The map screen, with the
destination marked displays.
6. Select the route preference for
Fastest, Shortest, or Other. The
system calculates and highlights
the route.
7. Press Start Guidance. The route
is now ready to be started.
See “ Getting Started on Your
Route ” in this section for more
information.
To use the point of interest
destination entry method by
selecting a category:
1. Press DEST.
2. Press
i .
3. Press Browse POI Categories to
view the list of POI categories.
4. Select a category.
The system displays available
POI names in the selected
category.
Page 265 of 538

Black plate (83,1)Cadillac Escalade/Escalade ESV Owner Manual - 2012 - 2nd CRC - 11/29/11
Infotainment System 7-83Adding Destinations to the
Address Book There are two ways to add a
destination to the address book: .
To add the current vehicle
position to the address book,
press the Mark screen button
from the map screen. The
system automatically saves the
current vehicle information in the
address book. When scrolling on
the map the Mark screen button
automatically adds the current
scrolled position information in
the address book. .
Press the Add to Address Book
screen button when available on
POI information screens,
Destination Entry screens,
or POI screens. The system
automatically saves this
information in the address book.
See “ Nav ” under Configure Menu on
page 7 ‑ 84 for information on editing
address book entries. Adding or Changing Preset
Destinations This feature allows additions or
changes one of five preset
destinations. When a destination
has been added as a preset
destination, it is available to select
from the Destination Entry screen.
See “ Preset Destination ” previously
for information on how to select a
preset destination as a final
destination.
To store the current vehicle position
as a preset destination:
1. Press Mark from the map screen
to add the current vehicle
position to the address book.
The Address Book screen
appears.
2. Press Name. An alpha-keyboard
displays. Enter the name. Press
OK then press Back to return to
the address book information
screen. 3. Press and hold one of the
buttons at the bottom of the
screen until the name appears in
that preset destination screen
button. It is now available to
select from the Destination Entry
screen.
To store an address book entry as a
preset destination:
1. Press CONFIG.
2. Press the Nav screen button.
3. Press Edit/View.
4. Select the address book entry to
be stored as the preset
destination. Press Name to add
a name, if needed.
5. Press and hold one of the
buttons at the bottom of the
screen until the name appears in
that preset destination screen
button. It is now available to
select from the Destination Entry
screen.
Page 267 of 538

Black plate (85,1)Cadillac Escalade/Escalade ESV Owner Manual - 2012 - 2nd CRC - 11/29/11
Infotainment System 7-85Volume: Press + or − to increase
or to decrease the volume of the
voice prompts. The system will
respond with the adjusted voice
level.
Voice Guidance: Press On or Off
to turn voice instructions on and off
while traveling on a planned route.
Route Preference
Press the Route Preference screen
button to change route options
when the system calculates a route.
Allow Major Roads: This feature
allows the system to use major
roads when calculating a planned
route.
Allow Toll Roads: This feature
allows the system to use toll roads
when calculating a planned route.
Allow Ferrys: This feature allows
the system to use ferries when
calculating a planned route. Allow Time and Seasonal
Restricted Roads: This feature
allows the system to use time
restricted and seasonal roads when
calculating a planned route.
Edit Address Book — How to Add
To add an address to the address
book, see “ Adding Destinations to
the Address Book ” under
Destination on page 7 ‑ 70 .
Edit Address Book — Edit/View
To edit the name of an
address book:
1. Press CONFIG.
2. Press the Nav screen button.
3. Press Edit/View Address Book.
4. Select the Address book entry. 5. Press the Name screen button
and use the alpha keyboard to
edit or add the name.
6. Press OK to save your changes,
then press Back to return to the
Address Book information
screen.
To add or change the phone number
of an address book entry:
1. Press CONFIG.
2. Press the Nav screen button.
3. Press Edit/View Address Book.
4. Select the address book entry to
change.
Page 268 of 538

Black plate (86,1)Cadillac Escalade/Escalade ESV Owner Manual - 2012 - 2nd CRC - 11/29/11
7-86 Infotainment System 5. Press the Phone # screen button
and use the numeric keyboard to
input or change the phone
number.
6. Press OK to save your changes,
then press Back to return to the
Address Book information
screen.
To change the map icon of an
address book entry:
1. Press CONFIG.
2. Press the Nav screen button.
3. Press Edit/View Address Book.
4. Select the address book entry to
change.
5. Press the Icon screen button.
6. Select an icon from the list.
To add a voice tag to an address
book entry:
1. Press CONFIG.
2. Press the Nav screen button.
3. Press Edit/View Address Book.
4. Press Add Voice Tag. 5. The system will ask for you to
state the name. You will have
four seconds to state the name.
The system will respond back
with the name and prompt you to
repeat the name for
confirmation.
To delete an address book entry:
1. Press CONFIG.
2. Press the Nav screen button.
3. Press Edit/View Address Book.
4. Select the address book entry to
delete.
5. Press Delete to delete the
address book entry.
6. A confirmation pop-up will
display. Press OK to delete;
press Cancel to cancel the
operation.
To delete the entire address book:
1. Press CONFIG.
2. Press the Nav screen button.
3. Press Edit/View Address Book. 4. A list of all the address book
entries will display. Press and
hold Clear All.
5. A confirmation pop-up will
display. Press OK to delete;
press Cancel to cancel the
operation.
Map Database Information
Use the Map Database Information/
Remove Map Data screen button to
view the coverage areas of the map
database or to replace the map
database.
Page 285 of 538
Black plate (103,1)Cadillac Escalade/Escalade ESV Owner Manual - 2012 - 2nd CRC - 11/29/11
Infotainment System 7-103
Phone Bluetooth For vehicles equipped with
Bluetooth capability, the system can
interact with many cell phones,
allowing: .
Placement and receipt of calls in
a hands-free mode. .
Sharing of the cell phone ’ s
address book or contact list with
the vehicle.
To minimize driver distraction,
before driving, and with the vehicle
parked: .
Become familiar with the
features of the cell phone.
Organize the phone book and
contact lists clearly and delete
duplicate or rarely used entries.
If possible, program speed dial
or other shortcuts. .
Review the controls and
operation of the infotainment
system. .
Pair cell phone(s) to the vehicle.
The system may not work with
all cell phones. See “ Pairing ” in
this section for more information. .
If the cell phone has voice
dialing capability, learn to use
that feature to access the
address book or contact list. See
“ Voice Pass-Thru ” in this section
for more information. .
See “ Storing and Deleting Phone
Numbers ” in this section for
more information.
{ WARNING
When using a cell phone, it can
be distracting to look too long or
too often at the screen of the
phone or the infotainment
(navigation) system. Taking your
eyes off the road too long or too
often could cause a crash
resulting in injury or death. Focus
your attention on driving. A Bluetooth system can use a
Bluetooth ‐ capable cell phone with a
Hands ‐ Free Profile to make and
receive phone calls. The system
can be used while the key is in the
ON/RUN or ACC/ACCESSORY
position. The range of the Bluetooth
system can be up to 9.1 m (30 ft).
Not all phones support all functions,
and not all phones work with the
in-vehicle Bluetooth system. See
www.gm.com/bluetooth for more
information on compatible phones.
Voice Recognition The Bluetooth system uses voice
recognition to interpret voice
commands to dial phone numbers
and name tags.
For additional information, say
“ Help ” while you are in a voice
recognition menu.
Noise: Keep interior noise levels to
a minimum. The system may not
recognize voice commands if there
is too much background noise.
Page 306 of 538
Black plate (6,1)Cadillac Escalade/Escalade ESV Owner Manual - 2012 - 2nd CRC - 11/29/11
9-6 Driving and Operating Remember: Antilock brakes help
avoid only the braking skid.
Off-Road Driving All-wheel-drive vehicles can be
used for off-road driving. Vehicles
without all-wheel drive and vehicles
not equipped with All Terrain (AT) or
On-Off Road (OOR) tires must not
be driven off-road except on a level,
solid surface. To contact the tire
manufacturer for more information
about the original equipment tires,
see the Limited Warranty and
Owner Assistance Information
manual.
Controlling the vehicle is the key to
successful off-road driving. One of
the best ways to control the vehicle
is to control the speed. { WARNINGWhen driving off-road, bouncing
and quick changes in direction
can easily throw you out of
position. This could cause you to
lose control and crash. You and
your passengers should always
wear safety belts.
Before Driving Off-Road .
Have all necessary maintenance
and service work completed. .
Fuel the vehicle, fill fluid levels,
and check inflation pressure in
all tires, including the spare,
if equipped. .
Read all the information about
all-wheel-drive vehicles in this
manual. .
Make sure all underbody
shields, if equipped, are properly
attached. .
Know the local laws that apply to
off-road driving.
To gain more ground clearance if
needed, it may be necessary to
remove the front fascia lower
air dam.
Notice: Operating the vehicle for
extended periods without the
front fascia lower air dam
installed can cause improper air
flow to the engine. Re ‐ attach the
front fascia air dam after off-road
driving.