set clock CADILLAC ESCALADE ESV 2012 Owners Manual
[x] Cancel search | Manufacturer: CADILLAC, Model Year: 2012, Model line: ESCALADE ESV, Model: CADILLAC ESCALADE ESV 2012Pages: 538, PDF Size: 8.42 MB
Page 20 of 538

Black plate (14,1)Cadillac Escalade/Escalade ESV Owner Manual - 2012 - 2nd CRC - 11/29/11
1-14 In Brief
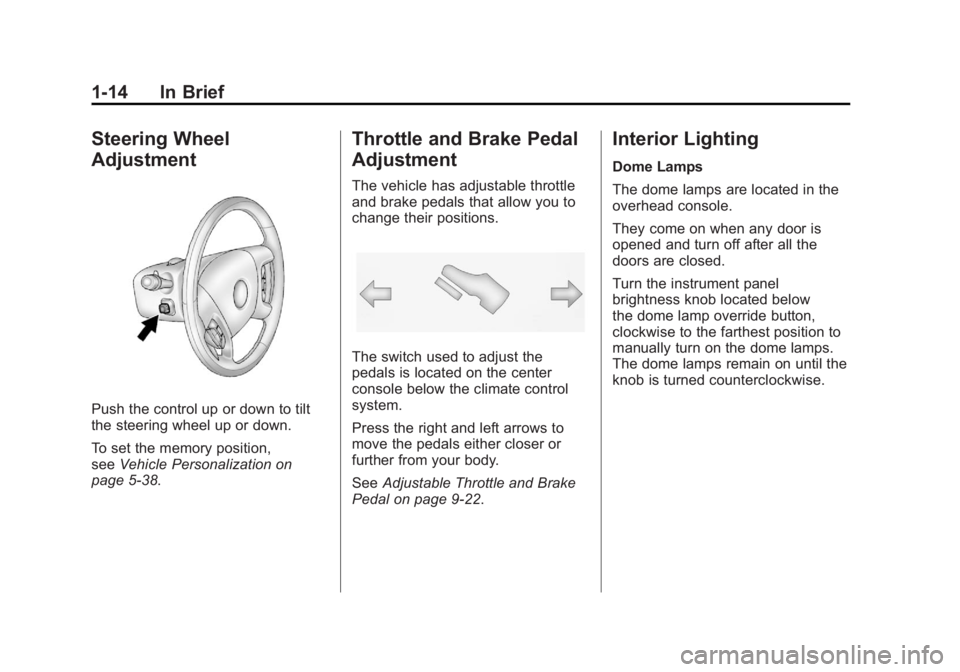
Steering Wheel
Adjustment
Push the control up or down to tilt
the steering wheel up or down.
To set the memory position,
see Vehicle Personalization on
page 5 ‑ 38 . Throttle and Brake Pedal
Adjustment The vehicle has adjustable throttle
and brake pedals that allow you to
change their positions.
The switch used to adjust the
pedals is located on the center
console below the climate control
system.
Press the right and left arrows to
move the pedals either closer or
further from your body.
See Adjustable Throttle and Brake
Pedal on page 9 ‑ 22 .Interior Lighting Dome Lamps
The dome lamps are located in the
overhead console.
They come on when any door is
opened and turn off after all the
doors are closed.
Turn the instrument panel
brightness knob located below
the dome lamp override button,
clockwise to the farthest position to
manually turn on the dome lamps.
The dome lamps remain on until the
knob is turned counterclockwise.
Page 127 of 538

Black plate (7,1)Cadillac Escalade/Escalade ESV Owner Manual - 2012 - 2nd CRC - 11/29/11
Instruments and Controls 5-7Turn off the vehicle, move the
magnetic item, then turn on the
vehicle and calibrate the compass.
To calibrate the compass, use the
following procedure:
Compass Calibration Procedure
1. Before calibrating the compass,
make sure the compass zone is
set to the variance zone in
which the vehicle is located.
See “ Compass Variance (Zone)
Procedure ” earlier in this
section.
Do not operate any switches
such as window, sunroof,
climate controls, seats, etc.
during the calibration procedure. 2. Press the vehicle information
button until PRESS
V TO
CALIBRATE COMPASS
displays.
3. Press the set/reset button to
start the compass calibration.
4. The DIC will display
CALIBRATING: DRIVE IN
CIRCLES. Drive the vehicle
in tight circles at less than
8 km/h (5 mph) to complete the
calibration. The DIC will display
CALIBRATION COMPLETE
for a few seconds when the
calibration is complete. The DIC
display will then return to the
previous menu. Clock The analog clock is not connected
with any other vehicle system and
runs by itself.
To adjust the clock, do the following:
1. Locate the adjustment button,
near the lower left corner of the
clock.
2. Push and hold the adjustment
button to advance the clock
hands. Holding the button down
will cause the clock to advance
faster. Release the button before
you get to the desired time.
3. Push and release the button to
increase the time by one minute
increments until the desired time
is reached.
Page 188 of 538

Black plate (6,1)Cadillac Escalade/Escalade ESV Owner Manual - 2012 - 2nd CRC - 11/29/11
7-6 Infotainment System Setting the Clock The navigation system time and the
analog clock operate independently.
Changing the time through the
navigation system does not change
the time on the analog clock. See
Clock on page 5 ‑ 7 to change the
analog clock time.
To set the time for the navigation
system:
1. Press CONFIG to enter the
configure menu options, then
press CONFIG again, repeatedly
until the time is selected or touch
the time screen button.
2. Press the Hours and Minutes −
and + to decrease or to increase
the time.
See “ Setting the Clock ” under
Configure Menu on page 7 ‑ 84 for
more information. Entering an Address and Point
of Interest, and Storing Preset
Destinations Entering an Address
Enter a destination by inputting the
city name first:
1. Press
O to turn the system on.
2. A caution may appear. Press OK
to proceed.
3. Press DEST.
4. Press
2 (Address Entry).
5. Select the state/province screen
button, if needed, to change the
current state or province. A list
of all of the available states and
provinces appear. Select the
state or province.
6. Once a state or province has
been selected the City name
category is automatically
selected for entry.
If five or fewer names are
available, a list displays. If more
than five are available, the List screen button displays a
number. This number represents
the number of available cities.
Press this button to view the list
and select a city.
7. Once a city has been selected
the Street name category is
automatically selected for entry.
If five or fewer streets are
available for the selected city,
the system displays the list of
streets. If more than five streets
are available the system
displays the alpha keyboard.
Start entering the street name.
If five or fewer names are
available, a list displays. If more
than five are available, the List
screen button displays a
number. This button represents
the number of available streets.
Select this button to view the list
and select a street.
8. Once a street has been
selected, select the House #
screen button to enter the house
Page 212 of 538

Black plate (30,1)Cadillac Escalade/Escalade ESV Owner Manual - 2012 - 2nd CRC - 11/29/11
7-30 Infotainment System artist, or album. It may take a
few minutes for the system to
sort the MP3.
y /
© or
¨ /
z (Seek/Scan):
1. To seek tracks, press the up
arrow to go to the next track.
2. Press the down arrow to go to
the start of the current track,
if more than eight seconds have
played.
3. If either arrow is pressed more
than once, the player continues
moving backward or forward
through the CD. The sound
mutes while seeking.
w (Tuning Knob):
1. Turn counterclockwise one notch
to go to the start of the current
track, turn it again to go to the
previous track.
2. Turn clockwise to go to the next
track. When playing an MP3 the rear seat
operator can power on the RSE
video screen and use the remote
control to navigate through the MP3.
Auxiliary Devices Using the Auxiliary Input Jack The navigation system has an
auxiliary input jack located on the
faceplate and in the center console.
This is not an audio output; do not
plug the headphone set into the
front auxiliary input jack. An external
audio device such as an iPod,
laptop computer, MP3 player, CD
player, or cassette tape player, etc.
can be connected to the auxiliary
input jack for use as another audio
source.
Drivers are encouraged to set up
any auxiliary device while the
vehicle is in P (Park). See Defensive
Driving on page 9 ‑ 3 for more
information on driver distraction. To use a portable audio player,
connect a 1/8 in (3.5 mm) cable to
the radio's front auxiliary input jack.
When a device is connected, press
AUDIO, then press AUDIO again
until AUX is selected or press the
AUX screen button to begin playing
audio from the device over the
vehicle speakers.
For optimal sound quality, increase
the portable audio device's volume
to the loudest level.
It is always best to power the
portable audio device through its
own battery while playing.
The vehicle may have a rear
entertainment system (RSE) with a
second and third row screen. The
RSE has audio adapters to allow
you to connect auxiliary devices.
The audio can be heard through the
speakers or through the wireless or
wired headphones. See the Rear
Seat Infotainment user guide for
more information.
Page 278 of 538

Black plate (96,1)Cadillac Escalade/Escalade ESV Owner Manual - 2012 - 2nd CRC - 11/29/11
7-96 Infotainment System For more information about the Rear
Vision Camera, see Rear Vision
Camera (RVC) on page 9 ‑ 48 in the
vehicle owner manual.
Rear Display(s)
Press the Rear Display(s) screen
button to allow the choice of
sources for rear display between
front disc, rear aux, or usb,
if connected. Setting the Clock The navigation system time and the
analog clock operate independently.
Changing the time through the
navigation system does not change
the time on the analog clock. See
Clock on page 5 ‑ 7 to change the
analog clock time.
Press CONFIG to enter the
configure menu options, then press
CONFIG repeatedly until the time is
selected or press the time screen
button.
Hours: Press − or + to decrease or
increase the hours.
Minutes: Press − or + to decrease
or increase the minutes.
12/24 Format: Select the
12 screen button for standard time;
select the 24 screen button for
military time. Global Positioning
System (GPS) The navigation system determines
the position of the vehicle by using
satellite signals, various vehicle
signals, and map data.
At times, other interferences such
as the satellite condition, road
configuration, the condition of the
vehicle and/or other circumstances
can interfere with the navigation
system's ability to determine the
accurate position of the vehicle.
The GPS shows the current position
of the vehicle using signals sent by
the GPS Satellites of the United
States Department of Defense.
When the vehicle is not receiving
signals from the satellites, a symbol
appears on the map screen. Refer
to Global Positioning System (GPS)
on page 7 ‑ 96 .
Page 294 of 538

Black plate (2,1)Cadillac Escalade/Escalade ESV Owner Manual - 2012 - 2nd CRC - 11/29/11
8-2 Climate Controls I. REAR (Rear Climate Control)
J. Air Delivery Mode Control
Off: Press the driver side
temperature knob to turn the climate
control system off. Outside air still
enters the vehicle, and is directed to
the floor. This direction can be
changed by pressing the mode
button. The temperature can also be
adjusted using either temperature
knob. Press the up or down arrows
on the fan switch, the defrost button,
the AUTO button, driver side
temperature knob, or the air
conditioning button to turn the
system on when it is off.
Driver and Passenger Side
Temperature Knob
The driver and passenger side
temperature knobs are used to
adjust the temperature of the air
coming through the system on the
driver or passenger side of the
vehicle. The temperature can be
adjusted even if the system is turned off. This is possible since
outside air always flows through the
system as the vehicle is moving
forward unless it is set to
recirculation mode. See
“ Recirculation ” later in this section.
Turn the knob clockwise or
counterclockwise to increase or
decrease the cabin temperature.
The display will show the
temperature setting increasing or
decreasing.
Set the passenger temperature
setting to match the driver
temperature setting by pressing the
passenger temperature knob.
When in defrost mode the
passenger temperature setting
cannot be changed.
Automatic Operation
AUTO (Automatic): When
automatic operation is active the
system will control the inside
temperature, the air delivery, and
the fan speed. Use the steps below to place the
entire system in automatic mode:
1. Press the AUTO button.
When AUTO is selected, the
display will change to show the
current temperature(s) and
AUTO come on the display. The
current delivery mode and fan
speed will also be displayed for
approximately 5 seconds.
When AUTO is selected, the air
conditioning operation and air
inlet will be automatically
controlled. The air conditioning
compressor will run when the
outside temperature is over
about 4°C (40°F). The air inlet
will normally be set to outside
air. If it is hot outside, the air
inlet may automatically switch to
recirculate inside air to help
quickly cool down the vehicle.
The light on the button comes on
in recirculation.