CADILLAC ESCALADE ESV 2014 Owner's Manual
Manufacturer: CADILLAC, Model Year: 2014, Model line: ESCALADE ESV, Model: CADILLAC ESCALADE ESV 2014Pages: 508, PDF Size: 7.64 MB
Page 111 of 508

Black plate (3,1)Cadillac Escalade/Escalade ESV Owner Manual (GMNA-Localizing-U.S./
Canada/Mexico-6081529) - 2014 - CRC 1st Edition - 4/23/13
Storage 4-3
Roof Rack System
{Warning
If something is carried on top of
the vehicle that is longer or wider
than the roof rack—like paneling,
plywood, or a mattress —the
wind can catch it while the vehicle
is being driven. The item being
carried could be violently torn off,
and this could cause a collision
and damage the vehicle. Never
carry something longer or wider
than the roof rack on top of the
vehicle unless using a GM
certified accessory carrier.
For vehicles with a roof rack, the
rack can be used to load items. For
roof racks that do not have
crossrails included, GM Certified
crossrails can be purchased as an
accessory. See your dealer for
additional information. For vehicles with crossrails, they
can be moved back and forth to
help secure cargo. To adjust them,
turn the knob located at each end of
the crossrail counterclockwise until
the crossrail can move freely. To
secure the crossrail, turn the knob
located at each end of the crossrail
clockwise until tightened. Tie the
load to the siderails or siderail
supports.
Notice:
Loading cargo on the
roof rack that weighs more than
91 kg (200 lb) or hangs over the
rear or sides of the vehicle may
damage the vehicle. Load cargo
so that it rests evenly between
the crossrails, making sure to
fasten cargo securely.
To prevent damage or loss of cargo
when driving, check to make sure
crossrails and cargo are securely
fastened. Loading cargo on the roof
rack will make the vehicle’ s center
of gravity higher. Avoid high speeds,
sudden starts, sharp turns, sudden
braking or abrupt maneuvers,
otherwise it may result in loss of control. If driving for a long distance,
on rough roads, or at high speeds,
occasionally stop the vehicle to
make sure the cargo remains in its
place.
Do not exceed the maximum vehicle
capacity when loading the vehicle.
For more information on vehicle
capacity and loading, see
Vehicle
Load Limits on page 9-14.
To prevent damage or loss of cargo,
check now and then to make sure
the luggage and cargo are still
securely fastened.
Be sure the cargo is properly
loaded.
.If small heavy objects are placed
on the roof, place the load in the
area over the rear wheels
(behind the rear side door on
extended models). If needed, cut
a piece of 3/8 inch plywood to fit
inside the crossrails and
siderails to spread the load.
If plywood is used, tie it to the
siderail supports.
Page 112 of 508

Black plate (4,1)Cadillac Escalade/Escalade ESV Owner Manual (GMNA-Localizing-U.S./
Canada/Mexico-6081529) - 2014 - CRC 1st Edition - 4/23/13
4-4 Storage
.Tie the load to the crossrails or
the siderail supports. Use the
crossrails only to keep the load
from sliding. To move the
crossrails, pull out on the latch
release handle at each end.
Slide the crossrail to the desired
position balancing the force side
to side. Push the release handle
back into the latched position
and slide the crossrail back and
forth slightly to be sure the latch
snaps securely into place..If needed to carry long items,
move the crossrails as far apart
as they will go. Tie the load to
the crossrails and the siderails
or siderail supports. Also tie the
load to the bumpers. Do not tie
the load so tightly that the
crossrails or siderails are
damaged.
.After moving a crossrail, be sure
it is securely locked into the
siderail.A Center High-Mounted Stoplamp
(CHMSL) is located above the glass
or above the rear load doors.
If items are loaded on the roof of the
vehicle, care should be taken not to
block or damage the CHMSL unit.
Page 113 of 508

Black plate (1,1)Cadillac Escalade/Escalade ESV Owner Manual (GMNA-Localizing-U.S./
Canada/Mexico-6081529) - 2014 - CRC 1st Edition - 4/23/13
Instruments and Controls 5-1
Instruments and
Controls
Controls
Steering Wheel Adjustment . . . 5-2
Steering Wheel Controls . . . . . . 5-2
Heated Steering Wheel . . . . . . . 5-3
Horn . . . . . . . . . . . . . . . . . . . . . . . . . . 5-3
Windshield Wiper/Washer . . . . . 5-3
Rear Window Wiper/Washer . . . . . . . . . . . . . . . . . . . . . . 5-4
Compass . . . . . . . . . . . . . . . . . . . . . 5-4
Clock . . . . . . . . . . . . . . . . . . . . . . . . . 5-6
Power Outlets . . . . . . . . . . . . . . . . . 5-6
Cigarette Lighter . . . . . . . . . . . . . . 5-8
Ashtrays . . . . . . . . . . . . . . . . . . . . . . 5-8
Warning Lights, Gauges, and
Indicators
Warning Lights, Gauges, and Indicators . . . . . . . . . . . . . . . . . . . . 5-9
Instrument Cluster . . . . . . . . . . . 5-10
Speedometer . . . . . . . . . . . . . . . . 5-11
Odometer . . . . . . . . . . . . . . . . . . . . 5-11
Trip Odometer . . . . . . . . . . . . . . . 5-11
Tachometer . . . . . . . . . . . . . . . . . . 5-11
Fuel Gauge . . . . . . . . . . . . . . . . . . 5-11 Engine Coolant Temperature
Gauge . . . . . . . . . . . . . . . . . . . . . . 5-12
Safety Belt Reminders . . . . . . . 5-12
Airbag Readiness Light . . . . . . 5-13
Passenger Airbag Status Indicator . . . . . . . . . . . . . . . . . . . . 5-13
Charging System Light . . . . . . 5-14
Malfunction Indicator Lamp . . . . . . . . . . . . . 5-15
Brake System Warning Light . . . . . . . . . . . . . . . . . . . . . . . 5-17
Antilock Brake System (ABS) Warning Light . . . . . . . . . . . . . . 5-18
Tow/Haul Mode Light . . . . . . . . 5-18
StabiliTrak
®OFF Light . . . . . . . 5-19
Traction Control System (TCS)/StabiliTrak
®Light . . . . 5-19
Tire Pressure Light . . . . . . . . . . 5-19
Engine Oil Pressure Light . . . . 5-20
Security Light . . . . . . . . . . . . . . . . 5-20
High-Beam On Light . . . . . . . . . 5-21
Front Fog Lamp Light . . . . . . . . 5-21
Lamps On Reminder . . . . . . . . . 5-21
Cruise Control Light . . . . . . . . . 5-21
Information Displays
Driver Information Center (DIC) . . . . . . . . . . . . . . . 5-22
Vehicle Messages
Vehicle Messages . . . . . . . . . . . 5-27
Battery Voltage and ChargingMessages . . . . . . . . . . . . . . . . . . 5-27
Brake System Messages . . . . 5-27
Door Ajar Messages . . . . . . . . . 5-28
Engine Cooling System Messages . . . . . . . . . . . . . . . . . . 5-28
Engine Oil Messages . . . . . . . . 5-29
Engine Power Messages . . . . 5-30
Fuel System Messages . . . . . . 5-30
Key and Lock Messages . . . . . 5-30
Lamp Messages . . . . . . . . . . . . . 5-30
Object Detection System Messages . . . . . . . . . . . . . . . . . . 5-31
Ride Control System Messages . . . . . . . . . . . . . . . . . . 5-32
Airbag System Messages . . . . 5-33
Security Messages . . . . . . . . . . 5-33
Tire Messages . . . . . . . . . . . . . . . 5-33
Transmission Messages . . . . . 5-34
Vehicle Reminder Messages . . . . . . . . . . . . . . . . . . 5-35
Washer Fluid Messages . . . . . 5-35
Vehicle Personalization
Vehicle Personalization . . . . . . 5-35
Page 114 of 508

Black plate (2,1)Cadillac Escalade/Escalade ESV Owner Manual (GMNA-Localizing-U.S./
Canada/Mexico-6081529) - 2014 - CRC 1st Edition - 4/23/13
5-2 Instruments and Controls
Universal Remote System
Universal Remote System . . . 5-44
Universal Remote SystemProgramming . . . . . . . . . . . . . . . 5-44
Universal Remote System Operation . . . . . . . . . . . . . . . . . . 5-49Controls
Steering Wheel
Adjustment
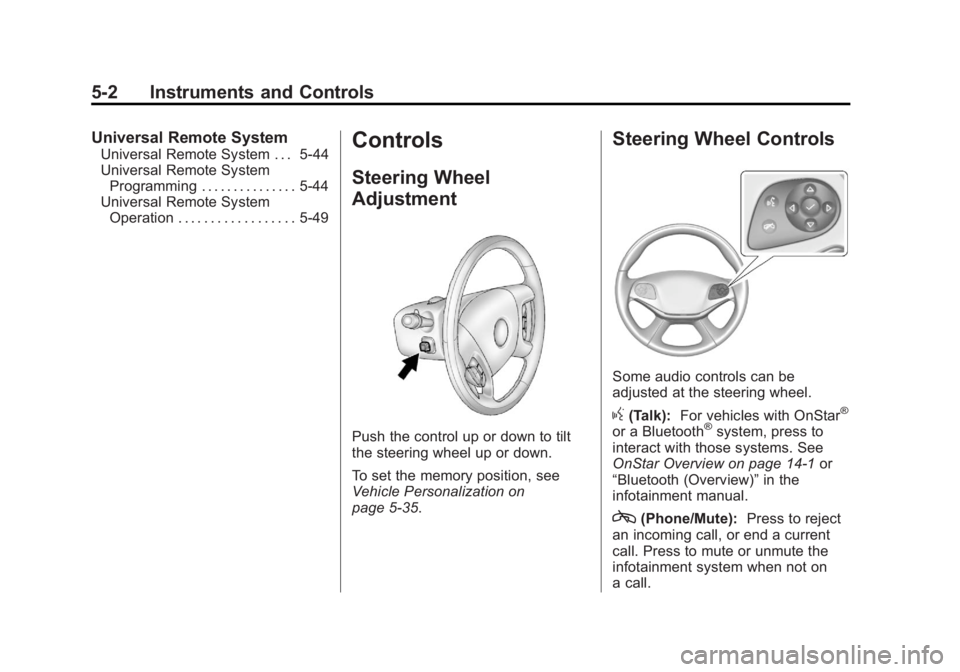
Push the control up or down to tilt
the steering wheel up or down.
To set the memory position, see
Vehicle Personalization on
page 5-35.
Steering Wheel Controls
Some audio controls can be
adjusted at the steering wheel.
g(Talk): For vehicles with OnStar®
or a Bluetooth®system, press to
interact with those systems. See
OnStar Overview on page 14-1 or
“Bluetooth (Overview)” in the
infotainment manual.
c(Phone/Mute): Press to reject
an incoming call, or end a current
call. Press to mute or unmute the
infotainment system when not on
a call.
Page 115 of 508

Black plate (3,1)Cadillac Escalade/Escalade ESV Owner Manual (GMNA-Localizing-U.S./
Canada/Mexico-6081529) - 2014 - CRC 1st Edition - 4/23/13
Instruments and Controls 5-3
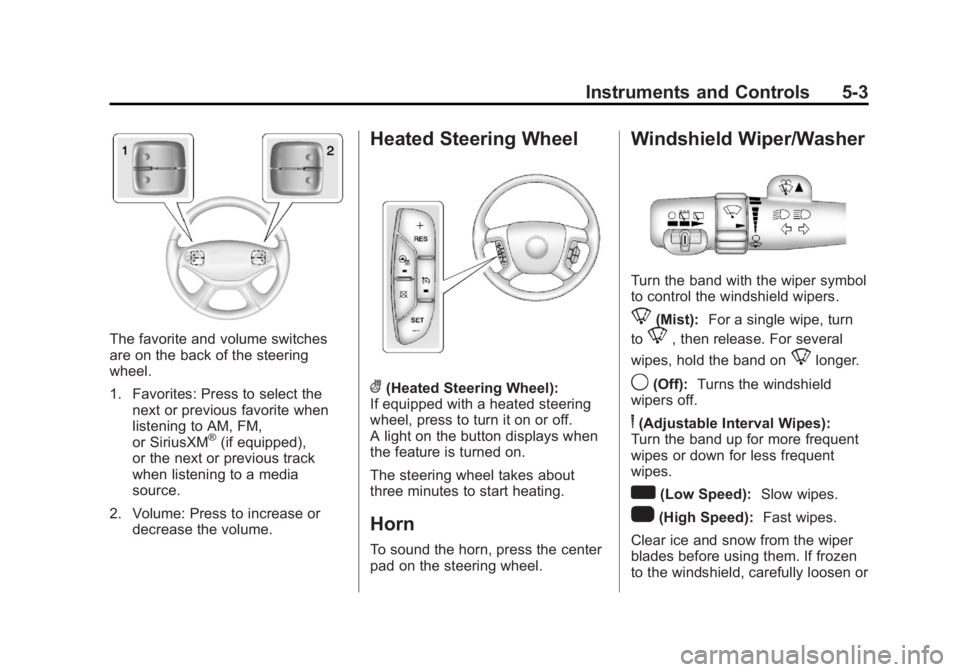
The favorite and volume switches
are on the back of the steering
wheel.
1. Favorites: Press to select thenext or previous favorite when
listening to AM, FM,
or SiriusXM
®(if equipped),
or the next or previous track
when listening to a media
source.
2. Volume: Press to increase or decrease the volume.
Heated Steering Wheel
((Heated Steering Wheel):
If equipped with a heated steering
wheel, press to turn it on or off.
A light on the button displays when
the feature is turned on.
The steering wheel takes about
three minutes to start heating.
Horn
To sound the horn, press the center
pad on the steering wheel.
Windshield Wiper/Washer
Turn the band with the wiper symbol
to control the windshield wipers.
8(Mist): For a single wipe, turn
to
8, then release. For several
wipes, hold the band on
8longer.
9(Off): Turns the windshield
wipers off.
6(Adjustable Interval Wipes):
Turn the band up for more frequent
wipes or down for less frequent
wipes.
w(Low Speed): Slow wipes.
1(High Speed): Fast wipes.
Clear ice and snow from the wiper
blades before using them. If frozen
to the windshield, carefully loosen or
Page 116 of 508

Black plate (4,1)Cadillac Escalade/Escalade ESV Owner Manual (GMNA-Localizing-U.S./
Canada/Mexico-6081529) - 2014 - CRC 1st Edition - 4/23/13
5-4 Instruments and Controls
thaw them. Damaged wiper blades
should be replaced. SeeWiper
Blade Replacement on page 10-28.
Heavy snow or ice can overload the
wiper motor. A circuit breaker will
stop the motor until it cools down.
Windshield Washer
{Warning
In freezing weather, do not use
the washer until the windshield is
warmed. Otherwise the washer
fluid can form ice on the
windshield, blocking your vision.
L(Washer Fluid): Push the
paddle at the top of the multifunction
lever, to spray washer fluid on the
windshield. The wipers clear the
window and then either stop or
return to the preset speed.
Rear Window Wiper/
Washer
The rear wiper control is located on
the turn and lane-change lever.
To turn the rear wiper on, slide the
lever to a wiper position.
((Off): Turns the wiper off.
5(Rear Wiper Delay): Turns on
the rear wiper delay.
Z(Rear Wiper): Turns on the rear
wiper.
=(Rear Wiper Wash): Press this
button on the end of the lever to
spray washer fluid on the rear
window. The wipers will clear the
rear window and either stop or
return to your preset speed. For
more washer cycles, press and hold
the button.
The rear window wiper/washer will
not operate if the liftgate or liftglass
is open or ajar. If the liftgate or
liftglass is opened while the rear
wiper is on, the wiper returns to the
parked position and stops.
Compass
Your vehicle may have a compass
in the Driver Information
Center (DIC).
Compass Zone
The zone is set to zone eight upon
leaving the factory. Your dealer will
set the correct zone for your
location.
Under certain circumstances, such
as during a long distance
cross-country trip or moving to a
new state or province, it will be
necessary to compensate for
compass variance by resetting the
zone through the DIC if the zone is
not set correctly.
Compass variance is the difference
between the earth's magnetic north
and true geographic north. If the
compass is not set to the zone
where you live, the compass may
give false readings. The compass
must be set to the variance zone in
which the vehicle is traveling.
Page 117 of 508

Black plate (5,1)Cadillac Escalade/Escalade ESV Owner Manual (GMNA-Localizing-U.S./
Canada/Mexico-6081529) - 2014 - CRC 1st Edition - 4/23/13
Instruments and Controls 5-5
To adjust for compass variance, use
the following procedure:
Compass Variance (Zone)
Procedure
1. Do not set the compass zonewhen the vehicle is moving. Only
set it when the vehicle is in
P (Park).
Press the vehicle information
button until PRESS
VTO
CHANGE COMPASS ZONE
displays.
2. Find the vehicle's current location and variance zone
number on the map.
Zones 1 through 15 are
available.
3. Press the set/reset button to scroll through and select the
appropriate variance zone.
4. Press the trip/fuel button until the vehicle heading, for
example, N for North, is
displayed in the DIC.
5. If calibration is necessary, calibrate the compass. See
“Compass Calibration
Procedure” following.
Compass Calibration
The compass can be manually
calibrated. Only calibrate the
compass in a magnetically clean
and safe location, such as an open
parking lot, where driving the
vehicle in circles is not a danger.
It is suggested to calibrate away from tall buildings, utility wires,
manhole covers, or other industrial
structures, if possible.
If CAL should ever appear in the
DIC display, the compass should be
calibrated.
If the DIC display does not show a
heading, for example, N for North,
or the heading does not change
after making turns, there may be a
strong magnetic field interfering with
the compass. Such interference
may be caused by a magnetic CB or
cell phone antenna mount, a
magnetic emergency light, magnetic
note pad holder, or any other
magnetic item. Turn off the vehicle,
move the magnetic item, then turn
on the vehicle and calibrate the
compass.
Page 118 of 508

Black plate (6,1)Cadillac Escalade/Escalade ESV Owner Manual (GMNA-Localizing-U.S./
Canada/Mexico-6081529) - 2014 - CRC 1st Edition - 4/23/13
5-6 Instruments and Controls
To calibrate the compass, use the
following procedure:
Compass Calibration Procedure
1. Before calibrating the compass,make sure the compass zone is
set to the variance zone in which
the vehicle is located. See
“Compass Variance (Zone)
Procedure” earlier in this
section.
Do not operate any switches
such as window, sunroof,
climate controls, seats, etc.
during the calibration procedure.
2. Press the vehicle information button until PRESS
VTO
CALIBRATE COMPASS
displays.
3. Press the set/reset button to start the compass calibration.
4. The DIC will display CALIBRATING: DRIVE IN
CIRCLES. Drive the vehicle in
tight circles at less than 8 km/h
(5 mph) to complete the
calibration. The DIC will display CALIBRATION COMPLETE for a
few seconds when the
calibration is complete. The DIC
display will then return to the
previous menu.
Clock
Setting the Time and Date
To set the time or date:
1. Select Settings from the Home
Page, then select Time and Date
Settings.
2. Select the desired function.
3. Turn the MENU knob to increase or decrease the value.
4. Press the MENU knob to go to the next value. After the last
value is selected the system will
update and return to the Settings
menu. Press
oBACK to go to
the last menu and save the
changes. If auto timing is set, the time
displayed on the clock may not
update immediately when driving
into a new time zone.
To set the clock display:
1. Select Settings from the Home
Page, then select Time and Date
Settings.
2. Select Clock Display.
3. Turn the MENU knob to Off or On.
4. Press the MENU knob to select.
Press
oBACK to go to the last
menu and save the changes.
Power Outlets
The accessory power outlets can be
used to plug in electrical equipment,
such as a cell phone or MP3 player.
The vehicle has three accessory
power outlets located:
.Inside the floor console
storage bin.
.On the rear of the floor console.
Page 119 of 508

Black plate (7,1)Cadillac Escalade/Escalade ESV Owner Manual (GMNA-Localizing-U.S./
Canada/Mexico-6081529) - 2014 - CRC 1st Edition - 4/23/13
Instruments and Controls 5-7
.In the rear cargo area on the
passenger side.
Remove the cover to use and
replace when not in use.
The accessory power outlets are
powered, even when the ignition is
in LOCK/OFF. Continuing to use
power outlets while the ignition is in
LOCK/OFF may cause the vehicle's
battery to run down.
{Warning
Power is always supplied to the
outlets. Do not leave electrical
equipment plugged in when the
vehicle is not in use because the
vehicle could catch fire and cause
injury or death.
Notice: Leaving electrical
equipment plugged in for an
extended period of time while the
vehicle is off will drain the
battery. Always unplug electrical
equipment when not in use and do not plug in equipment that
exceeds the maximum 20 ampere
rating.
Certain power accessory plugs may
not be compatible with the
accessory power outlet and could
overload adapter or vehicle fuses.
If a problem is experienced, see
your dealer.
When adding electrical equipment,
be sure to follow the proper
installation instructions included with
the equipment. Do not use
equipment exceeding the
maximum amperage rating of
20 amperes. See
Add-On Electrical
Equipment on page 9-65.
Notice: Hanging heavy
equipment from the power outlet
can cause damage not covered
by the vehicle warranty. The
power outlets are designed for
accessory power plugs only, such
as cell phone charge cords.
Power Outlet 110 Volt
Alternative Current
The vehicle may have a power
outlet that can be used to plug in
electrical equipment that uses a
maximum limit of 150 watts.
The power outlet is on the rear of
the center console.
An indicator light on the outlet turns
on to show it is in use. The light
comes on when the ignition is in
ON/RUN and equipment requiring
Page 120 of 508

Black plate (8,1)Cadillac Escalade/Escalade ESV Owner Manual (GMNA-Localizing-U.S./
Canada/Mexico-6081529) - 2014 - CRC 1st Edition - 4/23/13
5-8 Instruments and Controls
less than 150 watts is plugged into
the outlet, and no system fault is
detected.
The indicator light does not come on
when the ignition is in LOCK/OFF or
if the equipment is not fully seated
into the outlet.
If equipment is connected using
more than 150 watts or a system
fault is detected, a protection circuit
shuts off the power supply and the
indicator light turns off. To reset the
circuit, unplug the item and plug it
back in or turn the Retained
Accessory Power (RAP) off and
then back on. SeeRetained
Accessory Power (RAP) on
page 9-25
The power outlet is not designed for
and may not work properly, if the
following are plugged in:
.Equipment with high initial peak
wattage such as:
compressor-driven refrigerators
and electric power tools.
.Other equipment requiring an
extremely stable power supply
such as:
microcomputer-controlled
electric blankets, touch sensor
lamps, etc.
Cigarette Lighter
For vehicles with a cigarette lighter,
it is located in the center console
near the cupholders. Press on the
access door to open it and use the
lighter.
To use the cigarette lighter, push it
in all the way, and let go. When it is
ready, it will pop back out by itself.
Notice: Holding a cigarette lighter
in while it is heating does not let
the lighter back away from the
heating element when it is hot.
Damage from overheating can
occur to the lighter or heating
element, or a fuse could be
blown. Do not hold a cigarette
lighter in while it is heating.
Ashtrays
For vehicles with an ashtray, it is
located in the center console near
the cupholders. Press on the access
door to open it and use the ashtray.
Notice: If papers, pins, or other
flammable items are put in the
ashtray, hot cigarettes or other
smoking materials could ignite
them and possibly damage the
vehicle. Never put flammable
items in the ashtray.
To remove the ashtray, pull it from
the center console. Slide it back in
and push down to be sure it is
secure.