light CADILLAC ESCALADE ESV 2014 Owner's Guide
[x] Cancel search | Manufacturer: CADILLAC, Model Year: 2014, Model line: ESCALADE ESV, Model: CADILLAC ESCALADE ESV 2014Pages: 508, PDF Size: 7.64 MB
Page 82 of 508
Black plate (32,1)Cadillac Escalade/Escalade ESV Owner Manual (GMNA-Localizing-U.S./
Canada/Mexico-6081529) - 2014 - CRC 1st Edition - 4/23/13
3-32 Seats and Restraints
{Warning
A child in a rear-facing child
restraint can be seriously injured
or killed if the passenger frontal
airbag inflates. This is because
the back of the rear-facing child
restraint would be very close to
the inflating airbag. A child in a
forward-facing child restraint can
be seriously injured or killed if the
passenger frontal airbag inflates
and the passenger seat is in a
forward position.
Even if the passenger sensing
system has turned off the
passenger frontal airbag, no
system is fail-safe. No one can
guarantee that an airbag will not
inflate under some unusual
circumstance, even though the
airbag is off.(Continued)
Warning (Continued)
Secure rear-facing child restraints
in a rear seat, even if the airbag
is off. If you secure a
forward-facing child restraint in
the front outboard passenger
seat, always move the seat as far
back as it will go. It is better to
secure the child restraint in a
rear seat.
The passenger sensing system is
designed to turn off the front
outboard passenger frontal airbag if:
.The front outboard passenger
seat is unoccupied.
.The system determines an infant
is present in a child restraint.
.A front outboard passenger
takes his/her weight off of the
seat for a period of time.
.There is a critical problem with
the airbag system or the
passenger sensing system. When the passenger sensing
system has turned off the front
outboard passenger frontal airbag,
the off indicator will light and stay lit
as a reminder that the airbag is off.
See
Passenger Airbag Status
Indicator on page 5-13.
The passenger sensing system is
designed to turn on the front
outboard passenger frontal airbag
anytime the system senses that a
person of adult size is sitting
properly in the front outboard
passenger seat.
When the passenger sensing
system has allowed the airbag to be
enabled, the on indicator will light
and stay lit as a reminder that the
airbag is active.
For some children, including
children in child restraints, and for
very small adults, the passenger
sensing system may or may not turn
off the front outboard passenger
frontal airbag, depending upon the
person's seating posture and body
build. Everyone in the vehicle who
Page 83 of 508

Black plate (33,1)Cadillac Escalade/Escalade ESV Owner Manual (GMNA-Localizing-U.S./
Canada/Mexico-6081529) - 2014 - CRC 1st Edition - 4/23/13
Seats and Restraints 3-33
has outgrown child restraints should
wear a safety belt properly—
whether or not there is an airbag for
that person.
{Warning
If the airbag readiness light ever
comes on and stays on, it means
that something may be wrong
with the airbag system. To help
avoid injury to yourself or others,
have the vehicle serviced right
away. See Airbag Readiness
Light on page 5-13 for more
information, including important
safety information.
If the On Indicator is Lit for a
Child Restraint
The passenger sensing system is
designed to turn off the front
outboard passenger frontal airbag if
the system determines that an infant
is present in a child restraint. If a
child restraint has been installed
and the on indicator is lit:
1. Turn the vehicle off.
2. Remove the child restraint from the vehicle.
3. Remove any additional items from the seat such as blankets,
cushions, seat covers, seat
heaters, or seat massagers.
4. Reinstall the child restraint following the directions provided
by the child restraint
manufacturer and refer to
Securing Child Restraints (Rear
Seat Position) on page 3-52 or
Securing Child Restraints (Front
Outboard Seat Position) on
page 3-55. 5. If, after reinstalling the child
restraint and restarting the
vehicle, the on indicator is still lit,
turn the vehicle off. Then slightly
recline the vehicle seatback and
adjust the seat cushion,
if adjustable, to make sure that
the vehicle seatback is not
pushing the child restraint into
the seat cushion.
Also make sure the child
restraint is not trapped under the
vehicle head restraint. If this
happens, adjust the head
restraint. See Head Restraints
on page 3-2.
6. Restart the vehicle.
The passenger sensing system
may or may not turn off the
airbag for a child in a child
restraint depending upon the
child’s size. It is better to secure
the child restraint in a rear seat.
Page 86 of 508
Black plate (36,1)Cadillac Escalade/Escalade ESV Owner Manual (GMNA-Localizing-U.S./
Canada/Mexico-6081529) - 2014 - CRC 1st Edition - 4/23/13
3-36 Seats and Restraints
belts, airbag sensing and diagnostic
module, steering wheel, instrument
panel, any airbag module, ceiling or
pillar garnish trim, overhead
console, front sensors, side impact
sensors, or airbag wiring.
Your dealer and the service manual
have information about the location
of the airbag sensors, sensing and
diagnostic module, and airbag
wiring.
In addition, the vehicle has a
passenger sensing system that
includes sensors as part of the front
outboard passenger seat. The
passenger sensing system may not
operate properly if the original seat
trim is replaced with non-GM
covers, upholstery, or trim, or; with
GM covers, upholstery, or trim
designed for a different vehicle. Any
object, such as an aftermarket seat
heater or a comfort-enhancing pad
or device, installed under or on top
of the seat fabric, could also
interfere with the operation of the
passenger sensing system. This
could either prevent properdeployment of the passenger
airbag(s) or prevent the passenger
sensing system from properly
turning off the passenger airbag(s).
See
Passenger Sensing System on
page 3-31.
If the vehicle has rollover roof-rail
airbags, see Different Size Tires
and Wheels on page 10-56 for
additional information.
If your vehicle needs to be modified
because you have a disability and
you have questions about whether
the modifications will affect the
vehicle's airbag system, or if you
have questions about whether the
airbag system will be affected if the
vehicle is modified for any other
reason, call Customer Assistance.
See Customer Assistance Offices
on page 13-3.
Airbag System Check
The airbag system does not need
regularly scheduled maintenance or
replacement. Make sure the airbag readiness light is working. See
Airbag Readiness Light on
page 5-13.
Notice:
If an airbag covering is
damaged, opened, or broken, the
airbag may not work properly. Do
not open or break the airbag
coverings. If there are any
opened or broken airbag covers,
have the airbag covering and/or
airbag module replaced. For the
location of the airbags, see
Where Are the Airbags? on
page 3-26. See your dealer for
service.
Replacing Airbag System
Parts after a Crash
{Warning
A crash can damage the airbag
systems in the vehicle.
A damaged airbag system may
not work properly and may not
protect you and your
(Continued)
Page 87 of 508
Black plate (37,1)Cadillac Escalade/Escalade ESV Owner Manual (GMNA-Localizing-U.S./
Canada/Mexico-6081529) - 2014 - CRC 1st Edition - 4/23/13
Seats and Restraints 3-37
Warning (Continued)
passenger(s) in a crash, resulting
in serious injury or even death. To
help make sure the airbag
systems are working properly
after a crash, have them
inspected and any necessary
replacements made as soon as
possible.
If an airbag inflates, you will need to
replace airbag system parts. See
your dealer for service.
If the airbag readiness light stays on
after the vehicle is started or comes
on when you are driving, the airbag
system may not work properly. Have
the vehicle serviced right away. See
Airbag Readiness Light on
page 5-13.
Child Restraints
Older Children
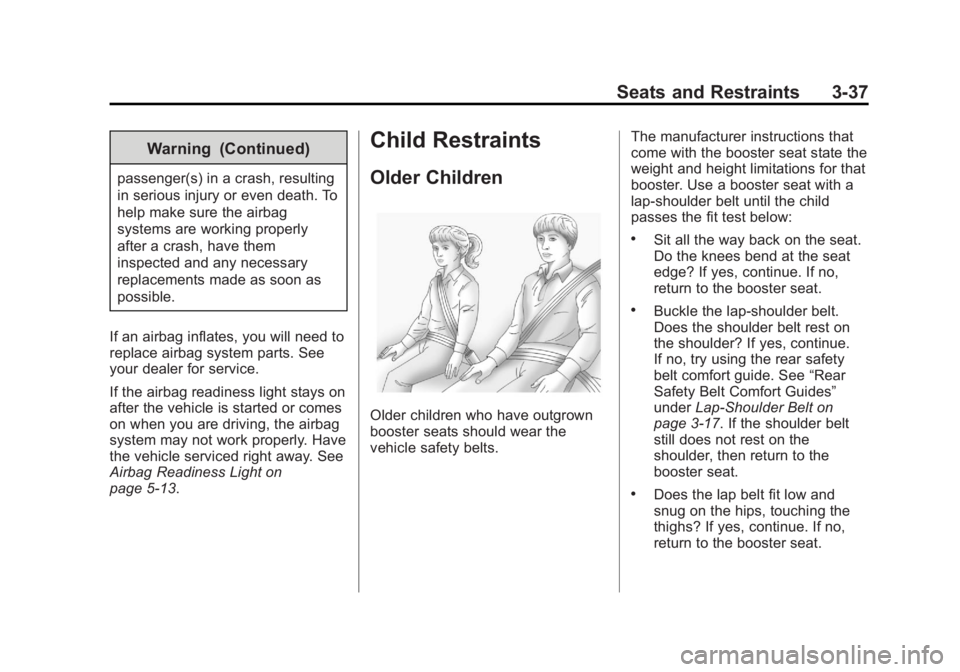
Older children who have outgrown
booster seats should wear the
vehicle safety belts. The manufacturer instructions that
come with the booster seat state the
weight and height limitations for that
booster. Use a booster seat with a
lap-shoulder belt until the child
passes the fit test below:
.Sit all the way back on the seat.
Do the knees bend at the seat
edge? If yes, continue. If no,
return to the booster seat.
.Buckle the lap-shoulder belt.
Does the shoulder belt rest on
the shoulder? If yes, continue.
If no, try using the rear safety
belt comfort guide. See
“Rear
Safety Belt Comfort Guides”
under Lap-Shoulder Belt on
page 3-17. If the shoulder belt
still does not rest on the
shoulder, then return to the
booster seat.
.Does the lap belt fit low and
snug on the hips, touching the
thighs? If yes, continue. If no,
return to the booster seat.
Page 107 of 508

Black plate (57,1)Cadillac Escalade/Escalade ESV Owner Manual (GMNA-Localizing-U.S./
Canada/Mexico-6081529) - 2014 - CRC 1st Edition - 4/23/13
Seats and Restraints 3-57
6. To tighten the belt, push downon the child restraint, pull the
shoulder portion of the belt to
tighten the lap portion of the belt,
and feed the shoulder belt back
into the retractor. When installing
a forward-facing child restraint, it
may be helpful to use your knee
to push down on the child
restraint as you tighten the belt. Try to pull the belt out of the
retractor to make sure the
retractor is locked. If the
retractor is not locked, repeat
Steps 5 and 6.
7. Before placing a child in the child restraint, make sure it is
securely held in place. To check,
grasp the child restraint at the
safety belt path and attempt to
move it side-to-side and
back-and-forth. When the child
restraint is properly installed,
there should be no more than
2.5 cm (1 in) of movement.
If the vehicle is equipped with the
passenger sensing system, and
when the passenger sensing system
has turned off the front outboard
passenger frontal airbag, the off
indicator in the passenger airbag
status indicator should light and stay
lit when you start the vehicle. See
Passenger Airbag Status Indicator
on page 5-13. If a child restraint has been installed
and the on indicator is lit, see
“If the
On Indicator is Lit for a Child
Restraint” underPassenger Sensing
System on page 3-31 for more
information.
To remove the child restraint,
unbuckle the vehicle safety belt and
let it return to the stowed position.
Page 112 of 508

Black plate (4,1)Cadillac Escalade/Escalade ESV Owner Manual (GMNA-Localizing-U.S./
Canada/Mexico-6081529) - 2014 - CRC 1st Edition - 4/23/13
4-4 Storage
.Tie the load to the crossrails or
the siderail supports. Use the
crossrails only to keep the load
from sliding. To move the
crossrails, pull out on the latch
release handle at each end.
Slide the crossrail to the desired
position balancing the force side
to side. Push the release handle
back into the latched position
and slide the crossrail back and
forth slightly to be sure the latch
snaps securely into place..If needed to carry long items,
move the crossrails as far apart
as they will go. Tie the load to
the crossrails and the siderails
or siderail supports. Also tie the
load to the bumpers. Do not tie
the load so tightly that the
crossrails or siderails are
damaged.
.After moving a crossrail, be sure
it is securely locked into the
siderail.A Center High-Mounted Stoplamp
(CHMSL) is located above the glass
or above the rear load doors.
If items are loaded on the roof of the
vehicle, care should be taken not to
block or damage the CHMSL unit.
Page 113 of 508
Black plate (1,1)Cadillac Escalade/Escalade ESV Owner Manual (GMNA-Localizing-U.S./
Canada/Mexico-6081529) - 2014 - CRC 1st Edition - 4/23/13
Instruments and Controls 5-1
Instruments and
Controls
Controls
Steering Wheel Adjustment . . . 5-2
Steering Wheel Controls . . . . . . 5-2
Heated Steering Wheel . . . . . . . 5-3
Horn . . . . . . . . . . . . . . . . . . . . . . . . . . 5-3
Windshield Wiper/Washer . . . . . 5-3
Rear Window Wiper/Washer . . . . . . . . . . . . . . . . . . . . . . 5-4
Compass . . . . . . . . . . . . . . . . . . . . . 5-4
Clock . . . . . . . . . . . . . . . . . . . . . . . . . 5-6
Power Outlets . . . . . . . . . . . . . . . . . 5-6
Cigarette Lighter . . . . . . . . . . . . . . 5-8
Ashtrays . . . . . . . . . . . . . . . . . . . . . . 5-8
Warning Lights, Gauges, and
Indicators
Warning Lights, Gauges, and Indicators . . . . . . . . . . . . . . . . . . . . 5-9
Instrument Cluster . . . . . . . . . . . 5-10
Speedometer . . . . . . . . . . . . . . . . 5-11
Odometer . . . . . . . . . . . . . . . . . . . . 5-11
Trip Odometer . . . . . . . . . . . . . . . 5-11
Tachometer . . . . . . . . . . . . . . . . . . 5-11
Fuel Gauge . . . . . . . . . . . . . . . . . . 5-11 Engine Coolant Temperature
Gauge . . . . . . . . . . . . . . . . . . . . . . 5-12
Safety Belt Reminders . . . . . . . 5-12
Airbag Readiness Light . . . . . . 5-13
Passenger Airbag Status Indicator . . . . . . . . . . . . . . . . . . . . 5-13
Charging System Light . . . . . . 5-14
Malfunction Indicator Lamp . . . . . . . . . . . . . 5-15
Brake System Warning Light . . . . . . . . . . . . . . . . . . . . . . . 5-17
Antilock Brake System (ABS) Warning Light . . . . . . . . . . . . . . 5-18
Tow/Haul Mode Light . . . . . . . . 5-18
StabiliTrak
®OFF Light . . . . . . . 5-19
Traction Control System (TCS)/StabiliTrak
®Light . . . . 5-19
Tire Pressure Light . . . . . . . . . . 5-19
Engine Oil Pressure Light . . . . 5-20
Security Light . . . . . . . . . . . . . . . . 5-20
High-Beam On Light . . . . . . . . . 5-21
Front Fog Lamp Light . . . . . . . . 5-21
Lamps On Reminder . . . . . . . . . 5-21
Cruise Control Light . . . . . . . . . 5-21
Information Displays
Driver Information Center (DIC) . . . . . . . . . . . . . . . 5-22
Vehicle Messages
Vehicle Messages . . . . . . . . . . . 5-27
Battery Voltage and ChargingMessages . . . . . . . . . . . . . . . . . . 5-27
Brake System Messages . . . . 5-27
Door Ajar Messages . . . . . . . . . 5-28
Engine Cooling System Messages . . . . . . . . . . . . . . . . . . 5-28
Engine Oil Messages . . . . . . . . 5-29
Engine Power Messages . . . . 5-30
Fuel System Messages . . . . . . 5-30
Key and Lock Messages . . . . . 5-30
Lamp Messages . . . . . . . . . . . . . 5-30
Object Detection System Messages . . . . . . . . . . . . . . . . . . 5-31
Ride Control System Messages . . . . . . . . . . . . . . . . . . 5-32
Airbag System Messages . . . . 5-33
Security Messages . . . . . . . . . . 5-33
Tire Messages . . . . . . . . . . . . . . . 5-33
Transmission Messages . . . . . 5-34
Vehicle Reminder Messages . . . . . . . . . . . . . . . . . . 5-35
Washer Fluid Messages . . . . . 5-35
Vehicle Personalization
Vehicle Personalization . . . . . . 5-35
Page 115 of 508
Black plate (3,1)Cadillac Escalade/Escalade ESV Owner Manual (GMNA-Localizing-U.S./
Canada/Mexico-6081529) - 2014 - CRC 1st Edition - 4/23/13
Instruments and Controls 5-3
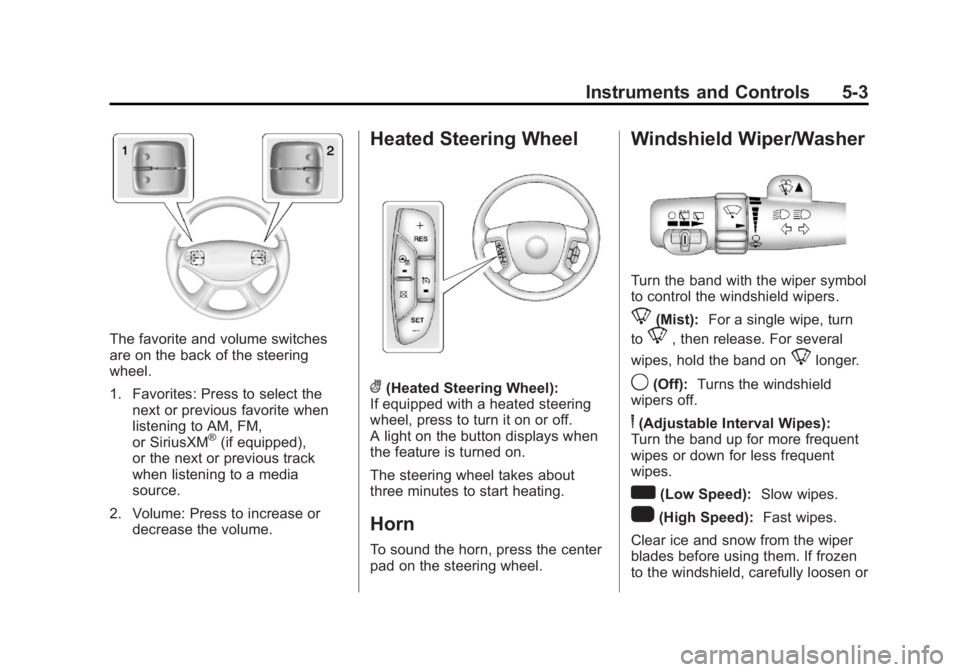
The favorite and volume switches
are on the back of the steering
wheel.
1. Favorites: Press to select thenext or previous favorite when
listening to AM, FM,
or SiriusXM
®(if equipped),
or the next or previous track
when listening to a media
source.
2. Volume: Press to increase or decrease the volume.
Heated Steering Wheel
((Heated Steering Wheel):
If equipped with a heated steering
wheel, press to turn it on or off.
A light on the button displays when
the feature is turned on.
The steering wheel takes about
three minutes to start heating.
Horn
To sound the horn, press the center
pad on the steering wheel.
Windshield Wiper/Washer
Turn the band with the wiper symbol
to control the windshield wipers.
8(Mist): For a single wipe, turn
to
8, then release. For several
wipes, hold the band on
8longer.
9(Off): Turns the windshield
wipers off.
6(Adjustable Interval Wipes):
Turn the band up for more frequent
wipes or down for less frequent
wipes.
w(Low Speed): Slow wipes.
1(High Speed): Fast wipes.
Clear ice and snow from the wiper
blades before using them. If frozen
to the windshield, carefully loosen or
Page 117 of 508

Black plate (5,1)Cadillac Escalade/Escalade ESV Owner Manual (GMNA-Localizing-U.S./
Canada/Mexico-6081529) - 2014 - CRC 1st Edition - 4/23/13
Instruments and Controls 5-5
To adjust for compass variance, use
the following procedure:
Compass Variance (Zone)
Procedure
1. Do not set the compass zonewhen the vehicle is moving. Only
set it when the vehicle is in
P (Park).
Press the vehicle information
button until PRESS
VTO
CHANGE COMPASS ZONE
displays.
2. Find the vehicle's current location and variance zone
number on the map.
Zones 1 through 15 are
available.
3. Press the set/reset button to scroll through and select the
appropriate variance zone.
4. Press the trip/fuel button until the vehicle heading, for
example, N for North, is
displayed in the DIC.
5. If calibration is necessary, calibrate the compass. See
“Compass Calibration
Procedure” following.
Compass Calibration
The compass can be manually
calibrated. Only calibrate the
compass in a magnetically clean
and safe location, such as an open
parking lot, where driving the
vehicle in circles is not a danger.
It is suggested to calibrate away from tall buildings, utility wires,
manhole covers, or other industrial
structures, if possible.
If CAL should ever appear in the
DIC display, the compass should be
calibrated.
If the DIC display does not show a
heading, for example, N for North,
or the heading does not change
after making turns, there may be a
strong magnetic field interfering with
the compass. Such interference
may be caused by a magnetic CB or
cell phone antenna mount, a
magnetic emergency light, magnetic
note pad holder, or any other
magnetic item. Turn off the vehicle,
move the magnetic item, then turn
on the vehicle and calibrate the
compass.
Page 119 of 508

Black plate (7,1)Cadillac Escalade/Escalade ESV Owner Manual (GMNA-Localizing-U.S./
Canada/Mexico-6081529) - 2014 - CRC 1st Edition - 4/23/13
Instruments and Controls 5-7
.In the rear cargo area on the
passenger side.
Remove the cover to use and
replace when not in use.
The accessory power outlets are
powered, even when the ignition is
in LOCK/OFF. Continuing to use
power outlets while the ignition is in
LOCK/OFF may cause the vehicle's
battery to run down.
{Warning
Power is always supplied to the
outlets. Do not leave electrical
equipment plugged in when the
vehicle is not in use because the
vehicle could catch fire and cause
injury or death.
Notice: Leaving electrical
equipment plugged in for an
extended period of time while the
vehicle is off will drain the
battery. Always unplug electrical
equipment when not in use and do not plug in equipment that
exceeds the maximum 20 ampere
rating.
Certain power accessory plugs may
not be compatible with the
accessory power outlet and could
overload adapter or vehicle fuses.
If a problem is experienced, see
your dealer.
When adding electrical equipment,
be sure to follow the proper
installation instructions included with
the equipment. Do not use
equipment exceeding the
maximum amperage rating of
20 amperes. See
Add-On Electrical
Equipment on page 9-65.
Notice: Hanging heavy
equipment from the power outlet
can cause damage not covered
by the vehicle warranty. The
power outlets are designed for
accessory power plugs only, such
as cell phone charge cords.
Power Outlet 110 Volt
Alternative Current
The vehicle may have a power
outlet that can be used to plug in
electrical equipment that uses a
maximum limit of 150 watts.
The power outlet is on the rear of
the center console.
An indicator light on the outlet turns
on to show it is in use. The light
comes on when the ignition is in
ON/RUN and equipment requiring