four wheel drive CADILLAC ESCALADE ESV 2019 User Guide
[x] Cancel search | Manufacturer: CADILLAC, Model Year: 2019, Model line: ESCALADE ESV, Model: CADILLAC ESCALADE ESV 2019Pages: 415, PDF Size: 6.66 MB
Page 222 of 415

Cadillac Escalade Owner Manual (GMNA-Localizing-U.S./Canada/Mexico-
12460268) - 2019 - crc - 9/14/18
DRIVING AND OPERATING 221
Hill Start Assist (HSA)
This vehicle has a Hill Start Assist
(HSA) feature, which may be useful
when the vehicle is stopped on a
grade sufficient enough to activate
HSA. This feature is designed to
prevent the vehicle from rolling, either
forward or rearward, during vehicle
drive off. After the driver completely
stops and holds the vehicle in a
complete standstill on a grade, HSA
will be automatically activated. During
the transition period between when
the driver releases the brake pedal and
starts to accelerate to drive off on a
grade, HSA holds the braking pressure
for a maximum of two seconds to
ensure that there is no rolling. The
brakes will automatically release when
the accelerator pedal is applied within
the two-second window. It will not
activate if the vehicle is in a drive gear
and facing downhill, or if the vehicle
is facing uphill and in R (Reverse).
Ride Control Systems
Traction Control/Electronic
Stability Control
System Operation
The vehicle has a Traction Control
System (TCS) and StabiliTrak®, an
electronic stability control system.
These systems help limit wheel spin
and assist the driver in maintaining
control, especially on slippery road
conditions.
TCS activates if it senses any of the
drive wheels are spinning or beginning
to lose traction. When this happens,
TCS applies the brakes to the spinning
wheels and reduces engine power to
limit wheel spin.
StabiliTrak activates when the vehicle
senses a difference between the
intended path and the direction the
vehicle is actually traveling.
StabiliTrak selectively applies braking
pressure to any one of the vehicle
wheel brakes to assist the driver in
keeping the vehicle on the intended
path. Trailer Sway Control (TSC) is also on automatically when the
vehicle is started. See
Trailer Sway
Control (TSC) 0273.
If cruise control is being used and
traction control or StabiliTrak begins
to limit wheel spin, cruise control will
disengage. Cruise control may be
turned back on when road conditions
allow.
Both systems come on automatically
when the vehicle is started and begins
to move. The systems may be heard or
felt while they are operating or while
performing diagnostic checks. This is
normal and does not mean there is a
problem with the vehicle.
It is recommended to leave both
systems on for normal driving
conditions, but it may be necessary to
turn TCS off if the vehicle gets stuck
in sand, mud, ice, or snow. See If the
Vehicle Is Stuck 0196 and “Turning
the Systems Off and On ”later in this
section.
When the transfer case (if equipped)
is in Four-Wheel Drive Low, the
stability system is automatically
disabled,
gcomes on, and the
Page 261 of 415
Cadillac Escalade Owner Manual (GMNA-Localizing-U.S./Canada/Mexico-
12460268) - 2019 - crc - 9/14/18
260 DRIVING AND OPERATING
To back the trailer into the water:1. If equipped, place the vehicle in four-wheel-drive high.
2. Slowly back down the boat ramp until the boat is floating, but no
further than necessary.
3. Press and hold the brake pedal, but do not shift into P (Park) yet.
4. Have someone place chocks under the front wheels of the
vehicle.
5. Gradually release the brake pedal to allow the chocks to absorb the
load of the trailer.
6. Reapply the brake pedal. Then apply the parking brake and shift
into P (Park). If equipped with a
manual transmission, turn off
the engine and move the shift
lever into 1 (First) gear.
7. Release the brake pedal.
Pulling the Trailer from the Water 1. Press and hold the brake pedal.
2. Start the engine and shift into a gear. 3. Release the parking brake.
4. Let up on the brake pedal.
5. Drive slowly until the tires are
clear of the chocks.
6. Stop and have someone pick up and store the chocks.
7. Slowly pull the trailer from the water.
8. Once the vehicle and trailer have been driven from the sloped part
of the boat ramp, the vehicle can
be shifted from four-wheel-drive
high. Shift into the drive mode
that is appropriate for the road
conditions.
Caution
If the vehicle tires begin to spin and
the vehicle begins to slide toward
the water, remove your foot from
the accelerator pedal and apply the
brake pedal. Seek help to have the
vehicle towed up the ramp.
Maintenance when Trailer
Towing
The vehicle needs service more often
when used to tow trailers. See
Maintenance Schedule 0360. It is
especially important to check the
automatic transmission fluid, engine
oil, axle lubricant, belts, cooling
system, and brake system before and
during each trip.
Check periodically that all nuts and
bolts on the trailer hitch are tight.
Engine Cooling when Trailer
Towing
The cooling system may temporarily
overheat during severe operating
conditions. See Engine Overheating
0 289.
Trailer Towing
Caution
Towing a trailer improperly can
damage the vehicle and result in
costly repairs not covered by the
(Continued)
Page 277 of 415
Cadillac Escalade Owner Manual (GMNA-Localizing-U.S./Canada/Mexico-
12460268) - 2019 - crc - 9/14/18
276 VEHICLE CARE
Vehicle Care
General Information
General Information . . . . . . . . . . . . . 277
California Proposition65 Warning . . . . . . . . . . . . . . . . . . . . . 277
California Perchlorate Materials Requirements . . . . . . . . . . . . . . . . . . . 278
Accessories and Modifications . . . . . . . . . . . . . . . . . . . 278
Vehicle Checks
Doing Your OwnService Work . . . . . . . . . . . . . . . . . . . . 278
Hood . . . . . . . . . . . . . . . . . . . . . . . . . . . . . . 279
Engine Compartment Overview . . . . . . . . . . . . . . . . . . . . . . . . . 280
Engine Oil . . . . . . . . . . . . . . . . . . . . . . . . . 281
Engine Oil Life System . . . . . . . . . . . 283
Automatic Transmission Fluid . . . . . . . . . . . . . . . . . . . . . . . . . . . . . 284
Engine Air Cleaner/Filter . . . . . . . . . 285
Cooling System . . . . . . . . . . . . . . . . . . . 286
Engine Overheating . . . . . . . . . . . . . . 289
Engine Fan . . . . . . . . . . . . . . . . . . . . . . . . 290
Washer Fluid . . . . . . . . . . . . . . . . . . . . . 290
Brakes . . . . . . . . . . . . . . . . . . . . . . . . . . . . . 291
Brake Fluid . . . . . . . . . . . . . . . . . . . . . . . 292
Battery - North America . . . . . . . . . 293 Four-Wheel Drive . . . . . . . . . . . . . . . . 294
Front Axle . . . . . . . . . . . . . . . . . . . . . . . . 294
Rear Axle . . . . . . . . . . . . . . . . . . . . . . . . . 295
Starter Switch Check . . . . . . . . . . . . . 296
Automatic Transmission Shift
Lock Control Function
Check . . . . . . . . . . . . . . . . . . . . . . . . . . . . 296
Park Brake and P (Park) Mechanism Check . . . . . . . . . . . . . . 296
Wiper Blade Replacement . . . . . . . 297
Glass Replacement . . . . . . . . . . . . . . . 298
Windshield Replacement . . . . . . . . 298
Gas Strut(s) . . . . . . . . . . . . . . . . . . . . . . . 298Headlamp Aiming
Headlamp Aiming . . . . . . . . . . . . . . . . 299
Bulb Replacement
Bulb Replacement . . . . . . . . . . . . . . . . 299
LED Lighting . . . . . . . . . . . . . . . . . . . . . 299
License Plate Lamp . . . . . . . . . . . . . . 300
Electrical System
Electrical System Overload . . . . . . 300
Fuses and Circuit Breakers . . . . . . 301
Engine Compartment Fuse Block . . . . . . . . . . . . . . . . . . . . . . . . . . . . 301
Instrument Panel Fuse Block (Right) . . . . . . . . . . . . . . . . . . . . . . . . . . . 305
Instrument Panel Fuse Block (Left) . . . . . . . . . . . . . . . . . . . . . . 307 Rear Compartment Fuse
Block . . . . . . . . . . . . . . . . . . . . . . . . . . . . 310
Wheels and Tires
Tires . . . . . . . . . . . . . . . . . . . . . . . . . . . . . . . 311
All-Season Tires . . . . . . . . . . . . . . . . . . 312
Winter Tires . . . . . . . . . . . . . . . . . . . . . . 312
Low-Profile Tires . . . . . . . . . . . . . . . . . 313
All-Terrain Tires . . . . . . . . . . . . . . . . . . 313
Tire Sidewall Labeling . . . . . . . . . . . 313
Tire Designations . . . . . . . . . . . . . . . . . 314
Tire Terminology andDefinitions . . . . . . . . . . . . . . . . . . . . . . 315
Tire Pressure . . . . . . . . . . . . . . . . . . . . . . 317
Tire Pressure for High-Speed Operation . . . . . . . . . . . . . . . . . . . . . . . . 319
Tire Pressure Monitor System . . . 319
Tire Pressure Monitor
Operation . . . . . . . . . . . . . . . . . . . . . . . . 320
Tire Inspection . . . . . . . . . . . . . . . . . . . 324
Tire Rotation . . . . . . . . . . . . . . . . . . . . . 324
When It Is Time for New Tires . . . . . . . . . . . . . . . . . . . . . . . . . . . . . 325
Buying New Tires . . . . . . . . . . . . . . . . 326
Different Size Tires and Wheels . . . . . . . . . . . . . . . . . . . . . . . . . . 327
Uniform Tire Quality Grading . . . 328
Wheel Alignment and Tire Balance . . . . . . . . . . . . . . . . . . . . . . . . . . 329
Wheel Replacement . . . . . . . . . . . . . . 329
Tire Chains . . . . . . . . . . . . . . . . . . . . . . . 330
Page 295 of 415

Cadillac Escalade Owner Manual (GMNA-Localizing-U.S./Canada/Mexico-
12460268) - 2019 - crc - 9/14/18
294 VEHICLE CARE
Extended Storage: Remove the black,
negative (−) cable from the battery or
use a battery trickle charger.
Four-Wheel Drive
Transfer Case
If the vehicle is equipped with
Four-Wheel Drive, be sure to perform
the lubricant checks described in this
section.
When to Check Lubricant
Refer toMaintenance Schedule 0360
to determine how often to check the
lubricant.
How to Check Lubricant
To get an accurate reading, the vehicle
should be on a level surface.
1. Fill Plug
2. Drain Plug
If the level is below the bottom of the
fill plug (1) hole, located on the
transfer case, some lubricant will need
to be added. Add enough lubricant to
raise the level to the bottom of the fill
plug (1) hole. Use care not to
overtighten the plug.
What to Use
Refer to Recommended Fluids and
Lubricants 0370 to determine what
kind of lubricant to use.
Front Axle
When to Check and Change
Lubricant
It is not necessary to regularly check
front axle fluid unless a leak is
suspected, or an unusual noise is
heard. A fluid loss could indicate a
problem. Have it inspected and
repaired.
How to Check Lubricant
To get an accurate reading, the vehicle
should be on a level surface.
1. Fill Plug
2. Drain Plug
Page 324 of 415
Cadillac Escalade Owner Manual (GMNA-Localizing-U.S./Canada/Mexico-
12460268) - 2019 - crc - 9/14/18
VEHICLE CARE 323
TPMS Sensor Matching Process
Each TPMS sensor has a unique
identification code. The identification
code needs to be matched to a new
tire/wheel position after rotating the
vehicle’s tires or replacing one or more
of the TPMS sensors. The TPMS
sensor matching process should also
be performed after replacing a spare
tire with a road tire containing the
TPMS sensor. The malfunction light
and the DIC message should go off at
the next ignition cycle. The sensors
are matched to the tire/wheel
positions, using a TPMS relearn tool,
in the following order: driver side
front tire, passenger side front tire,
passenger side rear tire, and driver
side rear tire. See your dealer for
service or to purchase a relearn tool.
A TPMS relearn tool can also be
purchased. See Tire Pressure Monitor
Sensor Activation Tool at
www.gmtoolsandequipment.com or
call 1-800-GM TOOLS
(1-800-468-6657).
There are two minutes to match the
first tire/wheel position, and
five minutes overall to match all fourtire/wheel positions. If it takes longer,
the matching process stops and must
be restarted.
The TPMS sensor matching process is:
1. Set the parking brake.
2. Place the vehicle in Service Mode. See Ignition Positions
0 202.
3. Make sure the Tire Pressure info display option is turned on. The
info displays on the DIC can be
turned on and off through the
Settings menu. See Driver
Information Center (DIC) 0148.
4. Use the five-way DIC control on the right side of the steering
wheel to scroll to the Tire
Pressure screen under the DIC
info page. See Driver Information
Center (DIC) 0148.
5. Press and hold SEL in the center of the five-way DIC control.
The horn sounds twice to signal
the receiver is in relearn mode
and the TIRE LEARNING ACTIVE
message displays on the DIC
screen. 6. Start with the driver side
front tire.
7. Place the relearn tool against the tire sidewall, near the valve stem.
Then press the button to activate
the TPMS sensor. A horn chirp
confirms that the sensor
identification code has been
matched to this tire and wheel
position.
8. Proceed to the passenger side front tire, and repeat the
procedure in Step 7.
9. Proceed to the passenger side rear tire, and repeat the
procedure in Step 7.
10. Proceed to the driver side rear tire, and repeat the procedure in
Step 7. The horn sounds two
times to indicate the sensor
identification code has been
matched to the driver side rear
tire, and the TPMS sensor
matching process is no longer
active. The TIRE LEARNING
ACTIVE message on the DIC
display screen goes off.
11. Turn the vehicle off.
Page 333 of 415
Cadillac Escalade Owner Manual (GMNA-Localizing-U.S./Canada/Mexico-
12460268) - 2019 - crc - 9/14/18
332 VEHICLE CARE
Warning (Continued)
3. For vehicles with four-wheeldrive with an N (Neutral)
transfer case position, be sure
the transfer case is in a drive
gear —not in N (Neutral).
4. Turn off the engine and do not restart while the vehicle
is raised.
5. Do not allow passengers to remain in the vehicle.
6. Place wheel blocks, if equipped, on both sides of
the tire at the opposite corner
of the tire being changed.
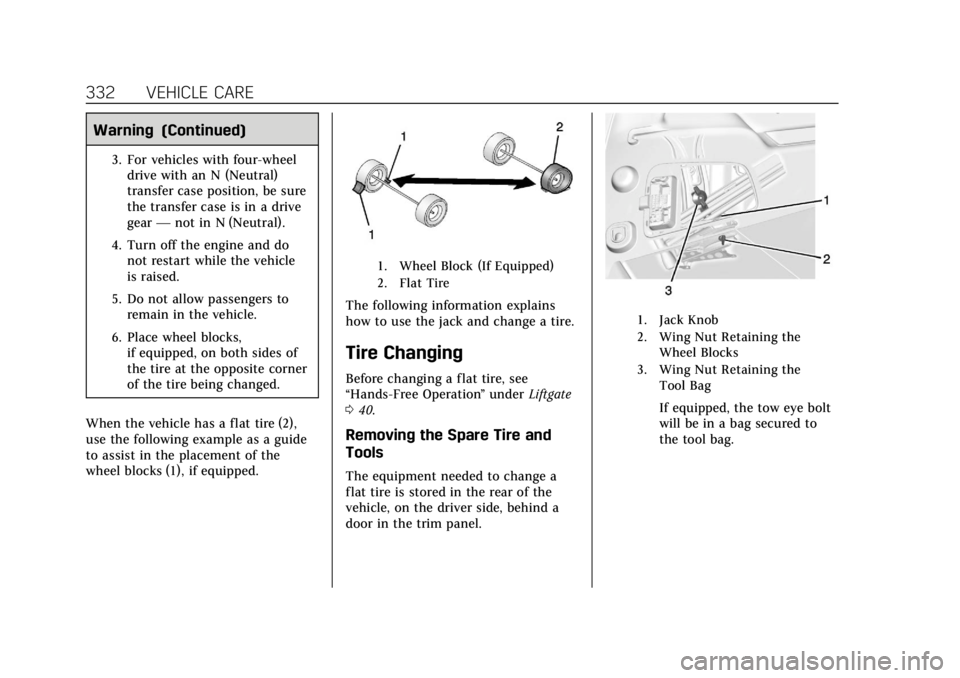
When the vehicle has a flat tire (2),
use the following example as a guide
to assist in the placement of the
wheel blocks (1), if equipped.
1. Wheel Block (If Equipped)
2. Flat Tire
The following information explains
how to use the jack and change a tire.
Tire Changing
Before changing a flat tire, see
“Hands-Free Operation ”under Liftgate
0 40.
Removing the Spare Tire and
Tools
The equipment needed to change a
flat tire is stored in the rear of the
vehicle, on the driver side, behind a
door in the trim panel.
1. Jack Knob
2. Wing Nut Retaining the
Wheel Blocks
3. Wing Nut Retaining the Tool Bag
If equipped, the tow eye bolt
will be in a bag secured to
the tool bag.
Page 342 of 415

Cadillac Escalade Owner Manual (GMNA-Localizing-U.S./Canada/Mexico-
12460268) - 2019 - crc - 9/14/18
VEHICLE CARE 341
Incorrectly Stored
8. Reinstall the spare tire lock.
9. Reinstall the hoist shaft access cover.
If equipped, reinstall the hitch
cover and turn the retainers
clockwise.
To store the tools: 1. Return the tools (wheel wrench, jack handle, and jack handle
extensions) to the tool bag.
2. Assemble the wheel blocks and jack together with the wing nut. 3. Position the jack and wheel
blocks in the driver side trim
panel over the wheelhouse.
4. Turn the jack knob clockwise until the jack is secured tight in
the mounting bracket. Be sure to
position the holes in the base of
the jack onto the pin in the
mounting bracket.
5. Use the retaining bracket to fasten the tool bag on the stud
and turn the wing nut clockwise
to secure.
6. Close the trim panel door.
Full-Size Spare Tire
If this vehicle came with a full-size
spare tire, it was fully inflated when
new, however, it can lose air over
time. Check the inflation pressure
regularly.
See Tire Pressure 0317 and Vehicle
Load Limits 0196. For instructions on
how to remove, install, or store a
spare tire, see Tire Changing0332. If equipped with a temporary use
full-size spare tire, it is indicated on
the tire sidewall. See
Tire Sidewall
Labeling 0313. This spare tire should
not be driven on over 112 km/h
(70 mph), or 88 km/h (55 mph) when
pulling a trailer, at the proper
inflation pressure. Repair and replace
the road tire as soon as it is
convenient, and stow the spare tire for
future use.
Caution
If the vehicle has four-wheel drive
and a different size spare tire is
installed, do not drive in four-wheel
drive until the flat tire is repaired
and/or replaced. The vehicle could
be damaged and the repairs would
not be covered by the warranty.
Never use four-wheel drive when a
different size spare tire is installed
on the vehicle.
The vehicle may have a different size
spare tire than the road tires originally
installed on the vehicle. This spare tire
was developed for use on this vehicle,
Page 343 of 415
Cadillac Escalade Owner Manual (GMNA-Localizing-U.S./Canada/Mexico-
12460268) - 2019 - crc - 9/14/18
342 VEHICLE CARE
so it is all right to drive on it. If the
vehicle has four-wheel drive and a
different size spare tire is installed,
drive only in two-wheel drive.
After installing the spare tire on the
vehicle, stop as soon as possible and
check that the spare tire is correctly
inflated.
Have the damaged or flat road tire
repaired or replaced and installed
back onto the vehicle as soon as
possible so the spare tire will be
available in case it is needed again.
Do not mix tires and wheels of
different sizes, because they will not
fit. Keep your spare tire and its wheel
together. If the vehicle has a spare tire
that does not match the original road
tires and wheels in size and type, do
not include the spare in the tire
rotation.Jump Starting
Jump Starting - North
America
For more information about the
vehicle battery, seeBattery - North
America 0293.
If the vehicle's battery has run down,
you may want to use another vehicle
and some jumper cables to start your
vehicle. Be sure to use the following
steps to do it safely.
{Warning
WARNING: Battery posts,
terminals, and related accessories
contain lead and lead compounds,
chemicals known to the State of
California to cause cancer and birth
defects or other reproductive harm.
Batteries also contain other
chemicals known to the State of
California to cause cancer. WASH
HANDS AFTER HANDLING. For
(Continued)
Warning (Continued)
more information go to
www.P65Warnings.ca.gov/
passenger-vehicle.
See California Proposition 65 Warning
0 277 and the back cover.
{Warning
Batteries can hurt you. They can be
dangerous because:
. They contain acid that can
burn you.
. They contain gas that can
explode or ignite.
. They contain enough
electricity to burn you.
If you do not follow these steps
exactly, some or all of these things
can hurt you.
Page 344 of 415

Cadillac Escalade Owner Manual (GMNA-Localizing-U.S./Canada/Mexico-
12460268) - 2019 - crc - 9/14/18
VEHICLE CARE 343
Caution
Ignoring these steps could result in
costly damage to the vehicle that
would not be covered by the vehicle
warranty. Trying to start the vehicle
by pushing or pulling it will not
work, and it could damage the
vehicle.
1. Check the other vehicle. It must have a 12-volt battery with a
negative ground system.
Caution
If the other vehicle does not have a
12-volt system with a negative
ground, both vehicles can be
damaged. Only use a vehicle that
has a 12-volt system with a
negative ground for jump starting.
2. Get the vehicles close enough so the jumper cables can reach, but
be sure the vehicles are not
touching each other. If they are,
it could cause an unwanted ground connection. You would
not be able to start your vehicle,
and the bad grounding could
damage the electrical systems.
To avoid the possibility of the
vehicles rolling, set the parking
brake firmly on both vehicles
involved in the jump start
procedure. Put the automatic
transmission in P (Park) or a
manual transmission in Neutral
before setting the parking brake.
For vehicles with
four-wheel-drive with a
N (Neutral) transfer case
position, be sure the transfer
case is in a drive gear
—not
N (Neutral).
Caution
If any accessories are left on or
plugged in during the jump starting
procedure, they could be damaged.
The repairs would not be covered
by the vehicle warranty. Whenever
possible, turn off or unplug all
accessories on either vehicle when
jump starting. 3. Turn the ignition off on both
vehicles. Unplug unnecessary
accessories plugged into the
accessory power outlets. Turn off
the radio and all the lamps that
are not needed. This will avoid
sparks and help save both
batteries. And it could save the
radio!
4. Open the hood on the other vehicle and locate the positive (+)
and negative (−) terminal
locations on that vehicle.
The positive (+) terminal is under
a red plastic cover at the positive
battery post. To uncover the
positive (+) terminal, open the
red plastic cover.
For more information on the
location of the remote
positive (+) and remote negative
(−) terminals, see Engine
Compartment Overview 0280.
Page 348 of 415

Cadillac Escalade Owner Manual (GMNA-Localizing-U.S./Canada/Mexico-
12460268) - 2019 - crc - 9/14/18
VEHICLE CARE 347
Dinghy Towing
Two-Wheel-Drive Vehicles
Caution
If the two-wheel-drive vehicle is
towed with all four wheels on the
ground, the drivetrain components
could be damaged. The repairs
would not be covered by the vehicle
warranty.
Two-wheel-drive vehicles should not
be towed with all four wheels on the
ground. Four-Wheel-Drive Vehicles
Only dinghy tow four-wheel-drive
vehicles with a two-speed transfer
case that have an N (Neutral) and a
Four-Wheel Drive Low (4
n) setting.
{Warning
Shifting a four-wheel-drive vehicle's
transfer case into N (Neutral) can
cause the vehicle to roll even if the
transmission is in P (Park). You or
others could be injured. Set the
parking brake before shifting the
transfer case to N (Neutral).
To dinghy tow:
1. Position the vehicle being towed behind the tow vehicle, facing
forward and on a level surface.
2. Securely attach the vehicle being towed to the tow vehicle.
3. Apply the parking brake and start the engine.
For vehicles with Electric Parking
Brakes (EPB), the EPB cannot be
applied and the tires must be
chocked.
4. Shift the transfer case to N (Neutral). See “Shifting into
N (Neutral)” underFour-Wheel
Drive 0214. Check that the
vehicle is in N (Neutral) by
shifting the transmission to
R (Reverse) and then to D
(Drive). There should be no
movement of the vehicle while
shifting.
5. Shift the transmission into D (Drive). Turn the engine off.