instrument cluster CADILLAC ESCALADE EXT 2003 2.G User Guide
[x] Cancel search | Manufacturer: CADILLAC, Model Year: 2003, Model line: ESCALADE EXT, Model: CADILLAC ESCALADE EXT 2003 2.GPages: 473, PDF Size: 3.31 MB
Page 178 of 473

Instrument Panel Cluster
Your instrument panel cluster is designed to let you know at a glance how your vehicle is running. You'll know how
fast you're going, about how much fuel you have and many other things you'll need to know to drive safely and
economically.
United States version shown, Canada similar.
3-32
Page 179 of 473

Speedometer and Odometer
Your speedometer lets you see your speed in both
miles per hour (mph) and kilometers per hour (km/h).
Your vehicle's odometer works together with the
driver information center. You can set a personal trip
and business trip odometer. See ªTrip Informationº under
DIC Operation and Displays on page 3-47.
The odometer mileage can be checked without the
vehicle running. Simply press the trip stem on the
instrument panel cluster.
If your vehicle ever needs a new odometer installed,
the new one will be set to the correct mileage total of the
old odometer.
Tachometer
Your tachometer displays the engine speed in
revolutions per minute (rpm).
Notice:Do not operate the engine with the
tachometer in the shaded warning area,
or engine damage may occur.
Safety Belt Reminder Light
When the key is turned to RUN or START, a chime
will come on for several seconds to remind people to
fasten their safety belts, unless the driver's safety belt is
already buckled.
The safety belt light will
also come on and stay
on for several seconds,
then it will ¯ash for
several more.
If the driver's belt is already buckled, neither the chime
nor the light will come on.
3-33
Page 193 of 473
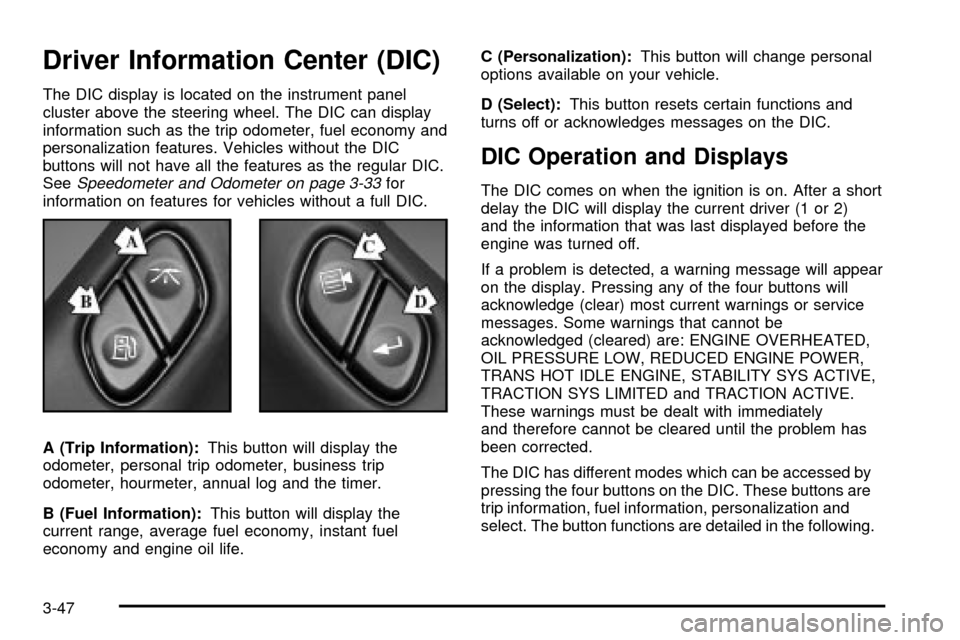
Driver Information Center (DIC)
The DIC display is located on the instrument panel
cluster above the steering wheel. The DIC can display
information such as the trip odometer, fuel economy and
personalization features. Vehicles without the DIC
buttons will not have all the features as the regular DIC.
See
Speedometer and Odometer on page 3-33for
information on features for vehicles without a full DIC.
A (Trip Information):This button will display the
odometer, personal trip odometer, business trip
odometer, hourmeter, annual log and the timer.
B (Fuel Information):This button will display the
current range, average fuel economy, instant fuel
economy and engine oil life.C (Personalization):This button will change personal
options available on your vehicle.
D (Select):This button resets certain functions and
turns off or acknowledges messages on the DIC.
DIC Operation and Displays
The DIC comes on when the ignition is on. After a short
delay the DIC will display the current driver (1 or 2)
and the information that was last displayed before the
engine was turned off.
If a problem is detected, a warning message will appear
on the display. Pressing any of the four buttons will
acknowledge (clear) most current warnings or service
messages. Some warnings that cannot be
acknowledged (cleared) are: ENGINE OVERHEATED,
OIL PRESSURE LOW, REDUCED ENGINE POWER,
TRANS HOT IDLE ENGINE, STABILITY SYS ACTIVE,
TRACTION SYS LIMITED and TRACTION ACTIVE.
These warnings must be dealt with immediately
and therefore cannot be cleared until the problem has
been corrected.
The DIC has different modes which can be accessed by
pressing the four buttons on the DIC. These buttons are
trip information, fuel information, personalization and
select. The button functions are detailed in the following.
3-47
Page 195 of 473

You can also reset the PERSONAL: XX MI, or
BUSINESS: XX MI while they are displayed by pressing
the reset stem on the cluster. If you press and hold
the reset stem or select button for one second,
the display will show the distance traveled since the last
ignition cycle for the personal or business trip.
Odometer
Press the trip information button until ODOMETER
appears on the display. This shows the total distance
the vehicle has been driven in either miles or kilometers.
Pressing the reset stem located on the instrument
cluster with the vehicle off will also display the odometer.
Hourmeter
Press the trip information button to scroll to the
hourmeter. The hourmeter shows the total number of
hours the engine has run. Pressing and holding the reset
stem for about 4 seconds on the instrument cluster
will also display the hourmeter after the odometer
is displayed when the vehicle is off.
Annual Log
Press the trip information button to scroll to the annual
log. The annual log shows the mileage accumulated
since it was last reset. To reset the annual log,
press and hold the select button for one seconds.
Timer
The DIC can be used as a stopwatch. Press the select
button while TIMER is displayed to start the timer.
The display will show the amount of time that has
passed since the timer was last reset (not including time
the ignition is off). Time will continue to be counted as
long as the ignition is on, even if another display is being
shown on the DIC. The timer will record up to 99 hours,
59 minutes and 59 seconds (99:59:59) after which
the display will roll back to zero.
To stop the counting of time, press the select button
brie¯y while TIMER is displayed.
To reset the timer to zero, press and hold the select
button while TIMER is displayed.
3-49
Page 295 of 473
If You Are Stuck: In Sand, Mud,
Ice or Snow
In order to free your vehicle when it is stuck, you will
need to spin the wheels, but you don't want to spin your
wheels too fast. The method known as ªrockingº can
help you get out when you're stuck, but you must
use caution.
{CAUTION:
If you let your tires spin at high speed, they
can explode, and you or others could be
injured. And, the transmission or other parts of
the vehicle can overheat. That could cause an
engine compartment ®re or other damage.
When you're stuck, spin the wheels as little as
possible. Don't spin the wheels above 35 mph
(55 km/h) as shown on the speedometer.
Notice:Spinning your wheels can destroy parts of
your vehicle as well as the tires. If you spin the
wheels too fast while shifting your transmission
back and forth, you can destroy your transmission.
For information about using tire chains on your
vehicle, see
Tire Chains on page 5-74.
Rocking Your Vehicle To Get It Out
First, turn your steering wheel left and right. That will
clear the area around your front wheels. If your vehicle
has the Stabilitrak
žSystem, turn the system off by
pressing the Stabilitrakžbutton so that the STABILITY
SYS DISABLED message and the traction off light
are illuminated on the instrument panel cluster. Then
shift back and forth between REVERSE (R) and a
forward gear, spinning the wheels as little as possible.
Release the accelerator pedal while you shift, and press
lightly on the accelerator pedal when the transmission
is in gear. By slowly spinning your wheels in the forward
and reverse directions, you will cause a rocking
motion that may free your vehicle. If that doesn't get
you out after a few tries, you may need to be towed out.
Or, you can use your recovery hooks if your vehicle
has them. If you do need to be towed out, see
Towing
Your Vehicle on page 4-48.
4-46
Page 325 of 473
Engine Oil
If the CHECK OIL LEVEL message appears on the
instrument cluster, it means you need to check
your engine oil level right away.
For more information, see ªCHECK OIL LEVELº under
DIC Warnings and Messages on page 3-58.
You should check your engine oil level regularly; this is
an added reminder.
Checking Engine Oil
It's a good idea to check your engine oil every time you
get fuel. In order to get an accurate reading, the oil
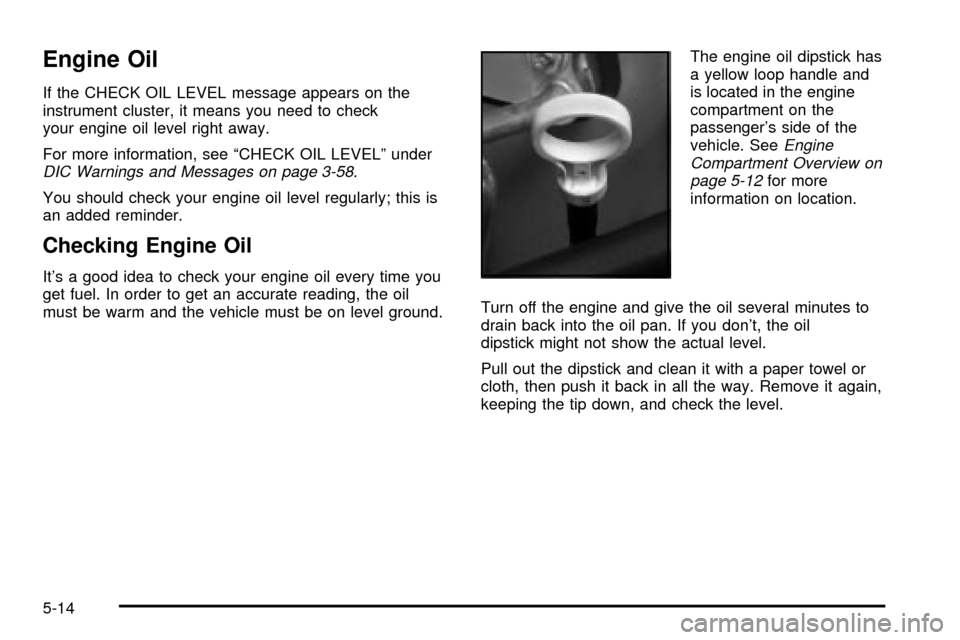
must be warm and the vehicle must be on level ground.The engine oil dipstick has
a yellow loop handle and
is located in the engine
compartment on the
passenger's side of the
vehicle. See
Engine
Compartment Overview on
page 5-12
for more
information on location.
Turn off the engine and give the oil several minutes to
drain back into the oil pan. If you don't, the oil
dipstick might not show the actual level.
Pull out the dipstick and clean it with a paper towel or
cloth, then push it back in all the way. Remove it again,
keeping the tip down, and check the level.
5-14
Page 338 of 473
Coolant Surge Tank Pressure Cap
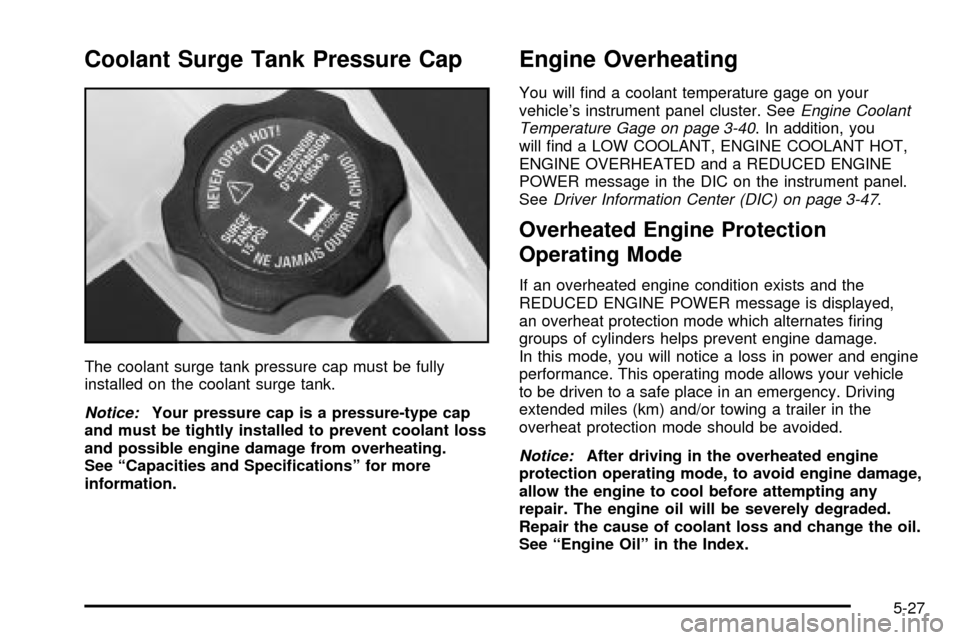
The coolant surge tank pressure cap must be fully
installed on the coolant surge tank.
Notice:Your pressure cap is a pressure-type cap
and must be tightly installed to prevent coolant loss
and possible engine damage from overheating.
See ªCapacities and Speci®cationsº for more
information.
Engine Overheating
You will ®nd a coolant temperature gage on your
vehicle's instrument panel cluster. SeeEngine Coolant
Temperature Gage on page 3-40. In addition, you
will ®nd a LOW COOLANT, ENGINE COOLANT HOT,
ENGINE OVERHEATED and a REDUCED ENGINE
POWER message in the DIC on the instrument panel.
See
Driver Information Center (DIC) on page 3-47.
Overheated Engine Protection
Operating Mode
If an overheated engine condition exists and the
REDUCED ENGINE POWER message is displayed,
an overheat protection mode which alternates ®ring
groups of cylinders helps prevent engine damage.
In this mode, you will notice a loss in power and engine
performance. This operating mode allows your vehicle
to be driven to a safe place in an emergency. Driving
extended miles (km) and/or towing a trailer in the
overheat protection mode should be avoided.
Notice:After driving in the overheated engine
protection operating mode, to avoid engine damage,
allow the engine to cool before attempting any
repair. The engine oil will be severely degraded.
Repair the cause of coolant loss and change the oil.
See ªEngine Oilº in the Index.
5-27
Page 419 of 473
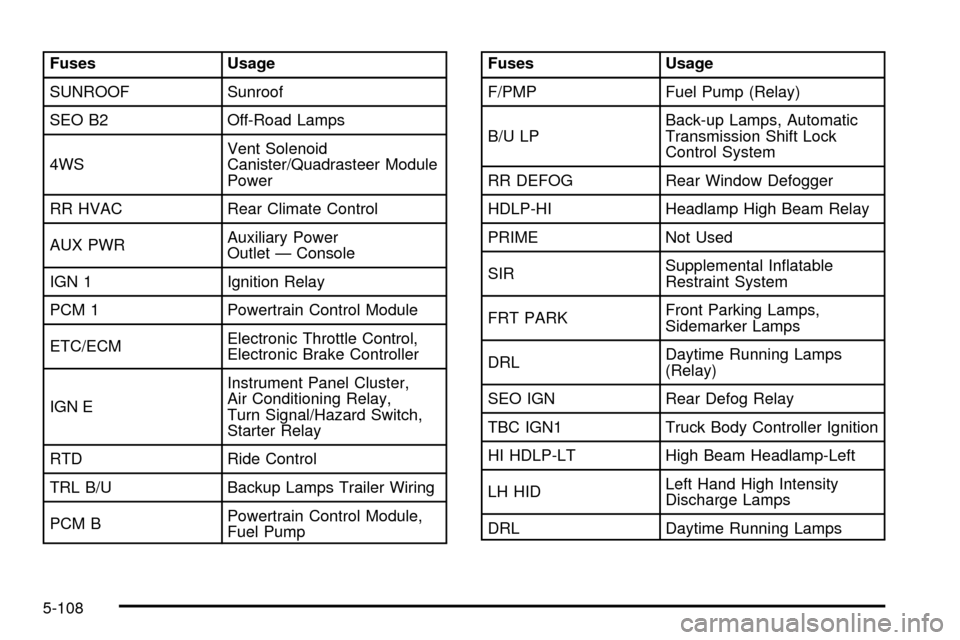
Fuses Usage
SUNROOF Sunroof
SEO B2 Off-Road Lamps
4WSVent Solenoid
Canister/Quadrasteer Module
Power
RR HVAC Rear Climate Control
AUX PWRAuxiliary Power
Outlet Ð Console
IGN 1 Ignition Relay
PCM 1 Powertrain Control Module
ETC/ECMElectronic Throttle Control,
Electronic Brake Controller
IGN EInstrument Panel Cluster,
Air Conditioning Relay,
Turn Signal/Hazard Switch,
Starter Relay
RTD Ride Control
TRL B/U Backup Lamps Trailer Wiring
PCM BPowertrain Control Module,
Fuel PumpFuses Usage
F/PMP Fuel Pump (Relay)
B/U LPBack-up Lamps, Automatic
Transmission Shift Lock
Control System
RR DEFOG Rear Window Defogger
HDLP-HI Headlamp High Beam Relay
PRIME Not Used
SIRSupplemental In¯atable
Restraint System
FRT PARKFront Parking Lamps,
Sidemarker Lamps
DRLDaytime Running Lamps
(Relay)
SEO IGN Rear Defog Relay
TBC IGN1 Truck Body Controller Ignition
HI HDLP-LT High Beam Headlamp-Left
LH HIDLeft Hand High Intensity
Discharge Lamps
DRL Daytime Running Lamps
5-108
Page 420 of 473
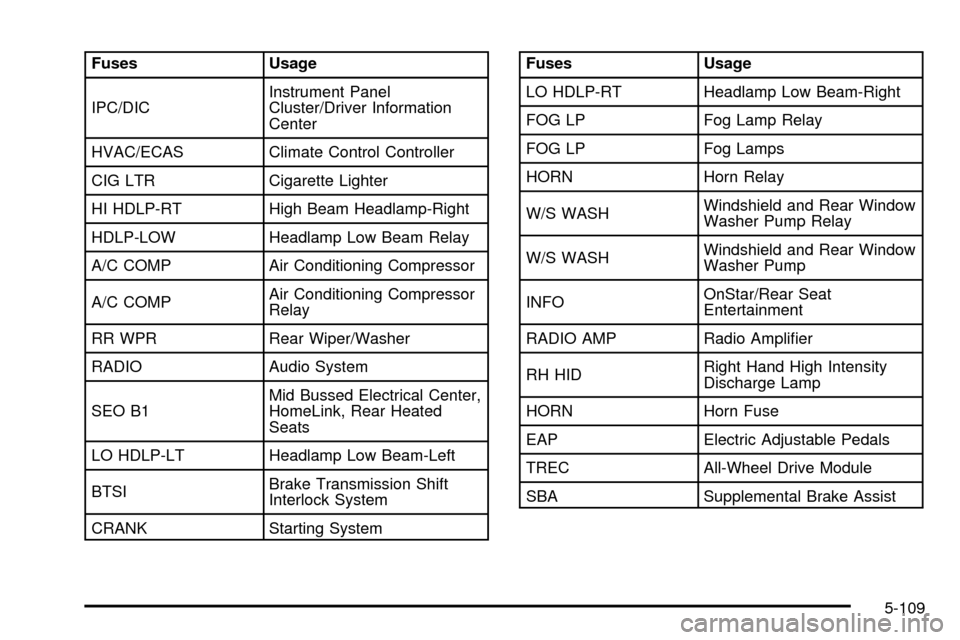
Fuses Usage
IPC/DICInstrument Panel
Cluster/Driver Information
Center
HVAC/ECAS Climate Control Controller
CIG LTR Cigarette Lighter
HI HDLP-RT High Beam Headlamp-Right
HDLP-LOW Headlamp Low Beam Relay
A/C COMP Air Conditioning Compressor
A/C COMPAir Conditioning Compressor
Relay
RR WPR Rear Wiper/Washer
RADIO Audio System
SEO B1Mid Bussed Electrical Center,
HomeLink, Rear Heated
Seats
LO HDLP-LT Headlamp Low Beam-Left
BTSIBrake Transmission Shift
Interlock System
CRANK Starting SystemFuses Usage
LO HDLP-RT Headlamp Low Beam-Right
FOG LP Fog Lamp Relay
FOG LP Fog Lamps
HORN Horn Relay
W/S WASHWindshield and Rear Window
Washer Pump Relay
W/S WASHWindshield and Rear Window
Washer Pump
INFOOnStar/Rear Seat
Entertainment
RADIO AMP Radio Ampli®er
RH HIDRight Hand High Intensity
Discharge Lamp
HORN Horn Fuse
EAP Electric Adjustable Pedals
TREC All-Wheel Drive Module
SBA Supplemental Brake Assist
5-109
Page 464 of 473

Instrument Panel Brightness.............................3-18
Instrument Panel Fuse Block..........................5-102
Instrument Panel.............................................3-32
Cluster.......................................................3-32
Overview..................................................... 3-4
Interior Lamps................................................3-18
J
Jump Starting.................................................5-44
K
Key Lock Cylinders Service..............................6-12
KEYFOB X BATTERY LOW.............................3-63
Keyless Entry System....................................... 2-4
Keys............................................................... 2-3
L
Lamps On Reminder.......................................3-16
Lamps...........................................................3-14
Exterior......................................................3-14
Interior.......................................................3-18
Lap-Shoulder Belt...................................1-14, 1-23LATCH System...............................................1-42
Child Restraints...........................................1-42
Securing a Child Restraint Designed for
the LATCH System...................................1-44
Leaving Your Vehicle With the Engine Running......2-37
LEFT REAR DOOR AJAR................................3-63
Light.............................................................3-34
Air Bag Readiness.......................................3-34
Anti-Lock Brake System Warning...................3-39
Brake System Warning.................................3-38
Charging System.........................................3-36
Cruise Control.............................................3-45
Low Fuel Warning.......................................3-46
Malfunction Indicator....................................3-42
Passenger Air Bag Status Indicator................3-35
Safety Belt Reminder...................................3-33
Tow/Haul Mode...........................................3-45
Traction Off................................................3-39
Listening to a DVD.........................................3-81
Loading Your Vehicle for Off-Road Driving..........4-19
Loading Your Vehicle.......................................4-48
Lockout Protection..........................................2-12
Locks............................................................. 2-9
Delayed Locking........................................... 2-9
Door........................................................... 2-8
Lockout Protection.......................................2-12
Power Door.................................................. 2-9
9