ESP CADILLAC ESCALADE EXT 2003 2.G Owner's Manual
[x] Cancel search | Manufacturer: CADILLAC, Model Year: 2003, Model line: ESCALADE EXT, Model: CADILLAC ESCALADE EXT 2003 2.GPages: 473, PDF Size: 3.31 MB
Page 306 of 473

Hitches
It's important to have the correct hitch equipment.
Crosswinds, large trucks going by and rough roads
are a few reasons why you'll need the right hitch.
Here are some rules to follow:
·If you'll be pulling a trailer that, when loaded, will
weigh more than 5,000 lbs. (2 270 kg), be sure
to use a properly mounted, weight-distributing hitch
and sway control of the proper size. This equipment
is very important for proper vehicle loading and good
handling when you're driving.
Safety Chains
You should always attach chains between your vehicle
and your trailer. Cross the safety chains under the
tongue of the trailer to help prevent the tongue from
contacting the road if it becomes separated from
the hitch. Always leave just enough slack so you can
turn with your rig. Never allow safety chains to drag on
the ground.
Trailer Brakes
If your trailer weighs more than 2,000 lbs. (900 kg)
loaded, then it needs its own brakes ± and they must be
adequate. Be sure to read and follow the instructions
for the trailer brakes so you'll be able to install,
adjust and maintain them properly.
Since your vehicle is equipped with Stabilitrak
ž, your
trailer brake system cannot tap into the vehicle's
hydraulic brake system.
Driving with a Trailer
Towing a trailer requires a certain amount of experience.
Before setting out for the open road, you'll want to get
to know your rig. Acquaint yourself with the feel of
handling and braking with the added weight of the trailer.
And always keep in mind that the vehicle you are
driving is now a good deal longer and not nearly as
responsive as your vehicle is by itself.
Before you start, check the trailer hitch and platform
(and attachments), safety chains, electrical connector,
lamps, tires and mirror adjustment. If the trailer has
electric brakes, start your vehicle and trailer moving and
then apply the trailer brake controller by hand to be
sure the brakes are working. This lets you check your
electrical connection at the same time.
4-57
Page 309 of 473

When You Are Ready to Leave After
Parking on a Hill
1. Apply your regular brakes and hold the pedal down
while you:
·start your engine,
·shift into a gear, and
·release the parking brake.
2. Let up on the brake pedal.
3. Drive slowly until the trailer is clear of the chocks.
4. Stop and have someone pick up and store the
chocks.
Maintenance When Trailer Towing
Your vehicle will need service more often when you're
pulling a trailer. See the Maintenance Schedule for more
on this. Things that are especially important in trailer
operation are automatic transmission ¯uid (don't over®ll),
engine oil, axle lubricant, belts, cooling system and
brake system. Each of these is covered in this manual,
and the Index will help you ®nd them quickly. If you're
trailering, it's a good idea to review these sections
before you start your trip.
Check periodically to see that all hitch nuts and bolts
are tight.
4-60
Page 332 of 473

Automatic Transmission Fluid
When to Check and Change
A good time to check your automatic transmission ¯uid
level is when the engine oil is changed.
Change both the ¯uid and ®lter every 50,000 miles
(83 000 km) if the vehicle is mainly driven under one or
more of these conditions:
·In heavy city traffic where the outside temperature
regularly reaches 90ÉF (32ÉC) or higher.
·In hilly or mountainous terrain.
·When doing frequent trailer towing.
·Uses such as found in taxi, police or delivery
service.
If you do not use your vehicle under any of these
conditions, change the ¯uid and ®lter every
100,000 miles (166 000 km).
See
Part A: Scheduled Maintenance Services on
page 6-4.
How to Check
Because this operation can be a little difficult, you may
choose to have this done at the dealership service
department.
If you do it yourself, be sure to follow all the instructions
here, or you could get a false reading on the dipstick.
Notice:Too much or too little ¯uid can damage
your transmission. Too much can mean that some
of the ¯uid could come out and fall on hot engine
part or exhaust system parts, starting a ®re.
Too little ¯uid could cause the transmission to
overheat. Be sure to get an accurate reading if you
check your transmission ¯uid.
Wait at least 30 minutes before checking the
transmission ¯uid level if you have been driving:
·When outside temperatures are above 90ÉF (32ÉC).
·At high speed for quite a while.
·In heavy traffic ± especially in hot weather.
·While pulling a trailer.
To get the right reading, the ¯uid should be at normal
operating temperature, which is 180ÉF to 200ÉF
(82ÉC to 93ÉC).
5-21
Page 334 of 473

1. Flip the handle up and then pull out the dipstick
and wipe it with a clean rag or paper towel.
2. Push it back in all the way, wait three seconds and
then pull it back out again.
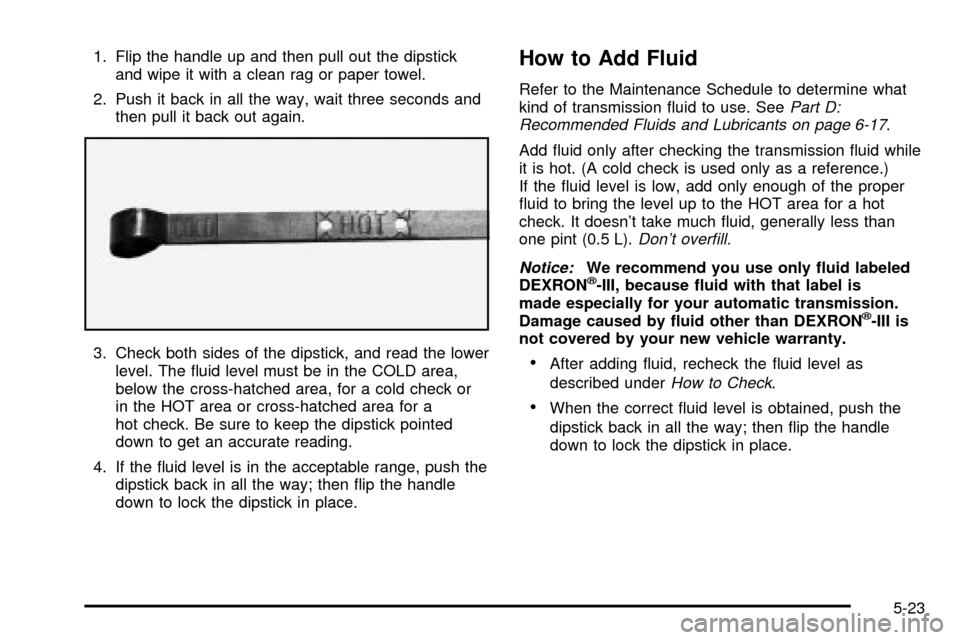
3. Check both sides of the dipstick, and read the lower
level. The ¯uid level must be in the COLD area,
below the cross-hatched area, for a cold check or
in the HOT area or cross-hatched area for a
hot check. Be sure to keep the dipstick pointed
down to get an accurate reading.
4. If the ¯uid level is in the acceptable range, push the
dipstick back in all the way; then ¯ip the handle
down to lock the dipstick in place.How to Add Fluid
Refer to the Maintenance Schedule to determine what
kind of transmission ¯uid to use. SeePart D:
Recommended Fluids and Lubricants on page 6-17.
Add ¯uid only after checking the transmission ¯uid while
it is hot. (A cold check is used only as a reference.)
If the ¯uid level is low, add only enough of the proper
¯uid to bring the level up to the HOT area for a hot
check. It doesn't take much ¯uid, generally less than
one pint (0.5 L).
Don't over®ll.
Notice:
We recommend you use only ¯uid labeled
DEXRONž-III, because ¯uid with that label is
made especially for your automatic transmission.
Damage caused by ¯uid other than DEXRON
ž-III is
not covered by your new vehicle warranty.
·After adding ¯uid, recheck the ¯uid level as
described under
How to Check.
·When the correct ¯uid level is obtained, push the
dipstick back in all the way; then ¯ip the handle
down to lock the dipstick in place.
5-23
Page 382 of 473

{CAUTION:
If you use bias-ply tires on your vehicle, the
wheel rim ¯anges could develop cracks after
many miles of driving. A tire and/or wheel
could fail suddenly, causing a crash. Use only
radial-ply tires with the wheels on your vehicle.
Uniform Tire Quality Grading
Quality grades can be found where applicable on the
tire sidewall between tread shoulder and maximum
section width. For example:
Treadwear 200 Traction AA Temperature A
The following information relates to the system
developed by the United States National Highway
Traffic Safety Administration, which grades tires by
treadwear, traction and temperature performance.
(This applies only to vehicles sold in the United States.)The grades are molded on the sidewalls of most
passenger car tires. The Uniform Tire Quality Grading
system does not apply to deep tread, winter-type
snow tires, space-saver or temporary use spare tires,
tires with nominal rim diameters of 10 to 12 inches
(25 to 30 cm), or to some limited-production tires.
While the tires available on General Motors passenger
cars and light trucks may vary with respect to these
grades, they must also conform to federal safety
requirements and additional General Motors Tire
Performance Criteria (TPC) standards.
Treadwear
The treadwear grade is a comparative rating based on
the wear rate of the tire when tested under controlled
conditions on a speci®ed government test course.
For example, a tire graded 150 would wear one and
a half (1.5) times as well on the government course as
a tire graded 100. The relative performance of tires
depends upon the actual conditions of their use,
however, and may depart signi®cantly from the norm
due to variations in driving habits, service practices and
differences in road characteristics and climate.
5-71
Page 383 of 473

Traction ± AA, A, B, C
The traction grades, from highest to lowest, are AA, A,
B, and C. Those grades represent the tire's ability
to stop on wet pavement as measured under controlled
conditions on speci®ed government test surfaces of
asphalt and concrete. A tire marked C may have poor
traction performance. Warning: The traction grade
assigned to this tire is based on straight-ahead braking
traction tests, and does not include acceleration,
cornering, hydroplaning, or peak traction characteristics.
Temperature ± A, B, C
The temperature grades are A (the highest), B, and C,
representing the tire's resistance to the generation
of heat and its ability to dissipate heat when tested
under controlled conditions on a speci®ed indoor
laboratory test wheel. Sustained high temperature can
cause the material of the tire to degenerate and
reduce tire life, and excessive temperature can lead to
sudden tire failure. The grade C corresponds to a
level of performance which all passenger car tires must
meet under the Federal Motor Vehicle Safety Standard
No. 109. Grades B and A represent higher levels of
performance on the laboratory test wheel than the
minimum required by law.Warning: The temperature grade for this tire is
established for a tire that is properly in¯ated and not
overloaded. Excessive speed, underin¯ation, or
excessive loading, either separately or in combination,
can cause heat buildup and possible tire failure.
Wheel Alignment and Tire Balance
The wheels on your vehicle were aligned and balanced
carefully at the factory to give you the longest tire life
and best overall performance.
Scheduled wheel alignment and wheel balancing are
not needed. However, if you notice unusual tire wear or
your vehicle pulling one way or the other, the alignment
may need to be reset. If you notice your vehicle
vibrating when driving on a smooth road, your wheels
may need to be rebalanced.
5-72
Page 386 of 473

If a Tire Goes Flat
It's unusual for a tire to ªblowoutº while you're driving,
especially if you maintain your tires properly. If air goes
out of a tire, it's much more likely to leak out slowly.
But if you should ever have a ªblowout,º here are a few
tips about what to expect and what to do:
If a front tire fails, the ¯at tire will create a drag that
pulls the vehicle toward that side. Take your foot off the
accelerator pedal and grip the steering wheel ®rmly.
Steer to maintain lane position, and then gently brake to
a stop well out of the traffic lane.
A rear blowout, particularly on a curve, acts much like a
skid and may require the same correction you'd use
in a skid. In any rear blowout, remove your foot from the
accelerator pedal. Get the vehicle under control by
steering the way you want the vehicle to go. It may be
very bumpy and noisy, but you can still steer. Gently
brake to a stop, well off the road if possible.{CAUTION:
Lifting a vehicle and getting under it to do
maintenance or repairs is dangerous without
the appropriate safety equipment and training.
The jack provided with your vehicle is designed
only for changing a ¯at tire. If it is used for
anything else, you or others could be badly
injured or killed if the vehicle slips off the jack.
Use the jack provided with your vehicle only for
changing a ¯at tire.
If a tire goes ¯at, the next part shows how to use your
jacking equipment to change a ¯at tire safely.
5-75
Page 441 of 473

Usage Fluid/Lubricant
Transfer CaseDEXRON
ž-III Automatic
Transmission Fluid.
Front Axle
Propshaft
SplineSpline Lubricant, Special Lubricant
(GM Part No. U.S. 12345879,
in Canada 10953511) or
lubricant meeting requirements of
GM 9985830.
Hood HingesMulti-Purpose Lubricant, Superlube
(GM Part No. U.S. 12346241,
in Canada 10953474, or equivalent).
Usage Fluid/Lubricant
Outer Tailgate
Handle Pivot
PointsMulti-Purpose Lubricant, Superlube
(GM Part No. U.S. 12346241,
in Canada 10953474, or equivalent).
Weatherstrip
ConditioningDielectric Silicone Grease
(GM Part No. U.S. 12345579,
in Canada 10953014, or equivalent).
Weatherstrip
SqueaksSynthetic Grease with Te¯on,
Superlube
(GM Part No. U.S. 12371287,
in Canada 10953437, or equivalent).
6-18
Page 445 of 473

Customer Assistance
Information
Customer Satisfaction Procedure
Your satisfaction and goodwill are important to
your dealer and to Cadillac. Normally, any concerns
with the sales transaction or the operation of your
vehicle will be resolved by your dealer's sales or service
departments. Sometimes, however, despite the best
intentions of all concerned, misunderstandings can
occur. If your concern has not been resolved to your
satisfaction, the following steps should be taken:
STEP ONE:Discuss your concern with a member of
dealership management. Normally, concerns can
be quickly resolved at that level. If the matter has
already been reviewed with the sales, service or parts
manager, contact the owner of the dealership or
the general manager.
STEP TWO:If after contacting a member of dealership
management, it appears your concern cannot be
resolved by the dealership without further help, contact
the Cadillac Customer Assistance Center, 24 hours
a day, by calling 1-800-458-8006. In Canada, contact
GM of Canada Customer Communication Centre
in Oshawa by calling 1-800-263-3777 (English) or
1-800-263-7854 (French).We encourage you to call the toll-free number in order
to give your inquiry prompt attention. Please have
the following information available to give the Customer
Assistance Representative:
·Vehicle Identi®cation Number (This is available from
the vehicle registration or title, or the plate at the
top left of the instrument panel and visible through
the windshield.)
·Dealership name and location
·Vehicle delivery date and present mileage
When contacting Cadillac, please remember that your
concern will likely be resolved at a dealer's facility.
That is why we suggest you follow Step One ®rst if you
have a concern.
STEP THREE:Both General Motors and your dealer
are committed to making sure you are completely
satis®ed with your new vehicle. However, if you continue
to remain unsatis®ed after following the procedure
outlined in Steps One and Two, you should ®le with the
GM/BBB Auto Line Program to enforce any additional
rights you may have. Canadian owners refer to
your Warranty and Owner Assistance Information
booklet for information on the Canadian Motor Vehicle
Arbitration Plan (CAMVAP).
7-2
Page 451 of 473

Transportation Options
Warranty service can generally be completed while
you wait. However, if you are unable to wait Cadillac
helps minimize your inconvenience by providing several
transportation options. Depending on the circumstances,
your dealer can offer you one of the following:
Shuttle Service
Participating dealers can provide you with shuttle
service to get you to your destination with minimal
interruption of your daily schedule. This includes a
one way shuttle ride to a destination up to 10 miles
from the dealership.
Public Transportation or Fuel
Reimbursement
If your vehicle requires overnight warranty repairs,
reimbursement up to $30 per day (®ve days maximum)
may be available for the use of public transportation
such as taxi or bus. In addition, should you arrange
transportation through a friend or relative,
reimbursement for reasonable fuel expenses up to
$10 per day (®ve day maximum) may be available.
Claim amounts should re¯ect actual costs and be
supported by original receipts.
Courtesy Rental Vehicle
When your vehicle is unavailable due to overnight
warranty repairs, your dealer may arrange to provide
you with a courtesy rental vehicle or reimburse you
for a rental vehicle you obtained, at actual cost, up to
a maximum of $37.00 per day supported by receipts.
This requires that you sign and complete a rental
agreement and meet state, local and rental vehicle
provider requirements. Requirements vary and
may include minimum age requirements, insurance
coverage, credit card, etc. You are responsible for
fuel usage charges and may also be responsible for
taxes, levies, usage fees, excessive mileage or
rental usage beyond the completion of the repair.
Generally it is not possible to provide a like-vehicle
as a courtesy rental.
7-8