cooling CADILLAC ESCALADE EXT 2003 2.G Owners Manual
[x] Cancel search | Manufacturer: CADILLAC, Model Year: 2003, Model line: ESCALADE EXT, Model: CADILLAC ESCALADE EXT 2003 2.GPages: 473, PDF Size: 3.31 MB
Page 85 of 473

CAUTION: (Continued)
death. If you must drive with the cargo covers
on and the tailgate and midgate open or if
electrical wiring or other cable connections
must pass through the seal between the body
and the midgate:
·Make sure all windows are shut.
·Turn the fan on your heating or cooling
system to its highest speed with the
setting on OUTSIDE AIR. That will force
outside air into your vehicle. See ªClimate
Control Systemº in the Index.
·If you have air outlets on or under the
instrument panel, open them all the way.
See ªEngine Exhaustº in the Index.
Midgate Operation
Your vehicle is equipped with a midgate and a removable
rear glass panel. The midgate allows you to extend the
length of your vehicle's cargo area.The following are the main components of the midgate
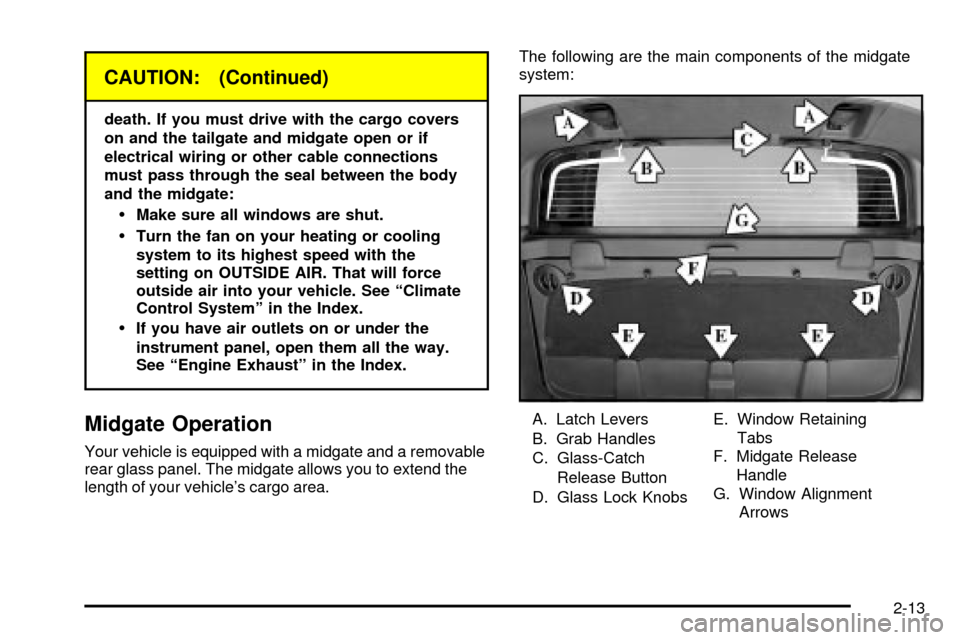
system:
A. Latch Levers
B. Grab Handles
C. Glass-Catch
Release Button
D. Glass Lock KnobsE. Window Retaining
Tabs
F. Midgate Release
Handle
G. Window Alignment
Arrows
2-13
Page 170 of 473

Climate Controls
Automatic Climate Control System
With this system, you can control the heating, cooling
and ventilation in your vehicle. Your vehicle also has a
¯ow-through ventilation system described later in this
section.
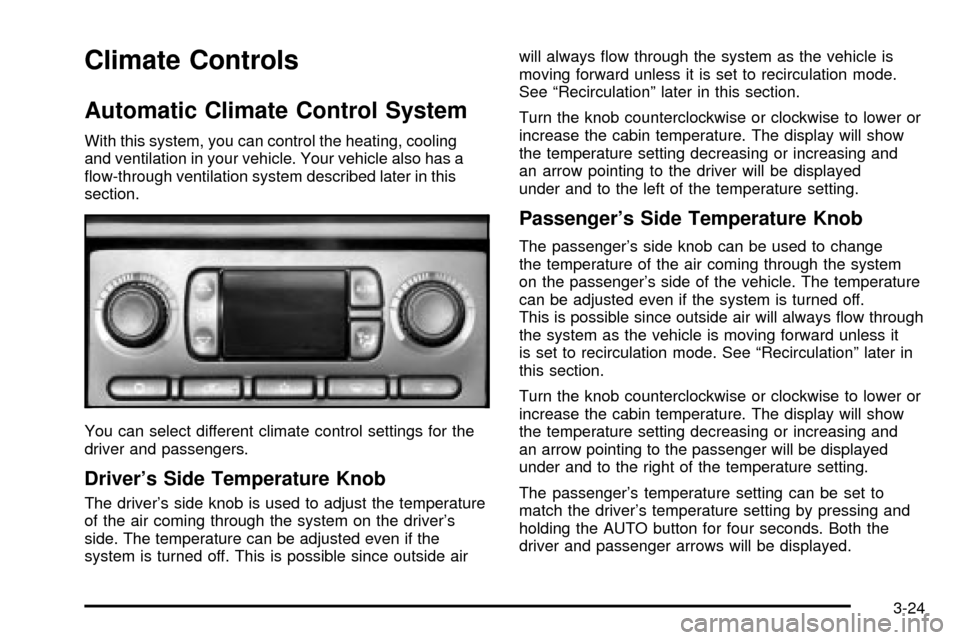
You can select different climate control settings for the
driver and passengers.
Driver's Side Temperature Knob
The driver's side knob is used to adjust the temperature
of the air coming through the system on the driver's
side. The temperature can be adjusted even if the
system is turned off. This is possible since outside airwill always ¯ow through the system as the vehicle is
moving forward unless it is set to recirculation mode.
See ªRecirculationº later in this section.
Turn the knob counterclockwise or clockwise to lower or
increase the cabin temperature. The display will show
the temperature setting decreasing or increasing and
an arrow pointing to the driver will be displayed
under and to the left of the temperature setting.
Passenger's Side Temperature Knob
The passenger's side knob can be used to change
the temperature of the air coming through the system
on the passenger's side of the vehicle. The temperature
can be adjusted even if the system is turned off.
This is possible since outside air will always ¯ow through
the system as the vehicle is moving forward unless it
is set to recirculation mode. See ªRecirculationº later in
this section.
Turn the knob counterclockwise or clockwise to lower or
increase the cabin temperature. The display will show
the temperature setting decreasing or increasing and
an arrow pointing to the passenger will be displayed
under and to the right of the temperature setting.
The passenger's temperature setting can be set to
match the driver's temperature setting by pressing and
holding the AUTO button for four seconds. Both the
driver and passenger arrows will be displayed.
3-24
Page 171 of 473

Automatic Operation
AUTO (Automatic):When automatic operation is
active the system will control the inside temperature,
the air delivery, and the fan speed.
Use the steps below to place the entire system in
automatic mode:
1. Press the AUTO button.
When AUTO is selected, the display will change to
show the current driver's set temperature, delivery
mode and fan speed. Press the AUTO button again
within ®ve seconds to display the passenger's set
temperature.
If the driver and passenger's temperature settings
are not the same, the opposite side temperature
setting will be displayed for an additional ®ve
seconds. To make the passenger's temperature
the same as the driver's press and hold the AUTO
button for about four seconds.
When auto is selected, the air conditioning operation
and air inlet will be automatically controlled. The air
conditioning compressor will run when the outside
temperature is over about 40ÉF (4ÉC). The air inlet
will normally be set to outside air. If it's hot outside,
the air inlet may automatically switch to recirculate
inside air to help quickly cool down your vehicle.
The light on the button will illuminate in recirculation.2. Set the driver's and passenger's temperature.
To ®nd your comfort setting, start with a 74ÉF (23ÉC)
temperature setting and allow about 20 minutes
for the system to regulate. Turn the driver's or
passenger's side temperature knob to adjust the
temperature setting as necessary. If you choose the
temperature setting of 60ÉF (15ÉC) the system will
remain at the maximum cooling setting. If you choose
the temperature setting of 90ÉF (32ÉC) the system
will remain at the maximum heat setting. Choosing
either maximum setting will not cause the vehicle to
heat or cool any faster.
Be careful not to cover the sensor located on the
top of the instrument panel near the windshield.
This sensor regulates air temperature based on
sun load, and also turns on your headlamps.
To avoid blowing cold air in cold weather, the system
will delay turning on the fan until warm air is available.
The length of delay depends on the engine coolant
temperature. Pressing the fan switch will override this
delay and change the fan to a selected speed.
9(Off):Press this button to turn off the entire climate
control system. Outside air will still enter the vehicle, and
will be directed to the ¯oor. This direction can be changed
by pressing the mode button. The temperature can also
be adjusted using either temperature knob. Press the up
or down arrows on the fan switch, the defrost button, the
AUTO button, or the air conditioning button to turn the
system on when it is off.
3-25
Page 186 of 473

Engine Coolant Temperature Gage
This gage shows the engine coolant temperature.
It also provides an indicator of how hard your vehicle is
working. During a majority of the operation, the gage
will read 210ÉF (100ÉC) or less. If you are pulling a load
or going up hills, it is normal for the temperature to
¯uctuate and approach the 250ÉF (122ÉC) mark. If the
gage reaches the 260ÉF (125ÉC) mark, it indicates
that the cooling system is working beyond its capacity.
See
Engine Overheating on page 5-27.
Transmission Temperature Gage
Your vehicle is equipped with a transmission
temperature gage.
When your ignition is on, the gage shows the temperature
of the transmission ¯uid. The normal operating range is
from 100ÉF (38ÉC) to about 265ÉF (130ÉC). United States
CanadaUnited StatesCanada
3-40
Page 205 of 473

CHANGE ENGINE OIL
This message is displayed when the engine oil needs to
be changed. SeeGM Oil Life Systempreviously in
this section for information on how to reset the message.
This message will clear itself after 10 seconds until
the next igntion cycle.
OIL LIFE RESET
This message will appear on the display for about
10 seconds after resetting the change engine oil
message.
OIL PRESSURE LOW
If low oil pressure levels occur, this message will be
displayed on the DIC and a chime will sound. Stop the
vehicle as soon as safely possible and do not operate
it until the cause of the low oil pressure has been
corrected. Check your oil as soon as possible and have
your vehicle serviced.
CHECK OIL LEVEL
If the oil level in the vehicle is low, this message will
appear on the DIC. Check the oil level and correct it as
necessary. You may need to let the vehicle cool or
warm up and cycle the ignition to be sure this message
will clear. Once the problem is corrected, pressing
the select button will clear this message from the DIC
display. This message will clear itself after 10 seconds
until the next igntion cycle.
LOW COOLANT LEVEL
If the engine coolant level is low, this message will
appear on the DIC. Adding coolant will clear the
message. This message will clear itself after 10 seconds
until the next igntion cycle.
ENGINE COOLANT HOT
If the cooling system temperature gets hot, this message
will appear in the DIC. Stop the vehicle and let the
engine idle in PARK (P) to allow the coolant to reach a
safe temperature. This message will clear when the
coolant temperature drops to a safe operating
temperature. Pressing the select button will clear it
from the DIC display.
3-59
Page 206 of 473

ENGINE OVERHEATED
If the engine cooling system reaches unsafe
temperatures for operation, this message will appear in
the DIC and you will hear a chime. Stop and turn off
the vehicle as soon as it is safe to do so to avoid severe
damage. This message will clear when the engine
has cooled to a safe operating temperature.
REDUCED ENGINE POWER
This message is displayed and a chime will sound
when the cooling system temperature gets too hot
and the engine further enters the engine coolant
protection mode.
See
Engine Overheating on page 5-27for further
information.
BATTERY NOT CHARGING
If the battery is not charging during operation, this
message will appear on the DIC. Driving with this
problem could drain your battery. Have the electrical
system checked as soon as possible. Pressing the
select button will clear it from the DIC display.
SERVICE AIR BAG
If there is a problem with the air bag system, this
message will be displayed on the DIC. Have a quali®ed
technician inspect the system for problems. Pressing
the select button will clear it from the DIC display.
SERVICE BRAKE SYSTEM
If a problem occurs with the brake system, this message
will appear on the DIC. If this message appears, stop
as soon as possible and turn off the vehicle. Restart the
vehicle and check for the message on the DIC display.
If the message is still displayed, or appears again when
you begin driving, the brake system needs service.
Pressing the select button will clear it from the
DIC display.
SERVICE 4WD
If a problem occurs with the all±wheel drive system,
this message will appear on the DIC. If this message
appears, stop as soon as possible and turn off the
vehicle. Restart the vehicle and check for the message
on the DIC display. If the message is still displayed,
or appears again when you begin driving, the four wheel
drive system needs service. Pressing the select button
will clear it from the DIC display.
3-60
Page 281 of 473

After Off-Road Driving
Remove any brush or debris that has collected on
the underbody, chassis or under the hood.
These accumulations can be a ®re hazard.
After operation in mud or sand, have the brake linings
cleaned and checked. These substances can cause
glazing and uneven braking. Check the body structure,
steering, suspension, wheels, tires and exhaust
system for damage. Also, check the fuel lines and
cooling system for any leakage.
Your vehicle will require more frequent service due to
off-road use. Refer to the Maintenance Schedule
for additional information.
Driving at Night
Night driving is more dangerous than day driving.
One reason is that some drivers are likely to be
impaired Ð by alcohol or drugs, with night vision
problems, or by fatigue.
4-32
Page 290 of 473

If you drive regularly in steep country, or if you're
planning to visit there, here are some tips that can make
your trips safer and more enjoyable. See
Operating
Your All-Wheel-Drive Vehicle Off Paved Roads on
page 4-18
for information about driving off-road.
·Keep your vehicle in good shape. Check all ¯uid
levels and also the brakes, tires, cooling system
and transmission. These parts can work hard
on mountain roads.
·Know how to go down hills. The most important
thing to know is this: let your engine do some of
the slowing down. Shift to a lower gear when you
go down a steep or long hill.
{CAUTION:
If you don't shift down, your brakes could get
so hot that they wouldn't work well. You would
then have poor braking or even none going
down a hill. You could crash. Shift down to let
your engine assist your brakes on a steep
downhill slope.
{CAUTION:
Coasting downhill in NEUTRAL (N) or with the
ignition off is dangerous. Your brakes will have
to do all the work of slowing down. They could
get so hot that they wouldn't work well.
You would then have poor braking or even
none going down a hill. You could crash.
Always have your engine running and your
vehicle in gear when you go downhill.
·Know how to go uphill. You may want to shift down to
a lower gear. The lower gears help cool your engine
and transmission, and you can climb the hill better.
·Stay in your own lane when driving on two-lane
roads in hills or mountains. Don't swing wide or cut
across the center of the road. Drive at speeds that let
you stay in your own lane.
·As you go over the top of a hill, be alert. There could
be something in your lane, like a stalled car or an
accident.
·You may see highway signs on mountains that warn
of special problems. Examples are long grades,
passing or no-passing zones, a falling rocks area or
winding roads. Be alert to these and take appropriate
action.
4-41
Page 309 of 473

When You Are Ready to Leave After
Parking on a Hill
1. Apply your regular brakes and hold the pedal down
while you:
·start your engine,
·shift into a gear, and
·release the parking brake.
2. Let up on the brake pedal.
3. Drive slowly until the trailer is clear of the chocks.
4. Stop and have someone pick up and store the
chocks.
Maintenance When Trailer Towing
Your vehicle will need service more often when you're
pulling a trailer. See the Maintenance Schedule for more
on this. Things that are especially important in trailer
operation are automatic transmission ¯uid (don't over®ll),
engine oil, axle lubricant, belts, cooling system and
brake system. Each of these is covered in this manual,
and the Index will help you ®nd them quickly. If you're
trailering, it's a good idea to review these sections
before you start your trip.
Check periodically to see that all hitch nuts and bolts
are tight.
4-60
Page 312 of 473

Service............................................................5-3
Doing Your Own Service Work.........................5-3
Adding Equipment to the Outside of
Your Vehicle..............................................5-4
Fuel................................................................5-4
Gasoline Octane............................................5-4
Gasoline Speci®cations....................................5-5
California Fuel...............................................5-5
Additives.......................................................5-6
Fuels in Foreign Countries...............................5-6
Filling Your Tank............................................5-7
Filling a Portable Fuel Container.......................5-9
Checking Things Under the Hood....................5-10
Hood Release..............................................5-10
Engine Compartment Overview.......................5-12
Engine Oil...................................................5-14
Engine Air Cleaner/Filter................................5-19
Automatic Transmission Fluid.........................5-21
Engine Coolant.............................................5-24
Coolant Surge Tank Pressure Cap..................5-27
Engine Overheating.......................................5-27
Cooling System............................................5-30
Engine Fan Noise.........................................5-36Power Steering Fluid.....................................5-37
Windshield Washer Fluid................................5-38
Brakes........................................................5-39
Battery........................................................5-43
Jump Starting...............................................5-44
All-Wheel Drive..............................................5-50
Rear Axle.......................................................5-51
Front Axle......................................................5-52
Headlamp Aiming...........................................5-53
Headlamp Horizontal Aiming...........................5-54
Headlamp Vertical Aiming..............................5-55
Bulb Replacement..........................................5-57
High Intensity Discharge (HID) Lighting............5-57
Halogen Bulbs..............................................5-57
Headlamps..................................................5-58
Front Turn Signal, Sidemarker and
Daytime Running Lamps.............................5-62
Center High-Mounted Stoplamp (CHMSL).........5-63
Taillamps.....................................................5-63
Replacement Bulbs.......................................5-64
Windshield Wiper Blade Replacement..............5-65
Section 5 Service and Appearance Care
5-1