roof CADILLAC ESCALADE EXT 2003 2.G Owners Manual
[x] Cancel search | Manufacturer: CADILLAC, Model Year: 2003, Model line: ESCALADE EXT, Model: CADILLAC ESCALADE EXT 2003 2.GPages: 473, PDF Size: 3.31 MB
Page 1 of 473

Seats and Restraint Systems........................... 1-1
Front Seats
............................................... 1-2
Rear Seats
............................................... 1-6
Safety Belts
.............................................. 1-8
Child Restraints
.......................................1-28
Air Bag Systems
......................................1-50
Restraint System Check
............................1-65
Features and Controls..................................... 2-1
Keys
........................................................ 2-3
Doors and Locks
....................................... 2-8
Windows
.................................................2-24
Theft-Deterrent Systems
............................2-26
Starting and Operating Your Vehicle
...........2-28
Mirrors
....................................................2-41
OnStar
žSystem
......................................2-46
HomeLinkžTransmitter
.............................2-48
Storage Areas
.........................................2-52
Sunroof
..................................................2-71
Vehicle Personalization
.............................2-72
Instrument Panel............................................. 3-1
Instrument Panel Overview
.......................... 3-4
Climate Controls
......................................3-24
Warning Lights, Gages and Indicators
.........3-31
Driver Information Center (DIC)
..................3-47
Audio System(s)
.......................................3-66Driving Your Vehicle....................................... 4-1
Your Driving, the Road, and Your Vehicle
..... 4-2
Towing
...................................................4-48
Service and Appearance Care.......................... 5-1
Service
..................................................... 5-3
Fuel
......................................................... 5-4
Checking Things Under the Hood
...............5-10
All-Wheel Drive
........................................5-50
Rear Axle
...............................................5-51
Front Axle
...............................................5-52
Headlamp Aiming
.....................................5-53
Bulb Replacement
....................................5-57
Windshield Wiper Blade Replacement
.........5-65
Tires
......................................................5-66
Appearance Care
.....................................5-93
Vehicle Identi®cation
...............................5-100
Electrical System
....................................5-101
Capacities and Speci®cations
...................5-110
Normal Maintenance Replacement Parts
......5-111
Maintenance Schedule..................................... 6-1
Maintenance Schedule
................................ 6-2
Customer Assistance Information.................... 7-1
Customer Assistance Information
.................. 7-2
Reporting Safety Defects
............................ 7-9
Index.................................................................1
2003 Cadillac Escalade EXT Owner ManualM
Page 74 of 473

HomeLinkžTransmitter...................................2-48
Programming the HomeLinkžTransmitter.........2-49
Storage Areas................................................2-52
Glove Box...................................................2-52
Cupholder(s)................................................2-52
Center Console Storage Area.........................2-53
Luggage Carrier...........................................2-53Rear Seat Armrest........................................2-54
Cargo Cover Panels......................................2-55
All-Weather Cargo Area.................................2-65
Top-Box Storage..........................................2-70
Sunroof.........................................................2-71
Vehicle Personalization...................................2-72
Memory Seat...............................................2-72
Section 2 Features and Controls
2-2
Page 125 of 473

Center Console Storage Area
Your vehicle has a console compartment between the
bucket seats.
To open it, press the button on the side of the console
and swing the console lid open.
The console may be equipped with an accessory
power outlet inside. See
Accessory Power Outlets on
page 3-22.
The rear of the console also has a cupholder that
swings down for the rear seat passengers to use.
Luggage Carrier
You can load things on top of your vehicle if it has this
feature.
The luggage carrier has slats and siderails attached
to the roof and may have crossrails which can be moved
back and forth to help secure cargo. Tie the load to
the siderails or siderail supports.
Notice:Loading cargo that weighs more than
200 lbs. (91 kg) on the luggage carrier may damage
your vehicle. When you carry large things, never
let them hang over the rear or the sides of your
vehicle. Load your cargo so that it rests on the
slats and does not scratch or damage the vehicle.
Put the cargo against the side rails and fasten
it securely to the luggage carrier. Put the main
weight as far forward as you can.
Don't exceed the maximum vehicle capacity when
loading your vehicle. For more information on vehicle
capacity and loading, see
Loading Your Vehicle on
page 4-48.
2-53
Page 126 of 473

To prevent damage or loss of cargo as you're leaving,
check now and then to make sure the luggage and
cargo are still securely fastened.
Be sure the cargo is properly loaded.
·If small heavy objects are placed on the roof cut a
piece of 3/8 inch plywood to ®t inside the crossrails
and siderails to spread the load. If plywood is
used, tie it to the siderail supports.
·Tie the load to the crossrails or the siderail supports.
Use the crossrails only to keep the load from
sliding. To move a crossrail, turn the release knobs,
on both sides of the rail, counterclockwise to
loosen it. Slide the crossrail to the desired position
balancing the force side to side. Turn the release
knobs, on both sides of the rail, clockwise to tighten
it and try to slide the crossrail back and forth
slightly to be sure it is tight.
·If you need to carry long items, move the crossrails
as far apart as they will go. Tie the load to the
crossrails and the siderails or siderail supports.
Also tie the load to the bumpers. Do not tie the load
so tightly that the crossrails or siderails are damaged.
·After moving a crossrail, be sure it is securely locked
into the siderail.
Your vehicle has a Center High-Mounted Stoplamp
(CHMSL) located above the rear glass.
If items are loaded on the roof of the vehicle, care
should be taken not to block or damage the CHMSL unit.
Rear Seat Armrest
Your vehicle's second row seat may have an
armrest/storage compartment.
Pull the loop at the top of the armrest out to lower
the armrest.
To open the compartment, if equipped, push the button
on the front of the armrest and pull the top open.
2-54
Page 143 of 473

Sunroof
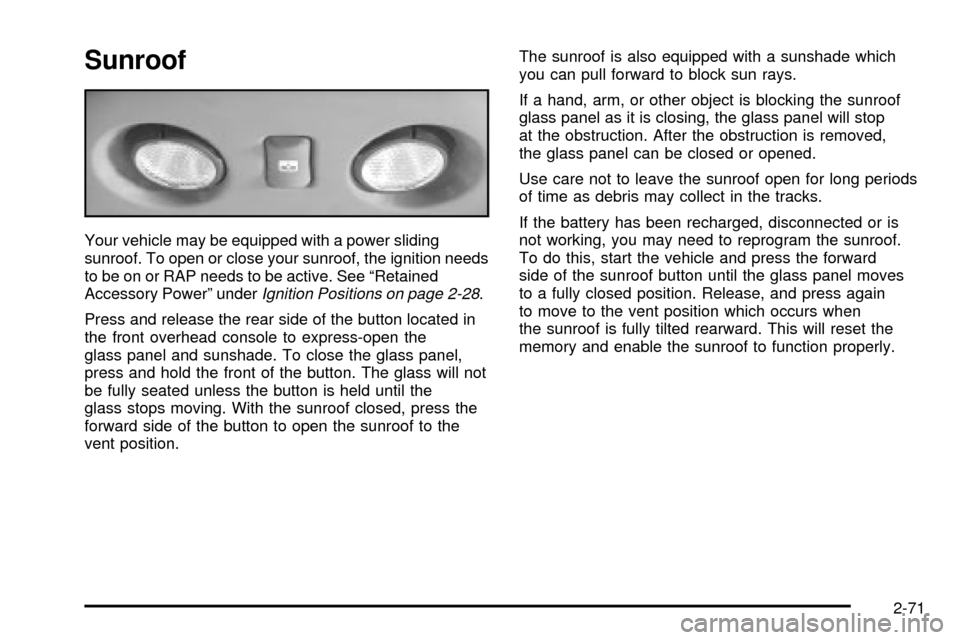
Your vehicle may be equipped with a power sliding
sunroof. To open or close your sunroof, the ignition needs
to be on or RAP needs to be active. See ªRetained
Accessory Powerº under
Ignition Positions on page 2-28.
Press and release the rear side of the button located in
the front overhead console to express-open the
glass panel and sunshade. To close the glass panel,
press and hold the front of the button. The glass will not
be fully seated unless the button is held until the
glass stops moving. With the sunroof closed, press the
forward side of the button to open the sunroof to the
vent position.The sunroof is also equipped with a sunshade which
you can pull forward to block sun rays.
If a hand, arm, or other object is blocking the sunroof
glass panel as it is closing, the glass panel will stop
at the obstruction. After the obstruction is removed,
the glass panel can be closed or opened.
Use care not to leave the sunroof open for long periods
of time as debris may collect in the tracks.
If the battery has been recharged, disconnected or is
not working, you may need to reprogram the sunroof.
To do this, start the vehicle and press the forward
side of the sunroof button until the glass panel moves
to a fully closed position. Release, and press again
to move to the vent position which occurs when
the sunroof is fully tilted rearward. This will reset the
memory and enable the sunroof to function properly.
2-71
Page 161 of 473

2(Headlamps):Turn the control to this position to
turn on the headlamps, together with the previously
listed lamps and lights.
When the vehicle is turned off and the headlamps are in
AUTO, the headlamps may automatically remain on
for a set time. You can change this delay time using the
DIC. See
Driver Information Center (DIC) on page 3-47.
You can switch your headlamps from low to high-beam
by pushing the turn signal/multifunction lever toward
the instrument panel.
Automatic Headlamp System
When it is dark enough outside and the headlamp
switch is in AUTO, your automatic headlamp system
will turn on your headlamps at the normal brightness
along with other lamps such as the taillamps,
sidemarker, parking lamps, roof marker lamps and the
instrument panel lights. The radio lights will also be dim.
To turn off the automatic headlamp system, turn the
exterior lamps switch to the off position and then
release.Your vehicle has a light sensor located on the top of the
instrument panel. Be sure it is not covered, or the
system will be on whenever the ignition is on.
The system may also turn on your headlamps when
driving through a parking garage, heavy overcast
weather or a tunnel. This is normal.
There is a delay in the transition between the daytime
and nighttime operation of the Daytime Running
Lamps (DRL) and the automatic headlamp systems so
that driving under bridges or bright overhead street
lights does not affect the system. The DRL and
automatic headlamp system will only be affected when
the light sensor sees a change in lighting lasting
longer than the delay.
If you start your vehicle in a dark garage, the automatic
headlamp system will come on immediately. Once
you leave the garage, it will take approximately
one minute for the automatic headlamp system to
change to DRL if it is light outside. During that delay,
your instrument panel cluster may not be as bright
as usual. Make sure your instrument panel brightness
control is in the full bright position. See ªInstrument
Panel Brightnessº under
Interior Lamps on page 3-18.
3-15
Page 247 of 473

Care of Your CDs and DVDs
Handle discs carefully. Store them in their original cases
or other protective cases and away from direct sunlight
and dust. If the surface of a disc is soiled, dampen
a clean, soft cloth in a mild, neutral detergent solution
and clean it, wiping from the center to the edge.
Be sure never to touch the side without writing when
handling discs. Pick up discs by grasping the outer
edges or the edge of the hole and the outer edge.
Care of Your CD Changer
The use of CD lens cleaner discs is not advised, due to
the risk of contaminating the lens of the CD optics
with lubricants internal to the CD mechanism.
Care of Your CD and DVD Player
The use of CD lens cleaner discs is not advised, due to
the risk of contaminating the lens of the CD optics
with lubricants internal to the CD mechanism.
Cleaning the Video Screen
Pour some isopropyl or rubbing alcohol on a clean cloth
and gently wipe the video screen. Do not spray
directly onto the screen and do not press too hard or
too long on the video screen.
Fixed Mast Antenna
The ®xed mast antenna can withstand most car washes
without being damaged. If the mast should ever
become slightly bent, you can straighten it out by hand.
If the mast is badly bent, as it might be by vandals,
you should replace it.
Check occasionally to be sure the mast is still tightened
to the cowl. If tightening is required, tighten by hand,
then with a wrench one quarter turn.
XMŸ Satellite Radio Antenna
System (United States Only)
Your XMŸ Satellite Radio antenna is located on the
roof of your vehicle. Keep this antenna clear of
snow and ice build up for clear radio reception.
The performance of your XMŸ system may be affected
if your sunroof is open.
Loading items onto the roof of your vehicle can interfere
with the performance of your XMŸ system. Make
sure that the XMŸ satellite antenna is not obstructed.
3-101
Page 268 of 473

Loading Your Vehicle for Off-Road
Driving
There are some important things to remember about
how to load your vehicle.
·The heaviest things should be on the load ¯oor and
forward of your rear axle. Put heavier items as far
forward as you can.
·Be sure the load is secured properly, so driving on
the off-road terrain doesn't toss things around.
{CAUTION:
·Cargo on the load ¯oor piled higher than
the seatbacks can be thrown forward
during a sudden stop. You or your
passengers could be injured. Keep cargo
below the top of the seatbacks.
CAUTION: (Continued)
CAUTION: (Continued)
·
Unsecured cargo on the load ¯oor can be
tossed about when driving over rough
terrain. You or your passengers can be
struck by ¯ying objects. Secure the cargo
properly.
·Heavy loads on the roof raise the vehicle's
center of gravity, making it more likely to
roll over. You can be seriously or fatally
injured if the vehicle rolls over. Put heavy
loads inside the cargo area, not on the
roof. Keep cargo in the cargo area as far
forward and low as possible.
You'll ®nd other important information in this manual.
See
Loading Your Vehicle on page 4-48andTires
on page 5-66.
4-19
Page 354 of 473

Battery
Your new vehicle comes with a maintenance free
ACDelcožbattery. When it's time for a new battery,
get one that has the replacement number shown on the
original battery's label. We recommend an ACDelco
ž
battery. SeeEngine Compartment Overview on
page 5-12for battery location.
Warning:Battery posts, terminals and related
accessories contain lead and lead compounds,
chemicals known to the State of California to cause
cancer and reproductive harm. Wash hands after
handling.
Vehicle Storage
If you're not going to drive your vehicle for 25 days or
more, remove the black, negative (-) cable from
the battery. This will help keep your battery from
running down.
{CAUTION:
Batteries have acid that can burn you and gas
that can explode. You can be badly hurt if you
aren't careful. See ªJump Startingº next for
tips on working around a battery without
getting hurt.
Contact your dealer to learn how to prepare your
vehicle for longer storage periods.
Also, for your audio system, see
Theft-Deterrent
Feature on page 3-98.
To reprogram your sunroof (if equipped), see
Sunroof
on page 2-71.
5-43
Page 419 of 473

Fuses Usage
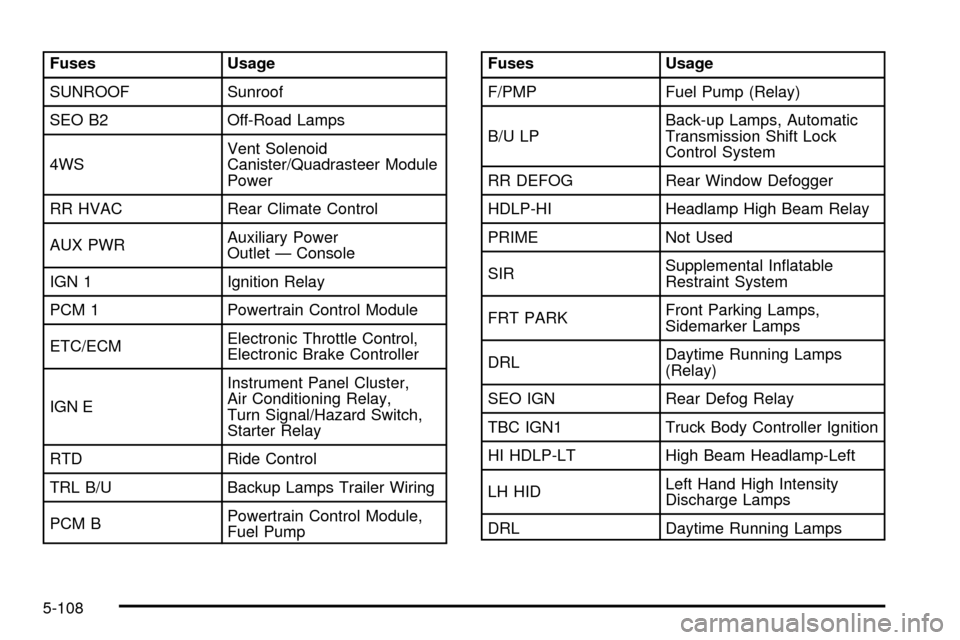
SUNROOF Sunroof
SEO B2 Off-Road Lamps
4WSVent Solenoid
Canister/Quadrasteer Module
Power
RR HVAC Rear Climate Control
AUX PWRAuxiliary Power
Outlet Ð Console
IGN 1 Ignition Relay
PCM 1 Powertrain Control Module
ETC/ECMElectronic Throttle Control,
Electronic Brake Controller
IGN EInstrument Panel Cluster,
Air Conditioning Relay,
Turn Signal/Hazard Switch,
Starter Relay
RTD Ride Control
TRL B/U Backup Lamps Trailer Wiring
PCM BPowertrain Control Module,
Fuel PumpFuses Usage
F/PMP Fuel Pump (Relay)
B/U LPBack-up Lamps, Automatic
Transmission Shift Lock
Control System
RR DEFOG Rear Window Defogger
HDLP-HI Headlamp High Beam Relay
PRIME Not Used
SIRSupplemental In¯atable
Restraint System
FRT PARKFront Parking Lamps,
Sidemarker Lamps
DRLDaytime Running Lamps
(Relay)
SEO IGN Rear Defog Relay
TBC IGN1 Truck Body Controller Ignition
HI HDLP-LT High Beam Headlamp-Left
LH HIDLeft Hand High Intensity
Discharge Lamps
DRL Daytime Running Lamps
5-108