sunroof CADILLAC ESCALADE EXT 2004 2.G Owners Manual
[x] Cancel search | Manufacturer: CADILLAC, Model Year: 2004, Model line: ESCALADE EXT, Model: CADILLAC ESCALADE EXT 2004 2.GPages: 478, PDF Size: 3.43 MB
Page 1 of 478

Seats and Restraint Systems........................... 1-1
Front Seats
............................................... 1-2
Rear Seats
............................................... 1-6
Safety Belts
.............................................. 1-8
Child Restraints
.......................................1-28
Air Bag Systems
......................................1-48
Restraint System Check
............................1-61
Features and Controls..................................... 2-1
Keys
........................................................ 2-3
Doors and Locks
....................................... 2-8
Windows
.................................................2-25
Theft-Deterrent Systems
............................2-27
Starting and Operating Your Vehicle
...........2-29
Mirrors
....................................................2-43
OnStar
žSystem
......................................2-48
HomeLinkžTransmitter
.............................2-50
Storage Areas
.........................................2-54
Sunroof
..................................................2-72
Vehicle Personalization
.............................2-73
Instrument Panel............................................. 3-1
Instrument Panel Overview
.......................... 3-4
Climate Controls
......................................3-24
Warning Lights, Gages and Indicators
.........3-33
Driver Information Center (DIC)
..................3-49
Audio System(s)
.......................................3-67Driving Your Vehicle....................................... 4-1
Your Driving, the Road, and Your Vehicle
..... 4-2
Towing
...................................................4-46
Service and Appearance Care.......................... 5-1
Service
..................................................... 5-3
Fuel
......................................................... 5-4
Checking Things Under the Hood
................. 5-8
All-Wheel Drive
........................................5-48
Rear Axle
...............................................5-49
Front Axle
...............................................5-50
Headlamp Aiming
.....................................5-51
Bulb Replacement
....................................5-55
Windshield Wiper Blade Replacement
.........5-62
Tires
......................................................5-63
Appearance Care
...................................5-102
Vehicle Identi®cation
...............................5-110
Electrical System
....................................5-111
Capacities and Speci®cations
...................5-120
Maintenance Schedule..................................... 6-1
Maintenance Schedule
................................ 6-2
Customer Assistance and Information.............. 7-1
Customer Assistance and Information
........... 7-2
Reporting Safety Defects
...........................7-10
Index................................................................ 1
2004 Cadillac Escalade EXT Owner ManualM
Page 70 of 478

Mirrors...........................................................2-43
Automatic Dimming Rearview Mirror with
OnStar
ž, Compass and Temperature
Display....................................................2-43
Outside Power Mirrors...................................2-45
Outside Convex Mirror...................................2-46
Outside Heated Mirrors..................................2-47
Outside Automatic Dimming Mirror with Curb
View Assist..............................................2-47
OnStar
žSystem.............................................2-48
HomeLinkžTransmitter...................................2-50
Programming the HomeLinkžTransmitter.........2-50Storage Areas................................................2-54
Glove Box...................................................2-54
Cupholder(s)................................................2-54
Center Console Storage Area.........................2-54
Luggage Carrier...........................................2-54
Rear Storage Area........................................2-55
Cargo Cover Panels......................................2-56
All-Weather Cargo Area.................................2-66
Top-Box Storage..........................................2-71
Sunroof.........................................................2-72
Vehicle Personalization...................................2-73
Memory Seat...............................................2-73
Section 2 Features and Controls
2-2
Page 140 of 478

Sunroof
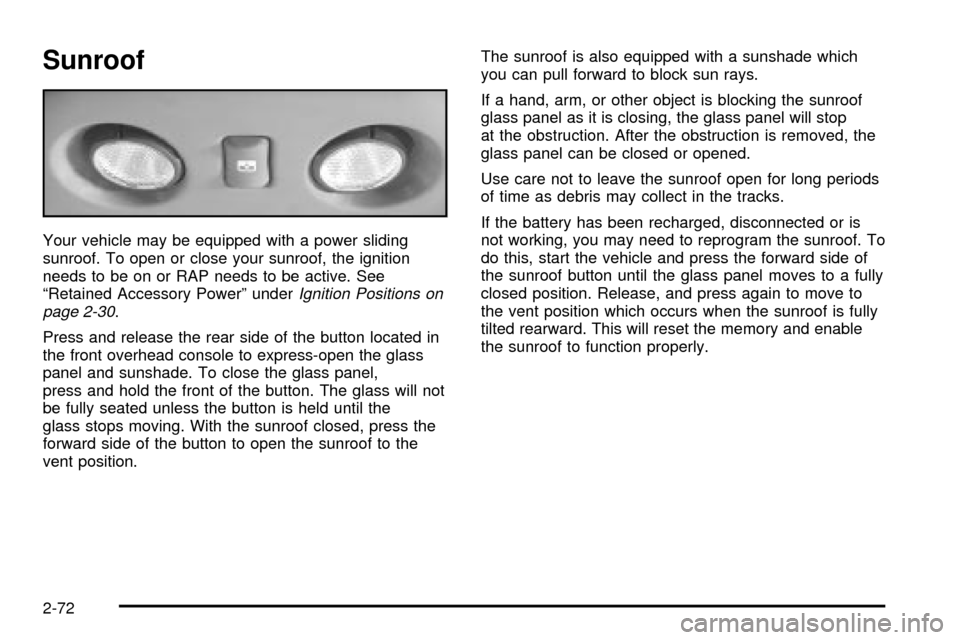
Your vehicle may be equipped with a power sliding
sunroof. To open or close your sunroof, the ignition
needs to be on or RAP needs to be active. See
ªRetained Accessory Powerº under
Ignition Positions on
page 2-30.
Press and release the rear side of the button located in
the front overhead console to express-open the glass
panel and sunshade. To close the glass panel,
press and hold the front of the button. The glass will not
be fully seated unless the button is held until the
glass stops moving. With the sunroof closed, press the
forward side of the button to open the sunroof to the
vent position.The sunroof is also equipped with a sunshade which
you can pull forward to block sun rays.
If a hand, arm, or other object is blocking the sunroof
glass panel as it is closing, the glass panel will stop
at the obstruction. After the obstruction is removed, the
glass panel can be closed or opened.
Use care not to leave the sunroof open for long periods
of time as debris may collect in the tracks.
If the battery has been recharged, disconnected or is
not working, you may need to reprogram the sunroof. To
do this, start the vehicle and press the forward side of
the sunroof button until the glass panel moves to a fully
closed position. Release, and press again to move to
the vent position which occurs when the sunroof is fully
tilted rearward. This will reset the memory and enable
the sunroof to function properly.
2-72
Page 244 of 478

Care of Your CD and DVD Player
The use of CD lens cleaner discs is not advised, due to
the risk of contaminating the lens of the CD optics
with lubricants internal to the CD mechanism.
Cleaning the Video Screen
Pour some isopropyl or rubbing alcohol on a clean cloth
and gently wipe the video screen. Do not spray
directly onto the screen and do not press too hard or
too long on the video screen.
Fixed Mast Antenna
The ®xed mast antenna can withstand most car washes
without being damaged. If the mast should ever
become slightly bent, you can straighten it out by hand.
If the mast is badly bent, as it might be by vandals,
you should replace it.
Check occasionally to be sure the mast is still tightened
to the cowl. If tightening is required, tighten by hand,
then with a wrench one quarter turn.
XMŸ Satellite Radio Antenna
System (48 Contiguous US States)
Your XMŸ Satellite Radio antenna is located on the roof
of your vehicle. Keep this antenna clear of snow and
ice build up for clear radio reception.
The performance of your XMŸ system may be affected
if your sunroof is open.
Loading items onto the roof of your vehicle can interfere
with the performance of your XMŸ system. Make
sure that the XMŸ satellite antenna is not obstructed.
Chime Level Adjustment
The radio is the vehicle chime producer. To change the
volume level, press and hold pushbutton 6 with the
ignition on and the radio power off. The chime volume
level will change from the normal level to loud, and
LOUD will appear on the display. To change back to the
default or normal setting, press and hold pushbutton 6
again. The chime level will change from the loud level to
normal, and NORMAL will appear on the display.
Each time the chime volume is changed, three chimes
will sound as an example of the new volume selected.
Removing the radio and not replacing it with a
factory radio or chime module will disable vehicle
chimes.
3-102
Page 352 of 478

Vehicle Storage
If you are not going to drive your vehicle for 25 days
or more, remove the black, negative (-) cable from
the battery. This will help keep your battery from
running down.
{CAUTION:
Batteries have acid that can burn you and gas
that can explode. You can be badly hurt if you
are not careful. See
Jump Starting on
page 5-42
for tips on working around a battery
without getting hurt.
Contact your dealer to learn how to prepare your
vehicle for longer storage periods.
Also, for your audio system, see
Theft-Deterrent
Feature on page 3-98.
To reprogram your sunroof (if equipped), see
Sunroof
on page 2-72.
Jump Starting
If your battery has run down, you may want to use
another vehicle and some jumper cables to start your
vehicle. But please use the following steps to do it
safely.
{CAUTION:
Batteries can hurt you. They can be dangerous
because:
·They contain acid that can burn you.
·They contain gas that can explode or
ignite.
·They contain enough electricity to
burn you.
If you do not follow these steps exactly, some
or all of these things can hurt you.
5-42
Page 427 of 478

*1Ð Gasoline Engine and Fuel Injection Rail #2.
*2Ð Gasoline Engine and Fuel Injection Rail #1.
*3Ð Gasoline Engine; Oxygen Sensors.
*4Ð Gasoline Engine; Oxygen Sensors.
*5Ð PCM Ignition
Fuses Usage
GLOW PLUG Not Used
CUST FEED Accessory Power
STUD #1 Auxiliary Power
MBECMid Bussed Electrical Center
Power Feed, Front Seats,
Right Doors
BLOWER Front Climate Control Fan
LBECLeft Bussed Electrical Center,
Door Modules, Door Locks,
Auxiliary Power Outlet - Rear
Cargo Area and Instrument
Panel
STUD 2Accessory Power/Trailer Wiring
Brake Feed
Fuses Usage
ABS Anti-Lock Brakes
VSES/ECAS Vehicle Stability
IGN A Ignition Power
IGN B Ignition Power
LBEC 1Left Bussed Electrical Center,
Left Doors, Truck Body
Controller, Flasher Module
TRL PARK Parking Lamps Trailer Wiring
RR PARKRight Rear Parking and
Sidemarker Lamps
LR PARKLeft Rear Parking and
Sidemarker Lamps
PARK LP Parking Lamps Relay
STARTER Starter Relay
INTPARK Interior Lamps
STOP LP Stoplamps
TBC BATTTruck Body Controller
Battery Feed
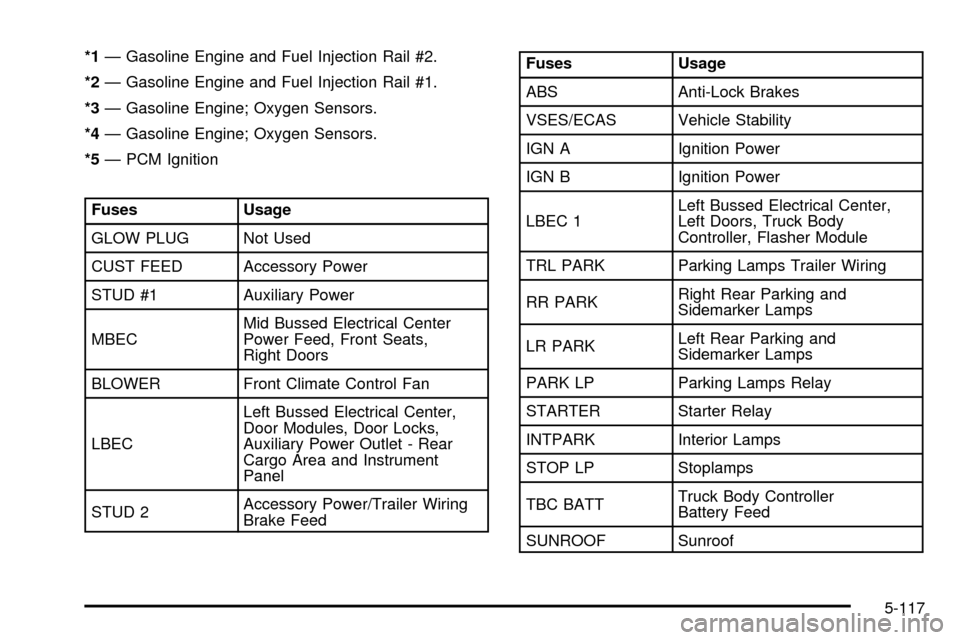
SUNROOF Sunroof
5-117
Page 475 of 478

Storage Areas
All-Weather Cargo Area................................2-66
Center Console Storage Area........................2-54
Cupholder(s)...............................................2-54
Glove Box..................................................2-54
Luggage Carrier..........................................2-54
Rear Storage Area.......................................2-55
Top-Box Storage..........................................2-71
Storing a Flat or Spare Tire, Jack and Tools.......5-94
Stuck in Sand, Mud, Ice or Snow......................4-44
Sun Visors.....................................................2-27
Sunroof.........................................................2-72
T
Tachometer....................................................3-35
Tailgate.........................................................2-23
Tailgate Removal............................................2-24
Taillamps.......................................................5-61
Temperature and Compass Display....................2-43
Testing the Alarm............................................2-28
Theft-Deterrent, Radio.....................................3-98
Theft-Deterrent Systems...................................2-27
Content Theft-Deterrent................................2-27
Passlock
ž...................................................2-29
Throttle, Adjustable..........................................2-32TIGHTEN FUEL CAP......................................3-63
Tilt Wheel........................................................ 3-7
Tire Sidewall Labeling......................................5-64
Tire Size.......................................................5-67
Tire Terminology and De®nitions........................5-68
Tires.............................................................5-63
Buying New Tires........................................5-76
Chains.......................................................5-81
Changing a Flat Tire....................................5-83
If a Tire Goes Flat.......................................5-82
In¯ation - Tire Pressure................................5-71
Inspection and Rotation................................5-74
Pressure Monitor System..............................5-72
Spare Tire................................................5-102
Uniform Tire Quality Grading.........................5-78
Wheel Alignment and Tire Balance.................5-79
Wheel Replacement.....................................5-80
When It Is Time for New Tires......................5-76
To Use the Engine Coolant Heater....................2-33
Top Drain Grates ± Removal and Cleaning.........2-68
Top Strap......................................................1-38
Top Strap Anchor Location...............................1-39
Top-Box Storage.............................................2-71
Torque Lock...................................................2-40
Total Weight on Your Vehicle's Tires..................4-60
Tow/Haul Mode Light.......................................3-47
Tow/Haul Mode Selector Button........................2-36
15