transmission oil CADILLAC ESCALADE EXT 2004 2.G Owners Manual
[x] Cancel search | Manufacturer: CADILLAC, Model Year: 2004, Model line: ESCALADE EXT, Model: CADILLAC ESCALADE EXT 2004 2.GPages: 478, PDF Size: 3.43 MB
Page 143 of 478
Instrument Panel Overview...............................3-4
Hazard Warning Flashers................................3-6
Other Warning Devices...................................3-6
Horn.............................................................3-7
Tilt Wheel.....................................................3-7
Turn Signal/Multifunction Lever.........................3-7
Exterior Lamps.............................................3-15
Interior Lamps..............................................3-19
Ultrasonic Rear Parking Assist (URPA)............3-20
Accessory Power Outlets...............................3-23
Ashtrays and Cigarette Lighter........................3-23
Analog Clock...............................................3-24
Climate Controls............................................3-24
Automatic Climate Control System...................3-24
Outlet Adjustment.........................................3-32
Climate Controls Personalization.....................3-32Warning Lights, Gages and Indicators.............3-33
Warning Lights, Gages, and Indicators.............3-33
Instrument Panel Cluster................................3-34
Speedometer and Odometer...........................3-35
Tachometer.................................................3-35
Safety Belt Reminder Light.............................3-35
Air Bag Readiness Light................................3-36
Passenger Air Bag Status Indicator.................3-36
Charging System Light..................................3-38
Voltmeter Gage............................................3-39
Brake System Warning Light..........................3-39
Anti-Lock Brake System Warning Light.............3-41
Low Tire Pressure Warning Light....................3-41
Traction Off Light..........................................3-42
Engine Coolant Temperature Gage..................3-42
Transmission Temperature Gage.....................3-43
Malfunction Indicator Lamp.............................3-44
Oil Pressure Gage........................................3-46
Cruise Control Light......................................3-47
Tow/Haul Mode Light....................................3-47
Fuel Gage...................................................3-48
Low Fuel Warning Light.................................3-48
Section 3 Instrument Panel
3-1
Page 307 of 478
Driving On Grades
Reduce speed and shift to a lower gearbeforeyou start
down a long or steep downgrade. If you don't shift
down, you might have to use your brakes so much that
they would get hot and no longer work well.
You can tow in DRIVE (D). You may want to shift
the transmission to THIRD (3) or, if necessary, a
lower gear selection if the transmission shifts too often
(e.g., under heavy loads and/or hilly conditions).
You may also want to activate the tow/haul mode if the
transmission shifts too often. See ªTow/Haul Modeº
earlier.
When towing at high altitude on steep uphill grades,
consider the following: Engine coolant will boil at a lower
temperature than at normal altitudes. If you turn your
engine off immediately after towing at high altitude
on steep uphill grades, your vehicle may show signs
similar to engine overheating. To avoid this, let the
engine run while parked (preferably on level ground)
with the automatic transmission in PARK (P) for a
few minutes before turning the engine off. If you do get
the overheat warning, see
Engine Overheating on
page 5-26.
Parking on Hills
{CAUTION:
You really should not park your vehicle, with a
trailer attached, on a hill. If something goes
wrong, your rig could start to move. People
can be injured, and both your vehicle and the
trailer can be damaged.
But if you ever have to park your rig on a hill, here's
how to do it:
1. Apply your regular brakes, but don't shift into
PARK (P) yet.
2. Have someone place chocks under the trailer
wheels.
3. When the wheel chocks are in place, release the
regular brakes until the chocks absorb the load.
4. Reapply the regular brakes. Then apply your
parking brake and shift into PARK (P).
5. Release the regular brakes.
4-63
Page 308 of 478
When You Are Ready to Leave After
Parking on a Hill
1. Apply your regular brakes and hold the pedal down
while you:
·start your engine,
·shift into a gear, and
·release the parking brake.
2. Let up on the brake pedal.
3. Drive slowly until the trailer is clear of the chocks.
4. Stop and have someone pick up and store the
chocks.
Maintenance When Trailer Towing
Your vehicle will need service more often when you're
pulling a trailer. See the Maintenance Schedule for more
on this. Things that are especially important in trailer
operation are automatic transmission ¯uid (don't over®ll),
engine oil, axle lubricant, belts, cooling system and
brake system. Each of these is covered in this manual,
and the Index will help you ®nd them quickly. If
you're trailering, it's a good idea to review these sections
before you start your trip.
Check periodically to see that all hitch nuts and bolts
are tight.
Trailer Wiring Harness
Heavy-Duty Trailer Wiring Package
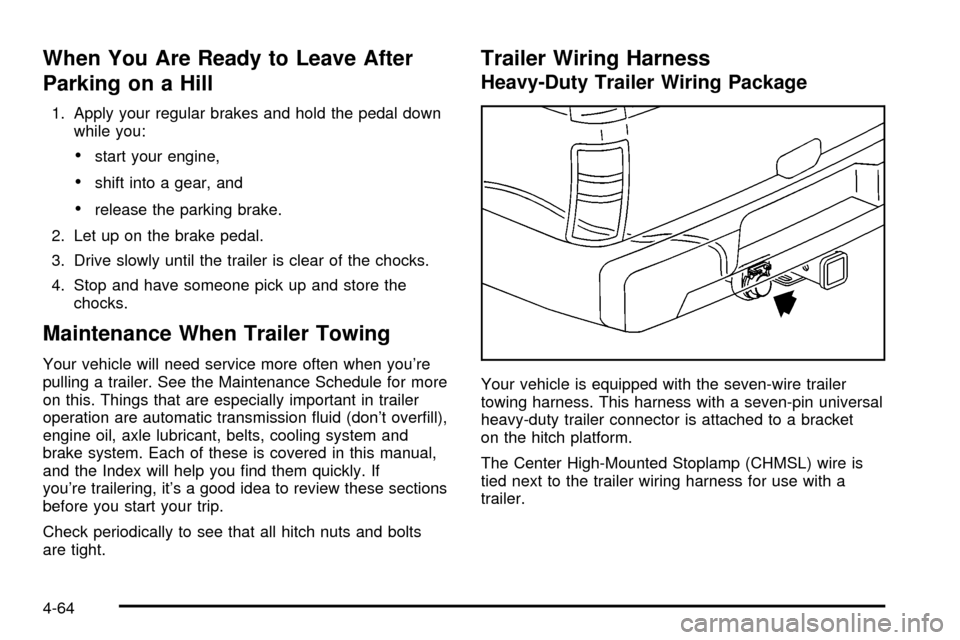
Your vehicle is equipped with the seven-wire trailer
towing harness. This harness with a seven-pin universal
heavy-duty trailer connector is attached to a bracket
on the hitch platform.
The Center High-Mounted Stoplamp (CHMSL) wire is
tied next to the trailer wiring harness for use with a
trailer.
4-64
Page 311 of 478
Service............................................................5-3
Doing Your Own Service Work.........................5-3
Adding Equipment to the Outside of Your
Vehicle......................................................5-4
Fuel................................................................5-4
Gasoline Octane............................................5-4
Gasoline Speci®cations....................................5-5
California Fuel...............................................5-5
Additives.......................................................5-5
Fuels in Foreign Countries...............................5-6
Filling Your Tank............................................5-6
Filling a Portable Fuel Container.......................5-8
Checking Things Under the Hood.....................5-8
Hood Release................................................5-9
Engine Compartment Overview.......................5-10
Engine Oil...................................................5-11
Engine Air Cleaner/Filter................................5-16
Automatic Transmission Fluid.........................5-19
Engine Coolant.............................................5-22
Coolant Surge Tank Pressure Cap..................5-25
Engine Overheating.......................................5-26
Cooling System............................................5-28
Engine Fan Noise.........................................5-34Power Steering Fluid.....................................5-35
Windshield Washer Fluid................................5-36
Brakes........................................................5-38
Battery........................................................5-41
Jump Starting...............................................5-42
All-Wheel Drive..............................................5-48
Rear Axle.......................................................5-49
Front Axle......................................................5-50
Headlamp Aiming...........................................5-51
Headlamp Horizontal Aiming...........................5-52
Headlamp Vertical Aiming..............................5-53
Bulb Replacement..........................................5-55
High Intensity Discharge (HID) Lighting............5-55
Halogen Bulbs..............................................5-55
Headlamps..................................................5-56
Front Turn Signal, Sidemarker and Daytime
Running Lamps.........................................5-60
Center High-Mounted Stoplamp (CHMSL).........5-61
Taillamps.....................................................5-61
Replacement Bulbs.......................................5-62
Windshield Wiper Blade Replacement..............5-62
Section 5 Service and Appearance Care
5-1
Page 321 of 478
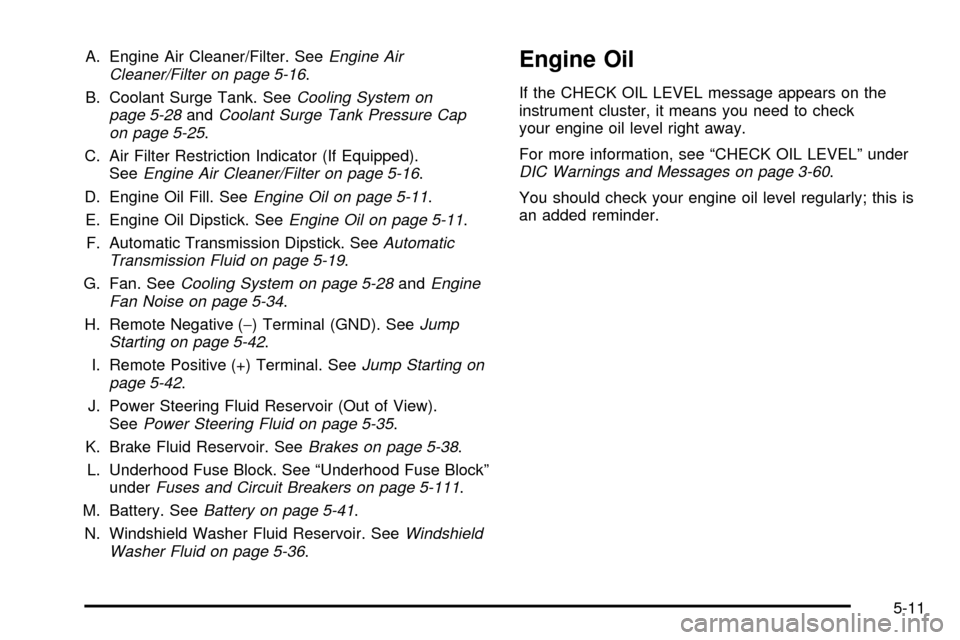
A. Engine Air Cleaner/Filter. SeeEngine Air
Cleaner/Filter on page 5-16.
B. Coolant Surge Tank. See
Cooling System on
page 5-28andCoolant Surge Tank Pressure Cap
on page 5-25.
C. Air Filter Restriction Indicator (If Equipped).
See
Engine Air Cleaner/Filter on page 5-16.
D. Engine Oil Fill. See
Engine Oil on page 5-11.
E. Engine Oil Dipstick. See
Engine Oil on page 5-11.
F. Automatic Transmission Dipstick. See
Automatic
Transmission Fluid on page 5-19.
G. Fan. See
Cooling System on page 5-28andEngine
Fan Noise on page 5-34.
H. Remote Negative (-) Terminal (GND). See
Jump
Starting on page 5-42.
I. Remote Positive (+) Terminal. See
Jump Starting on
page 5-42.
J. Power Steering Fluid Reservoir (Out of View).
See
Power Steering Fluid on page 5-35.
K. Brake Fluid Reservoir. See
Brakes on page 5-38.
L. Underhood Fuse Block. See ªUnderhood Fuse Blockº
under
Fuses and Circuit Breakers on page 5-111.
M. Battery. See
Battery on page 5-41.
N. Windshield Washer Fluid Reservoir. See
Windshield
Washer Fluid on page 5-36.
Engine Oil
If the CHECK OIL LEVEL message appears on the
instrument cluster, it means you need to check
your engine oil level right away.
For more information, see ªCHECK OIL LEVELº under
DIC Warnings and Messages on page 3-60.
You should check your engine oil level regularly; this is
an added reminder.
5-11
Page 329 of 478
Automatic Transmission Fluid
When to Check and Change
A good time to check your automatic transmission ¯uid
level is when the engine oil is changed.
Change both the ¯uid and ®lter every 50,000 miles
(83 000 km) if the vehicle is mainly driven under one or
more of these conditions:
·In heavy city traffic where the outside temperature
regularly reaches 90ÉF (32ÉC) or higher.
·In hilly or mountainous terrain.
·When doing frequent trailer towing.
·Uses such as found in taxi, police or delivery
service.
If you do not use your vehicle under any of these
conditions, change the ¯uid and ®lter every
100,000 miles (166 000 km).
See
Scheduled Maintenance on page 6-4.
How to Check
Because this operation can be a little difficult, you may
choose to have this done at the dealership service
department.
If you do it yourself, be sure to follow all the instructions
here, or you could get a false reading on the dipstick.
Notice:Too much or too little ¯uid can damage
your transmission. Too much can mean that some
of the ¯uid could come out and fall on hot engine
part or exhaust system parts, starting a ®re.
Too little ¯uid could cause the transmission to
overheat. Be sure to get an accurate reading if you
check your transmission ¯uid.
Wait at least 30 minutes before checking the
transmission ¯uid level if you have been driving:
·When outside temperatures are above 90ÉF (32ÉC).
·At high speed for quite a while.
·In heavy traffic ± especially in hot weather.
·While pulling a trailer.
5-19
Page 428 of 478
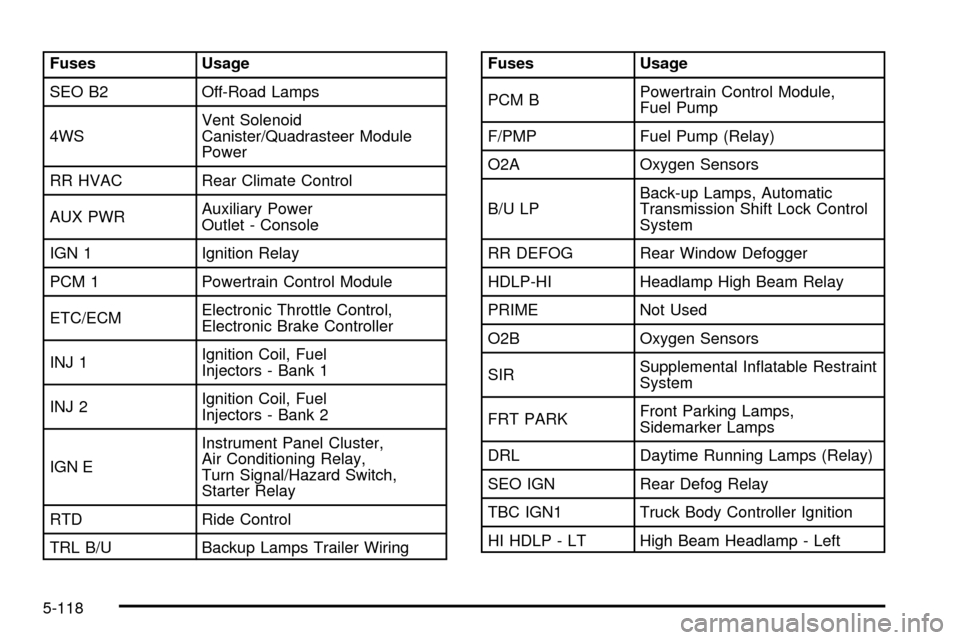
Fuses Usage
SEO B2 Off-Road Lamps
4WSVent Solenoid
Canister/Quadrasteer Module
Power
RR HVAC Rear Climate Control
AUX PWRAuxiliary Power
Outlet - Console
IGN 1 Ignition Relay
PCM 1 Powertrain Control Module
ETC/ECMElectronic Throttle Control,
Electronic Brake Controller
INJ 1Ignition Coil, Fuel
Injectors - Bank 1
INJ 2Ignition Coil, Fuel
Injectors - Bank 2
IGN EInstrument Panel Cluster,
Air Conditioning Relay,
Turn Signal/Hazard Switch,
Starter Relay
RTD Ride Control
TRL B/U Backup Lamps Trailer WiringFuses Usage
PCM BPowertrain Control Module,
Fuel Pump
F/PMP Fuel Pump (Relay)
O2A Oxygen Sensors
B/U LPBack-up Lamps, Automatic
Transmission Shift Lock Control
System
RR DEFOG Rear Window Defogger
HDLP-HI Headlamp High Beam Relay
PRIME Not Used
O2B Oxygen Sensors
SIRSupplemental In¯atable Restraint
System
FRT PARKFront Parking Lamps,
Sidemarker Lamps
DRL Daytime Running Lamps (Relay)
SEO IGN Rear Defog Relay
TBC IGN1 Truck Body Controller Ignition
HI HDLP - LT High Beam Headlamp - Left
5-118
Page 435 of 478
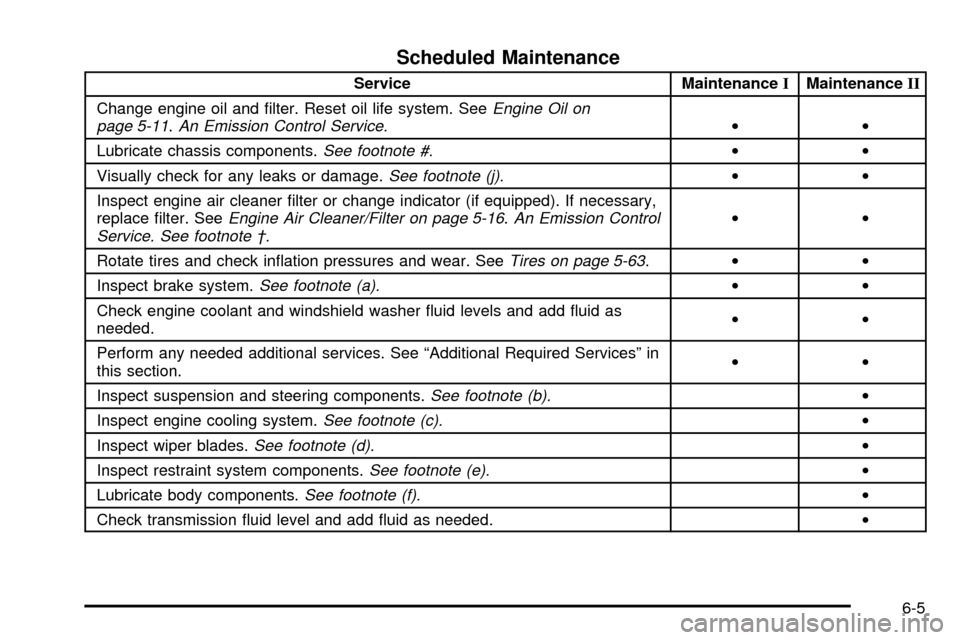
Scheduled Maintenance
Service MaintenanceIMaintenanceII
Change engine oil and ®lter. Reset oil life system. See
Engine Oil on
page 5-11.An Emission Control Service.··
Lubricate chassis components.
See footnote #.··
Visually check for any leaks or damage.
See footnote (j).··
Inspect engine air cleaner ®lter or change indicator (if equipped). If necessary,
replace ®lter. See
Engine Air Cleaner/Filter on page 5-16.An Emission Control
Service. See footnote ².··
Rotate tires and check in¯ation pressures and wear. See
Tires on page 5-63.··
Inspect brake system.
See footnote (a).··
Check engine coolant and windshield washer ¯uid levels and add ¯uid as
needed.··
Perform any needed additional services. See ªAdditional Required Servicesº in
this section.··
Inspect suspension and steering components.
See footnote (b).·
Inspect engine cooling system.
See footnote (c).·
Inspect wiper blades.
See footnote (d).·
Inspect restraint system components.
See footnote (e).·
Lubricate body components.
See footnote (f).·
Check transmission ¯uid level and add ¯uid as needed.·
6-5
Page 439 of 478
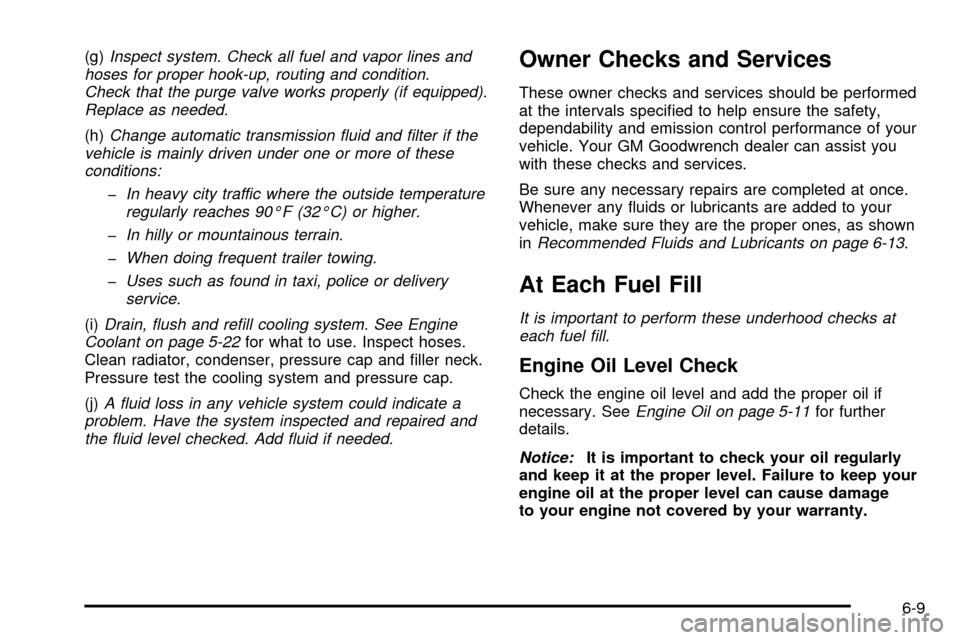
(g)Inspect system. Check all fuel and vapor lines and
hoses for proper hook-up, routing and condition.
Check that the purge valve works properly (if equipped).
Replace as needed.
(h)Change automatic transmission ¯uid and ®lter if the
vehicle is mainly driven under one or more of these
conditions:
þIn heavy city traffic where the outside temperature
regularly reaches 90ÉF (32ÉC) or higher.
þIn hilly or mountainous terrain.
þWhen doing frequent trailer towing.
þUses such as found in taxi, police or delivery
service.
(i)Drain, ¯ush and re®ll cooling system. See Engine
Coolant on page 5-22for what to use. Inspect hoses.
Clean radiator, condenser, pressure cap and ®ller neck.
Pressure test the cooling system and pressure cap.
(j)
A ¯uid loss in any vehicle system could indicate a
problem. Have the system inspected and repaired and
the ¯uid level checked. Add ¯uid if needed.
Owner Checks and Services
These owner checks and services should be performed
at the intervals speci®ed to help ensure the safety,
dependability and emission control performance of your
vehicle. Your GM Goodwrench dealer can assist you
with these checks and services.
Be sure any necessary repairs are completed at once.
Whenever any ¯uids or lubricants are added to your
vehicle, make sure they are the proper ones, as shown
in
Recommended Fluids and Lubricants on page 6-13.
At Each Fuel Fill
It is important to perform these underhood checks at
each fuel ®ll.
Engine Oil Level Check
Check the engine oil level and add the proper oil if
necessary. SeeEngine Oil on page 5-11for further
details.
Notice:It is important to check your oil regularly
and keep it at the proper level. Failure to keep your
engine oil at the proper level can cause damage
to your engine not covered by your warranty.
6-9
Page 443 of 478
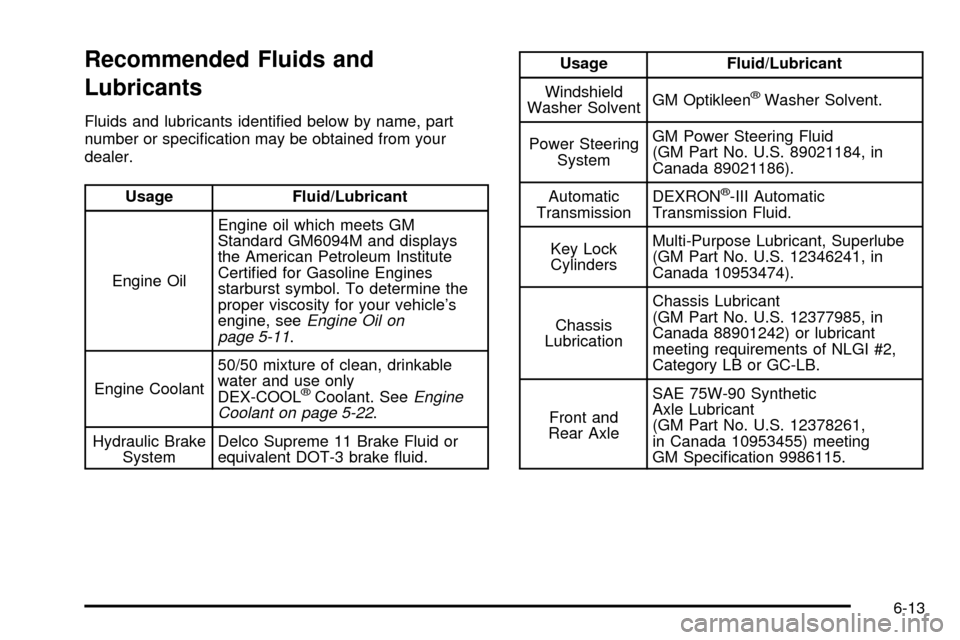
Recommended Fluids and
Lubricants
Fluids and lubricants identi®ed below by name, part
number or speci®cation may be obtained from your
dealer.
Usage Fluid/Lubricant
Engine OilEngine oil which meets GM
Standard GM6094M and displays
the American Petroleum Institute
Certi®ed for Gasoline Engines
starburst symbol. To determine the
proper viscosity for your vehicle's
engine, see
Engine Oil on
page 5-11.
Engine Coolant50/50 mixture of clean, drinkable
water and use only
DEX-COOL
žCoolant. SeeEngine
Coolant on page 5-22.
Hydraulic Brake
SystemDelco Supreme 11 Brake Fluid or
equivalent DOT-3 brake ¯uid.
Usage Fluid/Lubricant
Windshield
Washer SolventGM Optikleen
žWasher Solvent.
Power Steering
SystemGM Power Steering Fluid
(GM Part No. U.S. 89021184, in
Canada 89021186).
Automatic
TransmissionDEXRON
ž-III Automatic
Transmission Fluid.
Key Lock
CylindersMulti-Purpose Lubricant, Superlube
(GM Part No. U.S. 12346241, in
Canada 10953474).
Chassis
LubricationChassis Lubricant
(GM Part No. U.S. 12377985, in
Canada 88901242) or lubricant
meeting requirements of NLGI #2,
Category LB or GC-LB.
Front and
Rear AxleSAE 75W-90 Synthetic
Axle Lubricant
(GM Part No. U.S. 12378261,
in Canada 10953455) meeting
GM Speci®cation 9986115.
6-13