windshield wipers CADILLAC ESCALADE EXT 2005 2.G Owners Manual
[x] Cancel search | Manufacturer: CADILLAC, Model Year: 2005, Model line: ESCALADE EXT, Model: CADILLAC ESCALADE EXT 2005 2.GPages: 460, PDF Size: 2.95 MB
Page 94 of 460
Notice:Using a tool to force the key from the
ignition switch could cause damage or break the
key. Use the correct key and turn the key only with
your hand. Make sure the key is in all the way. If
none of this works, then your vehicle needs service.
B (Accessory):This position lets you use things
like the radio and the windshield wipers when the
engine is off.
Notice:Lengthy operation of features such as
the radio in the accessory ignition position
may drain the battery and prevent your vehicle
from starting. Do not operate your vehicle in
the accessory ignition position for a long period
of time.
C (Run):This is the position for driving.
D (Start):This position starts the engine.
Retained Accessory Power (RAP)
The Retained Accessory Power (RAP) feature will allow
certain features on your vehicle to continue to work
for up to 10 minutes after the ignition key is turned to
LOCK or until one of the doors is opened.
Starting Your Engine
Your vehicle is equipped with Starter Motor Control.
This feature assists in starting the engine and protects
the electrical system. This feature may cause the
engine to crank even after the ignition key is not
in START.
Move your shift lever to PARK (P) or NEUTRAL (N).
Your engine will not start in any other position — that is
a safety feature. To restart when you are already
moving, use NEUTRAL (N) only.
Notice:Do not try to shift to PARK (P) if your
vehicle is moving. If you do, you could damage the
transmission. Shift to PARK (P) only when your
vehicle is stopped.
1. With your foot off the accelerator pedal, turn the
ignition key to START. When the engine starts,
let go of the key. The idle speed will go down as
your engine gets warm.
Notice:Holding your key in START for longer
than 15 seconds at a time will disengage the starter
motor, cause your battery to be drained much
sooner, and add excessive heat that can damage
your starter motor. Try not to hold the key in
START for longer than 15 seconds and wait about
15 seconds between each try to help avoid draining
your battery or damaging your starter.
2-28
Page 137 of 460
Instrument Panel Overview...............................3-4
Hazard Warning Flashers................................3-6
Other Warning Devices...................................3-6
Horn.............................................................3-6
Tilt Wheel.....................................................3-7
Turn Signal/Multifunction Lever.........................3-7
Turn and Lane-Change Signals........................3-8
Headlamp High/Low-Beam Changer..................3-9
Flash-to-Pass.................................................3-9
Windshield Wipers..........................................3-9
Windshield Washer.......................................3-10
Cruise Control..............................................3-10
Exterior Lamps.............................................3-13
Headlamps on Reminder................................3-14
Daytime Running Lamps (DRL).......................3-15
Automatic Headlamp System..........................3-15
Fog Lamps..................................................3-16
Exterior Cargo Lamps....................................3-17
Instrument Panel Brightness...........................3-17
Dome Lamps...............................................3-18
Entry/Exit Lighting.........................................3-18
Reading Lamps............................................3-18
Battery Run-Down Protection..........................3-19
Ultrasonic Rear Parking Assist (URPA)............3-19
Accessory Power Outlets...............................3-22
Ashtrays and Cigarette Lighter........................3-22
Analog Clock...............................................3-23Climate Controls............................................3-23
Dual Automatic Climate Control System...........3-23
Outlet Adjustment.........................................3-28
Warning Lights, Gages, and Indicators............3-29
Instrument Panel Cluster................................3-30
Speedometer and Odometer...........................3-31
Tachometer.................................................3-31
Safety Belt Reminder Light.............................3-31
Airbag Readiness Light..................................3-32
Passenger Airbag Status Indicator...................3-33
Charging System Light..................................3-34
Voltmeter Gage............................................3-35
Brake System Warning Light..........................3-35
Anti-Lock Brake System Warning Light.............3-37
Low Tire Pressure Warning Light....................3-37
Traction Off Light..........................................3-38
Engine Coolant Temperature Gage..................3-38
Transmission Temperature Gage.....................3-39
Malfunction Indicator Lamp.............................3-40
Oil Pressure Gage........................................3-42
Security Light...............................................3-43
Cruise Control Light......................................3-44
Highbeam On Light.......................................3-44
Tow/Haul Mode Light....................................3-44
Fuel Gage...................................................3-45
Low Fuel Warning Light.................................3-45
Section 3 Instrument Panel
3-1
Page 143 of 460
Tilt Wheel
The tilt steering wheel allows you to adjust the steering
wheel before you drive. You can raise it to the highest
level to give your legs more room when you enter
and exit the vehicle.
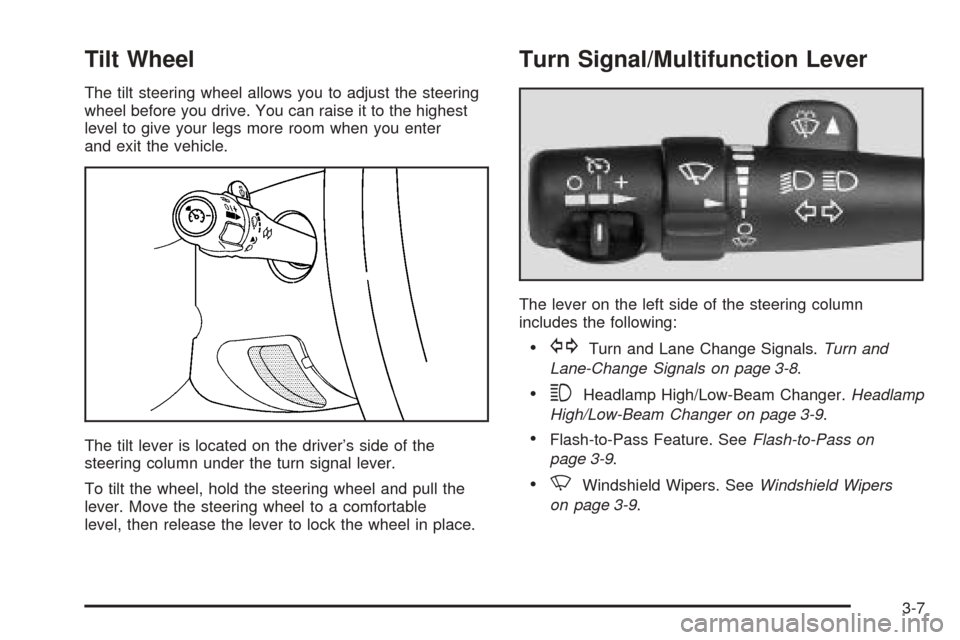
The tilt lever is located on the driver’s side of the
steering column under the turn signal lever.
To tilt the wheel, hold the steering wheel and pull the
lever. Move the steering wheel to a comfortable
level, then release the lever to lock the wheel in place.
Turn Signal/Multifunction Lever
The lever on the left side of the steering column
includes the following:
GTurn and Lane Change Signals.Turn and
Lane-Change Signals on page 3-8.
3Headlamp High/Low-Beam Changer.Headlamp
High/Low-Beam Changer on page 3-9.
Flash-to-Pass Feature. SeeFlash-to-Pass on
page 3-9.
NWindshield Wipers. SeeWindshield Wipers
on page 3-9.
3-7
Page 145 of 460
Headlamp High/Low-Beam Changer
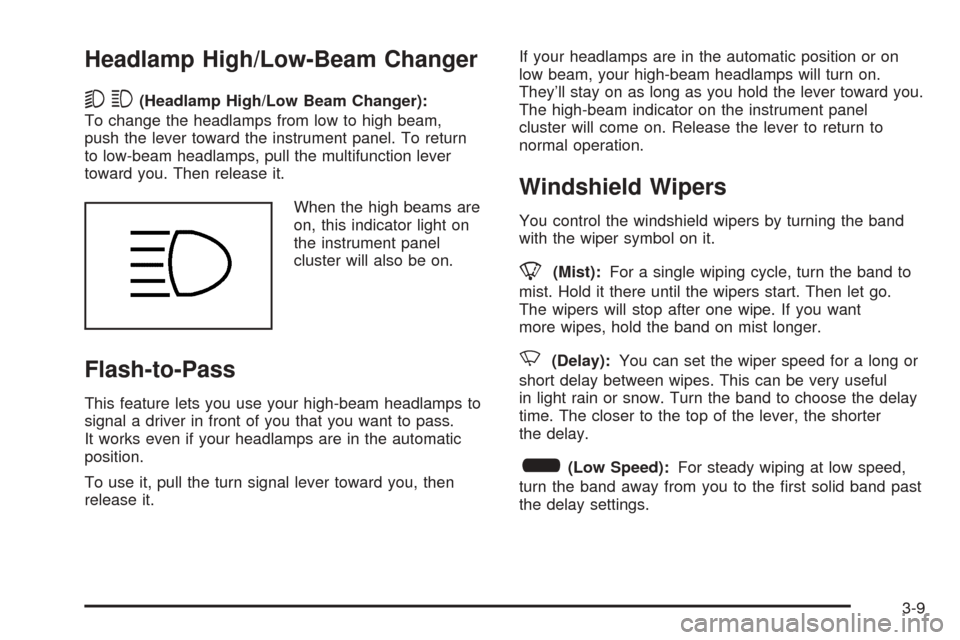
53(Headlamp High/Low Beam Changer):
To change the headlamps from low to high beam,
push the lever toward the instrument panel. To return
to low-beam headlamps, pull the multifunction lever
toward you. Then release it.
When the high beams are
on, this indicator light on
the instrument panel
cluster will also be on.
Flash-to-Pass
This feature lets you use your high-beam headlamps to
signal a driver in front of you that you want to pass.
It works even if your headlamps are in the automatic
position.
To use it, pull the turn signal lever toward you, then
release it.If your headlamps are in the automatic position or on
low beam, your high-beam headlamps will turn on.
They’ll stay on as long as you hold the lever toward you.
The high-beam indicator on the instrument panel
cluster will come on. Release the lever to return to
normal operation.
Windshield Wipers
You control the windshield wipers by turning the band
with the wiper symbol on it.
8(Mist):For a single wiping cycle, turn the band to
mist. Hold it there until the wipers start. Then let go.
The wipers will stop after one wipe. If you want
more wipes, hold the band on mist longer.
N(Delay):You can set the wiper speed for a long or
short delay between wipes. This can be very useful
in light rain or snow. Turn the band to choose the delay
time. The closer to the top of the lever, the shorter
the delay.
6(Low Speed):For steady wiping at low speed,
turn the band away from you to the �rst solid band past
the delay settings.
3-9
Page 146 of 460
1(High Speed):For high-speed wiping, turn the
band further, to the second solid band past the
delay settings.
9(Off):To stop the wipers, move the band to off.
Be sure to clear ice and snow from the wiper blades
before using them. If they’re frozen to the windshield,
carefully loosen or thaw them. If your blades do become
worn or damaged, get new blades or blade inserts.
Windshield Washer
L(Washer Fluid):There is a paddle marked with the
windshield washer symbol at the top of the multifunction
lever. To spray washer �uid on the windshield, push
the paddle. The wipers will clear the window and then
either stop or return to your preset speed.
{CAUTION:
In freezing weather, do not use your washer
until the windshield is warmed. Otherwise the
washer �uid can form ice on the windshield,
blocking your vision.
Cruise Control
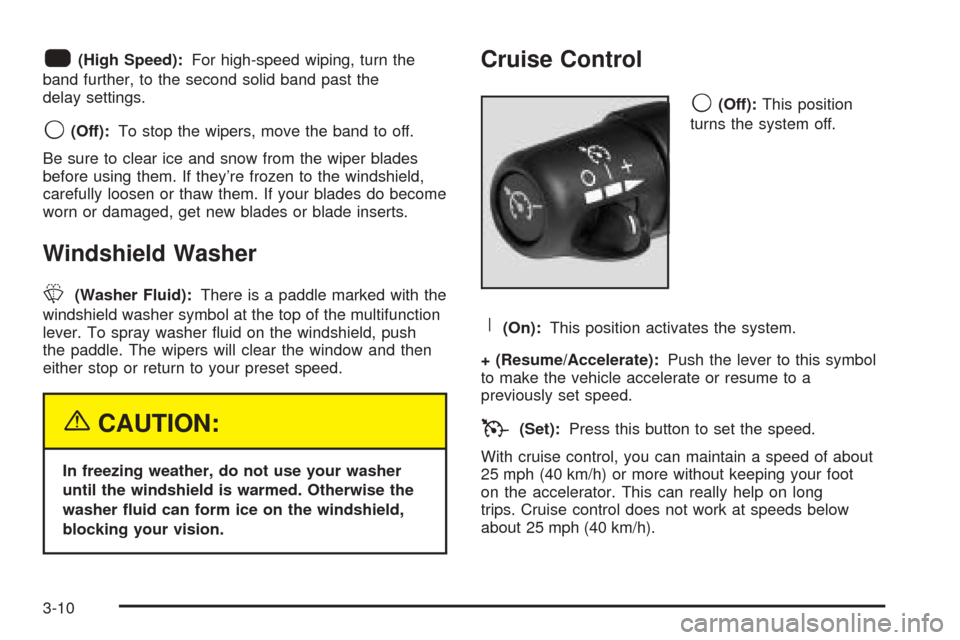
9(Off):This position
turns the system off.
R(On):This position activates the system.
+ (Resume/Accelerate):Push the lever to this symbol
to make the vehicle accelerate or resume to a
previously set speed.
T(Set):Press this button to set the speed.
With cruise control, you can maintain a speed of about
25 mph (40 km/h) or more without keeping your foot
on the accelerator. This can really help on long
trips. Cruise control does not work at speeds below
about 25 mph (40 km/h).
3-10
Page 404 of 460
Instrument Panel Fuse Block
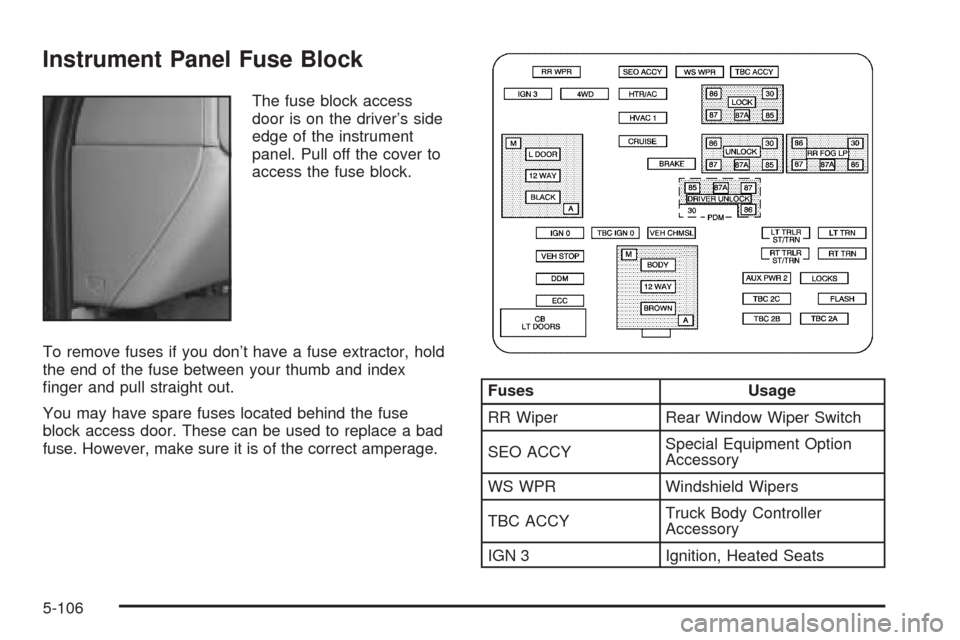
The fuse block access
door is on the driver’s side
edge of the instrument
panel. Pull off the cover to
access the fuse block.
To remove fuses if you don’t have a fuse extractor, hold
the end of the fuse between your thumb and index
�nger and pull straight out.
You may have spare fuses located behind the fuse
block access door. These can be used to replace a bad
fuse. However, make sure it is of the correct amperage.
Fuses Usage
RR Wiper Rear Window Wiper Switch
SEO ACCYSpecial Equipment Option
Accessory
WS WPR Windshield Wipers
TBC ACCYTruck Body Controller
Accessory
IGN 3 Ignition, Heated Seats
5-106
Page 459 of 460
U
Ultrasonic Rear Parking Assist (URPA)...............3-19
Understanding Radio Reception........................3-97
Uniform Tire Quality Grading............................5-73
V
Vehicle
Control........................................................ 4-5
Damage Warnings........................................... iv
Symbols......................................................... iv
Vehicle Customization, DIC..............................3-60
Vehicle Data Collection and Event Data
Recorders..................................................7-10
Vehicle Identi�cation
Number (VIN)............................................5-104
Service Parts Identi�cation Label..................5-104
Vehicle Personalization
Memory Seat..............................................2-69
Ventilation Adjustment......................................3-28
Visors...........................................................2-24
Voltmeter Gage..............................................3-35
W
Warning Lights, Gages and Indicators................3-29
Warnings
DIC Warnings and Messages........................3-50
Hazard Warning Flashers............................... 3-6
Other Warning Devices.................................. 3-6
Safety and Symbols......................................... iii
Vehicle Damage.............................................. iv
Wheels
Alignment and Tire Balance..........................5-74
Replacement...............................................5-75
Where to Put the Restraint...............................1-34
Windows.......................................................2-23
Power........................................................2-24
Windshield
Wiper Blades, Cleaning..............................5-101
Windshield Washer.........................................3-10
Fluid..........................................................5-36
Windshield Wiper
Blade Replacement......................................5-59
Fuses......................................................5-105
Windshield Wipers......................................... 3-9
Winter Driving................................................4-38
13