key CADILLAC ESCALADE EXT 2009 3.G Owners Manual
[x] Cancel search | Manufacturer: CADILLAC, Model Year: 2009, Model line: ESCALADE EXT, Model: CADILLAC ESCALADE EXT 2009 3.GPages: 546, PDF Size: 4.43 MB
Page 463 of 546
3. Remove the wheel blocks (A) attached to the
jack (E) by turning the wing nut (C)
counterclockwise. Place the wheel blocks where
needed as indicated in previously in this section.
The tools for changing a �at tire are located in the
passenger’s side top-box storage unit.
To remove the tools, do the following:
1. Open the top door on the passenger’s side top-box
storage unit. Use the ignition/door key to unlock it if
it is locked. SeeTop-Box Storage on page 2-81
for more information.
2. Remove the black pouch from the storage box.
You now have all of the tools you will need to
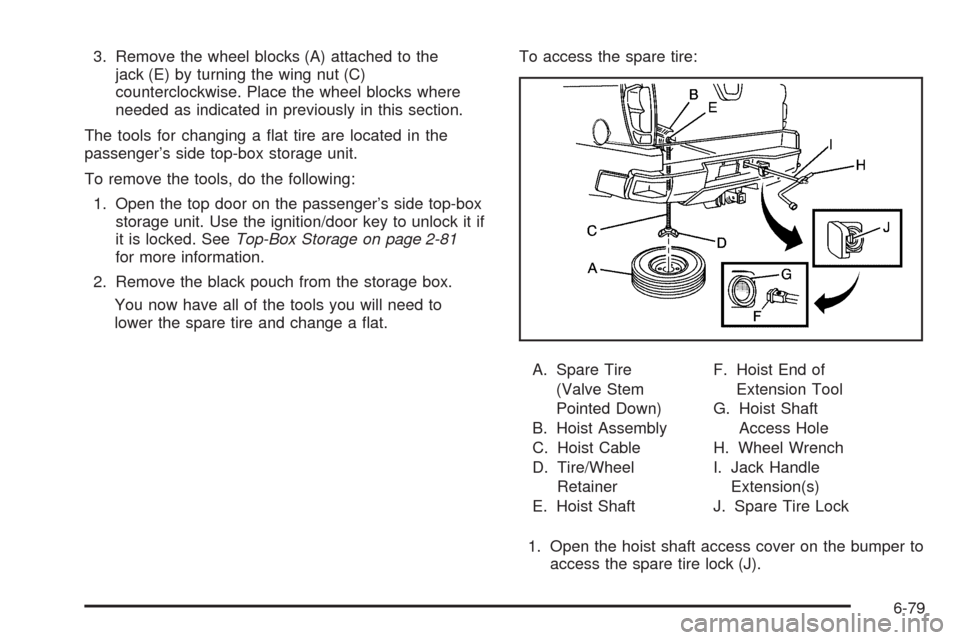
lower the spare tire and change a �at.To access the spare tire:
A. Spare Tire
(Valve Stem
Pointed Down)
B. Hoist Assembly
C. Hoist Cable
D. Tire/Wheel
Retainer
E. Hoist ShaftF. Hoist End of
Extension Tool
G. Hoist Shaft
Access Hole
H. Wheel Wrench
I. Jack Handle
Extension(s)
J. Spare Tire Lock
1. Open the hoist shaft access cover on the bumper to
access the spare tire lock (J).
6-79
Page 464 of 546
2. To remove the spare tire lock, insert the ignition
key, turn it clockwise and pull it straight out.
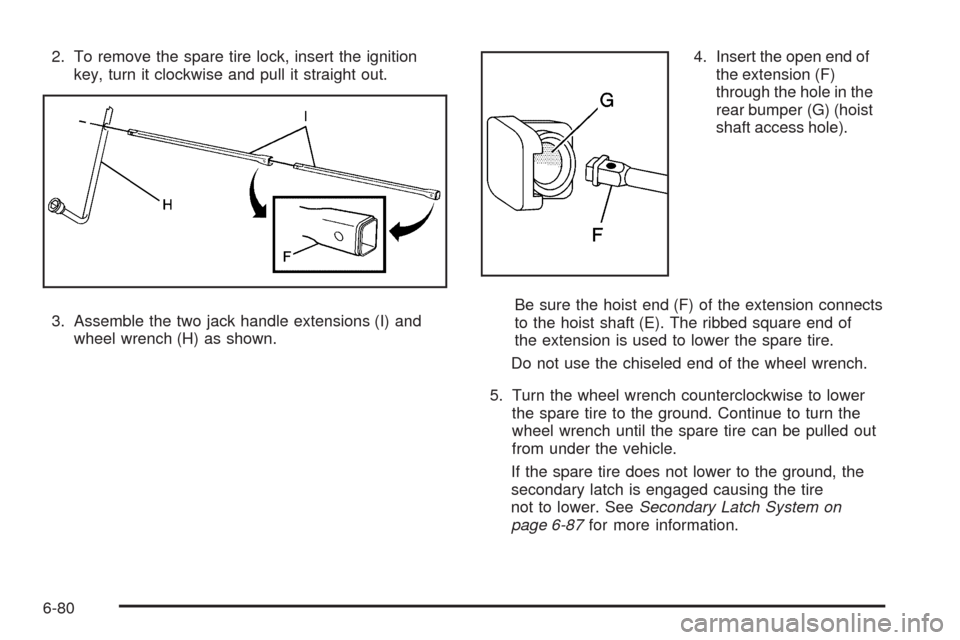
3. Assemble the two jack handle extensions (I) and
wheel wrench (H) as shown.4. Insert the open end of
the extension (F)
through the hole in the
rear bumper (G) (hoist
shaft access hole).
Be sure the hoist end (F) of the extension connects
to the hoist shaft (E). The ribbed square end of
the extension is used to lower the spare tire.
Do not use the chiseled end of the wheel wrench.
5. Turn the wheel wrench counterclockwise to lower
the spare tire to the ground. Continue to turn the
wheel wrench until the spare tire can be pulled out
from under the vehicle.
If the spare tire does not lower to the ground, the
secondary latch is engaged causing the tire
not to lower. SeeSecondary Latch System on
page 6-87for more information.
6-80
Page 489 of 546
Fuses Usage
8Passenger Side Turn Signal,
Stoplamp
9Passenger Door Module, Driver
Unlock
10 Power Door Lock 2 (Unlock Feature)
11 Power Door Lock 2 (Lock Feature)
12Stoplamps, Center-High Mounted
Stoplamp
13 Rear Climate Controls
14 Power Mirror
15 Body Control Module (BCM)
16 Accessory Power Outlets
17 Interior Lamps
18 Power Door Lock 1 (Unlock Feature)
19 Rear Seat Entertainment
20Ultrasonic Rear Parking Assist,
Power Liftgate
21 Power Door Lock 1 (Lock Feature)Fuses Usage
22 Driver Information Center (DIC)
23 Rear Wiper
24 Cooled Seats
25Driver Seat Module, Remote
Keyless Entry System
26Driver Power Door Lock
(Unlock Feature)
Circuit Breaker Usage
LT DRDriver Side Power Window Circuit
Breaker
Harness
ConnectorUsage
LT DR Driver Door Harness Connection
BODY Harness Connector
BODY Harness Connector
6-105
Page 492 of 546

Fuses Usage
6 Trailer Brake Controller
7 Front Washer
8 Oxygen Sensors
9 Antilock Brakes System 2
10 Trailer Back-up Lamps
11 Driver Side Low-Beam Headlamp
12 Engine Control Module (Battery)
13Fuel Injectors, Ignition Coils
(Right Side)
14Transmission Control Module
(Battery)
15 Vehicle Back-up Lamps
16Passenger Side Low-Beam
Headlamp
17 Air Conditioning Compressor
18 Oxygen Sensors
19 Transmission Controls (Ignition)
20 Fuel Pump
21 Fuel System Control Module
22 Headlamp Washers
23 Rear Windshield Washer
24Fuel Injectors, Ignition Coils
(Left Side)
25 Trailer Park LampsFuses Usage
26 Driver Side Park Lamps
27 Passenger Side Park Lamps
28 Fog Lamps
29 Horn
30Passenger Side High-Beam
Headlamp
31 Daytime Running Lamps
32 Driver Side High-Beam Headlamp
33 Daytime Running Lights 2
34 Sunroof
35Key Ignition System, Theft Deterrent
System
36 Windshield Wiper
37 SEO B2 Up�tter Usage (Battery)
38 Electric Adjustable Pedals
39 Climate Controls (Battery)
40 Airbag System (Ignition)
41 Ampli�er
42 Audio System
43Miscellaneous (Ignition), Cruise
Control
44 Liftgate Release
45 Airbag System (Battery)
46 Instrument Panel Cluster
6-108
Page 502 of 546

(b)Visually inspect front and rear suspension and
steering system for damaged, loose, or missing parts,
signs of wear or lack of lubrication. Inspect power
steering lines and hoses for proper hook-up, binding,
leaks, cracks, cha�ng, etc. Visually check constant
velocity joints, rubber boots, and axle seals for leaks.
(c)Visually inspect hoses and have them replaced
if they are cracked, swollen, or deteriorated. Inspect
all pipes, �ttings, and clamps; replace with genuine parts
as needed. To help ensure proper operation, a
pressure test of the cooling system and pressure cap
and cleaning the outside of the radiator and air
conditioning condenser is recommended at least
once a year.
(d)Inspect wiper blades for wear, cracking, or
contamination. Clean the windshield and wiper blades, if
contaminated. Replace wiper blades that are worn or
damaged. See Windshield Wiper Blade Replacement on
page 6-53 and Windshield and Wiper Blades on
page 6-99 for more information.
(e)Make sure the safety belt reminder light and safety
belt assemblies are working properly. Look for any
other loose or damaged safety belt system parts. If you
see anything that might keep a safety belt system
from doing its job, have it repaired. Have any torn or
frayed safety belts replaced. Also see Checking
the Restraint Systems on page 1-69.(f)Lubricate all key lock cylinders, hood latch assembly,
secondary latch, pivots, spring anchor, release pawl,
rear compartment hinges, outer tailgate handle
pivot points, latch bolt, fuel door hinge, and folding seat
hardware. More frequent lubrication may be required
when exposed to a corrosive environment. Applying
silicone grease on weatherstrips with a clean cloth will
make them last longer, seal better, and not stick or
squeak.
(g)Inspect system. Check all fuel and vapor lines and
hoses for proper hook-up, routing, and condition. Check
that the purge valve works properly, if equipped.
Replace as needed.
(h)Change automatic transmission �uid and �lter if the
vehicle is mainly driven under one or more of these
conditions:
�In heavy city traffic where the outside temperature
regularly reaches 90°F (32°C) or higher.
�In hilly or mountainous terrain.
�When doing frequent trailer towing.
�Uses such as found in taxi, police, or delivery
service.
7-8
Page 505 of 546
Automatic Transmission Shift Lock
Control System Check
{CAUTION:
When you are doing this inspection, the vehicle
could move suddenly. If the vehicle moves, you or
others could be injured.
1. Before starting this check, be sure there is enough
room around the vehicle. It should be parked on a
level surface.
2. Firmly apply the parking brake. SeeParking Brake
on page 2-41.
Be ready to apply the regular brake immediately if
the vehicle begins to move.
3. With the engine off, turn the ignition to ON/RUN,
but do not start the engine. Without applying the
regular brake, try to move the shift lever out
of P (Park) with normal effort. If the shift lever
moves out of P (Park), contact your dealer/retailer
for service.
Ignition Transmission Lock Check
While parked, and with the parking brake set, try to turn
the ignition to LOCK/OFF in each shift lever position.
The ignition should turn to LOCK/OFF only
when the shift lever is in P (Park).
The ignition key should come out only in
LOCK/OFF.
Contact your dealer/retailer if service is required.
7-11
Page 507 of 546
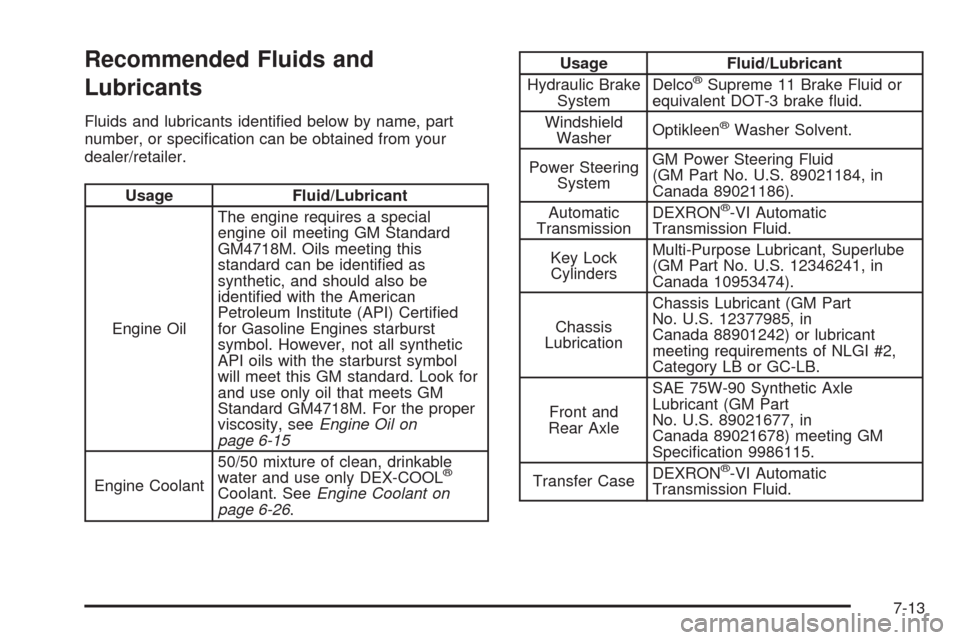
Recommended Fluids and
Lubricants
Fluids and lubricants identi�ed below by name, part
number, or speci�cation can be obtained from your
dealer/retailer.
Usage Fluid/Lubricant
Engine OilThe engine requires a special
engine oil meeting GM Standard
GM4718M. Oils meeting this
standard can be identi�ed as
synthetic, and should also be
identi�ed with the American
Petroleum Institute (API) Certi�ed
for Gasoline Engines starburst
symbol. However, not all synthetic
API oils with the starburst symbol
will meet this GM standard. Look for
and use only oil that meets GM
Standard GM4718M. For the proper
viscosity, seeEngine Oil on
page 6-15
Engine Coolant50/50 mixture of clean, drinkable
water and use only DEX-COOL
®
Coolant. SeeEngine Coolant on
page 6-26.
Usage Fluid/Lubricant
Hydraulic Brake
SystemDelco®Supreme 11 Brake Fluid or
equivalent DOT-3 brake �uid.
Windshield
WasherOptikleen
®Washer Solvent.
Power Steering
SystemGM Power Steering Fluid
(GM Part No. U.S. 89021184, in
Canada 89021186).
Automatic
TransmissionDEXRON
®-VI Automatic
Transmission Fluid.
Key Lock
CylindersMulti-Purpose Lubricant, Superlube
(GM Part No. U.S. 12346241, in
Canada 10953474).
Chassis
LubricationChassis Lubricant (GM Part
No. U.S. 12377985, in
Canada 88901242) or lubricant
meeting requirements of NLGI #2,
Category LB or GC-LB.
Front and
Rear AxleSAE 75W-90 Synthetic Axle
Lubricant (GM Part
No. U.S. 89021677, in
Canada 89021678) meeting GM
Speci�cation 9986115.
Transfer CaseDEXRON
®-VI Automatic
Transmission Fluid.
7-13
Page 531 of 546

This data can help provide a better understanding of the
circumstances in which crashes and injuries occur.
Important:EDR data is recorded by your vehicle only
if a non-trivial crash situation occurs; no data is
recorded by the EDR under normal driving conditions
and no personal data (e.g., name, gender, age,
and crash location) is recorded. However, other parties,
such as law enforcement, could combine the EDR
data with the type of personally identifying data routinely
acquired during a crash investigation.
To read data recorded by an EDR, special equipment is
required, and access to the vehicle or the EDR is
needed. In addition to the vehicle manufacturer, other
parties, such as law enforcement, that have the special
equipment, can read the information if they have
access to the vehicle or the EDR.
GM will not access this data or share it with others
except: with the consent of the vehicle owner or, if the
vehicle is leased, with the consent of the lessee; in
response to an official request of police or similar
government office; as part of GM’s defense of litigation
through the discovery process; or, as required by
law. Data that GM collects or receives may also be used
for GM research needs or may be made available to
others for research purposes, where a need is shown
and the data is not tied to a speci�c vehicle or
vehicle owner.OnStar®
If your vehicle has OnStar and you subscribe to the
OnStar services, please refer to the OnStar Terms and
Conditions for information on data collection and
use. See alsoOnStar
®System on page 2-56in this
manual for more information.
Navigation System
If your vehicle has a navigation system, use of the
system may result in the storage of destinations,
addresses, telephone numbers, and other trip
information. Refer to the navigation system operating
manual for information on stored data and for deletion
instructions.
Radio Frequency
Identi�cation (RFID)
RFID technology is used in some vehicles for functions
such as tire pressure monitoring and ignition system
security, as well as in connection with conveniences
such as key fobs for remote door locking/unlocking and
starting, and in-vehicle transmitters for garage door
openers. RFID technology in GM vehicles does not use
or record personal information or link with any other
GM system containing personal information.
8-17
Page 537 of 546
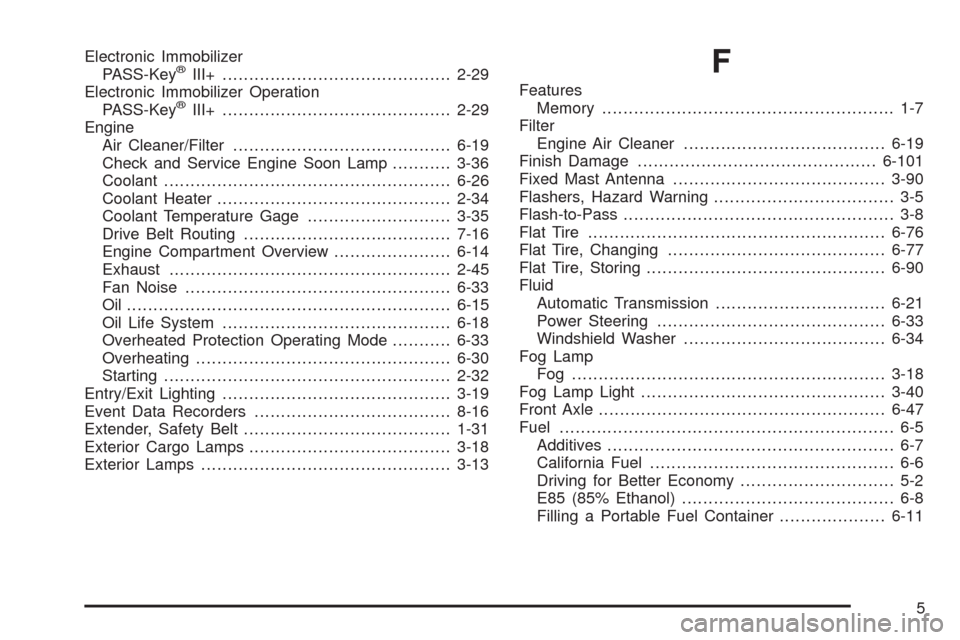
Electronic Immobilizer
PASS-Key®III+...........................................2-29
Electronic Immobilizer Operation
PASS-Key
®III+...........................................2-29
Engine
Air Cleaner/Filter.........................................6-19
Check and Service Engine Soon Lamp...........3-36
Coolant......................................................6-26
Coolant Heater............................................2-34
Coolant Temperature Gage...........................3-35
Drive Belt Routing.......................................7-16
Engine Compartment Overview......................6-14
Exhaust.....................................................2-45
Fan Noise..................................................6-33
Oil .............................................................6-15
Oil Life System...........................................6-18
Overheated Protection Operating Mode...........6-33
Overheating................................................6-30
Starting......................................................2-32
Entry/Exit Lighting...........................................3-19
Event Data Recorders.....................................8-16
Extender, Safety Belt.......................................1-31
Exterior Cargo Lamps......................................3-18
Exterior Lamps...............................................3-13
F
Features
Memory ....................................................... 1-7
Filter
Engine Air Cleaner......................................6-19
Finish Damage.............................................6-101
Fixed Mast Antenna........................................3-90
Flashers, Hazard Warning.................................. 3-5
Flash-to-Pass................................................... 3-8
Flat Tire........................................................6-76
Flat Tire, Changing.........................................6-77
Flat Tire, Storing.............................................6-90
Fluid
Automatic Transmission................................6-21
Power Steering...........................................6-33
Windshield Washer......................................6-34
Fog Lamp
Fog ...........................................................3-18
Fog Lamp Light..............................................3-40
Front Axle......................................................6-47
Fuel............................................................... 6-5
Additives...................................................... 6-7
California Fuel.............................................. 6-6
Driving for Better Economy............................. 5-2
E85 (85% Ethanol)........................................ 6-8
Filling a Portable Fuel Container....................6-11
5
Page 539 of 546

I
Ignition Positions.............................................2-31
Infants and Young Children, Restraints...............1-34
In�ation - Tire Pressure...................................6-60
Instrument Panel
Brightness..................................................3-18
Cluster.......................................................3-28
Overview..................................................... 3-4
Storage Area..............................................2-66
J
Jump Starting.................................................6-40
K
Keyless Entry System....................................... 2-4
Keys............................................................... 2-3
L
Labeling, Tire Sidewall.....................................6-55
Lamp
Malfunction Indicator....................................3-36
Lamps
Dome ........................................................3-19
Dome Lamp Override...................................3-19
Exterior Cargo.............................................3-18
Reading.....................................................3-19
Lap-Shoulder Belt...........................................1-26LATCH System for Child Restraints...................1-41
Level Control..................................................5-39
License Plate Lamps.......................................6-52
Light
Airbag Readiness........................................3-30
Antilock Brake System (ABS) Warning............3-34
Brake System Warning.................................3-33
Charging System.........................................3-32
Cruise Control.............................................3-40
Fog Lamp ..................................................3-40
Highbeam On.............................................3-40
Lights On Reminder.....................................3-40
Oil Pressure...............................................3-39
Passenger Airbag Status Indicator..................3-31
Safety Belt Reminders..................................3-29
Security.....................................................3-39
StabiliTrak
®Indicator....................................3-34
Tire Pressure..............................................3-35
Tow/Haul Mode...........................................3-41
Lighting
Entry/Exit...................................................3-19
Lights
Exterior Lamps............................................3-13
Flash-to-Pass............................................... 3-8
High/Low Beam Changer................................ 3-7
On Reminder..............................................3-16
Loading Your Vehicle.......................................5-31
Locking Rear Axle............................................ 5-9
Lockout Protection..........................................2-11
7