light CADILLAC ESCALADE EXT 2009 3.G Owners Manual
[x] Cancel search | Manufacturer: CADILLAC, Model Year: 2009, Model line: ESCALADE EXT, Model: CADILLAC ESCALADE EXT 2009 3.GPages: 546, PDF Size: 4.43 MB
Page 288 of 546
To add a stopover:
1. Press the DEST hard key.
2. Select the Add Stopover screen button. This button
only appears if a route has been calculated.
3. Using the desired method of entering a destination,
enter the stopover. See “Destination” previously for
more information.
4. Select the route preference (Fastest, Shortest, or
Other). The system calculates and highlights the
route.
5. Select the Start Guidance screen button. The route
is now ready to be started.
6. To add the second and third stopovers, press the
DEST hard key, then select the Add screen button,
where the next waypoint should appear on the
route.
7. Select the route preference (Fastest, Shortest, or
Other). The system calculates and highlights the
route.
8. Select the Start Guidance screen button. The route
is now ready to be started.To delete a stopover from the current route:
1. Press the DEST hard key.
2. Select the Delete screen button for the desired
stopover to delete.
3. The system displays a pop-up con�rmation
message. Touch Yes to delete the stopover; touch
No to cancel this operation.
4. Select the route preference (Fastest, Shortest, or
Other). The system calculates and highlights the
route.
5. Select the Start Guidance screen button. The route
is now ready to be started.
Suspend Guidance
Press this screen button, from the Route screen, to put
the current route on hold.
Resume Guidance
Press this screen button, from the Route screen, to
resume guidance on the current route.
Cancel Guidance
Press this screen button, from the Route screen, to
cancel the current route.
4-38
Page 293 of 546

4. Select the Add Voice Tag screen button.
5. The system will ask for you to state the name. You
will have four seconds to state the name. The
system will respond back with the name and prompt
you to repeat the name for con�rmation.
To delete an address book entry:
1. Select the CONFIG hard key.
2. Select the NAV screen button.
3. Select the Edit/View Address Book screen button.
4. Select the address book entry to delete.
5. Press the Delete screen button to delete the
address book entry.
6. A con�rmation pop-up will display. Select Ok to
delete; select Cancel to cancel the operation.
To delete the entire address book:
1. Select the CONFIG hard key.
2. Select the NAV screen button.
3. Select the Edit/View Address Book screen button.
4. A list of all the address book entries will display.
Press and hold the Clear All screen button.
5. A con�rmation pop-up will display. Select Ok to
delete; select Cancel to cancel the operation.Map Database Information
Touch the Map Database Information screen button to
view the coverage areas of the map DVD.
Off-Road Mode
To turn the Off-road mode on or off, do the following:
1. Press the CONFIG hard key.
2. Press the Nav screen button.
3. Press the Off-Road mode screen button. The button
will be highlighted when the feature is on.
4-43
Page 295 of 546
Traffic information is delivered to the vehicle by the
XM™ Radio satellites. XM NavTraffic™ makes it
possible for the navigation system to provide
continuously updated traffic information personalized for
a driver’s needs.
XM NavTraffic™ currently broadcasts the traffic
information for many markets nationally, and the service
may be available in more cities in the future. Visit
xmnavtraffic.com for more details on local coverage.
A service fee is required in order to receive the
XM NavTraffic™ service.
Turning XM NavTraffic™ On and Off
To turn traffic on or off:
1. Press the CONFIG hard key, then press the
CONFIG key repeatedly until Nav is selected
or press the Nav screen button.
2. Touch the Traffic Options button.
3. Touch the Traffic button. This button is highlighted
when it is active.
Selecting Alert for Approaching Traffic Events
enables the system to show a pop-up screen that
noti�es of possible traffic issues ahead.
When this feature is highlighted, while traveling on
a route, accidents located on the route are
indicated and can be avoided.
Traffic Icon
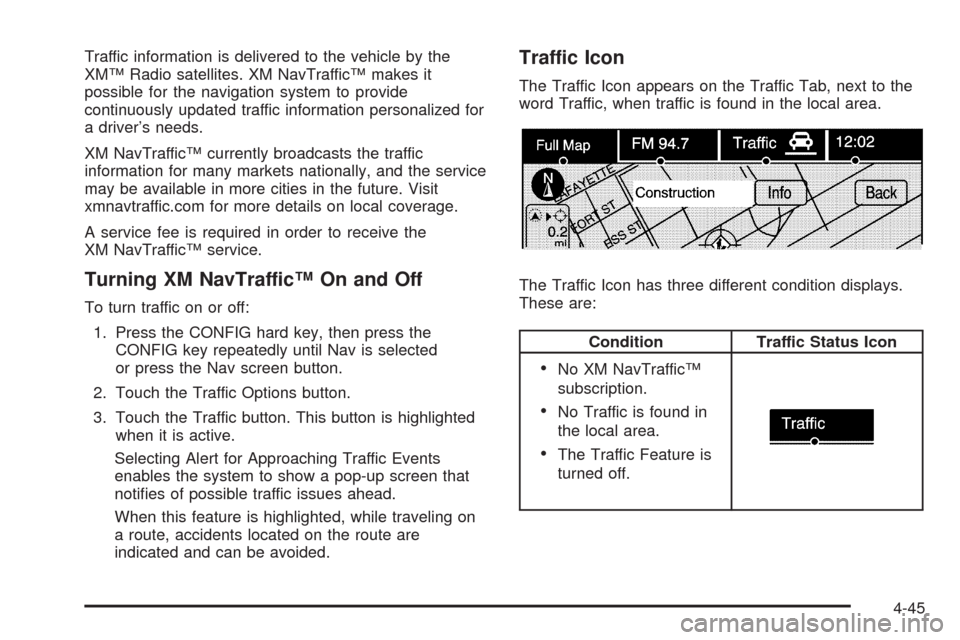
The Traffic Icon appears on the Traffic Tab, next to the
word Traffic, when traffic is found in the local area.
The Traffic Icon has three different condition displays.
These are:
Condition Traffic Status Icon
No XM NavTraffic™
subscription.
No Traffic is found in
the local area.
The Traffic Feature is
turned off.
4-45
Page 298 of 546

Traffic Flow Status— This touch screen button is used
to enable or disable the green, yellow, red and
orange arrows shown beside the roads and used to
show the traffic �ow or extent of a traffic event.
Black indicates a closed road segment
Red indicates signi�cantly impaired traffic �ow with
average speed of less than 25 mph.
Yellow indicates slightly impaired traffic �ow with
average speed between 25 and 45 mph.
Green indicates normal traffic �ow with average
speed above 45 mph.
Orange indicates construction.
Traffic �ow data arrows display on the map when scaled
up to eight miles.
Closed Road, Traffic Delays, Incidents, and
Advisories — These four touch screen buttons are used
to select the traffic event ICONS that appear on the
map screens.
Alert for Approaching Traffic Events:WhenOn,ifan
approaching traffic event is within the alert range, one
of two traffic alert pop-up screens display:
With no route planned, while on expressways,
Approaching Traffic Event without Avoid screen
displays.
With route planned, Traffic Event on Route screen
displays.
If the Alert for Approaching Traffic Events is Off, the
alert pop-up screen does not display.
4-48
Page 303 of 546
:Touch the + (plus) or−(minus)
screen buttons to increase or decrease the CADILLAC ESCALADE EXT 2009 3.G Owners Manual Brightness/Contrast/Mode
Touch this screen button to change the brightness,
contrast, and mode of the display.
](Brightness):Touch the + (plus) or−(minus)
screen buttons to increase or decrease the](/img/23/7931/w960_7931-302.png)
Brightness/Contrast/Mode
Touch this screen button to change the brightness,
contrast, and mode of the display.
](Brightness):Touch the + (plus) or−(minus)
screen buttons to increase or decrease the brightness
of the screen.
_(Contrast):Touch the + (plus) or−(minus) screen
buttons to increase or decrease the contrast of the
screen.Auto (Automatic):Touch this screen button for the
system to automatically adjust the screen background
depending on exterior lighting conditions.
Night:Touch this screen button and the system makes
the map background darker.
Day:Touch this screen button and the system makes
the map background brighter.
Setting the Clock
The navigation system time and the analog clock
operate independently. Changing the time through the
navigation system does not change the time on the
analog clock. SeeAnalog Clock on page 3-22to change
the analog clock time.
Press the CONFIG key to enter the con�gure menu
options, then press the CONFIG key repeatedly until the
time is selected or touch the time screen button.
Hours:Press the−(minus) or + (plus) signs to
decrease or increase the hours.
Minutes:Press the−(minus) or + (plus) signs to
decrease or increase the minutes.
12/24 Format:Select the 12 screen button for standard
time; select the 24 screen button for military time.
4-53
Page 308 of 546
Finding a Station
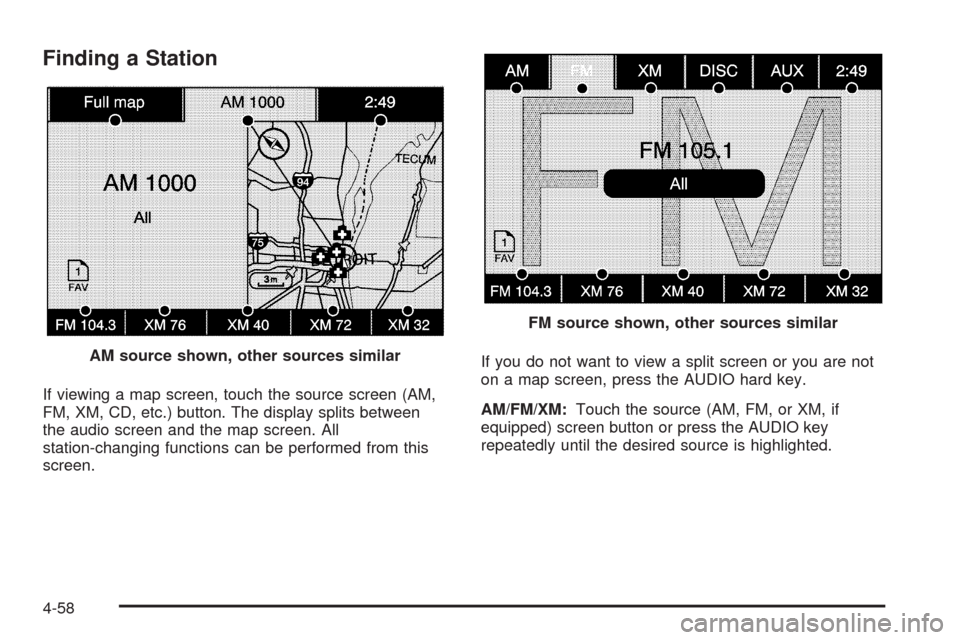
If viewing a map screen, touch the source screen (AM,
FM, XM, CD, etc.) button. The display splits between
the audio screen and the map screen. All
station-changing functions can be performed from this
screen.If you do not want to view a split screen or you are not
on a map screen, press the AUDIO hard key.
AM/FM/XM:Touch the source (AM, FM, or XM, if
equipped) screen button or press the AUDIO key
repeatedly until the desired source is highlighted. AM source shown, other sources similar
FM source shown, other sources similar
4-58
Page 312 of 546
Limit Features While Driving
Touch the Limit Features While Driving screen button to
turn on and off the ability to limit functions while
driving. When this screen button is highlighted, the
following functions will be limited while driving:
Music Navigator Scrolling
Radio Category Scrolling
Navigation Menu Scrolling and some functions
Number of Preset Pages
Touch the Number of Preset Pages screen button to
change the number of preset pages, 1 through 6. Each
preset page can contain �ve preset stations. Touch
the desired numbered screen button.
Bose®AudioPilot®
AudioPilot:The Bose®AudioPilot®noise
compensation technology.
To use AudioPilot
®:
1. Press the CONFIG key to enter the menu screen,
then press the CONFIG key repeatedly until Radio
is selected or touch the Radio screen button
2. Press the Automatic Volume Control screen button
to access the AudioPilot menu.
3. Press the ON screen button.To turn it off, touch the OFF screen button. When on,
AudioPilot
®continuously adjusts the audio system
equalization, to compensate for background noise, so
that the music sound is consistent at the set volume
level.
This feature is most effective at lower volume settings
where background noise can affect how well the
music being played is heard through the vehicle’s audio
system. At higher volume settings, where the music
is much louder than the background noise, there may be
little or no adjustments by AudioPilot
®. For more
information on AudioPilot®, visit bose.com/audiopilot.
Remove/Add XM Categories
Touch the Remove/Add XM Categories screen button to
remove or add XM categories when selecting XM
categories from the category list screen. The list of XM
categories appear on the screen. Use the up and
down arrow screen buttons to scroll through the list. The
categories to remove are highlighted and the categories
to add are dark in color. Touch the category to be
added or removed. Touch the Restore All Categories
screen button to add all categories that have been
removed.
4-62
Page 322 of 546

Z(Eject):To eject a disc, do the following:
1. Press the eject hard key.
2. The system will display “Ejecting Disc”.
Press the DISC screen button to display the Disc
Changer screen. Select the disc to eject. If a
selection is not made, the system will eject the disc
from the current slot. If the disc is not removed
from the slot, the system will pull it back in
after 10 seconds and start playing it.
To eject all discs at once, press and hold the eject
hard key. The system will display the disc number
being ejected.
Playing a DVD
There are three ways to play a DVD:
Once a DVD is inserted, the system will
automatically start play of the DVD.
If you are on a map screen, touch the DVD screen
button.
Press the AUDIO hard key, then touch the DVD
screen button.
When a DVD is loaded, the rear seat passengers can
power on the RSE video screen and use the remote
control to navigate through the DVD.
O/3(Power/Volume):Press this knob to turn the
system on and off. Turn the knob to increase or
decrease the volume of the audio system.
Press and hold this knob for more than two seconds to
turn off the navigation system, RSE video screen,
and RSA. If the vehicle has not been tuned off, the RSE
and the RSA can be turned back on by pressing this
knob and will continue play of the last active source.
DVD Menu Options
Once a DVD starts to play, the menu options and cursor
screen buttons will automatically appear. To display
the menu Options screen button while a DVD is playing,
touch anywhere on the screen.
Options:Select this screen button to view the menu
option screen buttons. Menu options are available when
they are highlighted. Some menu options are only
available when the DVD is not playing.
Cursor:Touch this button to access the cursor menu.
The arrows and other cursor options allow you to
navigate the DVD menu options. The cursor menu
options are only available if a DVD has a menu. Use the
cursor menu to start a DVD video from the disc
main menu.
q,Q,r,R(Arrow Buttons):Use these arrow
buttons to move around the DVD menu.
4-72
Page 323 of 546
Enter:Touch this button to select the highlighted
option.
Return:Touch this button to go back to the previous
DVD menu.
Back:Touch this button to go back to the main DVD
display screen.
Move:Touch this button to move the cursor buttons
back and forth from the bottom-right corner to the top-left
corner of the screen.
j/r(Pause/Play):Touch this button to pause the
DVD. This button will then change to the play button.
Touch the play button to play the DVD. Touch this button
in a DVD disc main menu to start the movie.
c(Stop):Touch this button to stop play of the DVD.
Press the play button to continue playing the DVD
from where the DVD was stopped. Press this button
twice to return to the beginning of the DVD.
DISC:Touch this screen button to view the list of
loaded disc(s). Select the disc to play.
r(Rewind):Touch and release this button to rewind
through the scene, chapters, and titles. Touch this
button again to increase the rewinding speed. Touch
the play button to stop rewinding. This button may
not work when the DVD is playing the copyright
information or the previews.
[(Forward):Touch and release this button to
advance rapidly through the scene, chapters, and titles.
Touch this button again to increase the fast forwarding
speed. Touch the play button to stop fast forwarding.
This button may not work when the DVD is playing the
copyright information or the previews.
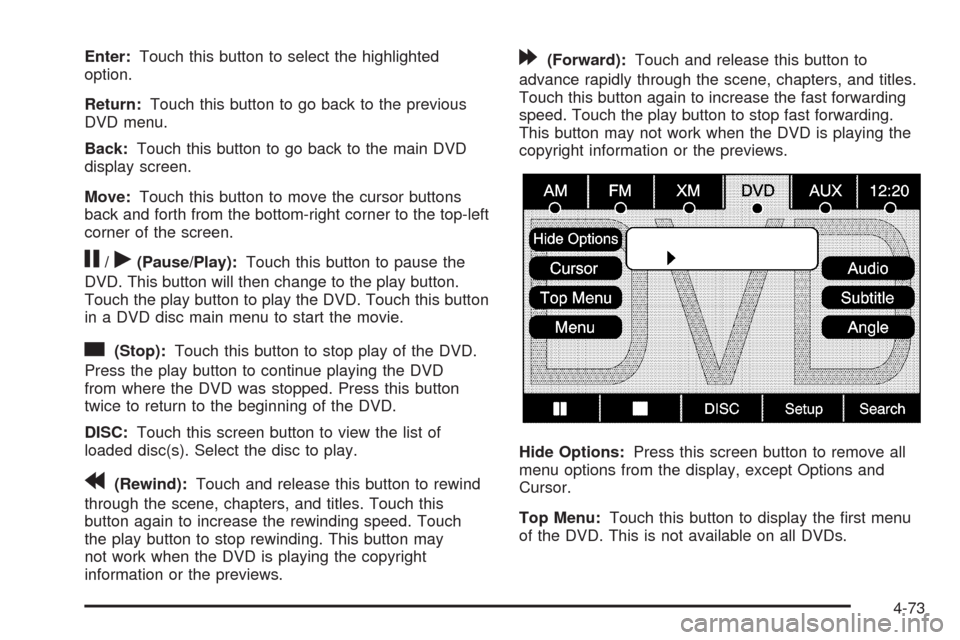
Hide Options:Press this screen button to remove all
menu options from the display, except Options and
Cursor.
Top Menu:Touch this button to display the �rst menu
of the DVD. This is not available on all DVDs.
4-73
Page 324 of 546
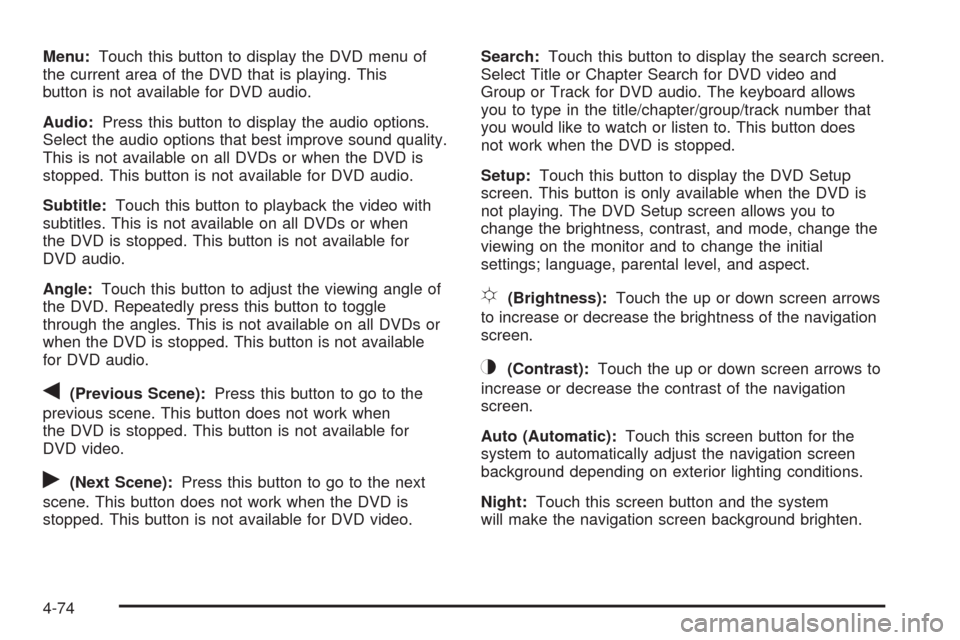
Menu:Touch this button to display the DVD menu of
the current area of the DVD that is playing. This
button is not available for DVD audio.
Audio:Press this button to display the audio options.
Select the audio options that best improve sound quality.
This is not available on all DVDs or when the DVD is
stopped. This button is not available for DVD audio.
Subtitle:Touch this button to playback the video with
subtitles. This is not available on all DVDs or when
the DVD is stopped. This button is not available for
DVD audio.
Angle:Touch this button to adjust the viewing angle of
the DVD. Repeatedly press this button to toggle
through the angles. This is not available on all DVDs or
when the DVD is stopped. This button is not available
for DVD audio.
q(Previous Scene):Press this button to go to the
previous scene. This button does not work when
the DVD is stopped. This button is not available for
DVD video.
r(Next Scene):Press this button to go to the next
scene. This button does not work when the DVD is
stopped. This button is not available for DVD video.Search:Touch this button to display the search screen.
Select Title or Chapter Search for DVD video and
Group or Track for DVD audio. The keyboard allows
you to type in the title/chapter/group/track number that
you would like to watch or listen to. This button does
not work when the DVD is stopped.
Setup:Touch this button to display the DVD Setup
screen. This button is only available when the DVD is
not playing. The DVD Setup screen allows you to
change the brightness, contrast, and mode, change the
viewing on the monitor and to change the initial
settings; language, parental level, and aspect.
!(Brightness):Touch the up or down screen arrows
to increase or decrease the brightness of the navigation
screen.
_(Contrast):Touch the up or down screen arrows to
increase or decrease the contrast of the navigation
screen.
Auto (Automatic):Touch this screen button for the
system to automatically adjust the navigation screen
background depending on exterior lighting conditions.
Night:Touch this screen button and the system
will make the navigation screen background brighten.
4-74