mirror CADILLAC ESCALADE EXT 2009 3.G Owners Manual
[x] Cancel search | Manufacturer: CADILLAC, Model Year: 2009, Model line: ESCALADE EXT, Model: CADILLAC ESCALADE EXT 2009 3.GPages: 546, PDF Size: 4.43 MB
Page 1 of 546

Seats and Restraint System............................. 1-1
Head Restraints
......................................... 1-2
Front Seats
............................................... 1-3
Rear Seats
..............................................1-10
Safety Belts
.............................................1-12
Child Restraints
.......................................1-32
Airbag System
.........................................1-53
Restraint System Check
............................1-69
Features and Controls..................................... 2-1
Keys
........................................................ 2-3
Doors and Locks
....................................... 2-9
Windows
.................................................2-23
Theft-Deterrent Systems
............................2-27
Starting and Operating Your Vehicle
...........2-31
Mirrors
....................................................2-47
Object Detection Systems
..........................2-50
OnStar
®System
......................................2-56
Universal Home Remote System
................2-59
Storage Areas
.........................................2-66
Sunroof
..................................................2-82
Instrument Panel............................................. 3-1
Instrument Panel Overview
.......................... 3-4
Climate Controls
......................................3-22Warning Lights, Gages, and Indicators
........3-27
Driver Information Center (DIC)
..................3-41
Audio System(s)
.......................................3-66
Navigation System.......................................... 4-1
Overview
.................................................. 4-2
Features and Controls
..............................4-11
Navigation Audio System
...........................4-57
Voice Recognition
....................................4-78
Driving Your Vehicle....................................... 5-1
Your Driving, the Road, and the Vehicle
....... 5-2
Towing
...................................................5-37
Service and Appearance Care.......................... 6-1
Service
..................................................... 6-3
Fuel
......................................................... 6-5
Checking Things Under the Hood
...............6-12
All-Wheel Drive
........................................6-45
Rear Axle
...............................................6-46
Front Axle
...............................................6-47
Headlamp Aiming
.....................................6-48
Bulb Replacement
....................................6-51
Windshield Wiper Blade Replacement
.........6-53
2009 Cadillac Escalade EXT Owner ManualM
Page 6 of 546

g:Outside Power Foldaway Mirrors
}:Power
/:Remote Vehicle Start
>:Safety Belt Reminders
7:Tire Pressure Monitor
_:Tow/Haul Mode
F:Traction Control
M:Windshield Washer Fluid
vi
Page 13 of 546

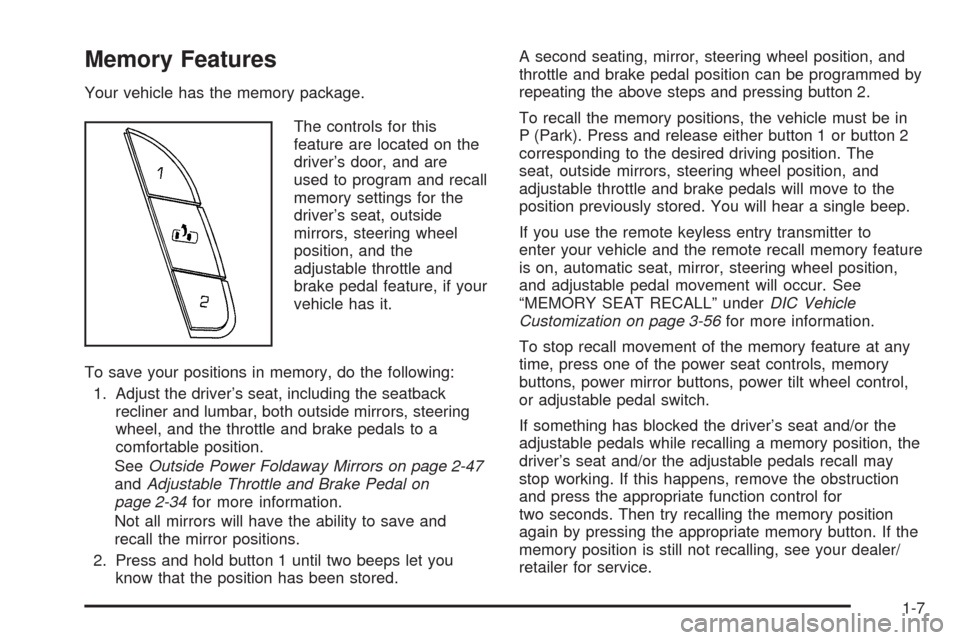
Memory Features
Your vehicle has the memory package.
The controls for this
feature are located on the
driver’s door, and are
used to program and recall
memory settings for the
driver’s seat, outside
mirrors, steering wheel
position, and the
adjustable throttle and
brake pedal feature, if your
vehicle has it.
To save your positions in memory, do the following:
1. Adjust the driver’s seat, including the seatback
recliner and lumbar, both outside mirrors, steering
wheel, and the throttle and brake pedals to a
comfortable position.
SeeOutside Power Foldaway Mirrors on page 2-47
andAdjustable Throttle and Brake Pedal on
page 2-34for more information.
Not all mirrors will have the ability to save and
recall the mirror positions.
2. Press and hold button 1 until two beeps let you
know that the position has been stored.A second seating, mirror, steering wheel position, and
throttle and brake pedal position can be programmed by
repeating the above steps and pressing button 2.
To recall the memory positions, the vehicle must be in
P (Park). Press and release either button 1 or button 2
corresponding to the desired driving position. The
seat, outside mirrors, steering wheel position, and
adjustable throttle and brake pedals will move to the
position previously stored. You will hear a single beep.
If you use the remote keyless entry transmitter to
enter your vehicle and the remote recall memory feature
is on, automatic seat, mirror, steering wheel position,
and adjustable pedal movement will occur. See
“MEMORY SEAT RECALL” underDIC Vehicle
Customization on page 3-56for more information.
To stop recall movement of the memory feature at any
time, press one of the power seat controls, memory
buttons, power mirror buttons, power tilt wheel control,
or adjustable pedal switch.
If something has blocked the driver’s seat and/or the
adjustable pedals while recalling a memory position, the
driver’s seat and/or the adjustable pedals recall may
stop working. If this happens, remove the obstruction
and press the appropriate function control for
two seconds. Then try recalling the memory position
again by pressing the appropriate memory button. If the
memory position is still not recalling, see your dealer/
retailer for service.
1-7
Page 77 of 546

Keys...............................................................2-3
Remote Keyless Entry (RKE) System................2-4
Remote Keyless Entry (RKE) System
Operation...................................................2-4
Remote Vehicle Start......................................2-7
Doors and Locks.............................................2-9
Door Locks....................................................2-9
Power Door Locks..........................................2-9
Delayed Locking.............................................2-9
Programmable Automatic Door Locks..............2-10
Rear Door Security Locks..............................2-10
Lockout Protection........................................2-11
Midgate
®.....................................................2-11
Tailgate.......................................................2-21
Power Assist Steps.......................................2-22
Windows........................................................2-23
Power Windows............................................2-24
Sun Visors...................................................2-26
Theft-Deterrent Systems..................................2-27
Content Theft-Deterrent.................................2-27
PASS-Key
®III+ Electronic Immobilizer.............2-29
PASS-Key®III+ Electronic Immobilizer
Operation.................................................2-29Starting and Operating Your Vehicle................2-31
New Vehicle Break-In....................................2-31
Ignition Positions..........................................2-31
Retained Accessory Power (RAP)...................2-32
Starting the Engine.......................................2-32
Adjustable Throttle and Brake Pedal................2-34
Engine Coolant Heater..................................2-34
Automatic Transmission Operation...................2-36
Tow/Haul Mode............................................2-39
Parking Brake..............................................2-41
Shifting Into Park..........................................2-43
Shifting Out of Park......................................2-44
Parking Over Things That Burn.......................2-45
Engine Exhaust............................................2-45
Running the Vehicle While Parked..................2-46
Mirrors...........................................................2-47
Manual Rearview Mirror.................................2-47
Automatic Dimming Rearview Mirror................2-47
Outside Power Foldaway Mirrors.....................2-47
Park Tilt Mirrors............................................2-48
Outside Convex Mirror...................................2-49
Outside Heated Mirrors..................................2-49
Object Detection Systems...............................2-50
Ultrasonic Rear Parking Assist (URPA)............2-50
Rear Vision Camera (RVC)............................2-52
Section 2 Features and Controls
2-1
Page 103 of 546

Sun Visors with Fixed Rod and Pull-out
Extension
Your vehicle may have this feature. Pull the sun visor
down to block glare. Pull the sun visor extender out
for additional coverage. Detach the sun visor from the
center mount and swing it to the side to cover the
side window.
Lighted Visor Vanity Mirror
Your vehicle has lighted visor vanity mirrors on both the
driver’s and passenger’s sun visors. Pull the sun
visor down and lift the mirror cover to turn the lamps on.
Theft-Deterrent Systems
Vehicle theft is big business, especially in some cities.
This vehicle has theft-deterrent features, however,
they do not make it impossible to steal.
Content Theft-Deterrent
Your vehicle has a content theft-deterrent alarm system.
This is the security light.
To arm the theft-deterrent system:
1. Open the door.
2. Lock the door with the Remote Keyless Entry (RKE)
transmitter or the power door lock switch. The
security light will come on to inform the driver the
system is arming. If a door is open when the doors
are locked, the security light will �ash.
If the delayed locking feature is turned on, the
theft-deterrent system will not start the arming
process until the last door is closed and the delay
timer has expired. SeeDelayed Locking on
page 2-9.
2-27
Page 123 of 546

Mirrors
Manual Rearview Mirror
Hold the inside rearview mirror in the center to move it
for a clearer view behind your vehicle. Adjust the
mirror to avoid glare from the headlamps behind you.
Push the tab forward for daytime use and pull it for
nighttime use.
Automatic Dimming Rearview Mirror
This vehicle may have an automatic dimming inside
rearview mirror with OnStar®. It may also have
Intellibeam®. For more information on Intellibeam™, see
“Intellibeam™ Intelligent High-Beam Headlamp Control
System” underExterior Lamps on page 3-13. For
more information on OnStar
®, seeOnStar®System on
page 2-56.
Automatic Dimming Mirror Operation
Automatic dimming reduces the glare of lights from
behind the vehicle. The dimming feature comes on and
the indicator light illuminates each time the vehicle is
started.
O(On/Off):Press to turn the dimming feature on
or off.
Cleaning the Mirror
Do not spray glass cleaner directly on the mirror. Use a
soft towel dampened with water.
Outside Power Foldaway Mirrors
Controls for the outside
power foldaway mirrors are
located on the driver
door armrest.
Mirror Adjustment
1. Press (C) to fold the mirrors out to the driving
position.
2. Press (D) to fold the mirrors in to the folded
position.
2-47
Page 124 of 546

Resetting the Power Foldaway Mirrors
You may need to reset the power foldaway mirrors if:
The mirrors are accidentally obstructed while folding.
They are accidentally manually folded/unfolded.
The mirrors will not stay in the unfolded position.
The mirrors vibrate at normal driving speeds.
Fold and unfold them one time using the mirror controls
to reset them to their normal position.
Automatic Dimming
Adjust the driver outside mirror for the glare of the
headlamps behind your vehicle. SeeAutomatic Dimming
Rearview Mirror on page 2-47for more information.
Turn Signal Indicator
The vehicle has a turn signal indicator on the mirror. An
arrow on the mirror �ashes in the direction of the turn
or lane change.
Park Tilt Mirrors
If the vehicle has the memory package, the passenger
and/or driver mirror tilts to a preselected position
when the vehicle is in R (Reverse). This feature lets the
driver view the curb when parallel parking. The
mirror(s) return to the original position when the vehicle
is shifted out of R (Reverse), or the ignition is turned
off or to OFF/LOCK.
Turn this feature on or off through the Driver Information
Center (DIC). SeeDIC Vehicle Customization on
page 3-56for more information.
2-48
Page 125 of 546

Outside Convex Mirror
{CAUTION:
A convex mirror can make things (like other
vehicles) look farther away than they really are. If
you cut too sharply into the right lane, you could hit
a vehicle on the right. Check the inside mirror or
glance over your shoulder before changing lanes.
The passenger side mirror is convex shaped. A convex
mirror’s surface is curved so more can be seen from
the driver seat.
Outside Heated Mirrors
<(Rear Window Defogger):Press to heat the
mirrors.
See “Rear Window Defogger” underDual Automatic
Climate Control System on page 3-22for more
information.
2-49
Page 126 of 546

Object Detection Systems
Ultrasonic Rear Parking
Assist (URPA)
For vehicles with the Ultrasonic Rear Parking Assist
(URPA) system, it operates at speeds less than 5 mph
(8 km/h), and assists the driver with parking and
avoiding objects while in R (Reverse). The sensors on
the rear bumper are used to detect the distance to
an object up to 8 feet (2.5 m) behind the vehicle, and at
least 10 inches (25.4 cm) off the ground.
{CAUTION:
The Ultrasonic Rear Parking Assist (URPA)
system does not replace driver vision. It cannot
detect:
objects that are below the bumper,
underneath the vehicle, or if they are too
close or far from the vehicle
children, pedestrians, bicyclists, or pets.
CAUTION: (Continued)
CAUTION: (Continued)
If you do not use proper care before and while
backing; vehicle damage, injury, or death could
occur. Even with URPA, always check behind the
vehicle before backing up. While backing, be sure
to look for objects and check the vehicle’s mirrors.
The display is located
above the rear window and
can be seen by looking
over your right shoulder.
URPA uses three color-coded lights to provide distance
and system information.
2-50
Page 168 of 546

Flash-to-Pass
This feature lets you use your high-beam headlamps to
signal a driver in front of you that you want to pass.
It works even if your headlamps are in the automatic
position.
To use it, pull the turn signal lever toward you, then
release it.
If your headlamps are in the automatic position or on
low beam, your high-beam headlamps will turn on. They
will stay on as long as you hold the lever toward you.
The high-beam indicator on the instrument panel cluster
will come on. Release the lever to return to normal
operation.
Windshield Wipers
The windshield wipers are controlled by turning the
band with
zon it.
8(Mist):For a single wiping cycle, turn the band to
mist. Hold it there until the wipers start. Then let go.
The wipers will stop after one wipe. If more wipes are
needed, hold the band on mist longer.
6(Delay): The wiper speed can be set for a long or
short delay between wipes. Turn the band to choose
the delay time. The closer to the top of the lever,
the shorter the delay.
6(Low Speed):For steady wiping at low speed,
turn the band away from you to the �rst solid band past
the delay settings.
1(High Speed):For high-speed wiping, turn the
band further, to the second solid band past the
delay settings.
9(Off):Turns the wipers off.
Be sure to clear ice and snow from the wiper blades
before using them. If the wipers are frozen to the
windshield, carefully loosen or thaw them. If the blades
do become worn or damaged, get new blades or
blade inserts.
Rainsense™ II Wipers
The vehicle has Rainsense™ II windshield wipers.
These wipers automatically turn on when a sensor,
mounted next to the inside rearview mirror, detects
moisture on the windshield. When active, these wipers
are able to detect moisture on the windshield and
automatically turn on the wipers.
To turn on the Rainsense™ feature, the wipers must be
set to one of the �ve delay settings. Each of the �ve
settings adjusts the sensitivity of the rain sensor.
3-8