ECO mode CADILLAC ESCALADE EXT 2010 3.G Owners Manual
[x] Cancel search | Manufacturer: CADILLAC, Model Year: 2010, Model line: ESCALADE EXT, Model: CADILLAC ESCALADE EXT 2010 3.GPages: 580, PDF Size: 6.23 MB
Page 22 of 580

Climate Controls
The heating, cooling, and ventilation in the vehicle can
be controlled with this system.
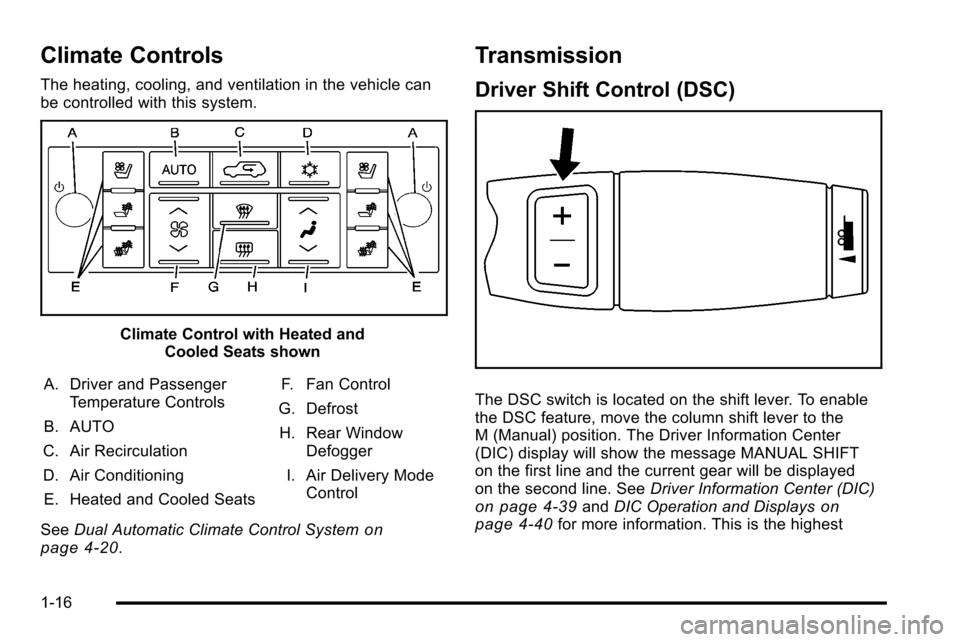
Climate Control with Heated andCooled Seats shown
A. Driver and Passenger Temperature Controls
B. AUTO
C. Air Recirculation
D. Air Conditioning E. Heated and Cooled Seats F. Fan Control
G. Defrost H. Rear Window Defogger
I. Air Delivery Mode Control
See Dual Automatic Climate Control System
on
page 4‑20.
Transmission
Driver Shift Control (DSC)
The DSC switch is located on the shift lever. To enable
the DSC feature, move the column shift lever to the
M (Manual) position. The Driver Information Center
(DIC) display will show the message MANUAL SHIFT
on the first line and the current gear will be displayed
on the second line. See Driver Information Center (DIC)
on page 4‑39andDIC Operation and Displayson
page 4‑40for more information. This is the highest
1-16
Page 93 of 580

The vehicle has a feature that may automatically unlock
the doors, turn on the interior lamps and hazard warning
flashers, and shut off the fuel system after the airbags
inflate. You can lock the doors, turn off the interior
lamps and hazard warning flashers by using the
controls for those features.
{WARNING:
A crash severe enough to inflate the airbags may
have also damaged important functions in the
vehicle, such as the fuel system, brake and
steering systems, etc. Even if the vehicle appears
to be drivable after a moderate crash, there may
be concealed damage that could make it difficult
to safely operate the vehicle.
Use caution if you should attempt to restart the
engine after a crash has occurred.In many crashes severe enough to inflate the airbag,
windshields are broken by vehicle deformation.
Additional windshield breakage may also occur
from the right front passenger airbag.
.Airbags are designed to inflate only once. After an
airbag inflates, you will need some new parts for
the airbag system. If you do not get them, the
airbag system will not be there to help protect you
in another crash. A new system will include airbag
modules and possibly other parts. The service
manual for your vehicle covers the need to replace
other parts.
.The vehicle has a crash sensing and diagnostic
module which records information after a crash.
See
Vehicle Data Recording and Privacy
on
page 9‑18and Event Data Recorderson
page 9‑19.
.Let only qualified technicians work on the airbag
systems. Improper service can mean that an
airbag system will not work properly. See your
dealer/retailer for service.
2-59
Page 109 of 580

Remote Vehicle Start
This feature allows you to start the engine from outside
of the vehicle. It may also start up the vehicle's heating
or air conditioning systems and rear window defogger.
Normal operation of the system will return after the key
is turned to the ON/RUN position.
During a remote start, the climate control system will
default to a heating or cooling mode depending on the
outside temperatures.
During a remote start, if your vehicle has an automatic
climate control system and heated seats, the heated
seats will turn on during colder outside temperatures
and will shut off when the key is turned to ON/RUN.
If your vehicle does not have an automatic climate
control system, during remote start, you will need to
manually turn the heated seats on and off. SeeHeated
and Cooled Seats
on page 2‑5for additional
information.
Laws in some communities may restrict the use of
remote starters. For example, some laws may require
a person using the remote start to have the vehicle in
view when doing so. Check local regulations for any
requirements on remote starting of vehicles.
Do not use the remote start feature if your vehicle is low
on fuel. Your vehicle may run out of fuel. If your vehicle has the remote start feature, the RKE
transmitter functions will have an increased range of
operation. However, the range may be less while the
vehicle is running.
There are other conditions which can affect the
performance of the transmitter, see
Remote Keyless
Entry (RKE) System
on page 3‑4for additional
information.
/ (Remote Start) : This button will be on the RKE
transmitter if you have remote start.
To start the vehicle using the remote start feature:
1. Aim the transmitter at the vehicle.
2. Press and release the transmitter's lock button. The vehicle's doors will lock. Immediately press
and hold the transmitter's remote start button until
the turn signal lights flash. If you cannot see the
vehicle's lights, press and hold the remote start
button for two to four seconds. Pressing the remote
start button again after the vehicle has started will
turn the engine off.
When the vehicle starts, the parking lamps will turn
on and remain on while the vehicle is running.
If the vehicle is left running it will automatically shut
off after 10 minutes unless a time extension has
been done.
3-7
Page 126 of 580

Express-Down/Up Windows
Windows with the express feature allow the windows to
be raised and lowered all the way without holding the
switch.
Press or pull the switch fully and release it to activate
the express feature.
The express mode can be canceled at any time by
briefly pressing or pulling the switch.
Express Window Anti-Pinch Feature
If any object is in the path of the window when the
express‐up is active, the window will stop at the
obstruction and auto‐reverse to a preset factory
position. Weather conditions such as severe icing may
also cause the window to auto‐reverse. The window
will return to normal operation once the obstruction or
condition is removed.
Express Window Anti‐Pinch Override
{WARNING:
If express override is activated, the window will
not reverse automatically. You or others could be
injured and the window could be damaged. Before
you use express override, make sure that all
people and obstructions are clear of the
window path.
In an emergency, the anti‐pinch feature can be
overridden in a supervised mode. Hold the window
switch all the way up to the second position. The
window will rise for as long as the switch is held.
Once the switch is released, the express mode is
re‐activated.
In this mode, the window can still close on an object in
its path. Use care when using the override mode.
3-24
Page 137 of 580

WARNING: (Continued)
You could be seriously injured. Plug the cord into
a properly grounded three-prong 110-volt AC
outlet. If the cord will not reach, use a heavy-duty
three-prong extension cord rated for at least
15 amps.
4. Before starting the engine, be sure to unplug and store the cord as it was before to keep it away from
moving engine parts. If you do not, it could be
damaged.
The length of time the heater should remain plugged in
depends on several factors. Ask a dealer/retailer in the
area where you will be parking the vehicle for the best
advice on this.
Active Fuel Management™
Vehicles with V8 engines may have Active Fuel
Management™. This system allows the engine to
operate on either all or half of its cylinders, depending
on the driving conditions.
When less power is required, such as cruising at a
constant vehicle speed, the system will operate in the
half cylinder mode, allowing the vehicle to achieve
better fuel economy. When greater power demands are required, such as accelerating from a stop, passing,
or merging onto a freeway, the system will maintain
full-cylinder operation.
If the vehicle has an Active Fuel Management™
indicator, see
DIC Operation and Displays
on
page 4‑40for more information on using this display .
Automatic Transmission Operation
The vehicle has a Hydra-Matic®6L80 automatic
transmission, and has an electronic shift position
indicator within the instrument panel cluster. The
electronic shift position indicator displays when the
shift lever is moved out of P (Park).
There are several different positions for the shift lever.
P (Park) : This position locks the rear wheels. It is the
best position to use when you start the engine because
the vehicle cannot move easily.
3-35
Page 139 of 580

D (Drive) :This position is for normal driving. It provides
the best fuel economy. If you need more power for
passing, and you are:
.Going less than about 35 mph (55 km/h), push the
accelerator pedal about halfway down.
.Going about 35 mph (55 km/h) or more, push the
accelerator all the way down.
By doing this, the vehicle shifts down to the next gear
and has more power.
D (Drive) can be used when towing a trailer, carrying a
heavy load, driving on steep hills, or for off-road driving.
You may want to shift the transmission to a lower gear
selection if the transmission shifts too often.
Downshifting the transmission in slippery road
conditions could result in skidding, see Skidding under
Loss of Control on page 6‑12.
M (Manual Mode) : This position lets drivers select
the range of gears appropriate for current driving
conditions. See Driver Shift Control (DSC) later in this
section.
Notice: Spinning the tires or holding the vehicle in
one place on a hill using only the accelerator pedal
may damage the transmission. The repair will not be
covered by the vehicle warranty. If you are stuck, do
not spin the tires. When stopping on a hill, use the
brakes to hold the vehicle in place. The vehicle has a shift stabilization feature that
adjusts the transmission shifting to the current driving
conditions in order to reduce rapid upshifts and
downshifts. This shift stabilization feature is designed to
determine, before making an upshift, if the engine will
be able to maintain vehicle speed by analyzing things
such as vehicle speed, throttle position and vehicle
load. If the shift stabilization feature determines that a
current vehicle speed cannot be maintained, the
transmission does not upshift and instead holds the
current gear. In some cases, this may appear to be a
delayed shift, however the transmission is operating
normally.
The vehicle's transmission uses adaptive shift controls
that compares key shift parameters to pre-programmed
ideal shifts stored in the transmissions computer. The
transmission constantly makes adjustments to improve
vehicle performance according to how the vehicle is
being used, such as with a heavy load or when
temperature changes. During this adaptive shift controls
process, shifting may feel different as the transmission
determines the best settings.
When temperatures are very cold, the Hydra-Matic
®
6L80 automatic transmission's gear shifting may be
delayed providing more stable shifts until the engine
warms up. Shifts may be more noticeable with a cold
transmission. This difference in shifting is normal.
3-37
Page 140 of 580

Driver Shift Control (DSC)
The vehicle has Driver Shift Control (DSC). DSC
controls the vehicle's transmission and vehicle speed
while driving down hill or towing a trailer by allowing you
to select a desired range of gears.
To use this feature, do the following:1. Move the shift lever to the M (Manual Mode).
2. Press the plus/minus button, to upshift or downshift selecting the desired range of gears for current
driving conditions. The DIC display will show the message MANUAL
SHIFT on the first line and the current gear will be
displayed on the second line. See
Driver Information
Center (DIC)
on page 4‑39and DIC Operation and
Displayson page 4‑40for more information. The
number displayed in the DIC is the highest gear that
can be used. However, the vehicle can automatically
shift to lower gears as it adjusts to driving conditions.
This means that all gears below that number are
available. When 5 (Fifth) is selected, 1 (First) through
5 (Fifth) gears are automatically shifted by the vehicle,
but 6 (Sixth) cannot be used until the plus/minus button
located on the steering column lever is used to change
to the gear.
Grade Braking is not available when the Driver Shift
Control is active. See Tow/Haul Mode
on page 3‑39for
more information.
While using the DSC, cruise control and the tow/haul
mode can be used.
3-38
Page 160 of 580

Example of Eight Dip Switches with Three PositionsThe panel of switches might not appear exactly as
they do in the examples above, but they should be
similar.
The switch positions on the hand-held transmitter
could be labeled, as follows:
.A switch in the up position could be labeled as
“Up,” “+,” or“On.”
.A switch in the down position could be labeled
as “Down,” “−,” or“Off.”
.A switch in the middle position could be labeled
as “Middle,” “0,” or“Neutral.” 2. Write down the eight to 12 switch settings from left
to right as follows:
.When a switch is in the up position, write “Left.”
.When a switch is in the down position, write
“Right.”
.If a switch is set between the up and down
position, write“Middle.”
The switch settings written down in Step 2 now
become the button strokes to be entered into
the Universal Home Remote in Step 4. Be sure
to enter the switch settings written down in
Step 2, in order from left to right, into the
Universal Home Remote, when completing
Step 4.
3. From inside your vehicle, first firmly press all three buttons at the same time for about three seconds.
Release the buttons to put the Universal Home
Remote into programming mode.
3-58
Page 184 of 580

Turn Signal/Multifunction Lever
The lever on the left side of the steering column
includes the following:
G:Turn and Lane Change Signals
53 :Headlamp High/Low-Beam Changer
N :Windshield Wipers
L :Windshield Washer
Flash-to-Pass.
Exterior Lamps.
Information for these features is on the pages following.
Turn and Lane-Change Signals
An arrow on the
instrument panel cluster
flashes in the direction of
the turn or lane change.
Move the lever all the way up or down to signal a turn.
Raise or lower the lever until the arrow starts to flash to
signal a lane change. The turn signals automatically
flash three times. It will flash six times if the tow-haul
mode is active. Holding the turn signal lever for more
than one second causes the turn signals to flash until
the lever is released.
The lever returns to its starting position when it is
released.
If after signaling a turn or a lane change the arrows
flash rapidly or do not come on, a signal bulb may be
burned out.
Have the bulbs replaced. If the bulb is not burned out,
check the fuse. See Instrument Panel Fuse Block
on
page 7‑105and Underhood Fuse Block on page 7‑108.
4-4
Page 201 of 580

The temperature can also be adjusted using either
temperature knob. Press the up or down arrows on the
fan switch, the defrost button, the AUTO button, driver
side temperature knob, or the air conditioning button to
turn the system on when it is off.
Driver and Passenger Side
Temperature Knob
The driver and passenger side temperature knobs are
used to adjust the temperature of the air coming
through the system on the driver or passenger's side of
the vehicle. The temperature can be adjusted even if
the system is turned off. This is possible since outside
air always flows through the system as the vehicle is
moving forward unless it is set to recirculation mode.
See“Recirculation” later in this section.
Turn the knob clockwise or counterclockwise to
increase or decrease the cabin temperature. The
display will show the temperature setting increasing or
decreasing.
Set the passenger's temperature setting to match the
driver temperature setting by pressing the passenger
power knob.
When in defrost mode the passenger temperature
setting cannot be changed.
Automatic Operation
AUTO (Automatic) : When automatic operation is
active the system will control the inside temperature, the
air delivery, and the fan speed.
Use the steps below to place the entire system in
automatic mode:
1. Press the AUTO button. When AUTO is selected, the display will change to
show the current temperature(s) and AUTO will
appear. The current delivery mode and fan speed
will also be displayed for approximately
five seconds.
When AUTO is selected, the air conditioning
operation and air inlet will be automatically
controlled. The air conditioning compressor will
run when the outside temperature is over about
4°C (40°F). The air inlet will normally be set to
outside air. If it is hot outside, the air inlet may
automatically switch to recirculate inside air to help
quickly cool down the vehicle. The light on the
button comes on in recirculation.
4-21