garage door opener CADILLAC ESCALADE EXT 2013 3.G Owners Manual
[x] Cancel search | Manufacturer: CADILLAC, Model Year: 2013, Model line: ESCALADE EXT, Model: CADILLAC ESCALADE EXT 2013 3.GPages: 476, PDF Size: 7.55 MB
Page 25 of 476

Black plate (19,1)Cadillac Escalade EXT Owner Manual - 2013 - CRC - 4/5/12
In Brief 1-19
Universal Remote System
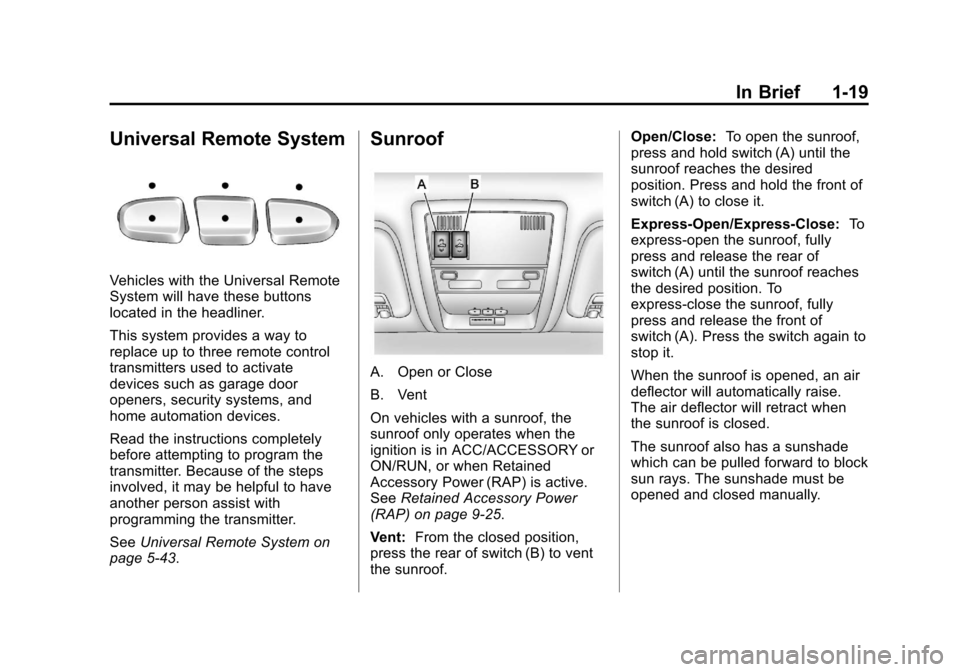
Vehicles with the Universal Remote
System will have these buttons
located in the headliner.
This system provides a way to
replace up to three remote control
transmitters used to activate
devices such as garage door
openers, security systems, and
home automation devices.
Read the instructions completely
before attempting to program the
transmitter. Because of the steps
involved, it may be helpful to have
another person assist with
programming the transmitter.
SeeUniversal Remote System on
page 5‑43.
Sunroof
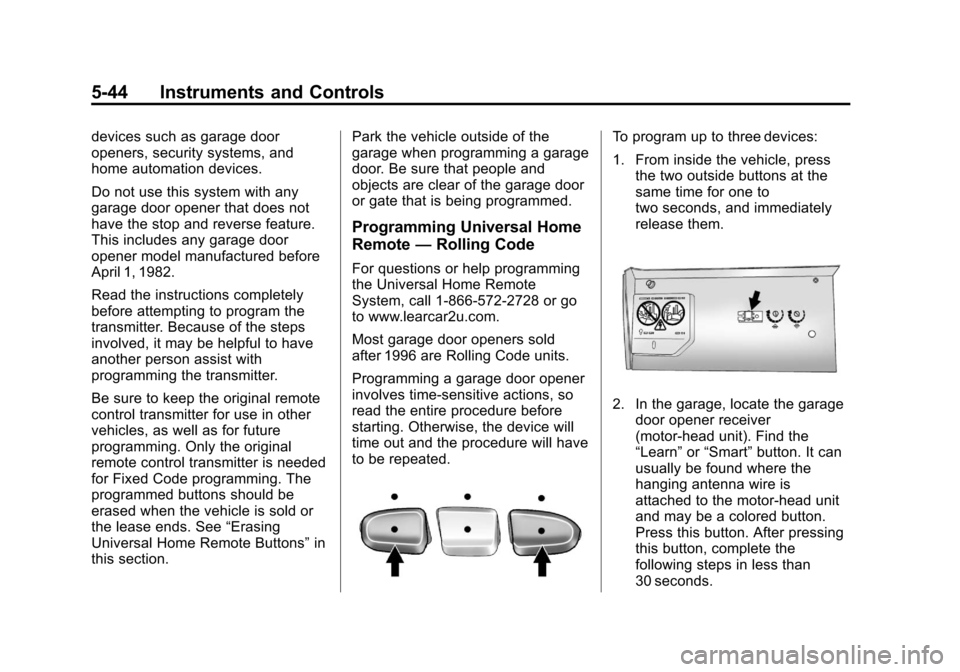
A. Open or Close
B. Vent
On vehicles with a sunroof, the
sunroof only operates when the
ignition is in ACC/ACCESSORY or
ON/RUN, or when Retained
Accessory Power (RAP) is active.
See Retained Accessory Power
(RAP) on page 9‑25.
Vent: From the closed position,
press the rear of switch (B) to vent
the sunroof. Open/Close:
To open the sunroof,
press and hold switch (A) until the
sunroof reaches the desired
position. Press and hold the front of
switch (A) to close it.
Express-Open/Express-Close: To
express-open the sunroof, fully
press and release the rear of
switch (A) until the sunroof reaches
the desired position. To
express-close the sunroof, fully
press and release the front of
switch (A). Press the switch again to
stop it.
When the sunroof is opened, an air
deflector will automatically raise.
The air deflector will retract when
the sunroof is closed.
The sunroof also has a sunshade
which can be pulled forward to block
sun rays. The sunshade must be
opened and closed manually.
Page 158 of 476

Black plate (44,1)Cadillac Escalade EXT Owner Manual - 2013 - CRC - 4/5/12
5-44 Instruments and Controls
devices such as garage door
openers, security systems, and
home automation devices.
Do not use this system with any
garage door opener that does not
have the stop and reverse feature.
This includes any garage door
opener model manufactured before
April 1, 1982.
Read the instructions completely
before attempting to program the
transmitter. Because of the steps
involved, it may be helpful to have
another person assist with
programming the transmitter.
Be sure to keep the original remote
control transmitter for use in other
vehicles, as well as for future
programming. Only the original
remote control transmitter is needed
for Fixed Code programming. The
programmed buttons should be
erased when the vehicle is sold or
the lease ends. See“Erasing
Universal Home Remote Buttons” in
this section. Park the vehicle outside of the
garage when programming a garage
door. Be sure that people and
objects are clear of the garage door
or gate that is being programmed.
Programming Universal Home
Remote
—Rolling Code
For questions or help programming
the Universal Home Remote
System, call 1-866-572-2728 or go
to www.learcar2u.com.
Most garage door openers sold
after 1996 are Rolling Code units.
Programming a garage door opener
involves time-sensitive actions, so
read the entire procedure before
starting. Otherwise, the device will
time out and the procedure will have
to be repeated.
To program up to three devices:
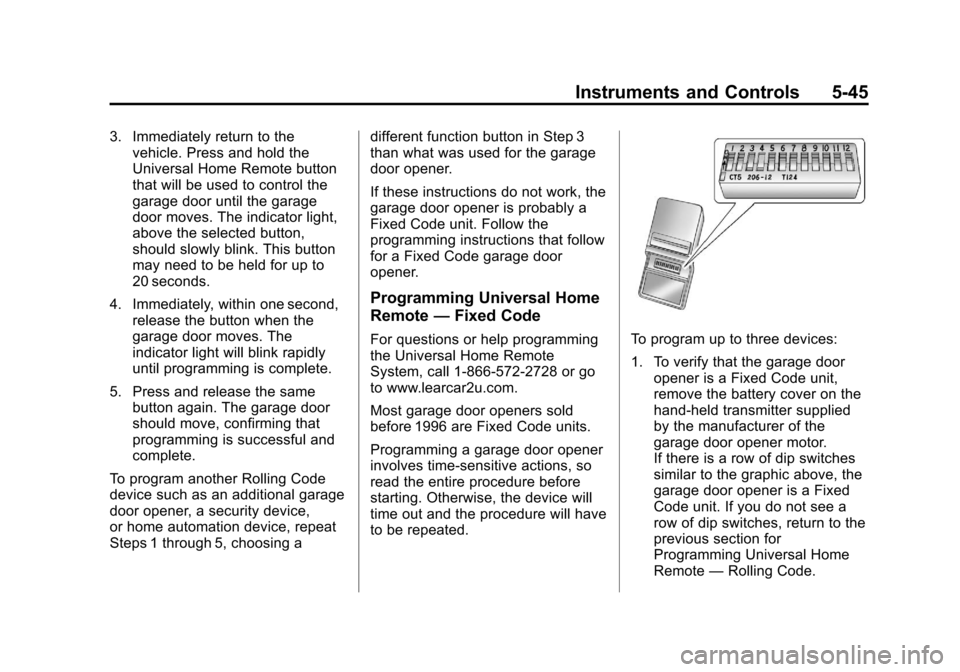
1. From inside the vehicle, press
the two outside buttons at the
same time for one to
two seconds, and immediately
release them.
2. In the garage, locate the garagedoor opener receiver
(motor-head unit). Find the
“Learn” or“Smart” button. It can
usually be found where the
hanging antenna wire is
attached to the motor-head unit
and may be a colored button.
Press this button. After pressing
this button, complete the
following steps in less than
30 seconds.
Page 159 of 476

Black plate (45,1)Cadillac Escalade EXT Owner Manual - 2013 - CRC - 4/5/12
Instruments and Controls 5-45
3. Immediately return to thevehicle. Press and hold the
Universal Home Remote button
that will be used to control the
garage door until the garage
door moves. The indicator light,
above the selected button,
should slowly blink. This button
may need to be held for up to
20 seconds.
4. Immediately, within one second, release the button when the
garage door moves. The
indicator light will blink rapidly
until programming is complete.
5. Press and release the same button again. The garage door
should move, confirming that
programming is successful and
complete.
To program another Rolling Code
device such as an additional garage
door opener, a security device,
or home automation device, repeat
Steps 1 through 5, choosing a different function button in Step 3
than what was used for the garage
door opener.
If these instructions do not work, the
garage door opener is probably a
Fixed Code unit. Follow the
programming instructions that follow
for a Fixed Code garage door
opener.
Programming Universal Home
Remote
—Fixed Code
For questions or help programming
the Universal Home Remote
System, call 1-866-572-2728 or go
to www.learcar2u.com.
Most garage door openers sold
before 1996 are Fixed Code units.
Programming a garage door opener
involves time-sensitive actions, so
read the entire procedure before
starting. Otherwise, the device will
time out and the procedure will have
to be repeated.To program up to three devices:
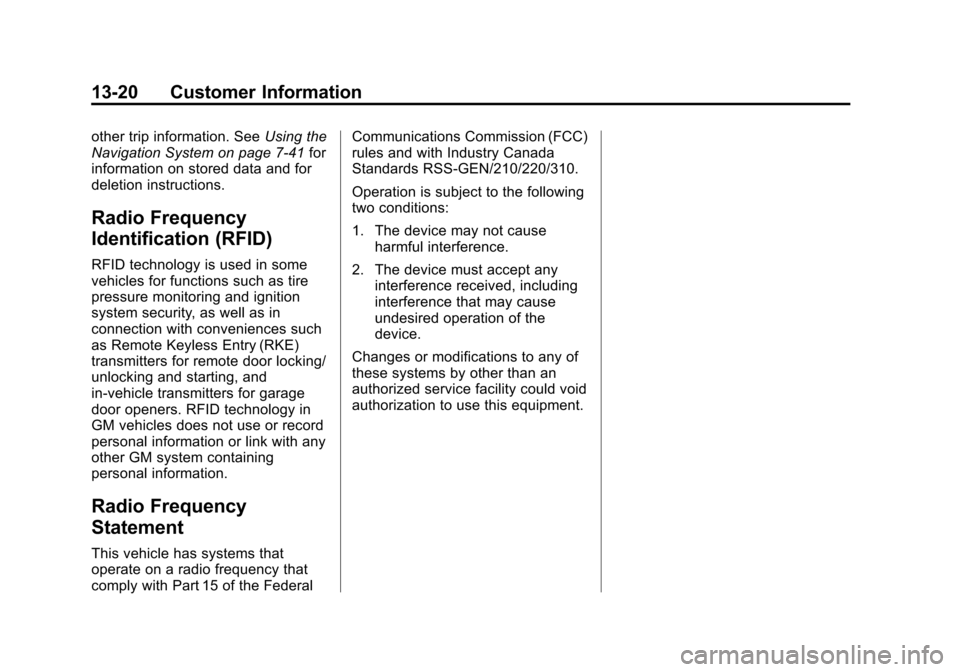
1. To verify that the garage door
opener is a Fixed Code unit,
remove the battery cover on the
hand-held transmitter supplied
by the manufacturer of the
garage door opener motor.
If there is a row of dip switches
similar to the graphic above, the
garage door opener is a Fixed
Code unit. If you do not see a
row of dip switches, return to the
previous section for
Programming Universal Home
Remote —Rolling Code.
Page 160 of 476

Black plate (46,1)Cadillac Escalade EXT Owner Manual - 2013 - CRC - 4/5/12
5-46 Instruments and Controls
Your hand-held transmitter can
have between 8 to 12 dip
switches depending on the
brand of transmitter.
The garage door opener receiver
(motor head unit) could also
have a row of dip switches that
can be used when programming
the Universal Home Remote.
If the total number of switches
on the motor head and
hand-held transmitter are
different, or if the dip switch
settings are different, use the dip
switch settings on the motor
head unit to program the
Universal Home Remote. The
motor head dip switch settings
can also be used when the
original hand-held transmitter is
not available.
Example of Eight Dip Switcheswith Two Positions
Example of Eight Dip Switcheswith Three Positions
The panel of switches might not
appear exactly as they do in the
examples above, but they
should be similar.
The switch positions on the
hand-held transmitter could be
labeled as follows:
.A switch in the up position
could be labeled as Up,
+, or On.
.A switch in the down
position could be labeled as
Down, −, or Off.
.A switch in the middle
position could be labeled as
Middle, 0, or Neutral.
2. Write down the 8 to 12 switch settings from left to right as
follows:
.When a switch is in the up
position, write “Left.”
.When a switch is in the
down position, write “Right.”
.If a switch is set between
the up and down position,
write“Middle.”
The switch settings written
down in Step 2 now
become the button strokes
to be entered into the
Universal Home Remote in
Step 4. Be sure to enter the
switch settings written down
in Step 2, in order from left
Page 161 of 476

Black plate (47,1)Cadillac Escalade EXT Owner Manual - 2013 - CRC - 4/5/12
Instruments and Controls 5-47
to right, into the Universal
Home Remote, when
completing Step 4.
3. From inside your vehicle, first firmly press all three buttons at
the same time for about
three seconds. Release the
buttons to put the Universal
Home Remote into
programming mode.
A. Left Button (Up, +, or On)
B. Middle Button (Middle, 0,or Neutral) C. Right Button (Down,
−,
or Off)
4. The indicator lights will blink slowly. Enter each switch setting
from Step 2 into your vehicle's
Universal Home Remote. You
will have two and one-half
minutes to complete Step 4. Now
press one button on the
Universal Home Remote for
each switch setting as follows:
.If you wrote “Left,”press
the left button (A) in the
vehicle.
.If you wrote “Right,”press
the right button (C) in the
vehicle.
.If you wrote “Middle,”press
the middle button (B) in the
vehicle.
5. After entering all of the switch positions, once again firmly
press and release all three
buttons at the same time. The
indicator lights will turn on. 6. Press and hold the button that
will be used to control the
garage door until the garage
door moves. The indicator light
above the selected button
should slowly blink. This button
may need to be held for up to
55 seconds.
7. Immediately release the button when the garage door moves.
The indicator light will blink
rapidly until programming is
complete.
8. Press and release the same button again. The garage door
should move, confirming that
programming is successful and
complete.
To program another Fixed Code
device such as an additional garage
door opener, a security device,
or home automation device, repeat
Steps 1-8, choosing a different
button in Step 6 than what was used
for the garage door opener.
Page 454 of 476

Black plate (20,1)Cadillac Escalade EXT Owner Manual - 2013 - CRC - 4/5/12
13-20 Customer Information
other trip information. SeeUsing the
Navigation System on page 7‑41 for
information on stored data and for
deletion instructions.
Radio Frequency
Identification (RFID)
RFID technology is used in some
vehicles for functions such as tire
pressure monitoring and ignition
system security, as well as in
connection with conveniences such
as Remote Keyless Entry (RKE)
transmitters for remote door locking/
unlocking and starting, and
in-vehicle transmitters for garage
door openers. RFID technology in
GM vehicles does not use or record
personal information or link with any
other GM system containing
personal information.
Radio Frequency
Statement
This vehicle has systems that
operate on a radio frequency that
comply with Part 15 of the Federal Communications Commission (FCC)
rules and with Industry Canada
Standards RSS‐GEN/210/220/310.
Operation is subject to the following
two conditions:
1. The device may not cause
harmful interference.
2. The device must accept any interference received, including
interference that may cause
undesired operation of the
device.
Changes or modifications to any of
these systems by other than an
authorized service facility could void
authorization to use this equipment.
Page 467 of 476

Black plate (5,1)Cadillac Escalade EXT Owner Manual - 2013 - CRC - 4/5/12
INDEX i-5
Front Axle . . . . . . . . . . . . . . . . . . . . 10-25
Front Fog LampLight . . . . . . . . . . . . . . . . . . . . . . . . . . 5-20
Front Seats Heated and Ventilated . . . . . . . . . 3-7
Fuel . . . . . . . . . . . . . . . . . . . . . . . . . . . 9-47 Additives . . . . . . . . . . . . . . . . . . . . . 9-48
E85 (85% Ethanol) . . . . . . . . . . . 9-49
Economy Driving . . . . . . . . . . . . . 1-21
Filling a Portable FuelContainer . . . . . . . . . . . . . . . . . . . 9-51
Filling the Tank . . . . . . . . . . . . . . . 9-50
Foreign Countries . . . . . . . . . . . . 9-48
Gasoline Specifications . . . . . . . 9-47
Gauge . . . . . . . . . . . . . . . . . . . . . . . . 5-10
Management, Active . . . . . . . . . . 9-27
Recommended . . . . . . . . . . . . . . . 9-47
Requirements, California . . . . . 9-48
System Messages . . . . . . . . . . . . 5-29
Full-Size Spare Tire . . . . . . . . . . 10-72 Fuses
Engine Compartment
Fuse Block . . . . . . . . . . . . . . . . 10-32
Fuses and Circuit Breakers . . . . . . . . . . . . . . . . . . 10-32
Instrument Panel Fuse Block . . . . . . . . . . . . . . . . . . . . . . 10-37
G
Garage Door Opener . . . . . . . . . . 5-42
Programming . . . . . . . . . . . . . . . . . 5-42
Gasoline Specifications . . . . . . . . . . . . . . . . . 9-47
Gauges Engine CoolantTemperature . . . . . . . . . . . . . . . . 5-11
Fuel . . . . . . . . . . . . . . . . . . . . . . . . . . 5-10
Odometer . . . . . . . . . . . . . . . . . . . . . 5-10
Speedometer . . . . . . . . . . . . . . . . . 5-10
Tachometer . . . . . . . . . . . . . . . . . . . 5-10
Trip Odometer . . . . . . . . . . . . . . . . 5-10
Warning Lights and Indicators . . . . . . . . . . . . . . . . . . . . 5-8 General Information
Service and Maintenance . . . . . 11-1
Towing . . . . . . . . . . . . . . . . . . . . . . . . 9-52
Vehicle Care . . . . . . . . . . . . . . . . . . 10-2
Glass Replacement . . . . . . . . . . . 10-28
Global Positioning System (GPS) . . . . . . . . . . . . . . . . 7-73
Glove Box . . . . . . . . . . . . . . . . . . . . . . 4-1
GM Mobility Reimbursement Program . . . . . . . . . . . . . . . . . . . . . . 13-6
H
Hazard Warning Flashers . . . . . . . 6-6
Head Restraints . . . . . . . . . . . . . . . . 3-2
HeadlampsAiming . . . . . . . . . . . . . . . . . . . . . . 10-29
Automatic . . . . . . . . . . . . . . . . . . . . . . 6-5
Bulb Replacement . . . . . . . . . . 10-29
Daytime RunningLamps (DRL) . . . . . . . . . . . . . . . . . 6-5
Flash-to-Pass . . . . . . . . . . . . . . . . . . 6-5
High Intensity Discharge (HID) Lighting . . . . . . . . . . . . . 10-29
High-Beam On Light . . . . . . . . . . 5-20
High/Low Beam Changer . . . . . . 6-4
Lamps On Reminder . . . . . . . . . 5-20