fuses CADILLAC SEVILLE 1996 4.G Owners Manual
[x] Cancel search | Manufacturer: CADILLAC, Model Year: 1996, Model line: SEVILLE, Model: CADILLAC SEVILLE 1996 4.GPages: 354, PDF Size: 20.21 MB
Page 72 of 354
Downloaded from www.Manualslib.com manuals search engine F
c
Remember, the theft-deterrent system won’t activate if
you lock the doors with a key or use the manual door
lock. It activates only if you use a power door lock
switch or the Keyless Entry system.
To avoid activating the alarm by accident:
0 The vehicle should be locked with the door key after-
the doors are closed if you don’t want to activate the
theft-deterrent system.
Always unlock a door with a key or use the Keyless
Entry system. (Pressing the unlock button on the
Keyless Entry transmitter disables the theft-deterrent
system.) Unlocking a door any other way will
activate the alarm. Cycling the ignition without
disarming the theft-deterrent system will also
activate the alarm.
If you activate the alarm by accident, unlock any door
with your key.
You can also turn off the alarm by using
the Keyless Entry system. The alarm won’t stop if you
try to unlock a door any other way.
Testing the Alarm
1. From inside the vehicle, roll down the window, then
get out of the vehicle, keeping the door open.
2. From outside of the vehicle, with the door open, lock
the vehicle using the power door lock or the Keyless
Entry
system and close the door. Wait 30 seconds.
3. Reach in and unlock the door using the manual lock
and open the door. The horn will sound and the
headlamps will flash.
If the alarm does not sound when it should, check to
see if the horn works. The
horn fuse may be blown. To
replace the fuse, see “Fuses and Circuit Breakers” in
the Index. If the fuse does not need to be replaced, you
may need to have your Cadillac serviced.
To reduce the possibility of theft, always activate
the optional theft-deterrent system when leaving
your vehicle.
Page 73 of 354
Downloaded from www.Manualslib.com manuals search engine PASS-Key@II
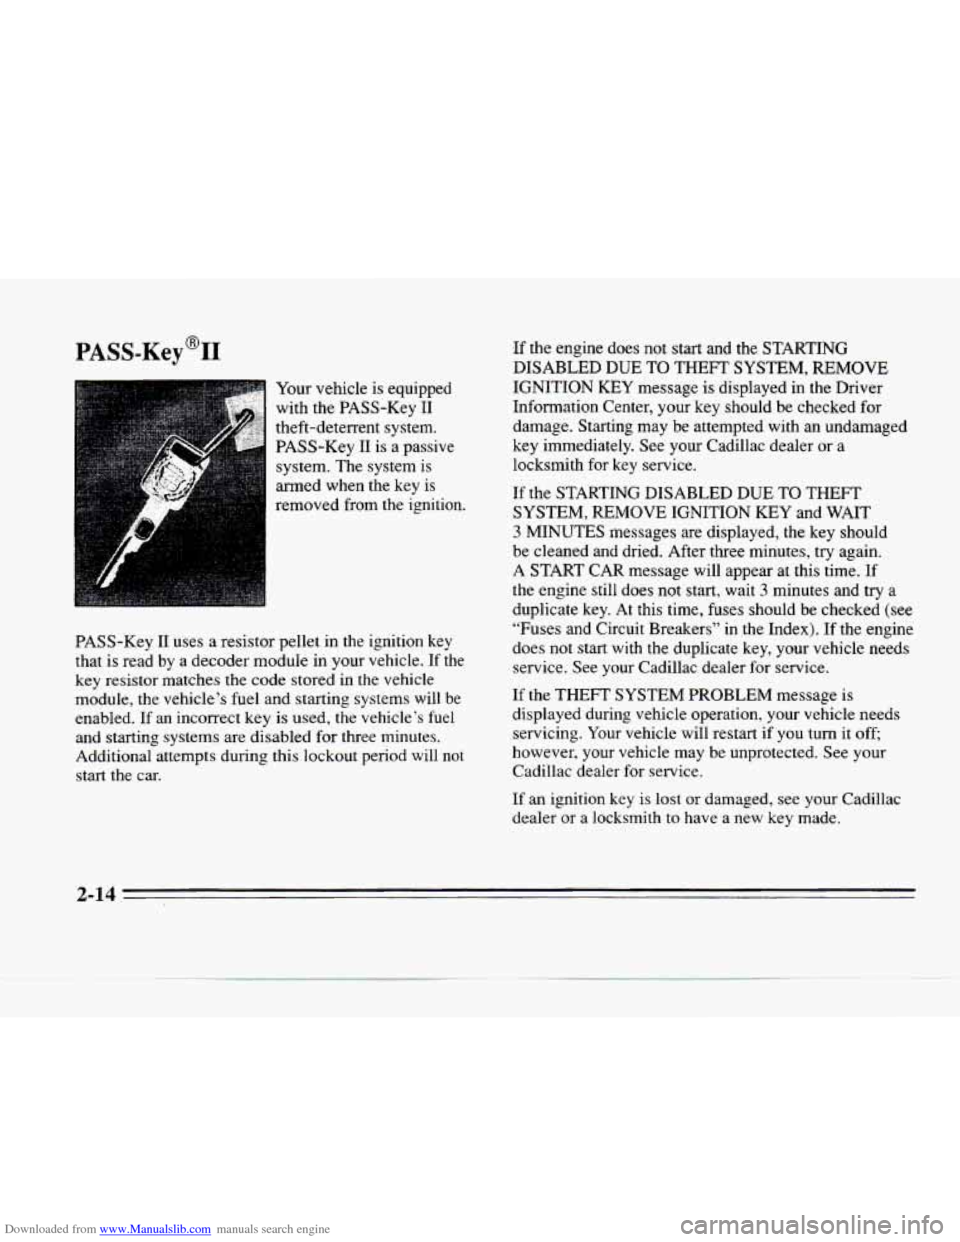
Your vehicle is equipped
with the PASS-Key I1
theft-deterrent system. PASS-Key I1 is a passive
system. The system is
armed when the key is
removed from the ignition.
PASS-Key
I1 uses a resistor pellet in the ignition key
that
is read by a decoder module in your vehicle. If the
key resistor matches the code stored in the vehicle
module, the vehicle’s fuel and starting systems
will be
enabled.
If an incorrect key is used, the vehicle’s fuel
and starting systems are disabled
for three minutes.
Additional attempts during this lockout period will not
start the car. -If
the engine does not start and the STARTING
DISABLED
DUE TO THEFT SYSTEM, REMOVE
IGNITION KEY message is displayed in the Driver
Information Center, your key should be checked for
damage. Starting may
be attempted with an undamaged
key immediately. See your Cadillac dealer or a
locksmith for key service.
If the STARTING DISABLED DUE TO THEFT
SYSTEM, REMOVE
IGNITION KEY and WAIT
3 MINUTES messages are displayed, the key should
be cleaned and dried. After three minutes, try again.
A START CAR message will appear at this time.
If
the engine still does not start, wait 3 minutes and try a
duplicate key. At this time, fuses should be checked (see
“Fuses and Circuit Breakers” in the Index). If the engine
does not start with the duplicate key, your vehicle needs
service. See your Cadillac dealer
for service.
If the THEFT SYSTEM PROBLEM message is
displayed during vehicle operation, your vehicle needs servicing. Your vehicle will restart
if you turn it off;
however, your vehicle may be unprotected. See your
Cadillac dealer for service.
If an ignition key is lost or damaged, see your Cadillac
dealer or a locksmith
to have a new key made.
2-14
Page 92 of 354
Downloaded from www.Manualslib.com manuals search engine rrr
xz
e
If the turn signal is left on, a warning chime will sound
and the
DIC will display TURN SIGNAL ON (after
driving about a mile) to remind you to turn it off.
Arrows that
flash rapidly when signaling for a turn or
lane change may be caused by
a burned out signal bulb.
Other drivers won’t see the turn signal.
Replace burned
out bulbs to help avoid possible
accidents. Check the fuse (see “Fuses and Circuit
Breakers”
in the Index) and for burned-out bulbs if the
arrow fails
to work when signaling a turn.
Headlamp High/Low Beam
Pull the turn signal lever all
the way toward you and
then release
it to change the
headlamps from low beam
to high or from high beam
to low. The blue light on the
instrument panel will be on
indicating high-beam usage.
Flash-To-Pass
This lets you use the high-beam headlamps to signal the
driver in front
of you that you want to pass. It works
even if
the headlamps are off.
Pull the turn signal lever toward you to use. When you do:
0 If the headlamps are off, the high-beam headlamps
will turn on. They’ll stay on as
long as you hold the
lever there. Release the lever to turn them off.
If the headlamps are on low beam, they will shift to
high beam and stay there. Pull
the lever toward you
to return to low beam.
0 If the headlamps are on high beam, they will switch
to low beam. To return to high beam, pull the lever
toward
you.
2-33
Page 313 of 354
Downloaded from www.Manualslib.com manuals search engine Electrical System
Add-on Electrical Equipment
NOTICE:
Don’t add anything electrical to your Cadillac
unless you check with your dealer first. Some
electrical equipment can damage your vehicle
and the damage wouldn’t be covered by your
warranty. Some add-on electrical equipment
can keep other components from working as
they should.
Your vehicle has an air bag system. Before attempting to
add anything electrical
to your Cadillac, see “Servicing
Your
Air Bag-Equipped Cadillac” in the Index.
Headlamp Wiring
The headlamp wiring has an individual fuse which is
powered by
a MaxiFuse@. An electrical overload will .
cause the lamps to go on and off, or in some cases to
remain
off. If this happens, have the headlamp wiring
checked right away.
MaxiFuse is
a registered trademark of Little
Fuse Incorporated.
Windshield Wiper Fuses
The windshield wiper motor is powered by a MaxiFuse.
If the motor overheats due to heavy snow, etc., the wipers
will stop until the motor cools. If the overload is caused
by some electrical problem, be sure to have it fixed.
Power Windows and Other Power Options
Circuit breakers protect the power windows and other
power accessories. When the current load
is too heavy,
the circuit breaker opens and closes, protecting the
circuit until the problem is fixed or
goes away.
6-54
Page 314 of 354
Downloaded from www.Manualslib.com manuals search engine c
r".
Fuses and Circuit Breakers
The wiring circuits in your vehicle are protected from
short circuits by a combination
of fuses and circuit
breakers. This greatly reduces the chance of fires caused
by electrical problems.
Look at the silver-colored band inside the fuse. If the
band is broken or melted, replace the fuse. Be sure you
replace
a bad fuse with a new one of the identical size
and rating.
If you ever have a problem on the road and don't have a
spare fuse, you can borrow one that has the same
amperage. Pick some feature of your vehicle that you
can get along without
-- like the radio or cigarette
lighter
-- and use its fuse, if it is the correct amperage.
Replace
it as soon as you can.
There
are three fuse blocks in your vehicle: the engine
compartment fuse block, the MaxiFuse relay center and
the rear compartment fuse block.
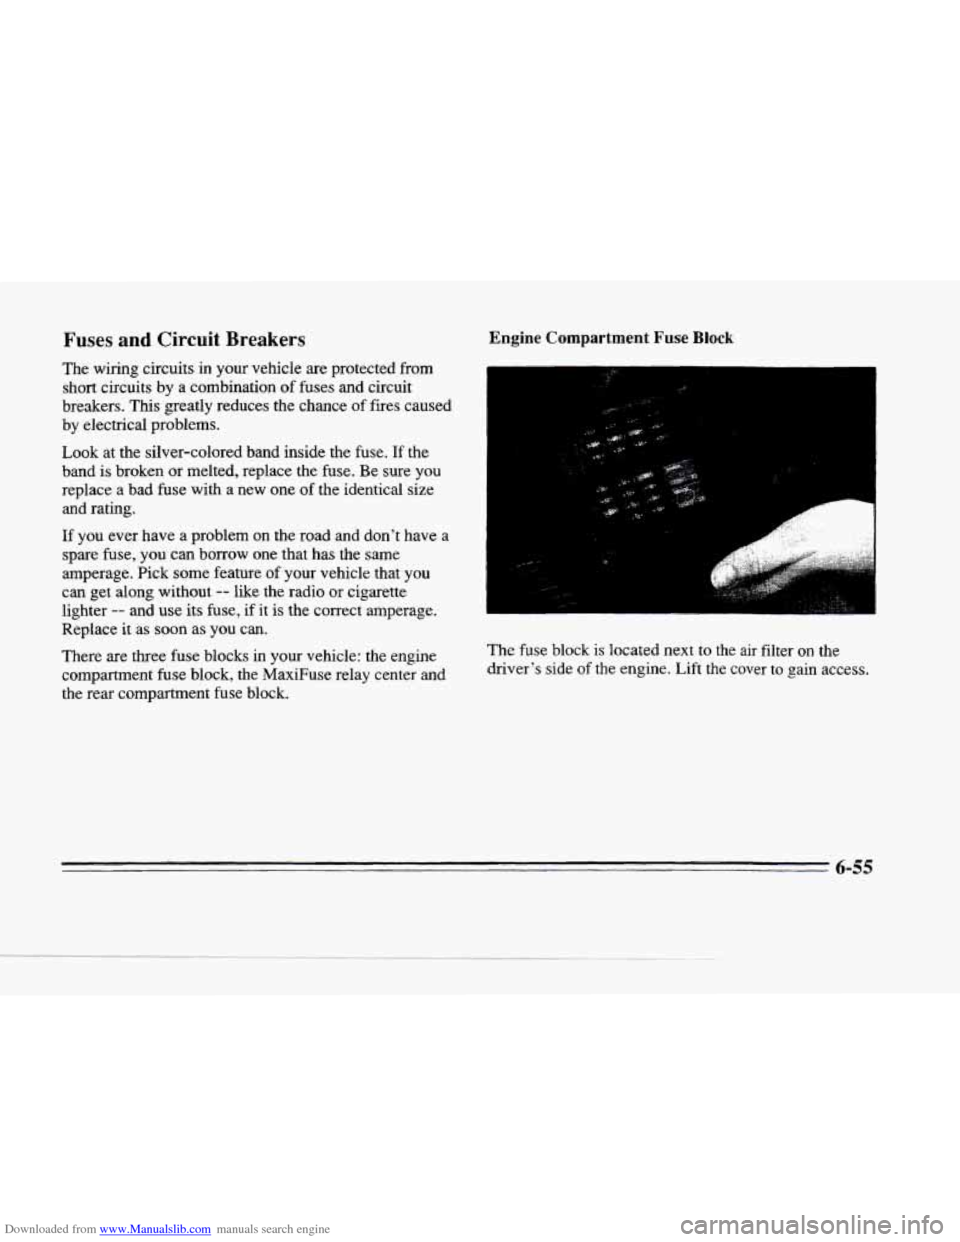
hgine Compartment Fuse Block
r-
The fuse block is located next to the air filter on the
driver's side
of the engine. Lift the cover to gain access.
6-55
Page 316 of 354
Downloaded from www.Manualslib.com manuals search engine -
Usage
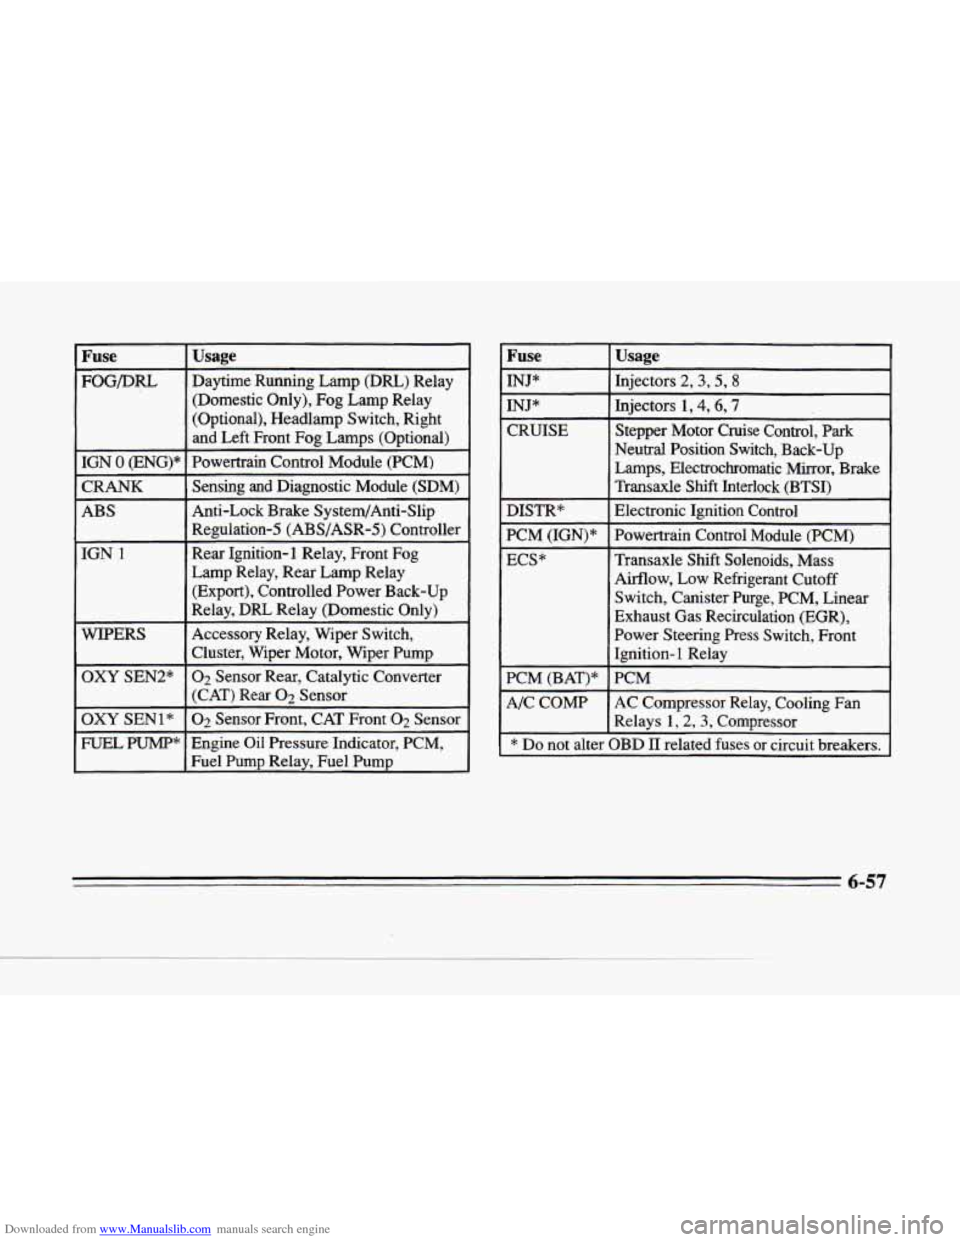
Fuse Fuse
FOG/DRL
Usage
Daytime Running Lamp (DRL) Relay
(Domestic Only),
Fog Lamp Relay
(Optional), Headlamp Switch, Right
and Left Front Fog Lamps (Optional)
~~ ~
Injectors 2,3,5,8
INJ* Injectors 1,4,6,7 -
Stepper Motor Cruise Control, Park
Neutral Position Switch, Back-up
Lamps, Electrochromatic Mirror, Brake
Transaxle Shift Interlock (BTSI)
CRUISE
I IGN 0 (ENG)* I Powertrain
Control Module (PCM) I
I CRANK I Sensing and Diagnostic Module (SDM) I - ~~
Electronic Ignition Control
I ABS I Regulation-5 (ABS/ASR-5) Controller I
Anti-Lock Brake System/Anti-Slip DISTR*
PCM (IGN)" ~
Powertrain
Control Module (PCM)
Transaxle Shift Solenoids, Mass
Airflow, Low Refrigerant Cutoff
Switch, Canister Purge, PCM, Linear
Exhaust
Gas Recirculation (EGR),
Power Steering Press Switch, Front
Ignition-
1 Relay
Rear
Ignition-1 Relay, Front Fog
Lamp Relay, Rear Lamp Relay
(Export), Controlled Power Back-up
Relay,
DRL Relay (Domestic Only)
IGN
1 ECS*
I I Cluster, Wiper
Motor, Wiper Pump I
Accessory Relay, Wiper Switch,
I
OXY SEN2* 02 Sensor Rear, Catalytic Converter
I (CAT) Rear Op Sensor I
-
PCM PCM (BAT)*
A/C COMP AC Compressor Relay, Cooling Fan
Relays
1,2,3, Compressor OXY SEN1 *
Engine Oil Pressure Indicator, PCM, FUEL PUMP"
02 Sensor Front, CAT Front 02 Sensor
Fuel Pump Relax Fuel PumD
* Do not alter OBD I1 related fuses or circuit breakers.
6-57
Page 317 of 354
Downloaded from www.Manualslib.com manuals search engine MaxiFuse/Relay Center
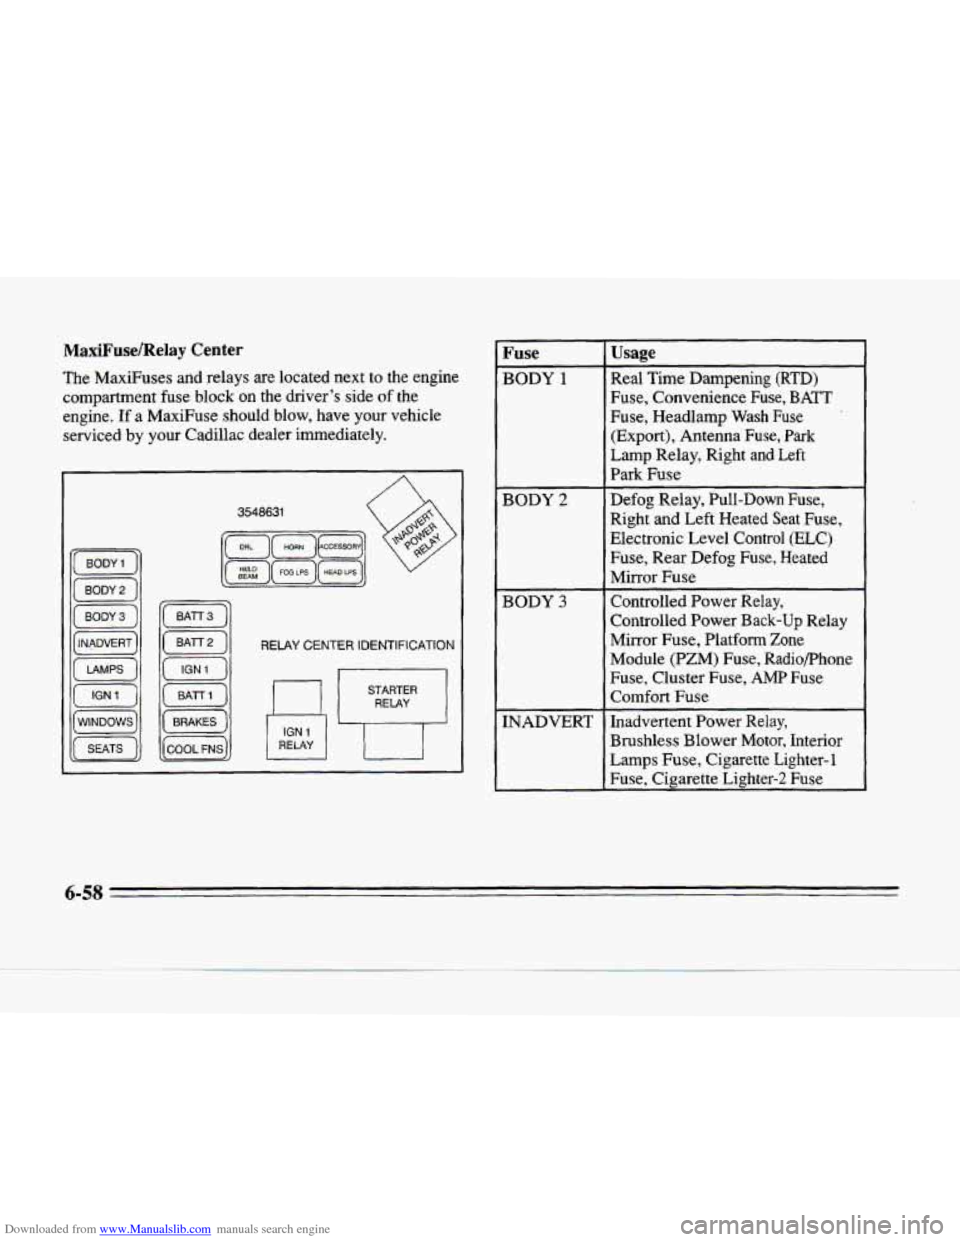
The MaxiFuses and relays are located next to the engine
compartment fuse block
on the driver’s side of the
engine. If a MaxiFuse should
blow, have your vehicle
serviced by your Cadillac dealer immediately.
RELAY CENTER IDENTIFICATION
RELAY
Fuse
BODY 1
BODY 2
BODY 3
INADVERT
Usage
Real Time Dampening (RTD)
Fuse, Convenience Fuse, BATT
Fuse, Headlamp Wash Fuse
(Export), Antenna Fuse,
Park
Lamp Relay, Right and Left
Park Fuse
Defog Relay, Pull-Down Fuse,
Right
and Left Heated Seat Fuse,
Electronic Level Control
(ELC)
Fuse, Rear Defog Fuse, Heated
Mirror Fuse
Controlled
Power Relay,
Controlled Power Back-up Relay
Mirror Fuse, Platform
Zone
Module (PZM) Fuse, Radiophone
Fuse, Cluster Fuse,
AMP Fuse
Comfort Fuse
Inadvertent Power Relay,
Brushless Blower Motor, Interior
Lamps
Fuse, Cigarette Lighter- 1
Fuse, Cigarette Lighter-2 Fuse
6-58
Page 318 of 354
Downloaded from www.Manualslib.com manuals search engine L-
c
L
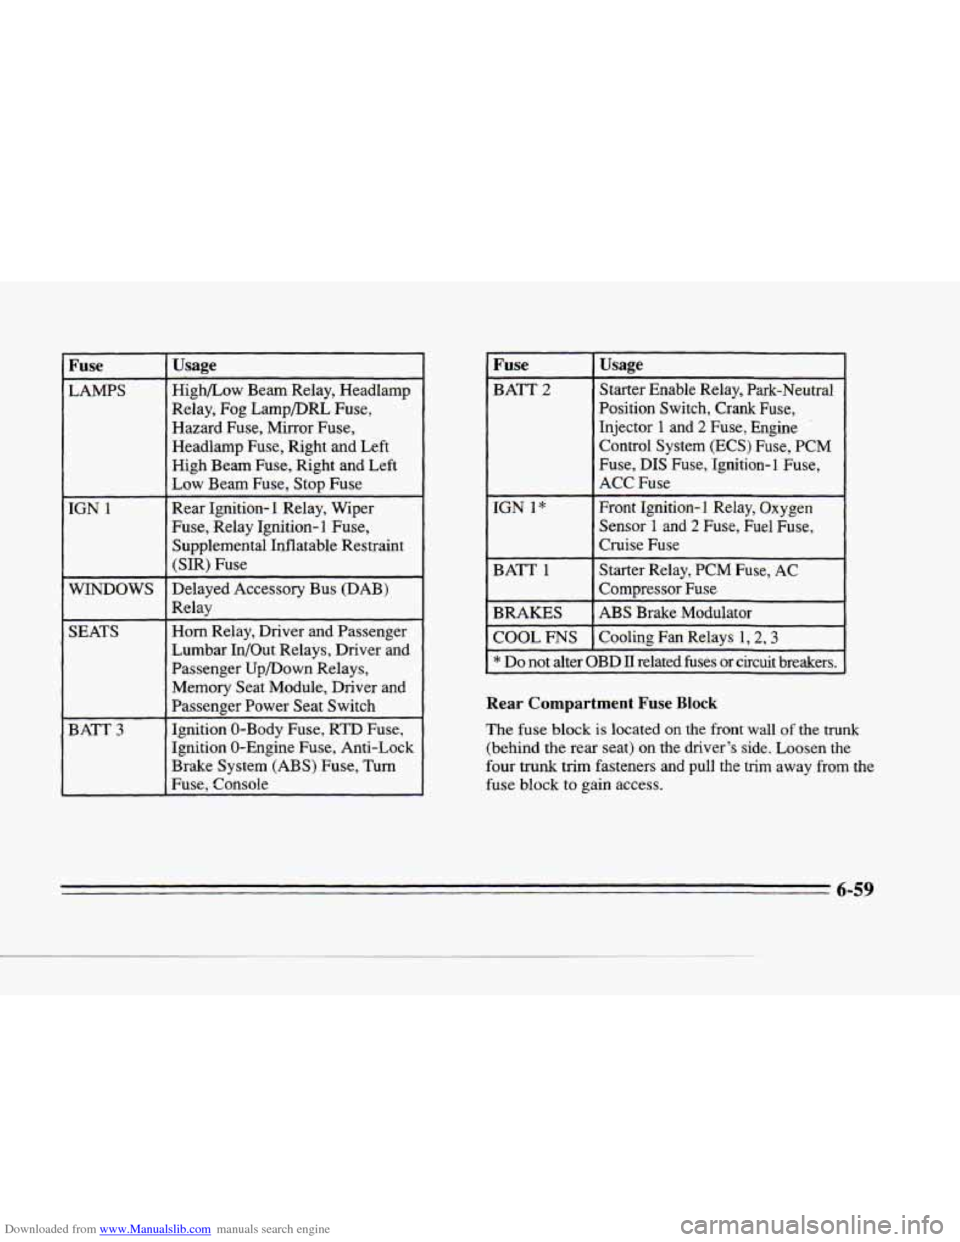
Fuse ~~
LAMPS
IGN
1
W6lDOWS
SEATS
BATT
3
Usage
Highbow Beam Relay, Headlamp
Relay, Fog Lamp/DRL Fuse,
Hazard Fuse, Mirror Fuse,
Headlamp Fuse, Right and Left
High Beam Fuse, Right and Left
Low Beam Fuse, Stop Fuse
Rear Ignition-1 Relay, Wiper
Fuse, Relay Ignition-
1 Fuse,
Supplemental Inflatable Restraint
(SIR) Fuse
Delayed Accessory Bus (DAB)
Relay
Horn Relay, Driver and Passenger
Lumbar In/Out Relays, Driver and
Passenger UpDown Relays,
Memory Seat Module, Driver and
Passenger Power Seat Switch
Ignition 0-Body Fuse,
RTD Fuse,
Ignition 0-Engine Fuse, Anti-Lock
Brake System
(ABS) Fuse, Turn
Fuse, Console
Fuse
Starter Enable Relay, Park-Neutral BATT 2
Usage
Position Switch, Crank Fuse,
Injector
1 and 2 Fuse, Engine .
Control System (ECS) Fuse, PCM
Fuse, DIS Fuse, 'Ignition-1 Fuse,
ACC Fuse
IGN
1" Front Ignition- 1 Relay, Oxygen
Sensor
1 and 2 Fuse, Fuel Fuse,
Cruise Fuse
BATT
1 Starter Relay, PCM Fuse, AC
BRAKES ABS Brake Modulator
COOL
FNS Cooling Fan Relays 1,2,3
* Do not alter OBD II related fuses or circuit breakers.
Compressor Fuse
Rear Compartment Fuse Block
The fuse block is located on the front wall of the trunk
(behind the rear seat)
on the driver's side. Loosen the
four trunk trim fasteners and pull the trim away from the
fuse block to gain access.
Page 320 of 354
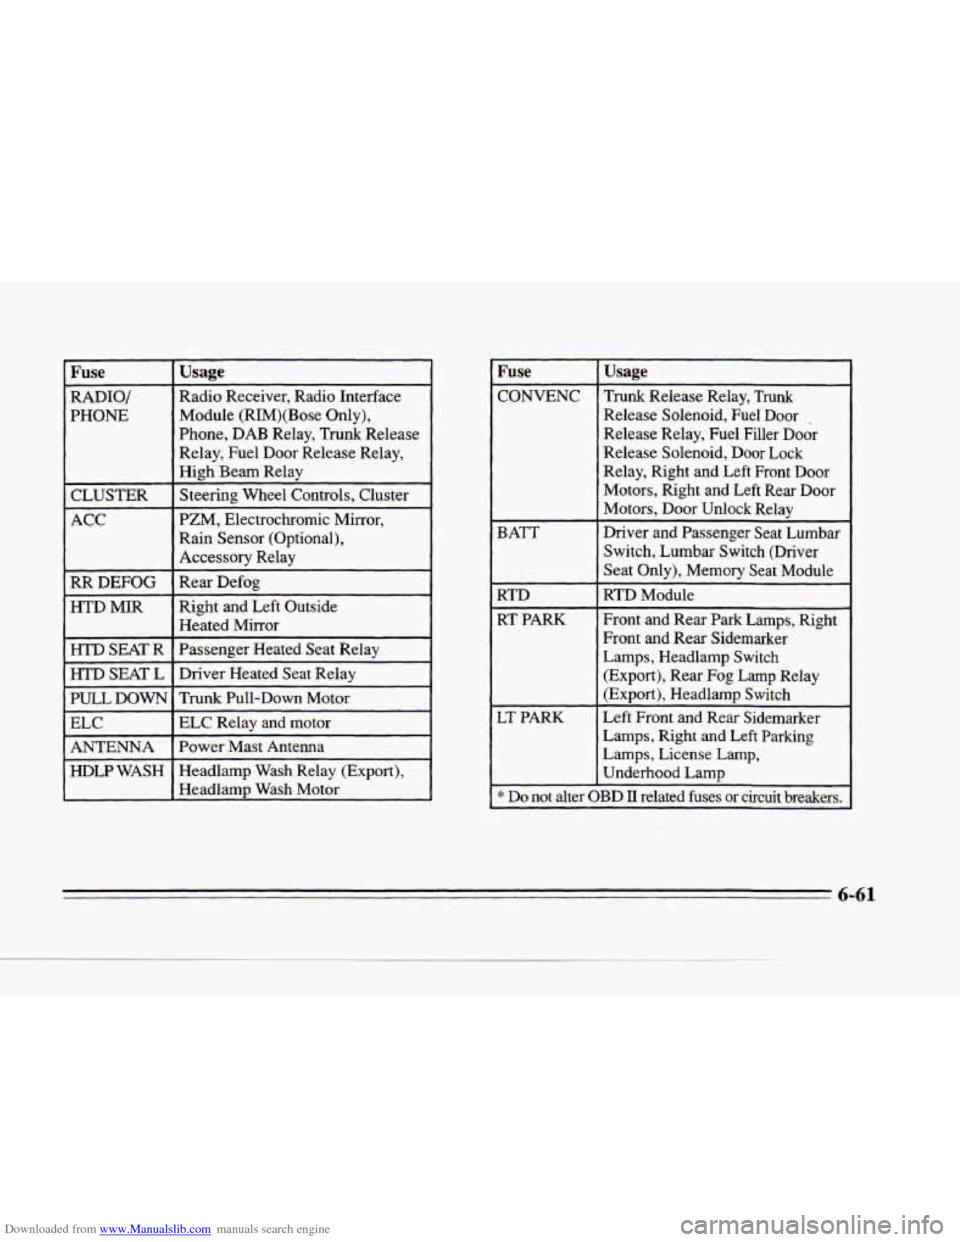
Downloaded from www.Manualslib.com manuals search engine c
Fuse
Module (RIM)(Bose Only),
PHONE Radio
Receiver, Radio Interface
RADIO/
Usage
Phone, DAB Relay, Trunk Release
Relay, Fuel Door Release Relay,
High Beam Relay
CLUSTER Steering
Wheel Controls, Cluster
ACC PZM,
Electrochromic Mirror,
Rain Sensor (Optional),
Accessory Relay
RR DEFOG Rear
Defog
HTD
MIR Right and Left Outside
Heated Mirror
HTD SEAT R Passenger Heated Seat Relay
HTD
SEAT L Driver
Heated Seat Relay
PULL
DOWN
ELC Relay and motor ELC
Trunk Pull-Down Motor
Headlamp Wash Relay (Export),
HDLP WASH Power
Mast Antenna
ANTENNA
Headlamp Wash Motor
Fuse
CONVENC
BATT
RTD
RT PARK
LT PARK
Usage
Trunk Release Relay, Trunk
Release Solenoid, Fuel Door .
Release Relay, Fuel Filler Door
Release Solenoid, Door Lock
Relay, Right and Left Front Door
Motors, Right and Left Rear Door
Motors, Door Unlock Relay
Driver and Passenger Seat Lumbar
Switch, Lumbar Switch (Driver
Seat Only), Memory Seat Module
RTD Module
Front and Rear Park Lamps, Right
Front
and Rear Sidemarker
Lamps, Headlamp Switch
(Export), Rear Fog Lamp Relay
(Export), Headlamp Switch
Left Front
and Rear Sidemarker
Lamps, Right
and Left Parking
Lamps, License Lamp,
Underhood Lamp
* Do not alter OBD II related fuses or circuit breakers.
~~
Page 343 of 354
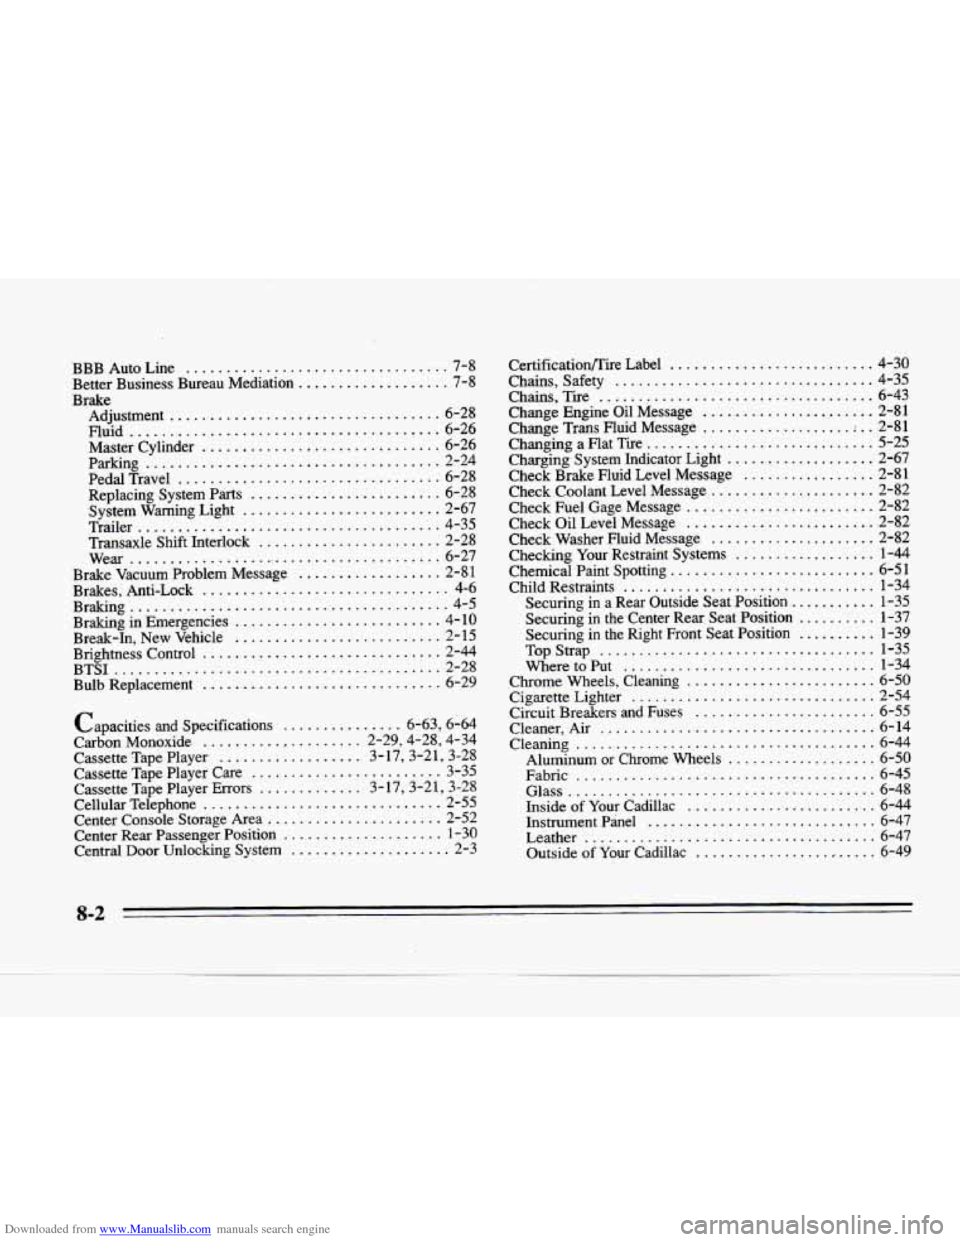
Downloaded from www.Manualslib.com manuals search engine BBB Auto Line ................................. 7-8
Better Business Bureau Mediation
................... 7-8
Adjustment
.................................. 6-28
Master Cylinder
.............................. 6-26
Replacing System
Parts ........................ 6-28
System Warning Light
......................... 2-67
Trailer
...................................... 4-35
Transaxle Shift Interlock
....................... 2-28
Brake Vacuum Problem Message
.................. 2-81
Brakes, Anti-Lock
............................... 4-6
Braking in Emergencies
.......................... 4-10
Brightness Control
.............................. 2-44
BTSJ
......................................... 2-28
Bulb Replacement
.............................. 6-29
Brake
Fluid ....................................... 6-26
Parking
..................................... 2-24
PedalTravel
................................. 6-28
Wear
........................................ 6-27
Braking
........................................ 4-5
Break-In, New Vehicle
........................... 2- 15
Capacities
and Specifications ............... 6.63. 6.64
Carbon Monoxide
.................... 2.29.4.28. 4.34
Cassette Tape Player
.................. 3.17.3.21. 3.28
Cassette Tape Player Care
........................ 3-35
Cassette Tape Player Errors
............. 3.17.3.21. 3.28
Cellular Telephone
.............................. 2-55
Center Console Storage Area
...................... 2-52
Center
Rear Passenger Position .................... 1-30
Central Door Unlocking System
.................... 2-3
CertificationEire Label .......................... 4-30
Chains. Safety
................................. 4-35
Change Engine Oil Message
....................... 2-81
Changing a Flat Tire
............................. 5-25
Charging System Indicator Light
................... 2-67
Check Brake Fluid Level Message
................. 2-81
Check Coolant Level Message
..................... 2-82
Check Fuel Gage Message
........................ 2-82
Check Oil Level Message
......................... 2-82
Checking Your Restraint Systems
.................. 1-44
Chemical Paint Spotting
.......................... 6-51
Child Restraints
................................ 1-34
Securing in the Center Rear Seat Position
.......... 1-37
Securing
in the Right Front Seat Position .......... 1-39
Chrome Wheels, Cleaning
........................ 6-50
Cigarette Lighter
............................... 2-54
Circuit Breakers and Fuses
....................... 6-55
Cleaner, Air
................................... 6-14
Cleaning ...................................... 6-44
Aluminum
or Chrome Wheels ................... 6-50
Fabric
...................................... 6-45
Glass
....................................... 6-48
Inside
of Your Cadillac ........................ 6-44
Instrument Panel ............................. 6-47
Leather
..................................... 6-47
Outside
of Your Cadillac ........................ 6-49
Chains.
Tire
................................... 6-43
Change
Trans Fluid Message ................... ; .. 2-81
Check Washer Fluid Message
..................... 2-82
Securing
in a Rear Outside Seat Position ........... 1-35
TopStrap
................................... 1-35
Wheretoput
................................ 1-34
8-2