spare tire CADILLAC SEVILLE 2003 5.G Owners Manual
[x] Cancel search | Manufacturer: CADILLAC, Model Year: 2003, Model line: SEVILLE, Model: CADILLAC SEVILLE 2003 5.GPages: 408, PDF Size: 2.72 MB
Page 262 of 408

Buying New Tires.........................................5-68
Uniform Tire Quality Grading..........................5-69
Wheel Alignment and Tire Balance..................5-71
Wheel Replacement......................................5-71
Tire Chains..................................................5-72
If a Tire Goes Flat........................................5-73
Changing a Flat Tire.....................................5-74
Compact Spare Tire......................................5-83
Appearance Care............................................5-83
Cleaning the Inside of Your Vehicle.................5-84
Care of Safety Belts......................................5-86
Weatherstrips...............................................5-86
Cleaning the Outside of Your Vehicle..............5-86
Sheet Metal Damage.....................................5-88
Finish Damage.............................................5-89
Underbody Maintenance................................5-89Chemical Paint Spotting.................................5-89
Vehicle Care/Appearance Materials..................5-90
Vehicle Identi®cation......................................5-91
Vehicle Identi®cation Number (VIN).................5-91
Service Parts Identi®cation Label.....................5-92
Electrical System............................................5-92
Add-On Electrical Equipment..........................5-92
Headlamp Wiring..........................................5-92
Windshield Wiper Fuses................................5-92
Power Windows and Other Power Options.......5-92
Fuses and Circuit Breakers............................5-93
Removing the Rear Seat Cushion...................5-96
Capacities and Speci®cations........................5-100
Normal Maintenance Replacement Parts.........5-101
Section 5 Service and Appearance Care
5-2
Page 320 of 408
Center High-Mounted
Stoplamp (CHMSL)
It is recommended that this component be replaced as
a unit. See your dealer.
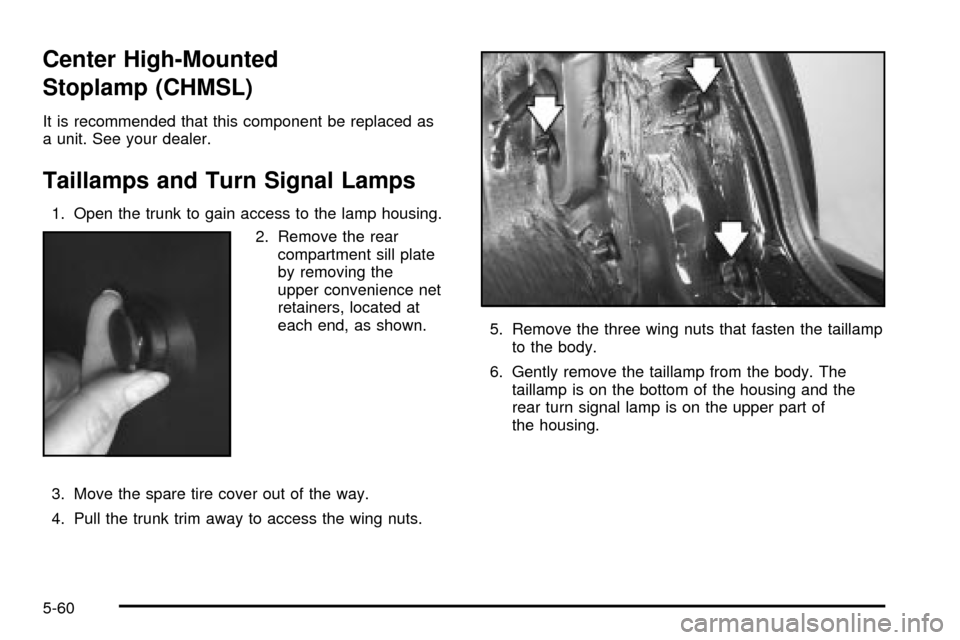
Taillamps and Turn Signal Lamps
1. Open the trunk to gain access to the lamp housing.
2. Remove the rear
compartment sill plate
by removing the
upper convenience net
retainers, located at
each end, as shown.
3. Move the spare tire cover out of the way.
4. Pull the trunk trim away to access the wing nuts.5. Remove the three wing nuts that fasten the taillamp
to the body.
6. Gently remove the taillamp from the body. The
taillamp is on the bottom of the housing and the
rear turn signal lamp is on the upper part of
the housing.
5-60
Page 325 of 408

When to Check
Check your tires once a month or more.
Don't forget your compact spare tire. It should be at
60 psi (420 kPa).
How to Check
Use a good quality pocket-type gage to check tire
pressure. You can't tell if your tires are properly in¯ated
simply by looking at them. Radial tires may look
properly in¯ated even when they're underin¯ated.
Be sure to put the valve caps back on the valve stems.
They help prevent leaks by keeping out dirt and
moisture.
Tire Pressure Monitor System
Your vehicle may have a Tire Pressure Monitor System
(TPM). The TPM system uses radio and sensor
technology to check tire pressure levels. Sensors,
mounted on each road wheel, transmit tire pressure
readings to a receiver located in the trunk. Tire pressure
status and tire pressure warnings are shown on the
Driver Information Center (DIC) display. See
Driver
Information Center (DIC) on page 3-53, for details
regarding DIC controls and displays.The system operates on a radio frequency subject to
Federal Communications Commission (FCC) Rules and
with Industry and Science Canada.
This device complies with Part 15 of the FCC Rules.
Operation is subject to the following two conditions:
(1) this device may not cause harmful interference, and
(2) this device must accept any interference received,
including interference that may cause undesired
operation.
This device complies with RSS-210 of Industry and
Science Canada. Operation is subject to the following
two conditions: (1) this device may not cause
interference, and (2) this device must accept any
interference received, including interference that may
cause undesired operation of the device.
Changes or modi®cations to this system by anyone
other than an authorized service facility could void
authorization to use this equipment.
5-65
Page 326 of 408

If the TPM system detects low tire pressure, below
25 psi (172 kPa), or high tire pressure, above 38 psi
(262 kPa), a message, CHECK TIRE PRESSURE, will
appear on the Driver Information Center (DIC)
display. By pressing the INFO button, the DIC screen
will show which tire(s) has the low or high pressure
condition. See
In¯ation -- Tire Pressure on page 5-64for
information regarding correct tire in¯ation. If a tire is
low, you should stop as soon as possible and check all
your tires for damage. If a tire is ¯at, see
If a Tire
Goes Flat on page 5-73.
Notice:Do not use a tire sealant if your vehicle is
equipped with Tire Pressure Monitors. The liquid
sealant can damage the tire pressure monitor
sensors.
Once a low or high tire pressure condition is detected,
the TPM system will display the CHECK TIRE
MESSAGE each time the engine is started, until the
tire(s) are set to the correct in¯ation pressure.
The Tire-Loading Information Label, which is located on
the rear edge of the driver's door, shows the correct
in¯ation pressure for the tires on your vehicle.
The TPM system also allows the driver to check the air
pressure status of each road tire using the Driver
Information Center (DIC). Each tire's air pressure will belisted individually, in the following order: LF (left front or
driver's side front tire), RF (right front or passenger's
side front tire), RR (right rear or passenger's side
rear tire) and LR (left rear or driver's side rear tire). See
In¯ation -- Tire Pressure on page 5-64for information
regarding correct tire in¯ation. Also, seeDriver
Information Center (DIC) on page 3-53for information
on the DIC controls and displays.
If the DIC display doesn't show tire pressures or the
SERVICE TPM SYSTEM message appears, see
your dealer for service. The TPM system may not work
properly while the compact spare tire is installed.
Anytime you replace one or more tires or rotate your
tires, the TPM system will need to be reset. A special
tool is needed to reset the sensor identi®cation
codes. See your dealer for service.
Your vehicle was delivered from the factory with
aluminum valve stem caps. If you ever have to replace
the valve stem caps on your vehicle, you should
replace them with aluminum or plastic caps.
The TPM system can alert you about a low or high tire
pressure condition, but it doesn't replace normal tire
maintenance. See
Tires on page 5-63.
5-66
Page 327 of 408
Tire Inspection and Rotation
Tires should be rotated every 7,500 miles (12 500 km).
Any time you notice unusual wear, rotate your tires
as soon as possible and check wheel alignment. Also
check for damaged tires or wheels. See
When It Is Time
for New Tires on page 5-68andWheel Replacement
on page 5-71for more information.
The purpose of regular rotation is to achieve more
uniform wear for all tires on the vehicle. The ®rst rotation
is the most important. See
Part A: Scheduled
Maintenance Services on page 6-4for scheduled
rotation intervals.
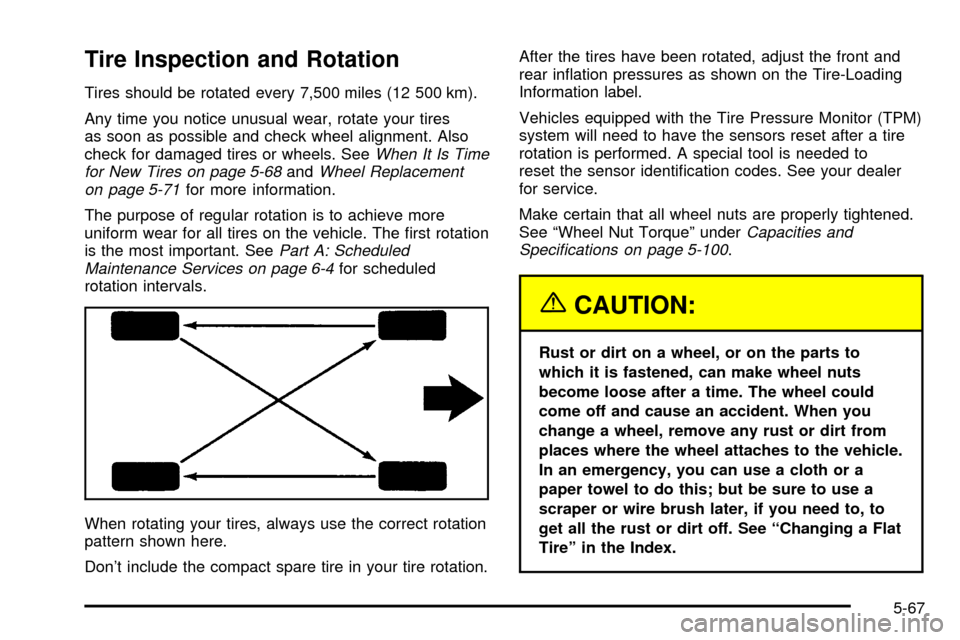
When rotating your tires, always use the correct rotation
pattern shown here.
Don't include the compact spare tire in your tire rotation.After the tires have been rotated, adjust the front and
rear in¯ation pressures as shown on the Tire-Loading
Information label.
Vehicles equipped with the Tire Pressure Monitor (TPM)
system will need to have the sensors reset after a tire
rotation is performed. A special tool is needed to
reset the sensor identi®cation codes. See your dealer
for service.
Make certain that all wheel nuts are properly tightened.
See ªWheel Nut Torqueº under
Capacities and
Speci®cations on page 5-100.
{CAUTION:
Rust or dirt on a wheel, or on the parts to
which it is fastened, can make wheel nuts
become loose after a time. The wheel could
come off and cause an accident. When you
change a wheel, remove any rust or dirt from
places where the wheel attaches to the vehicle.
In an emergency, you can use a cloth or a
paper towel to do this; but be sure to use a
scraper or wire brush later, if you need to, to
get all the rust or dirt off. See ªChanging a Flat
Tireº in the Index.
5-67
Page 329 of 408
{CAUTION:
Mixing tires could cause you to lose control
while driving. If you mix tires of different sizes
or types (radial and bias-belted tires), the
vehicle may not handle properly, and you
could have a crash. Using tires of different
sizes may also cause damage to your vehicle.
Be sure to use the same size and type tires on
all wheels. It's all right to drive with your
compact spare temporarily, it was developed
for use on your vehicle. See ªCompact Spare
Tireº in the index.
{CAUTION:
If you use bias-ply tires on your vehicle, the
wheel rim ¯anges could develop cracks after
many miles of driving. A tire and/or wheel
could fail suddenly, causing a crash. Use only
radial-ply tires with the wheels on your vehicle.
Uniform Tire Quality Grading
Quality grades can be found where applicable on the
tire sidewall between tread shoulder and maximum
section width. For example:
Treadwear 200 Traction AA Temperature A
The following information relates to the system
developed by the United States National Highway
Traffic Safety Administration, which grades tires by
treadwear, traction and temperature performance. (This
applies only to vehicles sold in the United States.)
The grades are molded on the sidewalls of most
passenger car tires. The Uniform Tire Quality Grading
system does not apply to deep tread, winter-type
snow tires, space-saver or temporary use spare tires,
tires with nominal rim diameters of 10 to 12 inches
(25 to 30 cm), or to some limited-production tires.
While the tires available on General Motors passenger
cars and light trucks may vary with respect to these
grades, they must also conform to federal safety
requirements and additional General Motors Tire
Performance Criteria (TPC) standards.
5-69
Page 335 of 408
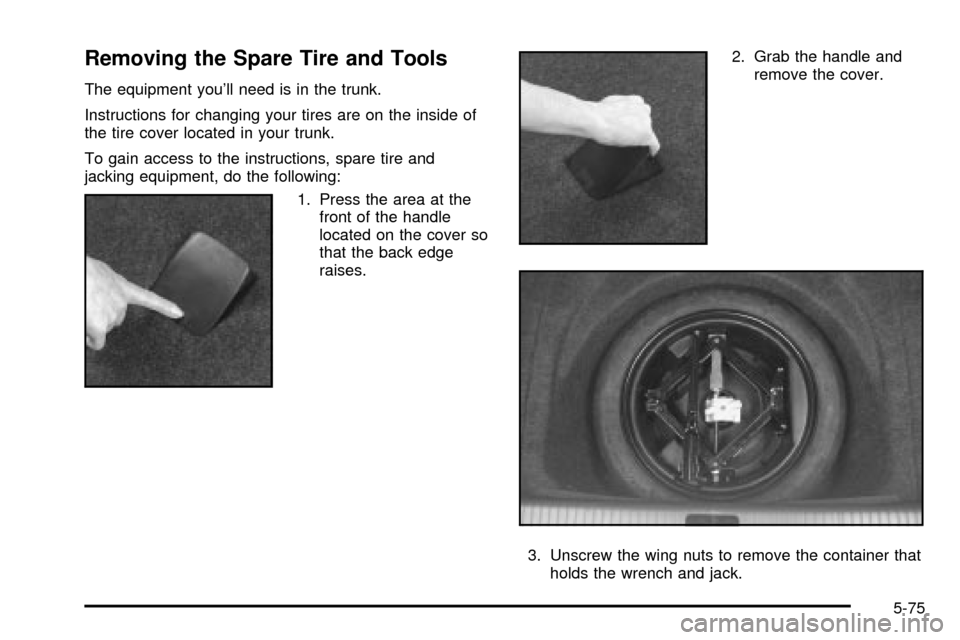
Removing the Spare Tire and Tools
The equipment you'll need is in the trunk.
Instructions for changing your tires are on the inside of
the tire cover located in your trunk.
To gain access to the instructions, spare tire and
jacking equipment, do the following:
1. Press the area at the
front of the handle
located on the cover so
that the back edge
raises.2. Grab the handle and
remove the cover.
3. Unscrew the wing nuts to remove the container that
holds the wrench and jack.
5-75
Page 336 of 408
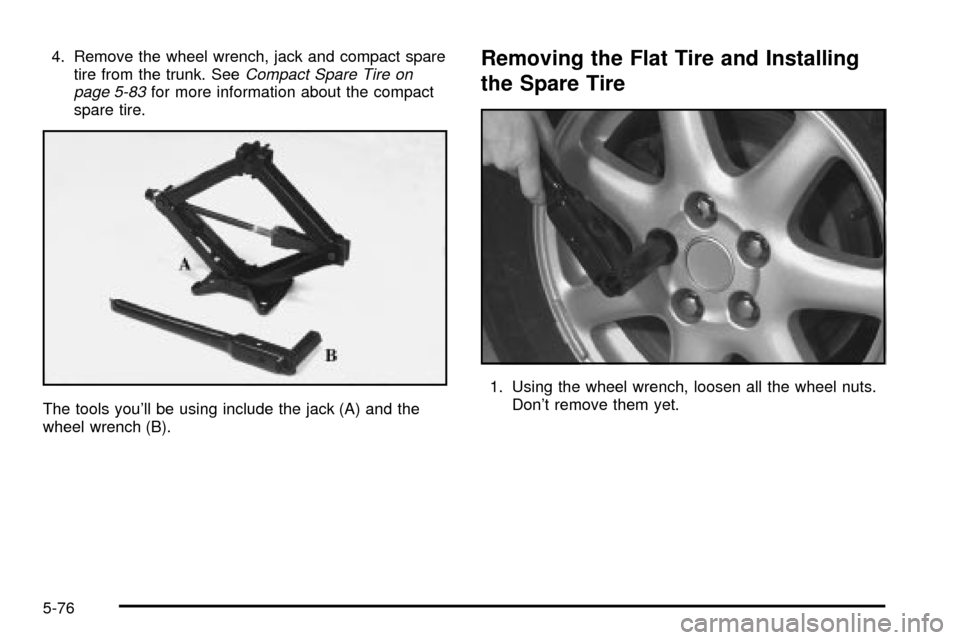
4. Remove the wheel wrench, jack and compact spare
tire from the trunk. SeeCompact Spare Tire on
page 5-83for more information about the compact
spare tire.
The tools you'll be using include the jack (A) and the
wheel wrench (B).
Removing the Flat Tire and Installing
the Spare Tire
1. Using the wheel wrench, loosen all the wheel nuts.
Don't remove them yet.
5-76
Page 338 of 408
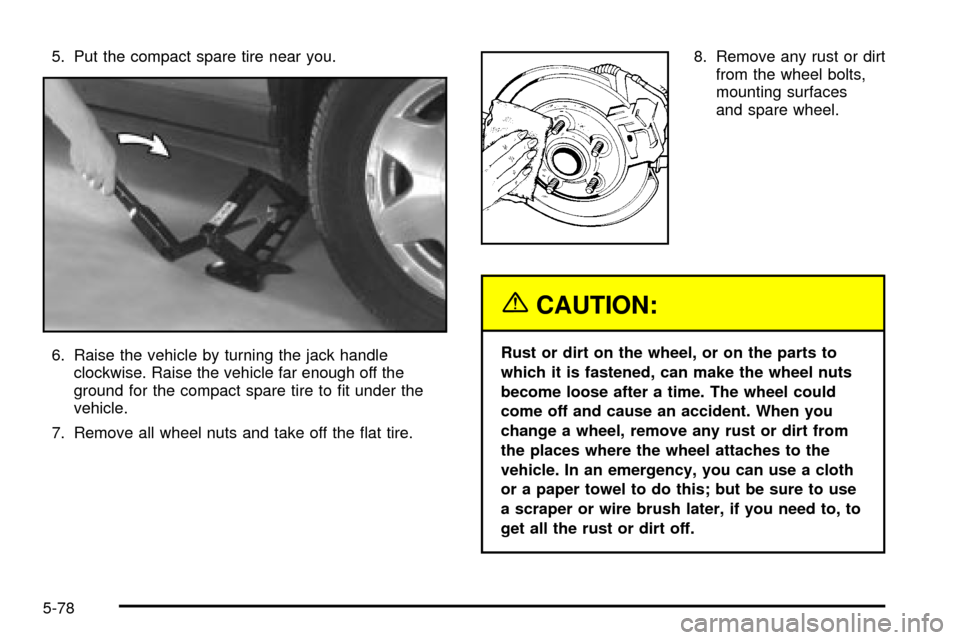
5. Put the compact spare tire near you.
6. Raise the vehicle by turning the jack handle
clockwise. Raise the vehicle far enough off the
ground for the compact spare tire to ®t under the
vehicle.
7. Remove all wheel nuts and take off the ¯at tire.8. Remove any rust or dirt
from the wheel bolts,
mounting surfaces
and spare wheel.
{CAUTION:
Rust or dirt on the wheel, or on the parts to
which it is fastened, can make the wheel nuts
become loose after a time. The wheel could
come off and cause an accident. When you
change a wheel, remove any rust or dirt from
the places where the wheel attaches to the
vehicle. In an emergency, you can use a cloth
or a paper towel to do this; but be sure to use
a scraper or wire brush later, if you need to, to
get all the rust or dirt off.
5-78
Page 339 of 408
{CAUTION:
Never use oil or grease on studs or nuts. If
you do, the nuts might come loose. Your wheel
could fall off, causing a serious accident.
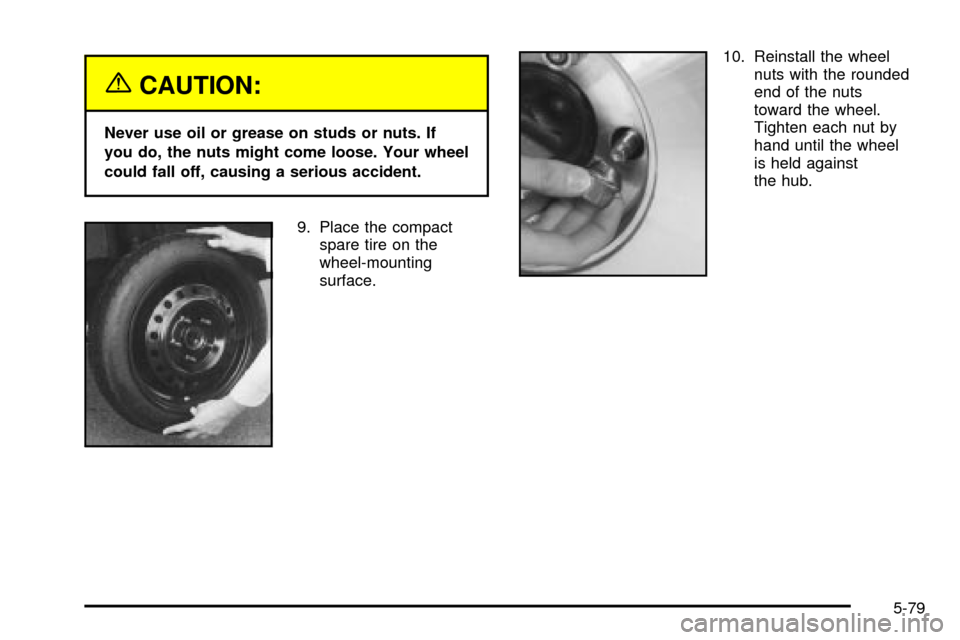
9. Place the compact
spare tire on the
wheel-mounting
surface.10. Reinstall the wheel
nuts with the rounded
end of the nuts
toward the wheel.
Tighten each nut by
hand until the wheel
is held against
the hub.
5-79