battery CADILLAC SEVILLE 2004 5.G Owners Manual
[x] Cancel search | Manufacturer: CADILLAC, Model Year: 2004, Model line: SEVILLE, Model: CADILLAC SEVILLE 2004 5.GPages: 410, PDF Size: 2.64 MB
Page 55 of 410
CAUTION: (Continued)
To avoid this, everyone in the vehicle should
get out as soon as it is safe to do so. If you
have breathing problems but can’t get out of
the vehicle after an air bag inflates, then get
fresh air by opening a window or a door. If you
experience breathing problems following an air
bag deployment, you should seek medical
attention.
Your vehicle has a feature that will automatically unlock
the doors and turn the interior lamps on when the air
bags inflate (if battery power is available). You can lock
the doors again and turn the interior lamps off by
using the door lock and interior lamp controls.
In many crashes severe enough to inflate an air bag,
windshields are broken by vehicle deformation.
Additional windshield breakage may also occur from the
right front passenger air bag.
•Air bags are designed to inflate only once. After an
air bag inflates, you’ll need some new parts for your
air bag system. If you don’t get them, the air bag
system won’t be there to help protect you in another
crash. A new system will include air bag modules
and possibly other parts. The service manual for your
vehicle covers the need to replace other parts.
•Your vehicle is equipped with a crash sensing and
diagnostic module, which records information about
the frontal air bag system. The module records
information about the readiness of the system, when
the system commands air bag inflation and driver’s
safety belt usage at deployment. The module also
records speed, engine rpm, brake and throttle data.
•Let only qualified technicians work on your air bag
systems. Improper service can mean that an air bag
system won’t work properly. See your dealer for
service.
Notice:If you damage the covering for the driver’s
or the right front passenger’s air bag, or the air
bag covering on the driver’s and right front
passenger’s seatback, the bag may not work
properly. You may have to replace the air bag
module in the steering wheel, both the air bag
module and the instrument panel for the right front
passenger’s air bag, or both the air bag module
and seatback for the driver’s and right front
passenger’s side impact air bag. Do not open or
break the air bag coverings.
1-49
Page 56 of 410
Servicing Your Air Bag-Equipped
Vehicle
Air bags affect how your vehicle should be serviced.
There are parts of the air bag systems in several places
around your vehicle. Your dealer and the service
manual have information about servicing your vehicle
and the air bag systems. To purchase a service manual,
seeService Publications Ordering Information on
page 7-12.
{CAUTION:
For up to 10 seconds after the ignition key is
turned off and the battery is disconnected, an
air bag can still inflate during improper
service. You can be injured if you are close to
an air bag when it inflates. Avoid yellow
connectors. They are probably part of the air
bag system. Be sure to follow proper service
procedures, and make sure the person
performing work for you is qualified to do so.
The air bag systems do not need regular maintenance.
Restraint System Check
Checking Your Restraint Systems
Now and then, make sure the safety belt reminder light
and all your belts, buckles, latch plates, retractors
and anchorages are working properly. Look for any other
loose or damaged safety belt system parts. If you see
anything that might keep a safety belt system from doing
its job, have it repaired.
Torn or frayed safety belts may not protect you in a
crash. They can rip apart under impact forces. If a belt
is torn or frayed, get a new one right away.
Also look for any opened or broken air bag covers, and
have them repaired or replaced. (The air bag system
does not need regular maintenance.)
1-50
Page 63 of 410
Remote Keyless Entry System
Your keyless entry system operates on a radio
frequency subject to Federal Communications
Commission (FCC) Rules and with Industry Canada.
This device complies with Part 15 of the FCC Rules.
Operation is subject to the following two conditions:
1. This device may not cause interference, and
2. This device must accept any interference received,
including interference that may cause undesired
operation of the device.
This device complies with RSS-210 of Industry Canada.
Operation is subject to the following two conditions:
1. This device may not cause interference, and
2. This device must accept any interference received,
including interference that may cause undesired
operation of the device.
Changes or modifications to this system by other than
an authorized service facility could void authorization to
use this equipment.At times you may notice a decrease in range. This is
normal for any remote keyless entry system. If the
transmitter does not work or if you have to stand closer
to your vehicle for the transmitter to work, try this:
•Check the distance. You may be too far from your
vehicle. You may need to stand closer during
rainy or snowy weather.
•Check the location. Other vehicles or objects may
be blocking the signal. Take a few steps to the
left or right, hold the transmitter higher, and
try again.
•Check to determine if battery replacement is
necessary. See “Battery Replacement” under
Remote Keyless Entry System Operation on
page 2-6.
•If you are still having trouble, see your dealer or a
qualified technician for service.
2-5
Page 66 of 410
Battery Replacement
Under normal use, the battery in your remote keyless
entry transmitter should last about four years.
You can tell the battery is weak if the transmitter will not
work at the normal range in any location. If you have
to get close to your vehicle before the transmitter works,
it is probably time to change the battery.
Notice:When replacing the battery, use care not to
touch any of the circuitry. Static from your body
transferred to these surfaces may damage the
transmitter.
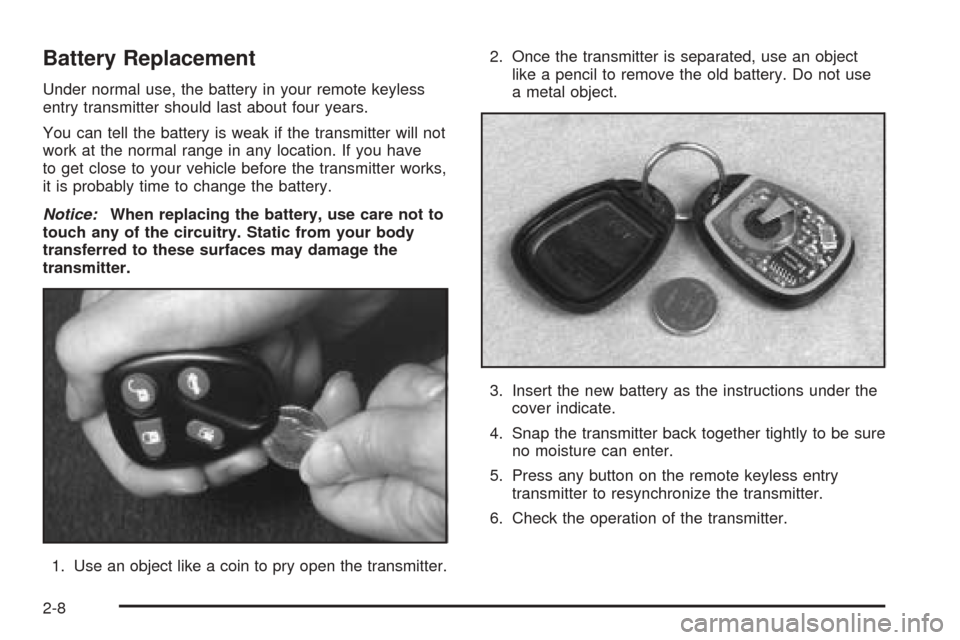
1. Use an object like a coin to pry open the transmitter.2. Once the transmitter is separated, use an object
like a pencil to remove the old battery. Do not use
a metal object.
3. Insert the new battery as the instructions under the
cover indicate.
4. Snap the transmitter back together tightly to be sure
no moisture can enter.
5. Press any button on the remote keyless entry
transmitter to resynchronize the transmitter.
6. Check the operation of the transmitter.
2-8
Page 76 of 410
Programming the Power Windows
If the battery on your vehicle has been recharged,
disconnected or is not working, you will need to
reprogram each front power window for the express-up
feature to work. Before reprogramming, you will need
to replace or recharge your vehicle’s battery.
To program each front window, follow these steps:
1. With the ignition in ACC or ON, or when RAP is
active, close all doors.
2. Press and hold the down arrow on the power
window switch until the window has fully opened.
3. Press the up arrow on the power window switch
until the window is fully closed.
4. Continue holding the switch up for approximately
two seconds after the window is completely
closed.
The window is now programmed. Repeat the process
for the other front window.
Anti-Pinch Feature
If a hand, an arm or another object is above the middle
of the window and is in the path of the window when
the express-up feature is active, the window will stop at
the obstruction and express-open to a preset factory
position.
{CAUTION:
Pressing and holding the power window
control will turn off the anti-pinch feature. If
this happens, a power window won’t stop if
something gets in the way. You or others
could be injured, and your window could be
damaged. Be careful not to press and hold the
power window control.
2-18
Page 84 of 410
Starting Your Engine
Move your shift lever to PARK (P) or NEUTRAL (N).
Your engine will not start in any other position – that is
a safety feature. To restart when you are already
moving, use NEUTRAL (N) only.
Notice:Shifting into PARK (P) with the vehicle
moving could damage the transaxle. Shift into
PARK (P) only when your vehicle is stopped.
1. With your foot off the accelerator pedal, turn your
ignition key to START. When the engine starts, let
go of the key. The idle speed will go down as
your engine gets warm.
Notice:Holding your key in START for longer than
15 seconds at a time will cause your battery to
be drained much sooner. And the excessive heat
can damage your starter motor. Wait about 15
seconds between each try to help avoid draining
your battery or damaging your starter.
2. If it does not start within 10 seconds, hold your key
in START for about 10 seconds at a time until your
engine starts. Wait about 15 seconds between
each try.3. If your engine still will not start, or starts but then
stops, it could be flooded with too much gasoline.
Try pushing your accelerator pedal all the way to the
floor and holding it there as you hold the key in
START for about three seconds. If the vehicle starts
briefly but then stops again, do the same thing.
Notice:Your engine is designed to work with the
electronics in your vehicle. If you add electrical
parts or accessories, you could change the way the
engine operates. Before adding electrical equipment,
check with your dealer. If you do not, your engine
might not perform properly.
2-26
Page 104 of 410
Be sure that people and objects are clear of the garage
door or gate operator you are programming. When
programming a garage door, it is advised to park outside
of the garage.
It is recommended that a new battery be installed in
your hand-held transmitter for quicker and more
accurate transmission of the radio frequency.
Your vehicle’s engine should be turned off while
programming the transmitter. Follow these steps to
program up to three channels:
1. Press and hold down the two outside buttons,
releasing only when the indicator light begins to
flash, after 20 seconds. Do not hold down the
buttons for longer than 30 seconds and do not
repeat this step to program a second and/or third
transmitter to the remaining two HomeLink
®buttons.
2. Position the end of your hand-held transmitter about
1 to 3 inches (3 to 8 cm) away from the HomeLink
®
buttons while keeping the indicator light in view.
3. Simultaneously press and hold both the desired
button on HomeLink
®and the hand-held transmitter
button. Do not release the buttons until Step 4
has been completed.
Some entry gates and garage door openers may
require you to substitute Step 3 with the procedure
noted in “Gate Operator and Canadian
Programming” later in this section.4. The indicator light will flash slowly at first and then
rapidly after HomeLink
®successfully receives the
frequency signal from the hand-held transmitter.
Release both buttons.
5. Press and hold the newly-trained HomeLink
®button
and observe the indicator light.
If the indicator light stays on constantly,
programming is complete and your device should
activate when the HomeLink
®button is pressed and
released.
To program the remaining two HomeLink
®buttons,
begin with Step 2 under “Programming HomeLink®.”
Do not repeat Step 1 as this will erase all of the
programmed channels.
If the indicator light blinks rapidly for two seconds
and then turns to a constant light, continue with
Steps 6 through 8 following to complete the
programming of a rolling-code equipped device
(most commonly, a garage door opener).
6. Locate in the garage, the garage door opener
receiver (motor-head unit). Locate the “Learn”
or “Smart” button. This can usually be found where
the hanging antenna wire is attached to the
motor-head unit.
2-46
Page 133 of 410
Light Sensor
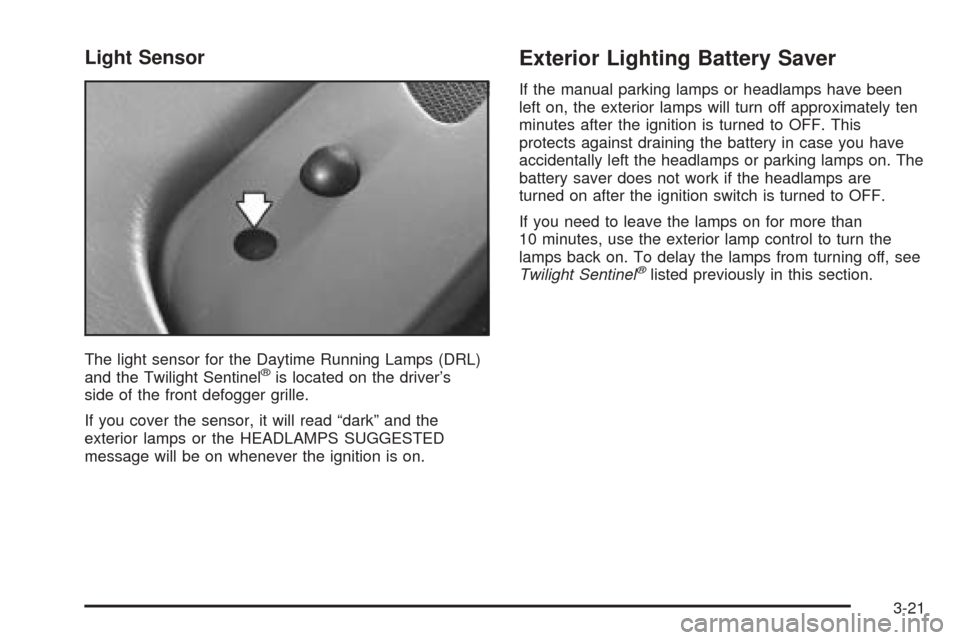
The light sensor for the Daytime Running Lamps (DRL)
and the Twilight Sentinel®is located on the driver’s
side of the front defogger grille.
If you cover the sensor, it will read “dark” and the
exterior lamps or the HEADLAMPS SUGGESTED
message will be on whenever the ignition is on.
Exterior Lighting Battery Saver
If the manual parking lamps or headlamps have been
left on, the exterior lamps will turn off approximately ten
minutes after the ignition is turned to OFF. This
protects against draining the battery in case you have
accidentally left the headlamps or parking lamps on. The
battery saver does not work if the headlamps are
turned on after the ignition switch is turned to OFF.
If you need to leave the lamps on for more than
10 minutes, use the exterior lamp control to turn the
lamps back on. To delay the lamps from turning off, see
Twilight Sentinel
®listed previously in this section.
3-21
Page 135 of 410
Entry Lighting
The entry lighting system automatically turns on the
courtesy lamps and the backlighting to the door switches
and to the exterior lamp control when a door is opened
or if you press the remote keyless entry transmitter
unlock button. If activated due to the transmitter,
the lighting will remain active for about 40 seconds.
Since the entry lighting system uses the light sensor, it
must be dark outside in order for the courtesy lamps
to turn on. The courtesy lamps turn off approximately
25 seconds after the last door is closed. They will dim to
off if the ignition key is placed in ON, or immediately
deactivate if the power locks are activated.
Parade Dimming
This feature prohibits dimming of the digital displays and
backlighting during daylight hours when the key is in
the ignition and the headlamps are on. This feature
operates with the light sensor for the Twilight
Sentinel
®and is fully automatic. When the light sensor
reads darkness outside and the parking lamps are
active, the digital displays can be adjusted by turning
the instrument panel brightness knob counterclockwise
to dim and clockwise to brighten lighting.
Reading Lamps
The front reading lamps are located in the overhead
console. These lamps and the interior courtesy lamps
come on when a door is opened and it is dark outside.
The rear reading lamps will not come on when a
front door is opened.
The rear courtesy lamps are located on the rear
headliner above the rear seat outboard positions. When
a rear door is opened, both the front and rear reading
lamps come on with the courtesy lamps.
Press the button near each lamp to turn it on and off.
If the reading lamps are left on, they automatically shut
off 10 minutes after the ignition has been turned off.
Battery Load Management
The battery load management feature is designed to
monitor the vehicle’s electrical load and determine when
the battery is in a heavy discharge condition. During
times of high electrical loading, the engine may idle at a
higher revolutions per minute (rpm) setting than
normal to make sure the battery charges. High electrical
loads may occur when several of the following are
on: headlamps, high beams, fog lamps, rear window
defogger, the climate control fan at high speeds, heated
seats and engine cooling fans.
3-23
Page 136 of 410
If the battery continues to discharge, even with the
engine idling at a higher rpm setting, some electrical
loads will automatically be reduced. When this occurs,
the rear window defogger may take slightly longer
to clear the glass, the heated seats may not get as warm
as they usually do and the fan may cut back to a
lower speed. For more battery saving information, see
“Battery Saver Active Message” underDIC Warnings
and Messages on page 3-55.
Inadvertent Power Battery Saver
This feature is designed to protect your vehicle’s battery
against drainage from the interior lamps, trunk lamp,
glove box lamp, cigarette lighters or the garage
door opener. When the ignition is turned off, the power
to these features will automatically turn off after
10 minutes (three minutes if a new car has 15 miles
(24 km) or less). Power will be restored for an additional
10 minutes if any door is opened, the trunk is opened
or the courtesy lamp switch is turned on.
Ultrasonic Rear Parking Assist
(URPA)
Your vehicle may be equipped with Ultrasonic Rear
Parking Assist (URPA). URPA is designed to help you
park while in REVERSE (R) and operates only at speeds
less than 3 mph (5 km/h). URPA can help you avoid
colliding with objects such as parked vehicles. The
system can detect objects 5 feet (1.5 m) behind your
vehicle and tell you how close those objects are to your
rear bumper.
{CAUTION:
Even with the Ultrasonic Rear Park Assist
system, the driver must check carefully before
backing up. The system does not operate
above typical backing speeds of 3 mph
(5 km/h) while parking. And, the system does
not detect objects that are more than 5 feet
(1.5 meters) behind the vehicle.
CAUTION: (Continued)
3-24