display CADILLAC SEVILLE 2004 5.G Owners Manual
[x] Cancel search | Manufacturer: CADILLAC, Model Year: 2004, Model line: SEVILLE, Model: CADILLAC SEVILLE 2004 5.GPages: 410, PDF Size: 2.64 MB
Page 69 of 410
Programmable Automatic Door
Locks
Your vehicle is programmed so that, when the doors are
closed, the ignition is on and the shift lever is moved
out of PARK (P), all the doors will lock. The doors
will unlock every time you stop the vehicle and move
the shift lever into PARK (P).
If someone needs to get out while your vehicle is not in
PARK (P), have the person use the manual lever or
power door lock switch. When the door is closed again,
it will not lock automatically. Use the manual lever or
power door lock switch to lock the door.
With the vehicle in PARK (P) and the ignition in ON, the
door locks can be programmed through prompts
displayed on the Driver Information Center (DIC). These
prompts allow the driver to choose various lock and
unlock settings. For programming information, seeDIC
Vehicle Personalization on page 3-63.
Rear Door Security Locks
Your vehicle is equipped with rear door security locks
that prevent passengers from opening the rear doors on
your vehicle from the inside.
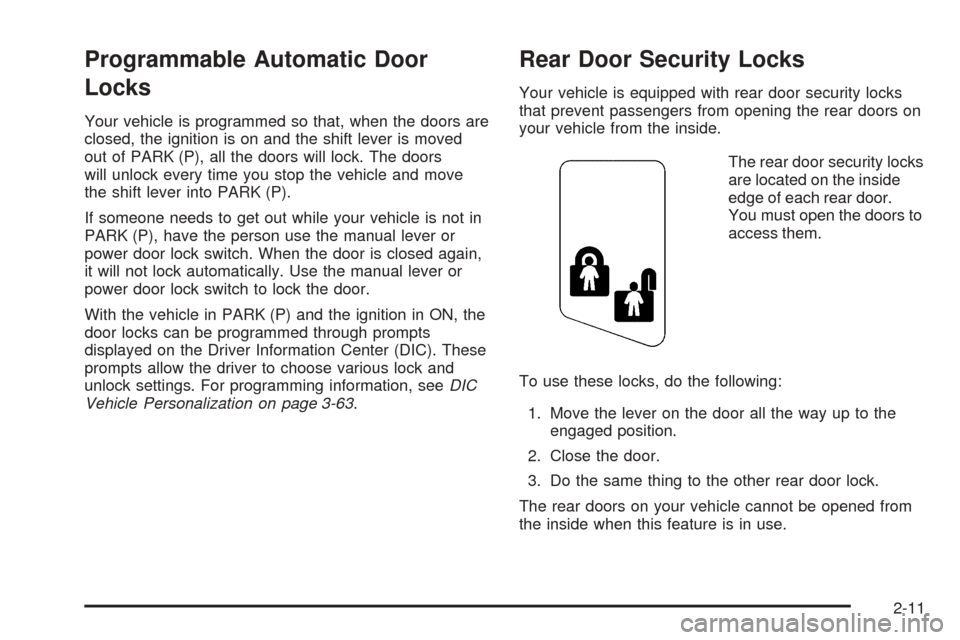
The rear door security locks
are located on the inside
edge of each rear door.
You must open the doors to
access them.
To use these locks, do the following:
1. Move the lever on the door all the way up to the
engaged position.
2. Close the door.
3. Do the same thing to the other rear door lock.
The rear doors on your vehicle cannot be opened from
the inside when this feature is in use.
2-11
Page 96 of 410
Automatic Dimming Rearview Mirror
with OnStar
®and Compass
Your vehicle may have an automatic dimming rearview
mirror with a compass display. The mirror also
contains OnStar
®controls. For more information see
OnStar®System on page 2-42.
The automatic dimming feature functions the same as
that of the automatic dimming rearview mirror without a
compass. SeeAutomatic Dimming Rearview Mirror
with OnStar
®on page 2-37.
The mirror also includes an eight-point compass display
in the upper right corner of the mirror face. When on,
the compass automatically calibrates as the vehicle
is driven.
Mirror Operation
O
(On/Off):Press and hold the button, located on the
lower left side of the mirror face, for about three
seconds to turn the automatic dimming feature on or off.
The indicator light will illuminate when this feature is
active. The automatic dimming feature is active
each time the vehicle is started.
Compass Operation
Press the on/off button once to turn the compass on
or off.
When the ignition and the compass feature are on, the
compass will show two character boxes for about
two seconds. After two seconds, the mirror will display
the compass heading.
Compass Calibration
If after two seconds, the display does not show a
compass heading (for example, N for North), there may
be a strong magnetic field interfering with the compass.
Such interference may be caused by a magnetic antenna
mount, magnetic note pad holder or a similar magnetic
item. If the letter C should ever appear in the compass
window, the compass may need calibration.
The mirror can be calibrated by driving the vehicle in
circles at 5 mph (8 km/h) or less until the display reads a
direction.
The compass can be placed in calibration mode
manually by pressing and holding the on/off button until
a C is shown in the compass display.
2-38
Page 97 of 410
Compass Variance
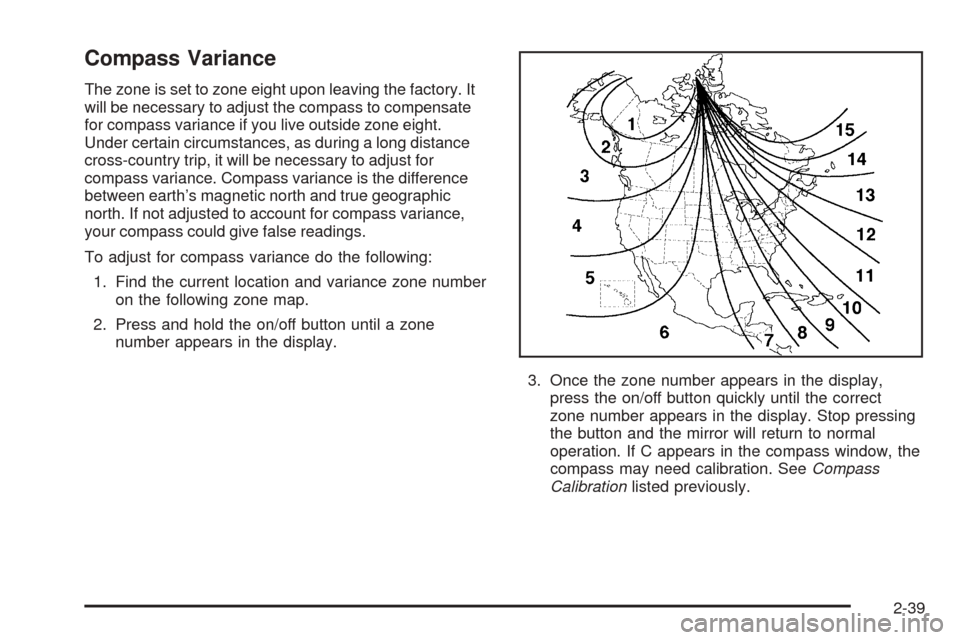
The zone is set to zone eight upon leaving the factory. It
will be necessary to adjust the compass to compensate
for compass variance if you live outside zone eight.
Under certain circumstances, as during a long distance
cross-country trip, it will be necessary to adjust for
compass variance. Compass variance is the difference
between earth’s magnetic north and true geographic
north. If not adjusted to account for compass variance,
your compass could give false readings.
To adjust for compass variance do the following:
1. Find the current location and variance zone number
on the following zone map.
2. Press and hold the on/off button until a zone
number appears in the display.
3. Once the zone number appears in the display,
press the on/off button quickly until the correct
zone number appears in the display. Stop pressing
the button and the mirror will return to normal
operation. If C appears in the compass window, the
compass may need calibration. SeeCompass
Calibrationlisted previously.
2-39
Page 113 of 410
Instrument Panel Overview...............................3-4
Hazard Warning Flashers................................3-6
Other Warning Devices...................................3-7
Horn.............................................................3-7
Tilt Wheel.....................................................3-7
Turn Signal/Multifunction Lever.........................3-9
Exterior Lamps.............................................3-16
Interior Lamps..............................................3-22
Ultrasonic Rear Parking Assist (URPA)............3-24
Accessory Power Outlets...............................3-26
Ashtrays and Cigarette Lighter........................3-27
Climate Controls............................................3-28
Dual Climate Control System..........................3-28
Outlet Adjustment.........................................3-33
Rear Climate Control System.........................3-34
Passenger Compartment Air Filter...................3-35
Steering Wheel Climate Controls.....................3-36
Climate Controls Personalization.....................3-36
Warning Lights, Gages and Indicators.............3-37
Warning Lights, Gages, and Indicators.............3-37
Instrument Panel Cluster................................3-38
Speedometer and Odometer...........................3-39
Tachometer.................................................3-40
Safety Belt Reminder Light.............................3-41Air Bag Readiness Light................................3-41
Charging System Light..................................3-42
Brake System Warning and Parking Brake
Indicator Light...........................................3-43
Anti-Lock Brake System Warning Light.............3-44
Traction Control System (TCS) Warning Light......3-44
Engine Coolant Temperature Warning Light......3-45
Engine Coolant Temperature Gage..................3-45
Malfunction Indicator Lamp.............................3-46
Oil Pressure Light.........................................3-49
Security Light...............................................3-50
Fog Lamp Light............................................3-50
Lights On Reminder......................................3-50
Cruise Control Light......................................3-50
Fuel Gage...................................................3-51
Driver Information Center (DIC).......................3-52
DIC Controls and Displays.............................3-52
DIC Warnings and Messages.........................3-55
Climate Controls and Radio System
Personalization..........................................3-62
DIC Vehicle Personalization............................3-63
Trip Computer................................................3-74
Oil Life Indicator...........................................3-74
Section 3 Instrument Panel
3-1
Page 117 of 410
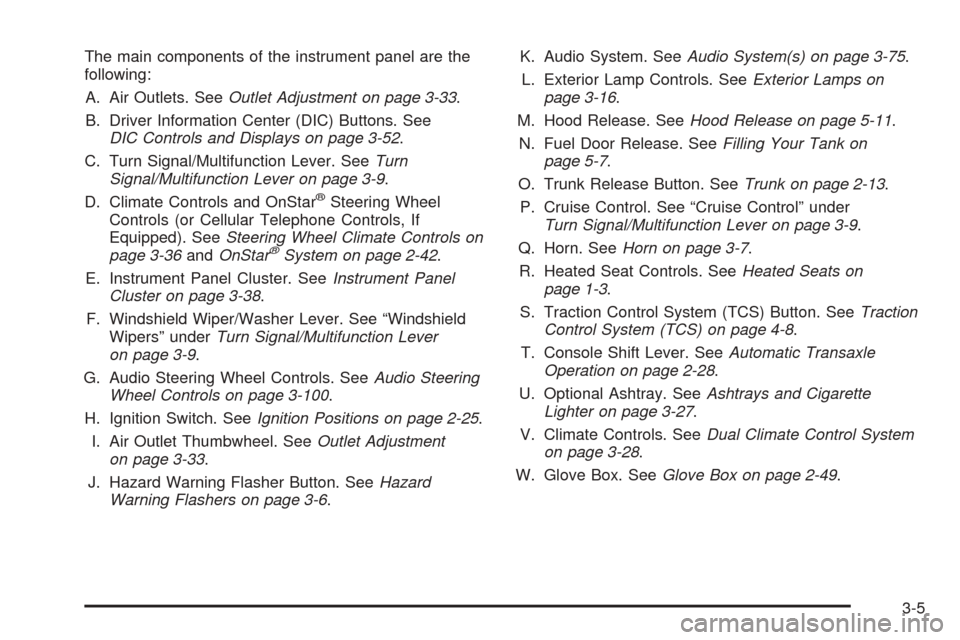
The main components of the instrument panel are the
following:
A. Air Outlets. SeeOutlet Adjustment on page 3-33.
B. Driver Information Center (DIC) Buttons. See
DIC Controls and Displays on page 3-52.
C. Turn Signal/Multifunction Lever. SeeTurn
Signal/Multifunction Lever on page 3-9.
D. Climate Controls and OnStar
®Steering Wheel
Controls (or Cellular Telephone Controls, If
Equipped). SeeSteering Wheel Climate Controls on
page 3-36andOnStar
®System on page 2-42.
E. Instrument Panel Cluster. SeeInstrument Panel
Cluster on page 3-38.
F. Windshield Wiper/Washer Lever. See “Windshield
Wipers” underTurn Signal/Multifunction Lever
on page 3-9.
G. Audio Steering Wheel Controls. SeeAudio Steering
Wheel Controls on page 3-100.
H. Ignition Switch. SeeIgnition Positions on page 2-25.
I. Air Outlet Thumbwheel. SeeOutlet Adjustment
on page 3-33.
J. Hazard Warning Flasher Button. SeeHazard
Warning Flashers on page 3-6.K. Audio System. SeeAudio System(s) on page 3-75.
L. Exterior Lamp Controls. SeeExterior Lamps on
page 3-16.
M. Hood Release. SeeHood Release on page 5-11.
N. Fuel Door Release. SeeFilling Your Tank on
page 5-7.
O. Trunk Release Button. SeeTrunk on page 2-13.
P. Cruise Control. See “Cruise Control” under
Turn Signal/Multifunction Lever on page 3-9.
Q. Horn. SeeHorn on page 3-7.
R. Heated Seat Controls. SeeHeated Seats on
page 1-3.
S. Traction Control System (TCS) Button. SeeTraction
Control System (TCS) on page 4-8.
T. Console Shift Lever. SeeAutomatic Transaxle
Operation on page 2-28.
U. Optional Ashtray. SeeAshtrays and Cigarette
Lighter on page 3-27.
V. Climate Controls. SeeDual Climate Control System
on page 3-28.
W. Glove Box. SeeGlove Box on page 2-49.
3-5
Page 121 of 410
Turn Signal/Multifunction Lever
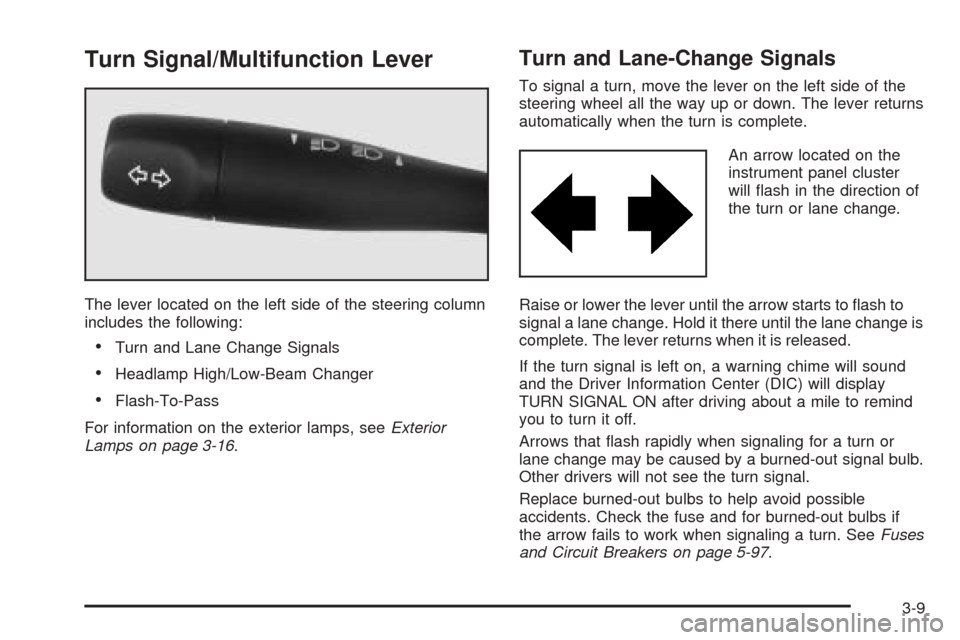
The lever located on the left side of the steering column
includes the following:
•Turn and Lane Change Signals
•Headlamp High/Low-Beam Changer
•Flash-To-Pass
For information on the exterior lamps, seeExterior
Lamps on page 3-16.
Turn and Lane-Change Signals
To signal a turn, move the lever on the left side of the
steering wheel all the way up or down. The lever returns
automatically when the turn is complete.
An arrow located on the
instrument panel cluster
will flash in the direction of
the turn or lane change.
Raise or lower the lever until the arrow starts to flash to
signal a lane change. Hold it there until the lane change is
complete. The lever returns when it is released.
If the turn signal is left on, a warning chime will sound
and the Driver Information Center (DIC) will display
TURN SIGNAL ON after driving about a mile to remind
you to turn it off.
Arrows that flash rapidly when signaling for a turn or
lane change may be caused by a burned-out signal bulb.
Other drivers will not see the turn signal.
Replace burned-out bulbs to help avoid possible
accidents. Check the fuse and for burned-out bulbs if
the arrow fails to work when signaling a turn. SeeFuses
and Circuit Breakers on page 5-97.
3-9
Page 125 of 410
Windshield Washer
The windshield washer has both a “demand” mode and
a “programmed” mode, depending on the amount of
windshield washer fluid you need.
{CAUTION:
In freezing weather, do not use your washer
until the windshield is warmed. Otherwise the
washer fluid can form ice on the windshield,
blocking your vision.
To spray washer fluid on the windshield in the
programmed mode, press and release the button on the
tip of the lever. The washer will provide a measured
amount of fluid to the windshield and the wiper will either
stop or return to your original wiping speed. To spray
washer fluid on the windshield in the demand mode,
press and hold the button until you have enough fluid,
and the wipers will either stop or return to your
original wiping speed.
CHECK WASHER FLUID will be displayed on the Driver
Information Center (DIC) when the washer fluid
reaches a low level.
Cruise Control
With cruise control, you can maintain a speed of about
25 mph (40 km/h) or more without keeping your foot
on the accelerator. This is helpful on long trips. Cruise
control does not work at speeds below about 25 mph
(40 km/h). When cruise control is on, you will see
a CRUISE light on the instrument panel cluster.
When you apply your brakes, the cruise control shuts off.
{CAUTION:
Cruise control can be dangerous where you
can not drive safely at a steady speed. So, do
not use your cruise control on winding roads
or in heavy traffic.
Cruise control can be dangerous on slippery
roads. On such roads, fast changes in tire
traction can cause needless wheel spinning,
and you could lose control. Do not use cruise
control on slippery roads.
If your vehicle is in cruise control when the traction
control system begins to limit wheel spin, the cruise
control will automatically disengage. SeeTraction
Control System (TCS) on page 4-8. When road
conditions allow you to safely use it again, you may
turn the cruise control back on.
3-13
Page 126 of 410
Setting Cruise Control
{CAUTION:
If you leave your cruise control on when you
are not using cruise, you might hit a button
and go into cruise when you do not want to.
You could be startled and even lose control.
Keep the cruise control switch off until you
want to use cruise control.
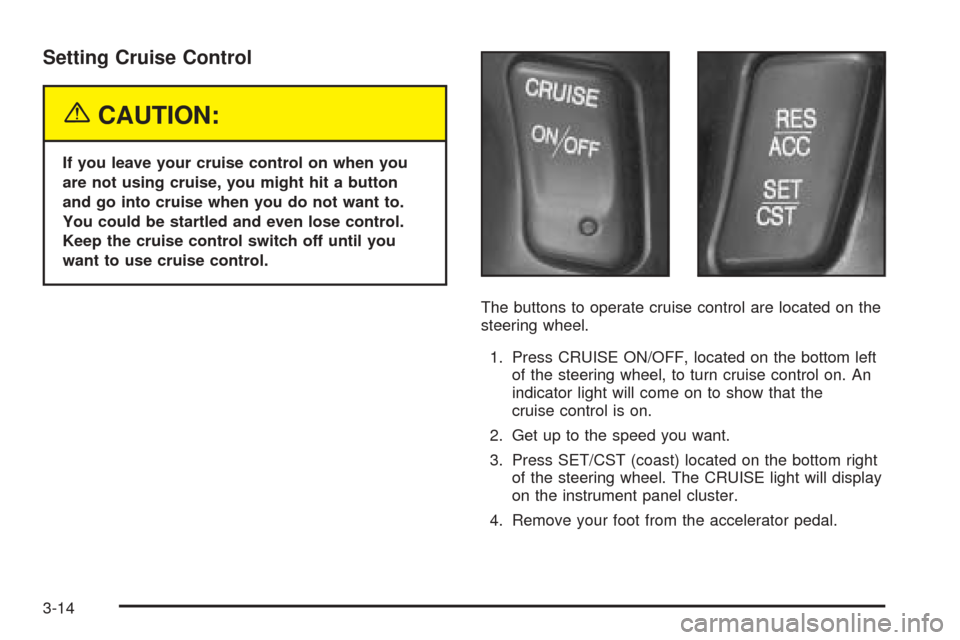
The buttons to operate cruise control are located on the
steering wheel.
1. Press CRUISE ON/OFF, located on the bottom left
of the steering wheel, to turn cruise control on. An
indicator light will come on to show that the
cruise control is on.
2. Get up to the speed you want.
3. Press SET/CST (coast) located on the bottom right
of the steering wheel. The CRUISE light will display
on the instrument panel cluster.
4. Remove your foot from the accelerator pedal.
3-14
Page 127 of 410
Resuming a Set Speed
Suppose you set your cruise control at a desired speed
and then you apply the brake. This shuts off the
cruise control. But you do not need to reset it.
Once the vehicle is traveling approximately 25 mph
(40 km/h) or more, you can press RES/ACC
(resume/accelerate) to return to your desired preset
speed. The CRUISE light will be displayed again.
The vehicle will return to and stay at your preset speed.
If you press and hold RES/ACC, the vehicle speed
will increase until you release the button or apply the
brake. Unless you want to go faster, do not press
and hold RES/ACC.
Increasing Speed While Using Cruise
Control
There are two ways to go to a higher speed:
•Use the accelerator pedal to get to the higher
speed. Press SET/CST, then release it and
the accelerator pedal. You will now cruise at the
higher speed.
•Press RES/ACC. Hold it there until you get up to
the speed that you want, and then release it. To
increase your speed in very small amounts, briefly
press RES/ACC and then release it. Each time
you do this, your vehicle will speed up
approximately 1 mph (1.6 km/h) faster.
The accelerate feature will only work after you have set
the cruise control speed by pressing SET/CST.
Reducing Speed While Using Cruise
Control
There are two ways to reduce your speed while using
cruise control:
•Press SET/CST until you reach the lower speed
you want, then release it.
•To slow down in very small amounts, press
SET/CST briefly. Each time you do this, the vehicle
will slow down approximately 1 mph (1.6 km/h).
3-15
Page 130 of 410
Daytime Running Lamps
Daytime Running Lamps (DRL) can make it easier for
others to see the front of your vehicle during the
day. DRL can be helpful in many different driving
conditions, but they can be especially helpful in the short
periods after dawn and before sunset. Fully functional
daytime running lamps are required on all vehicles
first sold in Canada.
The DRL system will make the high-beam headlamps
come on at reduced brightness when the following
conditions are met:
•It is still daylight and the ignition is on,
•the exterior lamp control is in the off position and
•the transaxle is not in PARK (P).
When DRL are on, only your high-beam headlamps (at
reduced brightness) will be on. No other exterior
lamps such as the parking lamps, taillamps, etc. will be
on when the DRL are being used. Your instrument
panel will not be lit up either.
When the Twilight Sentinel
®lever is on and it is dark
enough outside, the high-beam headlamps (at reduced
intensity) will turn off and normal low-beam headlamp
operation will occur.When the Twilight Sentinel
®lever is on and it is bright
enough outside, the regular lamps will go off, and
the high-beam headlamps at reduced brightness will
take over. If you start your vehicle in a dark garage, the
automatic headlamp system will come on immediately.
Once you leave the garage, it will take approximately
one minute for the automatic headlamp system to
change to DRL if it is light outside. During that delay,
your instrument panel cluster may not be as bright
as usual. Make sure your instrument panel brightness
knob is in the full bright position. See “Instrument Panel
Brightness” underInterior Lamps on page 3-22.
If it is dark enough outside and the Twilight Sentinel
®
lever is off, a HEADLAMPS SUGGESTED message will
display on the Driver’s Information Center (DIC). This
message informs the driver that turning on the exterior
lamps is recommended even though the DRL are
still illuminated. Turning on the Twilight Sentinel
®or the
headlamps will deactivate the DRL and remove the
HEADLAMPS SUGGESTED message. If the parking
lamps or the fog lamps were turned on instead, the DRL
will still deactivate and the HEADLAMPS SUGGESTED
message will continue to be displayed.
3-18