key CADILLAC SRX 2005 1.G Repair Manual
[x] Cancel search | Manufacturer: CADILLAC, Model Year: 2005, Model line: SRX, Model: CADILLAC SRX 2005 1.GPages: 442, PDF Size: 2.52 MB
Page 391 of 442

J Cases Usage
LOW FAN Low Cooling Fan Motor
BLOWER PWM Fan Motor Assembly
STARTER Starter Solenoid
EBCM Electronic Brake Control Module
Fuses Usage
RT PARKPassenger’s Side Taillamp
Assembly, Front Sidemarker and
Front Parking Lamp Assembly
HORN Dual Horn Assembly
LT HI BEAM Driver’s Side High-Beam Headlamp
LT LOW BEAM Driver’s Side Low-Beam Headlamp
RT LOW BEAMPassenger’s Side Low-Beam
Headlamp
RT HI BEAMPassenger’s Side High-Beam
Headlamp
HFV6 ECMHigh Feature V6 ECM (Electronic
Control Module)
REAR WPR Rear Wiper Motor
THEFTECM, TCM (Transmission Control
Module), PASS-Key
®III+ Module
Fuses Usage
LT PARKDriver’s Side Taillamp Assembly,
Front Sidemarker and Front Parking
Lamp Assembly
LIC/DIMMINGRear License Plate Assembly, DIM
(Dash Integration Module)
DIM/ALDLDIM, ALDL (Assembly Line
Data Link)
FLASHER Turn Signal/Hazard Flasher Module
V8 ECM V8 ECM, Canister Purge
STRG CTLSSteering Wheel Control Pad,
Headlamp Switch
STARTER RLY Jumper to Starter Relay
WASH NOZDriver’s and Passenger’s Side
Heated Washer Nozzles
ODD COILSOdd Ignition Coils, Fuel Injectors,
Odd Injection Coils
TCM/IPCTCM, ECM and IPC (Instrument
Panel Cluster)
SPARE Not Used
ABS Anti-Lock Brake System
VICSVehicle Information and
Communication System
5-97
Page 392 of 442
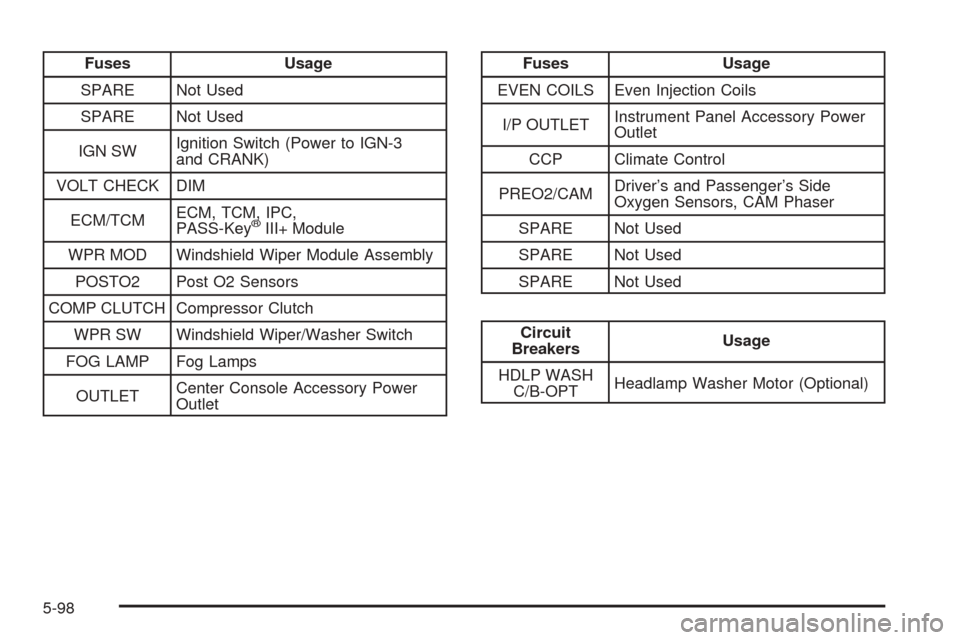
Fuses Usage
SPARE Not Used
SPARE Not Used
IGN SWIgnition Switch (Power to IGN-3
and CRANK)
VOLT CHECK DIM
ECM/TCMECM, TCM, IPC,
PASS-Key
®III+ Module
WPR MOD Windshield Wiper Module Assembly
POSTO2 Post O2 Sensors
COMP CLUTCH Compressor Clutch
WPR SW Windshield Wiper/Washer Switch
FOG LAMP Fog Lamps
OUTLETCenter Console Accessory Power
Outlet
Fuses Usage
EVEN COILS Even Injection Coils
I/P OUTLETInstrument Panel Accessory Power
Outlet
CCP Climate Control
PREO2/CAMDriver’s and Passenger’s Side
Oxygen Sensors, CAM Phaser
SPARE Not Used
SPARE Not Used
SPARE Not Used
Circuit
BreakersUsage
HDLP WASH
C/B-OPTHeadlamp Washer Motor (Optional)
5-98
Page 396 of 442

Relays Usage
REAR FOG
LAMP
RLY MICRORear Fog Lamps (Export Only)
FUEL PUMP
MOTOR
RLY MICROFuel Pump Motor
Fuses Usage
INTERIOR
LAMPHush Panel Lamps, Puddle Lamps,
Overhead Courtesy Lamp Assembly
RT FRT
DR MODPassenger’s Door Module
RIMRIM (Rear Integration Module),
Ignition Switch, Key Lock Cylinder
REAR FOG
LAMPRear Fog Lamps (Export Only)
SUSPNTN Suspension Module
VICSTV Tuner Assembly, VICS (Vehicle
Information Communication System)
Module
SPARE Not Used
POWER
SOUNDERPower Sounder, Inclination Sensor
AFTERBOIL Afterboil Heater Pump
Fuses Usage
CANISTER
VENTCanister Vent Solenoid
FUEL
PUMP MTRFuel Pump Motor
REAR HVAC Rear Climate Control System
R FRT HTD
SEAT MODPassenger’s Side Heated Seat
Module
REAR HATCH Rear Hatch Latch
AIR BAG SDM (Sensing Diagnostic Module)
IGN 1Shifter, Power Sounder, Rear
Parking Aid, Rearview Mirror, RIM
SPARE Not Used
SPARE Not Used
J Cases Usage
SUNROOF MOD Power Sunroof Module
REAR DEFOG Rear Window Defogger Element
Circuit
BreakersUsage
DR MOD
PWR C/BDoor Modules
5-102
Page 405 of 442
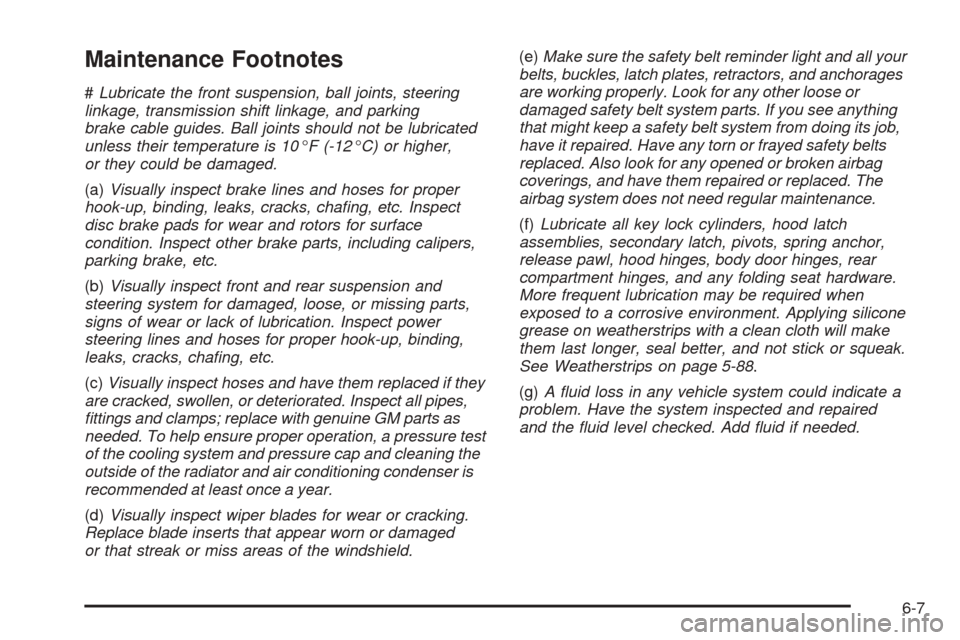
Maintenance Footnotes
#Lubricate the front suspension, ball joints, steering
linkage, transmission shift linkage, and parking
brake cable guides. Ball joints should not be lubricated
unless their temperature is 10°F (-12°C) or higher,
or they could be damaged.
(a)Visually inspect brake lines and hoses for proper
hook-up, binding, leaks, cracks, cha�ng, etc. Inspect
disc brake pads for wear and rotors for surface
condition. Inspect other brake parts, including calipers,
parking brake, etc.
(b)Visually inspect front and rear suspension and
steering system for damaged, loose, or missing parts,
signs of wear or lack of lubrication. Inspect power
steering lines and hoses for proper hook-up, binding,
leaks, cracks, cha�ng, etc.
(c)Visually inspect hoses and have them replaced if they
are cracked, swollen, or deteriorated. Inspect all pipes,
�ttings and clamps; replace with genuine GM parts as
needed. To help ensure proper operation, a pressure test
of the cooling system and pressure cap and cleaning the
outside of the radiator and air conditioning condenser is
recommended at least once a year.
(d)Visually inspect wiper blades for wear or cracking.
Replace blade inserts that appear worn or damaged
or that streak or miss areas of the windshield.(e)Make sure the safety belt reminder light and all your
belts, buckles, latch plates, retractors, and anchorages
are working properly. Look for any other loose or
damaged safety belt system parts. If you see anything
that might keep a safety belt system from doing its job,
have it repaired. Have any torn or frayed safety belts
replaced. Also look for any opened or broken airbag
coverings, and have them repaired or replaced. The
airbag system does not need regular maintenance.
(f)Lubricate all key lock cylinders, hood latch
assemblies, secondary latch, pivots, spring anchor,
release pawl, hood hinges, body door hinges, rear
compartment hinges, and any folding seat hardware.
More frequent lubrication may be required when
exposed to a corrosive environment. Applying silicone
grease on weatherstrips with a clean cloth will make
them last longer, seal better, and not stick or squeak.
See Weatherstrips on page 5-88.
(g)A �uid loss in any vehicle system could indicate a
problem. Have the system inspected and repaired
and the �uid level checked. Add �uid if needed.
6-7
Page 408 of 442
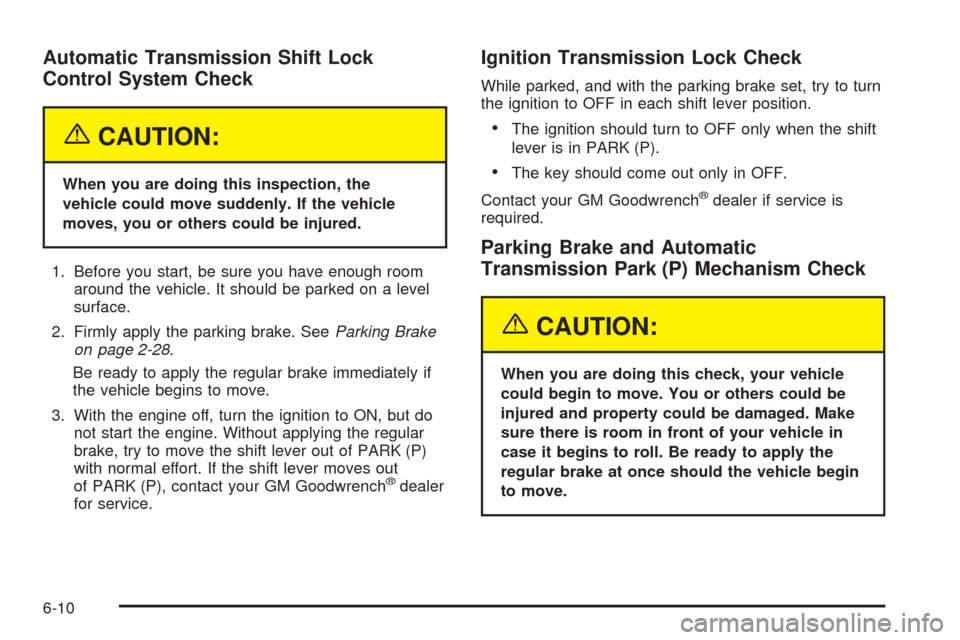
Automatic Transmission Shift Lock
Control System Check
{CAUTION:
When you are doing this inspection, the
vehicle could move suddenly. If the vehicle
moves, you or others could be injured.
1. Before you start, be sure you have enough room
around the vehicle. It should be parked on a level
surface.
2. Firmly apply the parking brake. SeeParking Brake
on page 2-28.
Be ready to apply the regular brake immediately if
the vehicle begins to move.
3. With the engine off, turn the ignition to ON, but do
not start the engine. Without applying the regular
brake, try to move the shift lever out of PARK (P)
with normal effort. If the shift lever moves out
of PARK (P), contact your GM Goodwrench
®dealer
for service.
Ignition Transmission Lock Check
While parked, and with the parking brake set, try to turn
the ignition to OFF in each shift lever position.
The ignition should turn to OFF only when the shift
lever is in PARK (P).
The key should come out only in OFF.
Contact your GM Goodwrench
®dealer if service is
required.
Parking Brake and Automatic
Transmission Park (P) Mechanism Check
{CAUTION:
When you are doing this check, your vehicle
could begin to move. You or others could be
injured and property could be damaged. Make
sure there is room in front of your vehicle in
case it begins to roll. Be ready to apply the
regular brake at once should the vehicle begin
to move.
6-10
Page 410 of 442
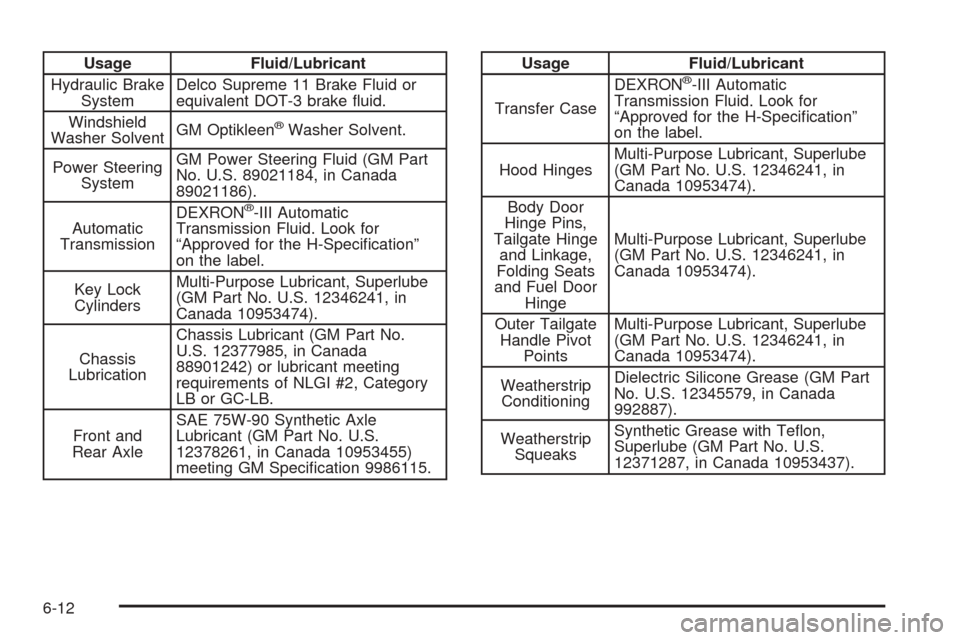
Usage Fluid/Lubricant
Hydraulic Brake
SystemDelco Supreme 11 Brake Fluid or
equivalent DOT-3 brake �uid.
Windshield
Washer SolventGM Optikleen
®Washer Solvent.
Power Steering
SystemGM Power Steering Fluid (GM Part
No. U.S. 89021184, in Canada
89021186).
Automatic
TransmissionDEXRON
®-III Automatic
Transmission Fluid. Look for
“Approved for the H-Speci�cation”
on the label.
Key Lock
CylindersMulti-Purpose Lubricant, Superlube
(GM Part No. U.S. 12346241, in
Canada 10953474).
Chassis
LubricationChassis Lubricant (GM Part No.
U.S. 12377985, in Canada
88901242) or lubricant meeting
requirements of NLGI #2, Category
LB or GC-LB.
Front and
Rear AxleSAE 75W-90 Synthetic Axle
Lubricant (GM Part No. U.S.
12378261, in Canada 10953455)
meeting GM Speci�cation 9986115.
Usage Fluid/Lubricant
Transfer CaseDEXRON®-III Automatic
Transmission Fluid. Look for
“Approved for the H-Speci�cation”
on the label.
Hood HingesMulti-Purpose Lubricant, Superlube
(GM Part No. U.S. 12346241, in
Canada 10953474).
Body Door
Hinge Pins,
Tailgate Hinge
and Linkage,
Folding Seats
and Fuel Door
HingeMulti-Purpose Lubricant, Superlube
(GM Part No. U.S. 12346241, in
Canada 10953474).
Outer Tailgate
Handle Pivot
PointsMulti-Purpose Lubricant, Superlube
(GM Part No. U.S. 12346241, in
Canada 10953474).
Weatherstrip
ConditioningDielectric Silicone Grease (GM Part
No. U.S. 12345579, in Canada
992887).
Weatherstrip
SqueaksSynthetic Grease with Te�on,
Superlube (GM Part No. U.S.
12371287, in Canada 10953437).
6-12
Page 434 of 442
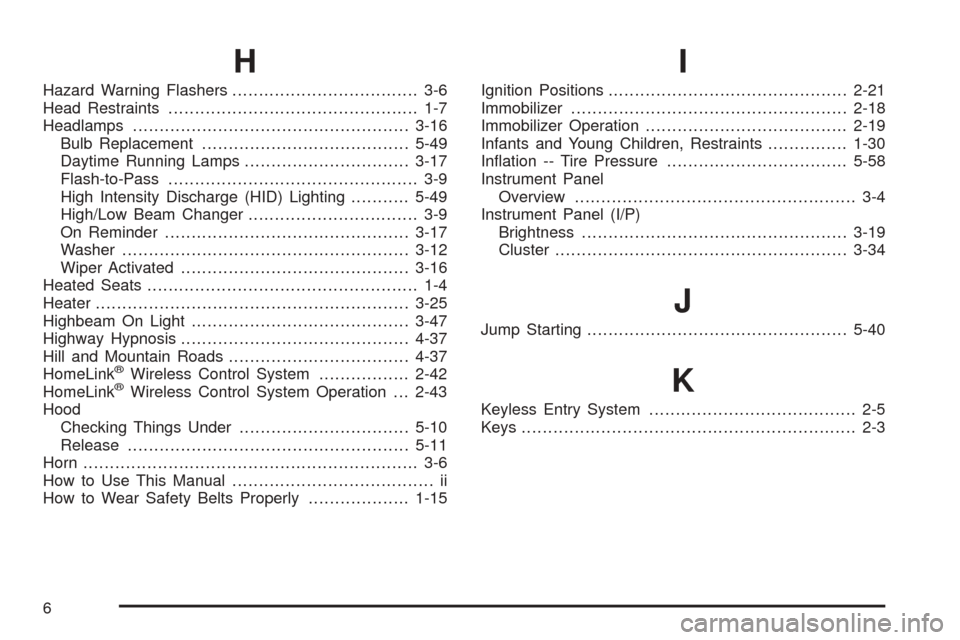
H
Hazard Warning Flashers................................... 3-6
Head Restraints............................................... 1-7
Headlamps....................................................3-16
Bulb Replacement.......................................5-49
Daytime Running Lamps...............................3-17
Flash-to-Pass............................................... 3-9
High Intensity Discharge (HID) Lighting...........5-49
High/Low Beam Changer................................ 3-9
On Reminder..............................................3-17
Washer......................................................3-12
Wiper Activated...........................................3-16
Heated Seats................................................... 1-4
Heater...........................................................3-25
Highbeam On Light.........................................3-47
Highway Hypnosis...........................................4-37
Hill and Mountain Roads..................................4-37
HomeLink
®Wireless Control System.................2-42
HomeLink®Wireless Control System Operation . . . 2-43
Hood
Checking Things Under................................5-10
Release.....................................................5-11
Horn............................................................... 3-6
How to Use This Manual...................................... ii
How to Wear Safety Belts Properly...................1-15
I
Ignition Positions.............................................2-21
Immobilizer....................................................2-18
Immobilizer Operation......................................2-19
Infants and Young Children, Restraints...............1-30
In�ation -- Tire Pressure..................................5-58
Instrument Panel
Overview..................................................... 3-4
Instrument Panel (I/P)
Brightness..................................................3-19
Cluster.......................................................3-34
J
Jump Starting.................................................5-40
K
Keyless Entry System....................................... 2-5
Keys............................................................... 2-3
6
Page 438 of 442

R
Radios..........................................................3-80
Care of Your CD and DVD Player................3-113
Care of Your CDs and DVDs.......................3-113
Navigation/Radio System, see Navigation
Manual...................................................3-98
Radio with CD............................................3-81
Setting the Time..........................................3-80
Theft-Deterrent..........................................3-111
Understanding Reception............................3-113
Reading Lamps..............................................3-20
Rear Air Conditioning System...........................3-31
Rear Axle......................................................5-47
Limited-Slip.................................................4-10
Rear Door Security Locks................................2-10
Rear Safety Belt Comfort Guides......................1-25
Rear Seat Entertainment System.......................3-98
Rear Seat Operation......................................... 1-8
Rear Seat Passengers, Safety Belts..................1-22
Rearview Mirror, Automatic Dimming with
OnStar
®.....................................................2-35
Rearview Mirror, Automatic Dimming with
OnStar
®and Compass.................................2-35
Reclining Seatbacks.......................................... 1-5
Recommended Fluids and Lubricants.................6-11
Recovery Hook...............................................4-44
Recreational Vehicle Towing.............................4-50
Remote Keyless Entry System............................ 2-5Remote Keyless Entry System, Operation............ 2-6
Removing the Flat Tire and Installing the
Spare Tire..................................................5-73
Removing the Spare Tire and Tools...................5-71
Reporting Safety Defects
Canadian Government..................................7-12
General Motors...........................................7-12
United States Government............................7-11
Restraint System Check
Checking the Restraint Systems....................1-58
Replacing Restraint System Parts After
a Crash..................................................1-59
Retained Accessory Power (RAP)......................2-22
Right Front Passenger Position, Safety Belts......1-22
Roadside
Service........................................................ 7-6
Rocking Your Vehicle to Get it Out....................4-44
Running the Engine While Parked.....................2-34
S
Safety Belt
Pretensioners..............................................1-27
Reminder Light............................................3-36
Safety Belts
Care of......................................................5-88
Driver Position............................................1-15
How to Wear Safety Belts Properly................1-15
10