sensor CADILLAC SRX 2011 2.G User Guide
[x] Cancel search | Manufacturer: CADILLAC, Model Year: 2011, Model line: SRX, Model: CADILLAC SRX 2011 2.GPages: 498, PDF Size: 7.62 MB
Page 187 of 498
Black plate (41,1)Cadillac SRX Owner Manual - 2011
Instruments and Controls 5-41
Climate and Air Quality
Select the Climate and Air Quality
menu and the following will be
displayed:
.Auto Fan Speed
.Air Quality Sensor
.Remote Start Auto Seat Cool
.Remote Start Auto Heated Seats
.Auto Defog
.Auto Rear Defog
Auto Fan Speed
This will allow you to select the
automatic fan speed. This feature
sets the climate control fan speed to
maintain the interior temperature.
Press the MENU / SELECT knob
when Auto Fan Speed is highlighted
to open the menu. Turn the knob
to highlight High, Medium, or Low.
Press the knob to confirm the
selection and move back to the
last menu. Air Quality Sensor
This will allow you to select whether
the system will operate at high or
low sensitivity. Only vehicles with
the dual zone climate control will
have this option.
Press the MENU / SELECT
knob when Air Quality Sensor
is highlighted to open the menu.
Turn the knob to highlight High or
Low Sensitivity. Press the knob to
confirm the selection and move
back to the last menu.
Remote Start Auto Seat Cool
When on, this feature will turn the
vented seats on when using remote
start on warm days.
Press the MENU / SELECT knob
when Remote Start Auto Seat Cool
is highlighted. Turn the knob to
select On or Off. Press the knob
to confirm and go back to the
last menu.
Remote Start Auto Heated Seats
When on, this feature will turn the
heated seats on when using remote
start on cold days.
Press the MENU / SELECT knob
when Remote Start Auto Heated
Seats is highlighted. Turn the knob
to select On or Off. Press the knob
to confirm and go back to the
last menu.
Auto Defog
This will allow you to turn the auto
defog on or off.
Press the MENU / SELECT knob
when Auto Defog is highlighted to
open the menu. Turn the knob to
highlight On or Off. Press the knob
to confirm the selection and move
back to the last menu.
Page 199 of 498
Black plate (3,1)Cadillac SRX Owner Manual - 2011
Lighting 6-3
Daytime Running
Lamps (DRL)
Daytime Running Lamps (DRL) can
make it easier for others to see the
front of your vehicle during the day.
Fully functional daytime running
lamps are required on all vehicles
first sold in Canada.
A light sensor on top of the
instrument panel makes the DRL
work, so be sure it is not covered.
The DRL system makes the
low‐beam headlamps come on at a
reduced brightness or for vehicles
with High Intensity Discharge (HID)
headlamps, the DRL lights will come
on when the following conditions
are met:
.The ignition is in the
ON/RUN mode.
.The exterior lamps control is
in AUTO.
.The engine is running.When the DRL are on, only the
low‐beam headlamps, at a reduced
level of brightness, will be on.
The high‐beam headlamps,
taillamps, sidemarker, instrument
panel and other lamps will not
be on.
The headlamps automatically
change from DRL to the regular
headlamps depending on the
darkness of the surroundings.
The other lamps that come on with
the headlamps will also come on.
When it is bright enough outside,
the headlamps go off and the DRL
come on.
To turn the DRL lamps off or on
again, turn the exterior lamps
control to the off position and then
release. For vehicles first sold in
Canada, the DRL lamps cannot be
turned off.
Adaptive Forward
Lighting (AFL)
For vehicles with Xenon
headlamps, the Adaptive Forward
Lighting System (AFL) adjusts
the headlamps to provide greater
road illumination in various driving
conditions.
To enable AFL, set the exterior
lamp control to the AUTO position.
Moving the control out of the AUTO
position will deactivate the system.
AFL will operate when the vehicle
speed is greater than 3 km/h
(2 mph). AFL will not operate when
the transmission is in R (Reverse).
AFL is not immediately operable
after starting the vehicle; driving
a short distance is required to
calibrate the AFL. See
Exterior
Lamp Controls on page 6‑1.
Page 200 of 498
Black plate (4,1)Cadillac SRX Owner Manual - 2011
6-4 Lighting
Curve Lighting
The Xenon light beam pivots based
on the steering wheel position and
vehicle speed of at least 10 km/h
(6 mph). The headlamps shine at
an angle of up to 15 degrees to the
right or left of the direction of travel.
Highway Lighting
If the vehicle is traveling straight
continuously at high speeds, the
light beam automatically raises
slightly to increase the headlamp
range.
City Lighting
If the vehicle speed is less than
50 km/h (31 mph), the headlamp
range is automatically reduced.Twilight Sentinel
This feature automatically turns the
lamps on and off. A light sensor on
top of the instrument panel makes
the Twilight Sentinel
®work, so be
sure it is not covered.
With Twilight Sentinel the following
will happen:
.When it is dark enough outside,
and the exterior lamps control
is in the AUTO position, the
Daytime Running Lamps (DRL)
go off, and the headlamps and
parking lamps come on. The
other lamps that come on with
the headlamps also come on.
.When it is bright enough outside,
the headlamps go off, and the
DRL come on, as long as the
exterior lamp switch is in the
AUTO position. See Exterior
Lamp Controls on page 6‑1. If the vehicle is started in a dark
garage, the automatic headlamp
system comes on immediately.
If it is light outside when the vehicle
leaves the garage, there is a
slight delay before the automatic
headlamp system changes to
the DRL. During that delay, the
instrument panel cluster may not
be as bright as usual. Make sure
the instrument panel brightness
control is in full bright position.
See
Instrument Panel Illumination
Control on page 6‑6 for more
information.
The vehicle can be idled with the
lamps off, even when it is dark
outside. After starting the vehicle,
turn the exterior lamp control to off,
then release it. The lamps will
remain off until the control is turned
to off again.
Page 271 of 498

Black plate (3,1)Cadillac SRX Owner Manual - 2011
Climate Controls 8-3
To change the current mode, select
one of the following:
Y(Vent):Air is directed to the
instrument panel outlets.
\(Bi-Level): Air is divided
between the instrument panel
outlets and the floor outlets.
C(Tri‐Level): Air is divided
between the windshield, instrument
panel, and floor outlets.
[(Floor): Air is directed to the
floor outlets.
-(Defog): Clears the windows of
fog or moisture. Air is directed to the
windshield and floor outlets.
8(Upper): Air is directed to the
windshield outlets.
7(Hi-Level): Air is divided
between the windshield and
instrument panel outlets.
0(Defrost): Clears the
windshield of fog or frost more
quickly. Air is directed to the
windshield.
#(Air Conditioning): Press to
turn the automatic air conditioning
on or off. If the fan is turned off or
the outside temperature falls below
freezing, the air conditioner will
not run.
Press AUTO to return to automatic
operation and the air conditioner
runs as needed. When the indicator
light is on, the air conditioner runs
automatically to cool the air inside
the vehicle or to dry the air needed
to defog the windshield faster.
h(Recirculation): Press to turn
on recirculation. An indicator light
comes on. Air is recirculated to
quickly cool the inside of the vehicle
or prevent outside air and odors
from entering.
Automatic Air Recirculation:
When the AUTO indicator light
is on, the air is automatically
recirculated as needed to help
quickly cool the inside of the
vehicle. The climate control system may
have a sensor to detect air pollution.
In auto recirculation control, the Air
Quality Control system may operate.
To adjust the sensitivity of the
Air Quality Control, see Climate
and Air Quality under
Vehicle
Personalization on page 5‑40.
Auto Defog: The climate control
system may have a sensor to
automatically detect high humidity
inside the vehicle. When high
humidity is detected, the climate
control system may adjust to
outside air supply and turn on the
air conditioner. If the climate control
system does not detect possible
window fogging, it returns to normal
operation. To turn Auto Defog off
or on, see Climate and Air Quality
under Vehicle Personalization on
page 5‑40.
%(Outside Air): Press to turn
on outside air. An indicator light
comes on. Outside air is circulated
through the vehicle.
Page 272 of 498
Black plate (4,1)Cadillac SRX Owner Manual - 2011
8-4 Climate Controls
Rear Window Defogger
=(Rear Window Defogger):
Press to turn the rear window
defogger on or off.
The rear window defogger turns
off automatically after about
10 minutes. If turned on again it
runs for about 5 minutes before
turning off. At higher speeds, the
rear window defogger may stay
on continuously.
The rear window defogger can
be set to automatic operation,
see Climate and Air Quality
under Vehicle Personalization on
page 5‑40. When auto rear defog is
selected, the rear window defogger
turns on automatically when the
interior temperature is cold and the
outside temperature is about 40°F
and below. The auto rear defogger
turns off automatically after about
10 minutes. At higher speeds, the
rear window defogger may stay on
continuously. The heated outside rearview mirrors
turn on when the rear window
defogger button is on and helps to
clear fog or frost from the surface of
the mirror. See
Heated Mirrors on
page 2‑23.
Notice: Do not try to clear frost
or other material from the inside
of the front windshield and rear
window with a razor blade or
anything else that is sharp.
This may damage the rear
window defogger grid and affect
your radio's ability to pick up
stations clearly. The repairs
wouldn't be covered by your
warranty.
Heated and Ventilated Seats:
Press to heat or ventilate the seat.
See Heated and Ventilated Front
Seats on page 3‑11. Remote Start Climate Control
Operation:
For vehicles with the
remote vehicle start feature, the
climate control system may run
when the vehicle is started remotely.
The system uses the driver's
previous settings to heat or cool the
inside of the vehicle. See Remote
Vehicle Start on page 2‑10.
The rear window defogger turns on
if it is cold outside.
Sensors
The solar sensor located on top
of the instrument panel near the
windshield, monitors the solar heat.
The climate control system
uses the sensor information to
adjust the temperature, fan speed,
recirculation, and air delivery mode
for best comfort.
If the sensor is covered the
automatic climate control system
may not work properly.
Page 316 of 498
Black plate (40,1)Cadillac SRX Owner Manual - 2011
9-40 Driving and Operating
Ending Cruise Control
There are three ways to end cruise
control:
.Step lightly on the brake pedal.
.Press the[button on the
steering wheel.
.Press theTbutton on the
steering wheel.
Erasing Speed Memory
The cruise control set speed is
erased from memory by pressing
the
Tbutton or if the ignition is
turned off.
Object Detection
Systems
Ultrasonic Parking Assist
For vehicles with the Ultrasonic
Front and Rear Parking Assist
(UFRPA) system, it assists the
driver with parking and avoiding
objects. UFRPA operates at speeds
less than 8 km/h (5 mph), and the
sensors on the front and rear
bumper detect objects up to 1.2 m
(4 ft) in front of the vehicle and 2.5 m
(8 ft) behind the vehicle, and at least
25.4 cm (10 in) off the ground.
{WARNING
The Ultrasonic Front and Rear
Park Assist (UFRPA) system
does not replace driver vision.
It cannot detect:
.objects that are below the
bumper, underneath the
vehicle, or if they are too
close or far from the vehicle
.children, pedestrians,
bicyclists, or pets.
If you do not use proper care
before moving forward and while
backing; vehicle damage, injury,
or death could occur. Even with
UFRPA, always check in front of
the vehicle before moving forward
and behind the vehicle before
backing up. While moving forward
and backing, be sure to look for
objects and check the vehicle's
mirrors.
Page 317 of 498
Black plate (41,1)Cadillac SRX Owner Manual - 2011
Driving and Operating 9-41
How the System Works
When the vehicle is shifted into
R (Reverse) the front and rear
sensors are automatically turned on,
after the vehicle is shifted out of
R (Reverse), the rear sensors are
turned off and the front sensors
stay on until the vehicle is above
a certain speed. The front sensors
may also be turned on by pressing
the park assist button located next
to the shift lever without shifting
into R (Reverse) while the vehicle
is traveling at a low speed.
See“Turning the System On
and Off” later in this section.
When the vehicle is in N (Neutral),
the system may be active. If the
vehicle is in a car wash, the sensors
may detect objects in the car wash.
See “Turning the System On and
Off” later in this section to turn the
system off. High-toned beeps heard from the
front speakers are for objects
detected near the front bumper.
Low-toned beeps heard from the
rear speakers are for objects
detected near the rear bumper.
When an object is detected, high or
low‐tone beeps are heard. As the
vehicle gets closer to an object, the
time between the beeps becomes
shorter. When the distance is less
than 30 cm (11.8 in), beeping is
continuous. The distance may
be less during warmer or humid
weather.
PARK ASSIST OFF displays on
the Driver Information Center (DIC)
to indicate that UFRPA is off.
The message disappears after
a short period of time.
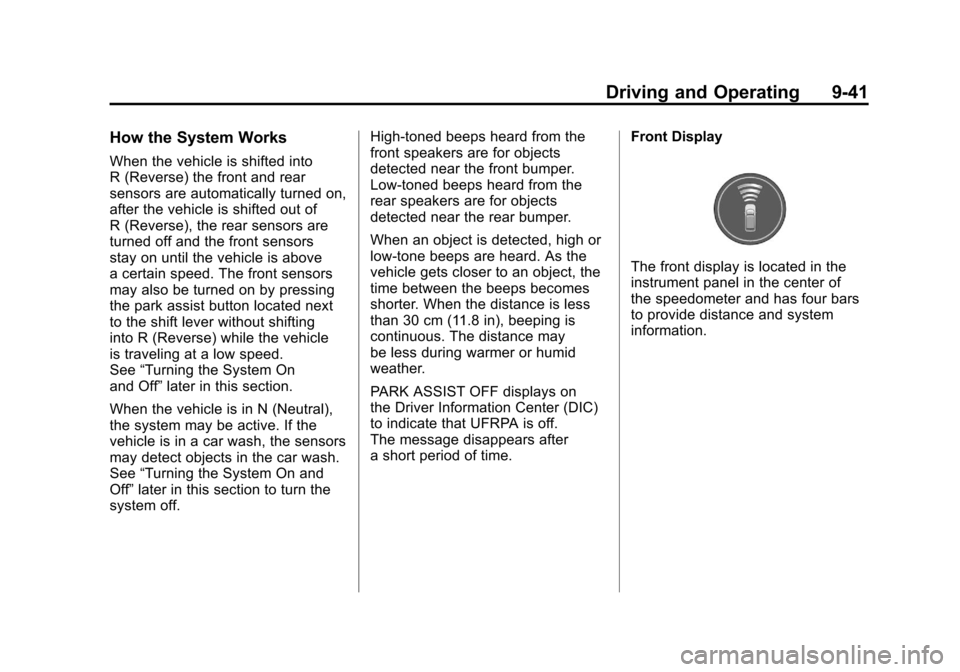
Front Display
The front display is located in the
instrument panel in the center of
the speedometer and has four bars
to provide distance and system
information.
Page 318 of 498
Black plate (42,1)Cadillac SRX Owner Manual - 2011
9-42 Driving and Operating
The following describes how the UFRPA front display lights appear as the
vehicle gets closer to a detected object:Description Metric English
one amber bar 1.2 m 4 ft
two amber bars 1.0 m 40 in
three amber bars 0.6 m 23 in
three amber bars and one red bar 0.3 m 1 ft
Turning the System On and Off
The UFRPA system can be turned
on and off by pressing the park
assist button located next to the
shift lever.
The park assist button lights up
when the system is on and turns
off when it has been disabled.
When the System Does Not
Seem to Work Properly
If UFRPA does not turn on due to a
temporary condition, the message
PARK ASSIST OFF displays on the
DIC, and the light on the park assist
button turns off. This can occur
under the following conditions:
.The ultrasonic sensors are
not clean. Keep the vehicle's
bumpers free of mud, dirt, snow,
ice and slush. For cleaning
instructions, see Exterior Care
on page 10‑101.
.A trailer was attached to the
vehicle, or an object was
hanging out of the liftgate during
the last drive cycle. Once the
attached object is removed,
UFRPA will return to normal
operation.
.If an object is attached to the
front of the vehicle.
.A tow bar is attached to the
vehicle.
.The vehicle's bumper is
damaged. Take the vehicle to
your dealer to repair the system.
.Other conditions may affect
system performance, such as
vibrations from a jackhammer or
the compression of air brakes on
a very large truck.
Page 376 of 498
Black plate (38,1)Cadillac SRX Owner Manual - 2011
10-38 Vehicle Care
Driver Side
The removal of the underhood
electrical center is required for the
replacement of one of these bulbs:
1. Open the hood. SeeHood on
page 10‑5.
{WARNING
Liquids from environment or
spillage and/or tools placed on
top of or used in the underhood
electrical center while the cover
is removed can pose a risk of
electrical shock/burn to anyone in
the vicinity. These conditions can
also cause damage to electrical
components on the vehicle. Keep
liquids and tools away from the
underhood electrical center when
the cover is removed.
2. Unlatch three clips and lift up the underhood electrical center
cover to remove.
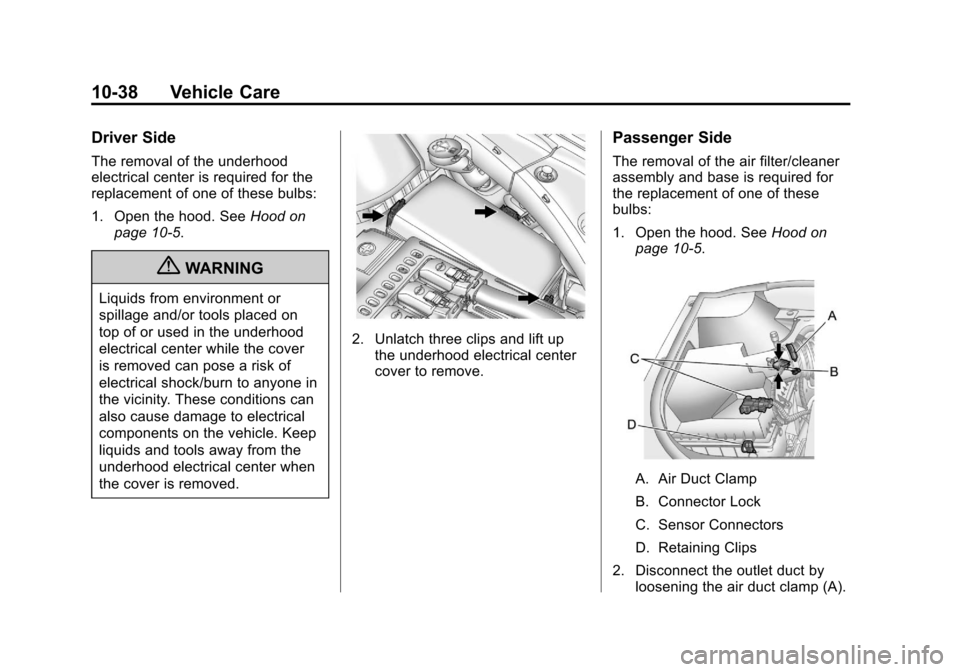
Passenger Side
The removal of the air filter/cleaner
assembly and base is required for
the replacement of one of these
bulbs:
1. Open the hood. See Hood on
page 10‑5.
A. Air Duct Clamp
B. Connector Lock
C. Sensor Connectors
D. Retaining Clips
2. Disconnect the outlet duct by loosening the air duct clamp (A).
Page 377 of 498
Black plate (39,1)Cadillac SRX Owner Manual - 2011
Vehicle Care 10-39
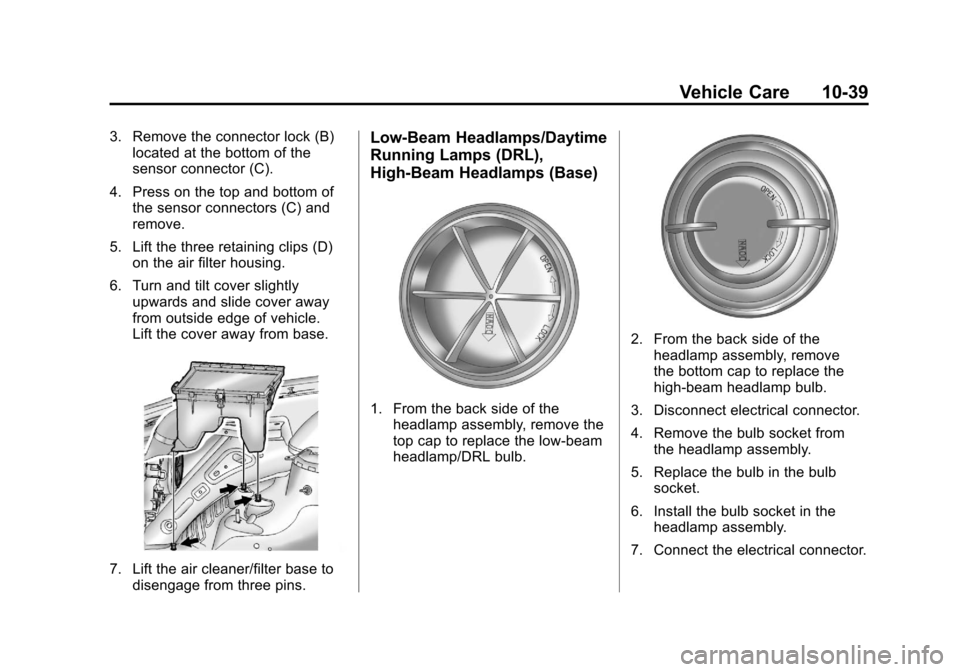
3. Remove the connector lock (B)located at the bottom of the
sensor connector (C).
4. Press on the top and bottom of the sensor connectors (C) and
remove.
5. Lift the three retaining clips (D) on the air filter housing.
6. Turn and tilt cover slightly upwards and slide cover away
from outside edge of vehicle.
Lift the cover away from base.
7. Lift the air cleaner/filter base todisengage from three pins.
Low-Beam Headlamps/Daytime
Running Lamps (DRL),
High-Beam Headlamps (Base)
1. From the back side of theheadlamp assembly, remove the
top cap to replace the low-beam
headlamp/DRL bulb.
2. From the back side of theheadlamp assembly, remove
the bottom cap to replace the
high-beam headlamp bulb.
3. Disconnect electrical connector.
4. Remove the bulb socket from the headlamp assembly.
5. Replace the bulb in the bulb socket.
6. Install the bulb socket in the headlamp assembly.
7. Connect the electrical connector.