ECU CADILLAC SRX 2013 2.G Owners Manual
[x] Cancel search | Manufacturer: CADILLAC, Model Year: 2013, Model line: SRX, Model: CADILLAC SRX 2013 2.GPages: 432, PDF Size: 7.13 MB
Page 1 of 432

Black plate (1,1)Cadillac SRX Owner Manual - 2013 - CRC - 11/9/12
2013 Cadillac SRX Owner ManualM
In Brief. . . . . . . . . . . . . . . . . . . . . . . . 1-1
Instrument Panel . . . . . . . . . . . . . . 1-2
Initial Drive Information . . . . . . . . 1-4
Vehicle Features . . . . . . . . . . . . . 1-16
Performance and Maintenance . . . . . . . . . . . . . . . . 1-21
Keys, Doors, and Windows . . . . . . . . . . . . . . . . . . . . 2-1
Keys and Locks . . . . . . . . . . . . . . . 2-2
Doors . . . . . . . . . . . . . . . . . . . . . . . . 2-13
Vehicle Security . . . . . . . . . . . . . . 2-17
Exterior Mirrors . . . . . . . . . . . . . . . 2-19
Interior Mirrors . . . . . . . . . . . . . . . . 2-21
Windows . . . . . . . . . . . . . . . . . . . . . 2-22
Roof . . . . . . . . . . . . . . . . . . . . . . . . . . 2-25
Seats and Restraints . . . . . . . . . 3-1
Head Restraints . . . . . . . . . . . . . . . 3-2
Front Seats . . . . . . . . . . . . . . . . . . . . 3-4
Rear Seats . . . . . . . . . . . . . . . . . . . 3-10
Safety Belts . . . . . . . . . . . . . . . . . . 3-13
Airbag System . . . . . . . . . . . . . . . . 3-20
Child Restraints . . . . . . . . . . . . . . 3-34 Storage
. . . . . . . . . . . . . . . . . . . . . . . 4-1
Storage Compartments . . . . . . . . 4-1
Additional Storage Features . . . 4-3
Roof Rack System . . . . . . . . . . . . 4-11
Instruments and Controls . . . . 5-1
Controls . . . . . . . . . . . . . . . . . . . . . . . 5-2
Warning Lights, Gauges, and
Indicators . . . . . . . . . . . . . . . . . . . . 5-9
Information Displays . . . . . . . . . . 5-27
Vehicle Messages . . . . . . . . . . . . 5-30
Vehicle Personalization . . . . . . . 5-40
Universal Remote System . . . . 5-45
Lighting . . . . . . . . . . . . . . . . . . . . . . . 6-1
Exterior Lighting . . . . . . . . . . . . . . . 6-1
Interior Lighting . . . . . . . . . . . . . . . . 6-6
Lighting Features . . . . . . . . . . . . . . 6-8
Infotainment System . . . . . . . . . 7-1
Introduction . . . . . . . . . . . . . . . . . . . . 7-1 Climate Controls
. . . . . . . . . . . . . 8-1
Climate Control Systems . . . . . . 8-1
Air Vents . . . . . . . . . . . . . . . . . . . . . . . 8-8
Maintenance . . . . . . . . . . . . . . . . . . . 8-8
Driving and Operating . . . . . . . . 9-1
Driving Information . . . . . . . . . . . . . 9-2
Starting and Operating . . . . . . . 9-14
Engine Exhaust . . . . . . . . . . . . . . 9-22
Automatic Transmission . . . . . . 9-23
Drive Systems . . . . . . . . . . . . . . . . 9-27
Brakes . . . . . . . . . . . . . . . . . . . . . . . 9-27
Ride Control Systems . . . . . . . . 9-31
Cruise Control . . . . . . . . . . . . . . . . 9-35
Driver Assistance Systems . . . 9-46
Fuel . . . . . . . . . . . . . . . . . . . . . . . . . . 9-59
Towing . . . . . . . . . . . . . . . . . . . . . . . 9-65
Conversions and Add-Ons . . . 9-72
Page 26 of 432
Black plate (20,1)Cadillac SRX Owner Manual - 2013 - CRC - 11/9/12
1-20 In Brief
Power Outlets
The accessory power outlets can be
used to plug in electrical equipment,
such as a cell phone or MP3 player.
The vehicle may have up to five
accessory power outlets.
The accessory power outlets are:
.Below the climate control system
inside the front storage bin.
.Inside the center floor console.
.On the rear of the center floor
console. For vehicles with a rear
climate control system, there will
be two accessory power outlets
on the rear of the center floor
console.
.In the rear cargo area.These are powered while the
vehicle is in ON/RUN/START or
ACC/ACCESSORY mode, or until
the driver door is opened within
10 minutes of turning off the vehicle.
The power outlet located in the rear
cargo area is powered at all times.
See
Power Outlets on page 5‑7.
Universal Remote System
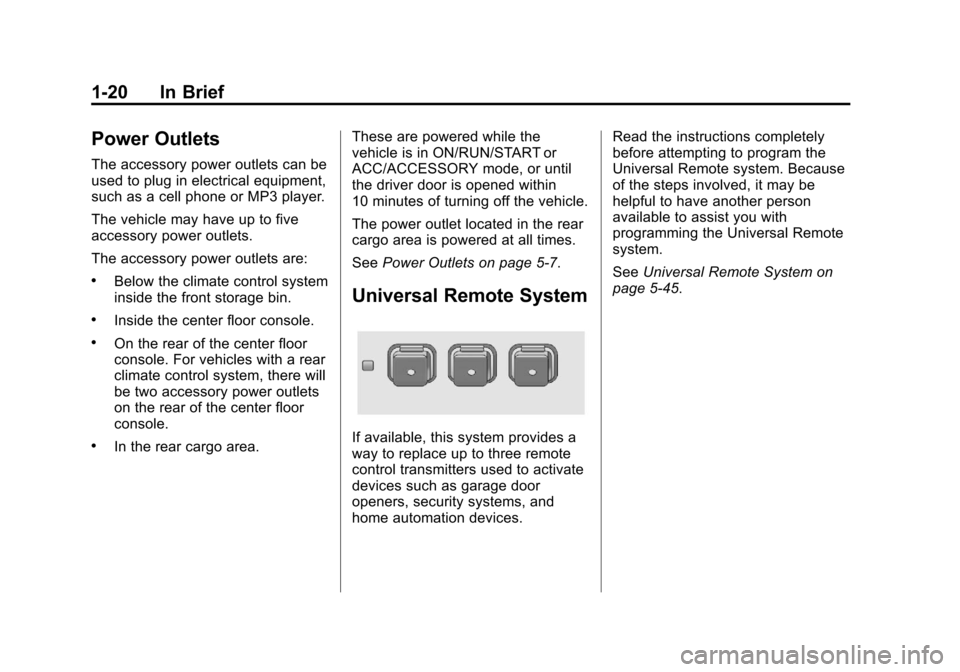
If available, this system provides a
way to replace up to three remote
control transmitters used to activate
devices such as garage door
openers, security systems, and
home automation devices. Read the instructions completely
before attempting to program the
Universal Remote system. Because
of the steps involved, it may be
helpful to have another person
available to assist you with
programming the Universal Remote
system.
See
Universal Remote System on
page 5‑45.
Page 29 of 432
Black plate (23,1)Cadillac SRX Owner Manual - 2013 - CRC - 11/9/12
In Brief 1-23
Fuel E85 (85% Ethanol)
Vehicles with a yellow fuel cap can
use either unleaded gasoline or
ethanol fuel containing up to
85% ethanol (E85). SeeFuel E85
(85% Ethanol) on page 9‑61. For
all other vehicles, use only the
unleaded gasoline described under
Recommended Fuel on page 9‑59.
Driving for Better Fuel
Economy
Driving habits can affect fuel
mileage. Here are some driving tips
to get the best fuel economy
possible.
.Avoid fast starts and accelerate
smoothly.
.Brake gradually and avoid
abrupt stops.
.Avoid idling the engine for long
periods of time.
.When road and weather
conditions are appropriate, use
cruise control.
.Always follow posted speed
limits or drive more slowly when
conditions require.
.Keep vehicle tires properly
inflated.
.Combine several trips into a
single trip.
.Replace the vehicle's tires with
the same TPC Spec number
molded into the tire's sidewall
near the size.
.Follow recommended scheduled
maintenance.
Roadside Service
U.S.: 1-800-224-1400
Canada: 1-800-882-1112
TTY Users (U.S. Only):
1-888-889-2438
Mexico: 01-800-466-0805
New vehicles are automatically
enrolled in the Roadside Service
program.
See Roadside Service (Mexico) on
page 13‑7 orRoadside Service
(U.S. and Canada) on page 13‑11.
OnStar®
If equipped, this vehicle has a
comprehensive, in-vehicle system
that can connect to a live Advisor
for Emergency, Security, Navigation,
Connection, and Diagnostic
Services. See OnStar Overview on
page 14‑1.
Page 31 of 432
Black plate (1,1)Cadillac SRX Owner Manual - 2013 - CRC - 11/9/12
Keys, Doors, and Windows 2-1
Keys, Doors, and
Windows
Keys and Locks
Keys . . . . . . . . . . . . . . . . . . . . . . . . . . 2-2
Remote Keyless Entry (RKE)System . . . . . . . . . . . . . . . . . . . . . . 2-3
Remote Keyless Entry (RKE) System Operation . . . . . . . . . . . 2-3
Remote Vehicle Start . . . . . . . . . 2-9
Door Locks . . . . . . . . . . . . . . . . . . 2-10
Power Door Locks . . . . . . . . . . . 2-11
Automatic Door Locks . . . . . . . 2-12
Safety Locks . . . . . . . . . . . . . . . . . 2-12
Doors
Liftgate . . . . . . . . . . . . . . . . . . . . . . 2-13
Vehicle Security
Vehicle Security . . . . . . . . . . . . . . 2-17
Vehicle Alarm System . . . . . . . 2-17
Immobilizer . . . . . . . . . . . . . . . . . . 2-18
Immobilizer Operation . . . . . . . 2-18
Exterior Mirrors
Convex Mirrors . . . . . . . . . . . . . . 2-19
Power Mirrors . . . . . . . . . . . . . . . . 2-20
Folding Mirrors . . . . . . . . . . . . . . . 2-20
Heated Mirrors . . . . . . . . . . . . . . . 2-21
Automatic Dimming Mirror . . . 2-21
Reverse Tilt Mirrors . . . . . . . . . . 2-21
Interior Mirrors
Manual Rearview Mirror . . . . . . 2-21
Automatic Dimming Rearview Mirror . . . . . . . . . . . . . . . . . . . . . . . 2-21
Windows
Windows . . . . . . . . . . . . . . . . . . . . . 2-22
Power Windows . . . . . . . . . . . . . 2-22
Sun Visors . . . . . . . . . . . . . . . . . . . 2-25
Roof
Sunroof . . . . . . . . . . . . . . . . . . . . . . 2-25
Page 47 of 432
Black plate (17,1)Cadillac SRX Owner Manual - 2013 - CRC - 11/9/12
Keys, Doors, and Windows 2-17
To open the liftgate, press the touch
pad on the handle on the outside of
the liftgate, and lift the gate open. To
close the liftgate, use the pull cup to
lower the liftgate and close. With the
power liftgate disabled, the liftgate
electric latch will still power latch
once contact is made with the
striker. Always close the liftgate
before driving.
If the RKE button is pressed while
power operation is disabled, the turn
signals flash and the liftgate will
not move.
The liftgate has an electric latch.
If the battery is disconnected or has
low voltage, the liftgate will not
open. The liftgate will resume
operation when the battery is
reconnected and charged.Vehicle Security
This vehicle has theft-deterrent
features; however, they do not make
the vehicle impossible to steal.
Vehicle Alarm System
This vehicle has an anti-theft alarm
system.
The indicator light, on the
instrument panel near the
windshield, indicates the status of
the system.
Arming the System
1. Close all doors, liftgate,and hood.
2. Lock the vehicle using the transmitter or the power door
lock button. The indicator light
on the instrument panel should
come on and stay on for about
30 seconds. 3. After 30 seconds, the alarm
system will arm, and the
indicator light will begin to slowly
flash indicating the alarm is
operating.
If a door, the hood, or liftgate is
opened without first unlocking with
the transmitter, the turn signals will
flash and the horn will sound for
about 30 seconds. The alarm
system will then re-arm to monitor
for the next unauthorized event.
The theft-deterrent alarm system will
not activate if the doors are locked
with the key. You can start the
vehicle with a recognized transmitter
in the vehicle if the alarm has been
set off.
Disarming the System
To disarm the system, either unlock
the doors using the transmitter,
or start the vehicle with a
recognized transmitter in the
vehicle.
Page 48 of 432
Black plate (18,1)Cadillac SRX Owner Manual - 2013 - CRC - 11/9/12
2-18 Keys, Doors, and Windows
To avoid setting off the alarm by
accident:
.Lock the vehicle with the
transmitter after all occupants
have left the vehicle and all
doors are closed.
.Always unlock a door with the
transmitter. Unlocking a door any
other way will not disarm the
alarm.
If you set off the alarm by accident,
turn off the alarm by pressing
Kon
the transmitter. The alarm will not
stop if you try to unlock a door any
other way.
How to Detect a Tamper
Condition
IfKis pressed and the horn chirps
three times, an attempted break-in
occurred while the system was
armed. If the alarm has been activated, the
THEFT ATTEMPTED message will
appear on the DIC. See
Key and
Lock Messages on page 5‑34 for
additional information.
Immobilizer
See Radio Frequency Statement on
page 13‑21 for information
regarding Part 15 of the Federal
Communications Commission (FCC)
rules and Industry Canada
Standards RSS-GEN/210/220/310.
Immobilizer Operation
This vehicle has a passive
theft-deterrent system.
The system does not have to be
manually armed or disarmed.
The vehicle is automatically
immobilized when the vehicle is
turned off.
The immobilization system is
disarmed when the pushbutton
start is activated to enter the ACC/ACCESSORY mode or the
ON/RUN/START mode and a valid
transmitter is present in the vehicle.
The security light, in the instrument
cluster, comes on if there is a
problem with arming or disarming
the theft-deterrent system.
The system has one or more
RKE transmitters matched to an
immobilizer control unit in your
vehicle. Only a correctly matched
RKE transmitter will start the
vehicle. If the transmitter is ever
damaged, you may not be able to
start your vehicle.
When trying to start the vehicle, the
security light comes on briefly when
the ignition is turned on.
Page 49 of 432
Black plate (19,1)Cadillac SRX Owner Manual - 2013 - CRC - 11/9/12
Keys, Doors, and Windows 2-19
If the engine does not start and the
security light stays on, there is a
problem with the system. Turn the
ignition off and try again.
If the vehicle will not change
ignition modes (ACC/ACCESSORY,
ON/RUN/START, OFF), and the
RKE transmitter appears to be
undamaged, try another transmitter.
Or, you may try placing the
transmitter in the transmitter pocket
located in the center console. See
“NO REMOTE DETECTED”under
Key and Lock Messages on
page 5‑34. If the ignition modes will not change
with the other transmitter, your
vehicle needs service. If the ignition
does change modes, the first
transmitter may be faulty. See
your dealer who can service the
theft-deterrent system and have a
new RKE transmitter programmed to
the vehicle.
It is possible for the immobilizer
system to learn new or replacement
RKE transmitters. Up to eight
transmitters can be programmed for
the vehicle. To program additional
transmitters, see
“Programming
Transmitters to the Vehicle” under
Remote Keyless Entry (RKE)
System Operation on page 2‑3.
Do not leave the key or device
that disarms or deactivates the
theft-deterrent system in the vehicle.Exterior Mirrors
Convex Mirrors
{WARNING
A convex mirror can make things,
like other vehicles, look farther
away than they really are. If you
cut too sharply into the right lane,
you could hit a vehicle on the
right. Check the inside mirror or
glance over your shoulder before
changing lanes.
The passenger side mirror is convex
shaped. A convex mirror's surface is
curved so more can be seen from
the driver seat.
Page 57 of 432
Black plate (1,1)Cadillac SRX Owner Manual - 2013 - CRC - 11/9/12
Seats and Restraints 3-1
Seats and
Restraints
Head Restraints
Head Restraints . . . . . . . . . . . . . . . 3-2
Front Seats
Seat Adjustment . . . . . . . . . . . . . . 3-4
Power Seat Adjustment . . . . . . . 3-4
Lumbar Adjustment . . . . . . . . . . . 3-5
Thigh Support Adjustment . . . . 3-5
Reclining Seatbacks . . . . . . . . . . 3-6
Memory Seats . . . . . . . . . . . . . . . . 3-7
Heated and Ventilated FrontSeats . . . . . . . . . . . . . . . . . . . . . . . . 3-9
Rear Seats
Rear Seats . . . . . . . . . . . . . . . . . . 3-10
Heated Rear Seats . . . . . . . . . . 3-12
Rear SeatPass-Through Door . . . . . . . . 3-12
Safety Belts
Safety Belts . . . . . . . . . . . . . . . . . . 3-13
How to Wear Safety BeltsProperly . . . . . . . . . . . . . . . . . . . . 3-14
Lap-Shoulder Belt . . . . . . . . . . . 3-15
Safety Belt Use During Pregnancy . . . . . . . . . . . . . . . . . . 3-18
Safety Belt Extender . . . . . . . . . 3-19
Safety System Check . . . . . . . . 3-19
Safety Belt Care . . . . . . . . . . . . . 3-19
Replacing Safety Belt System Parts after a Crash . . . . . . . . . 3-20
Airbag System
Airbag System . . . . . . . . . . . . . . . 3-20
Where Are the Airbags? . . . . . 3-22
When Should an AirbagInflate? . . . . . . . . . . . . . . . . . . . . . 3-24
What Makes an Airbag Inflate? . . . . . . . . . . . . . . . . . . . . . 3-25
How Does an Airbag Restrain? . . . . . . . . . . . . . . . . . . . 3-25
What Will You See after an Airbag Inflates? . . . . . . . . . . . . 3-26 Passenger Sensing
System . . . . . . . . . . . . . . . . . . . . . 3-27
Servicing the Airbag-Equipped Vehicle . . . . . . . . . . . . . . . . . . . . . 3-31
Adding Equipment to the
Airbag-Equipped Vehicle . . . 3-32
Airbag System Check . . . . . . . . 3-33
Replacing Airbag System Parts after a Crash . . . . . . . . . 3-33
Child Restraints
Older Children . . . . . . . . . . . . . . . 3-34
Infants and YoungChildren . . . . . . . . . . . . . . . . . . . . 3-36
Child Restraint Systems . . . . . 3-38
Where to Put the Restraint . . . 3-40
Lower Anchors and Tethers for Children (LATCH
System) . . . . . . . . . . . . . . . . . . . . 3-41
Replacing LATCH System Parts After a Crash . . . . . . . . . 3-49
Securing Child Restraints (Rear Seat) . . . . . . . . . . . . . . . . . 3-50
Securing Child Restraints (Front Passenger Seat) . . . . 3-52
Page 59 of 432
Black plate (3,1)Cadillac SRX Owner Manual - 2013 - CRC - 11/9/12
Seats and Restraints 3-3
The front seat outboard head
restraints are not designed to be
removed.
Rear Seats
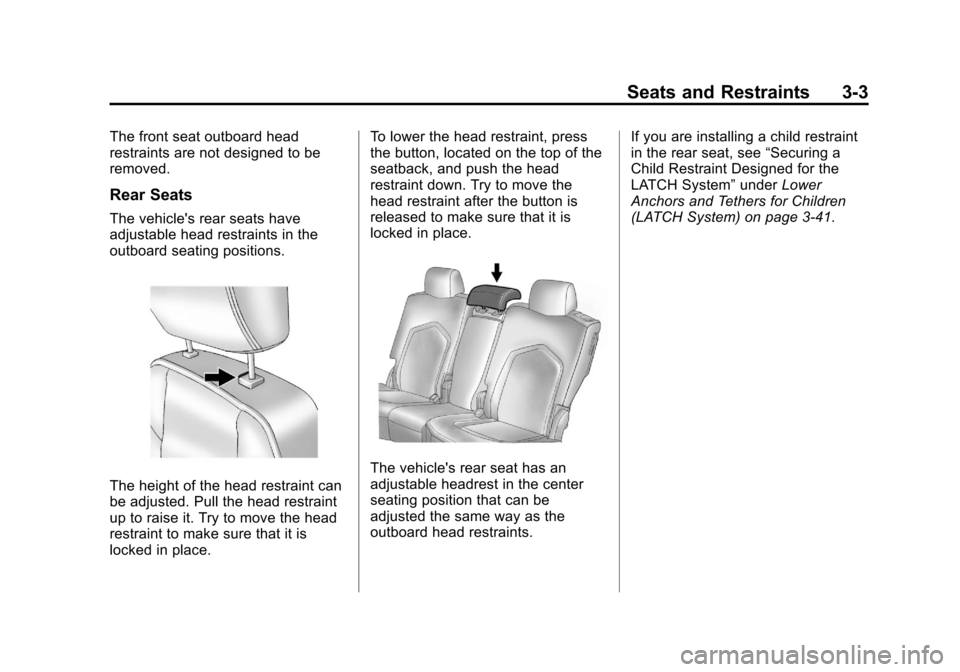
The vehicle's rear seats have
adjustable head restraints in the
outboard seating positions.
The height of the head restraint can
be adjusted. Pull the head restraint
up to raise it. Try to move the head
restraint to make sure that it is
locked in place.To lower the head restraint, press
the button, located on the top of the
seatback, and push the head
restraint down. Try to move the
head restraint after the button is
released to make sure that it is
locked in place.
The vehicle's rear seat has an
adjustable headrest in the center
seating position that can be
adjusted the same way as the
outboard head restraints.
If you are installing a child restraint
in the rear seat, see
“Securing a
Child Restraint Designed for the
LATCH System” underLower
Anchors and Tethers for Children
(LATCH System) on page 3‑41.
Page 71 of 432
Black plate (15,1)Cadillac SRX Owner Manual - 2013 - CRC - 11/9/12
Seats and Restraints 3-15
would apply force on your
abdomen. This could cause
serious or even fatal injuries.
.Wear the shoulder belt over the
shoulder and across the chest.
These parts of the body are best
able to take belt restraining
forces. The shoulder belt locks if
there is a sudden stop or crash.
{WARNING
You can be seriously injured,
or even killed, by not wearing
your safety belt properly.
.Never allow the lap or
shoulder belt to become
loose or twisted.
.Never wear the shoulder belt
under both arms or behind
your back.
.Never route the lap or
shoulder belt over an
armrest.
Lap-Shoulder Belt
All seating positions in the vehicle
have a lap-shoulder belt.
The following instructions explain
how to wear a lap-shoulder belt
properly.
1. Adjust the seat, if the seat isadjustable, so you can sit up
straight. To see how, see “Seats”
in the Index.
2. Pick up the latch plate and pull the belt across you. Do not let it
get twisted.
The lap-shoulder belt may lock if
you pull the belt across you very
quickly. If this happens, let the
belt go back slightly to unlock it.
Then pull the belt across you
more slowly.
If the shoulder portion of a
passenger belt is pulled out all
the way, the child restraint
locking feature may be engaged.
If this happens, let the belt go
back all the way and start again.
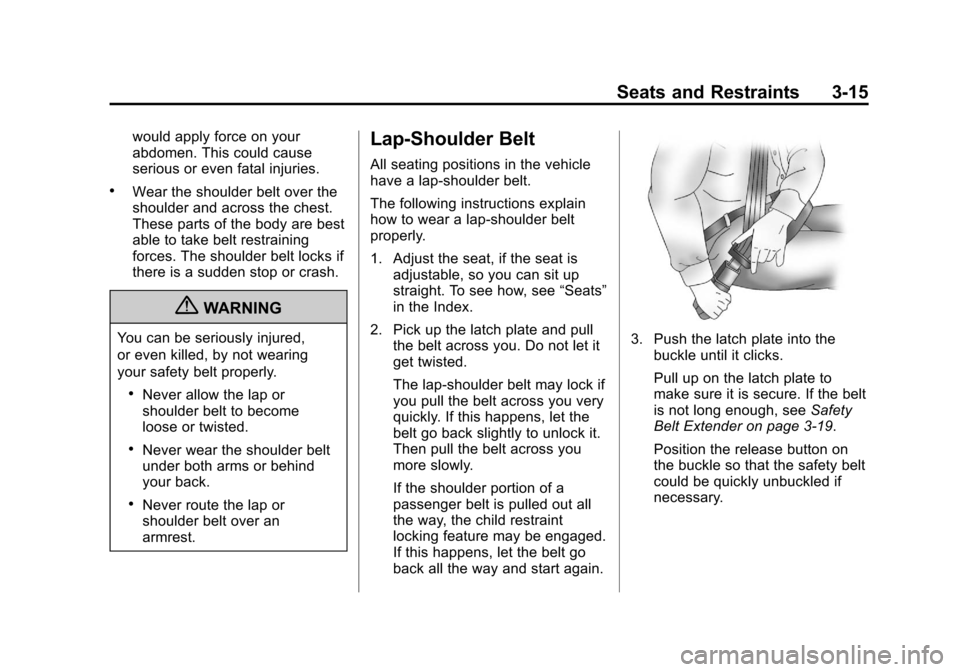
3. Push the latch plate into the
buckle until it clicks.
Pull up on the latch plate to
make sure it is secure. If the belt
is not long enough, see Safety
Belt Extender on page 3‑19.
Position the release button on
the buckle so that the safety belt
could be quickly unbuckled if
necessary.