tow CADILLAC SRX 2014 Workshop Manual
[x] Cancel search | Manufacturer: CADILLAC, Model Year: 2014, Model line: SRX, Model: CADILLAC SRX 2014Pages: 416, PDF Size: 4.56 MB
Page 323 of 416
Black plate (63,1)Cadillac SRX Owner Manual (GMNA-Localizing-U.S./Canada/Mexico-
6081464) - 2014 - CRC - 10/4/13
Vehicle Care 10-63
Warning (Continued)
parts. The area damaged by the
tire chains could cause loss of
control and a crash.
Use another type of traction
device only if its manufacturer
recommends it for the vehicle's
tire size combination and road
conditions. Follow that
manufacturer's instructions. To
avoid vehicle damage, drive slow
and readjust or remove the
traction device if it contacts the
vehicle. Do not spin the wheels.
If traction devices are used, install
them on the front tires.
If a Tire Goes Flat
It is unusual for a tire to blow out
while driving, especially if the tires
are maintained properly. SeeTires
on page 10-42. If air goes out of a
tire, it is much more likely to leak
out slowly. But if there is ever a
blowout, here are a few tips about
what to expect and what to do:
If a front tire fails, the flat tire
creates a drag that pulls the vehicle
toward that side. Take your foot off
the accelerator pedal and grip the
steering wheel firmly. Steer to
maintain lane position, and then
gently brake to a stop, well off the
road, if possible.
A rear blowout, particularly on a
curve, acts much like a skid and
may require the same correction as
used in a skid. Stop pressing the accelerator pedal and steer to
straighten the vehicle. It may be
very bumpy and noisy. Gently brake
to a stop, well off the road,
if possible.
{Warning
Driving on a flat tire will cause
permanent damage to the tire.
Re-inflating a tire after it has been
driven on while severely
underinflated or flat may cause a
blowout and a serious crash.
Never attempt to re-inflate a tire
that has been driven on while
severely underinflated or flat.
Have your dealer or an authorized
tire service center repair or
replace the flat tire as soon as
possible.
Page 336 of 416
Black plate (76,1)Cadillac SRX Owner Manual (GMNA-Localizing-U.S./Canada/Mexico-
6081464) - 2014 - CRC - 10/4/13
10-76 Vehicle Care
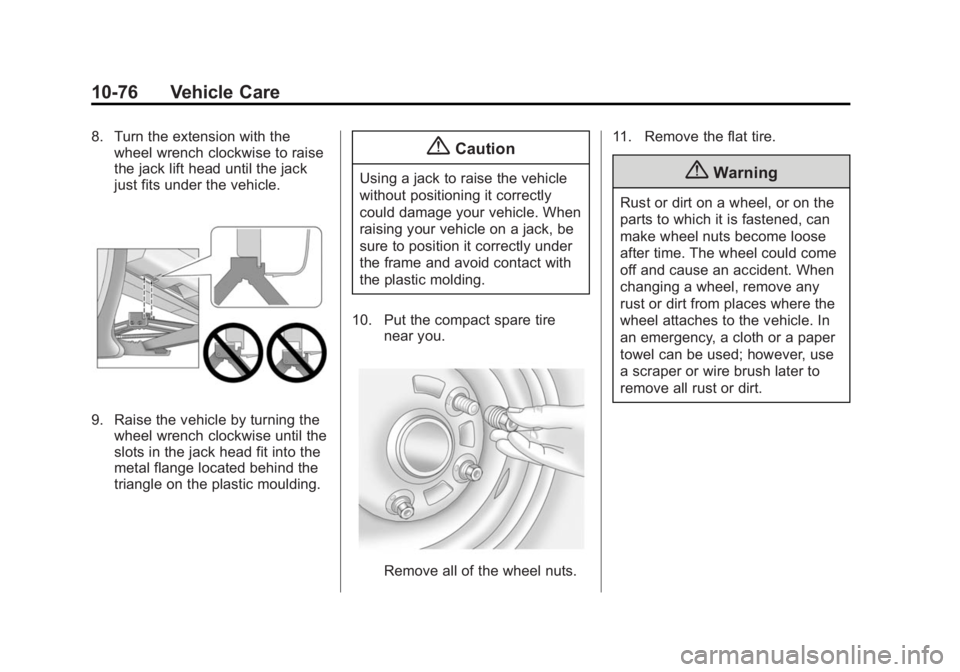
8. Turn the extension with thewheel wrench clockwise to raise
the jack lift head until the jack
just fits under the vehicle.
9. Raise the vehicle by turning the
wheel wrench clockwise until the
slots in the jack head fit into the
metal flange located behind the
triangle on the plastic moulding.
{Caution
Using a jack to raise the vehicle
without positioning it correctly
could damage your vehicle. When
raising your vehicle on a jack, be
sure to position it correctly under
the frame and avoid contact with
the plastic molding.
10. Put the compact spare tire near you.
Remove all of the wheel nuts. 11. Remove the flat tire.
{Warning
Rust or dirt on a wheel, or on the
parts to which it is fastened, can
make wheel nuts become loose
after time. The wheel could come
off and cause an accident. When
changing a wheel, remove any
rust or dirt from places where the
wheel attaches to the vehicle. In
an emergency, a cloth or a paper
towel can be used; however, use
a scraper or wire brush later to
remove all rust or dirt.
Page 344 of 416
Black plate (84,1)Cadillac SRX Owner Manual (GMNA-Localizing-U.S./Canada/Mexico-
6081464) - 2014 - CRC - 10/4/13
10-84 Vehicle Care
Towing the Vehicle
{Caution
Incorrectly towing a disabled
vehicle may cause damage. The
damage would not be covered by
the vehicle warranty. Do not lash
or hook to the chassis
components—including the front
and rear subframes, suspension
control arms, and links —during
towing and recovery of a disabled
vehicle, or when securing the
vehicle. Use the proper nylon
strap harnesses around the tires
to secure the vehicle.
Have the vehicle towed on a flatbed
car carrier. A wheel lift tow truck
could damage the vehicle.
Consult your dealer or a
professional towing service if the
disabled vehicle must be towed. To tow the vehicle behind another
vehicle for recreational purposes,
such as behind a motor home, see
“Recreational Vehicle Towing”
following.
Recreational Vehicle
Towing
Recreational vehicle towing means
towing the vehicle behind another
vehicle, such as behind a motor
home. The two most common types
of recreational vehicle towing are
known as dinghy towing and dolly
towing. Dinghy towing is towing the
vehicle with all four wheels on the
ground. Dolly towing is towing the
vehicle with two wheels on the
ground and two wheels up on a
device known as a dolly.
Here are some important things to
consider before recreational vehicle
towing:
.The towing capacity of the
towing vehicle. Be sure to read
the tow vehicle manufacturer's
recommendations.
.How far the vehicle will be
towed. Some vehicles have
restrictions on how far and how
long they can tow.
.The proper towing equipment.
See your dealer or trailering
professional for additional advice
and equipment
recommendations.
.If the vehicle is ready to be
towed. Just as preparing the
vehicle for a long trip, make sure
the vehicle is prepared to be
towed.
Dinghy Towing
Front-wheel-drive and
all-wheel-drive vehicles may be
dinghy towed from the front. These
vehicles can also be towed by
placing them on a platform trailer
with all four wheels off of the
ground. For other towing options,
see the information on dolly towing
that follows.
Page 345 of 416

Black plate (85,1)Cadillac SRX Owner Manual (GMNA-Localizing-U.S./Canada/Mexico-
6081464) - 2014 - CRC - 10/4/13
Vehicle Care 10-85
{Caution
If 105 km/h (65 mph) is exceeded
while towing the vehicle, it could
be damaged. Never exceed
105 km/h (65 mph) while towing
the vehicle.
For vehicles being dinghy towed,
the vehicle should be run at the
beginning of each day and at each
RV fuel stop for about five minutes.
This will ensure proper lubrication of
transmission components.
To tow the vehicle from the front
with all four wheels on the ground:
1. Position the vehicle that will be towed and secure it to the
towing vehicle.
2. Remove the shift lever boot bypulling up on the rear of the trim
plate.
3. Use a small screwdriver or toolto press and hold the manual
release button on the front right.
4. Put the vehicle in N (Neutral).
{Caution
If the vehicle is towed without
performing each of the steps
listed under “Dinghy Towing,” the
automatic transmission could be
damaged. Be sure to follow all
steps of the dinghy towing
procedure prior to and after
towing the vehicle.
Page 346 of 416

Black plate (86,1)Cadillac SRX Owner Manual (GMNA-Localizing-U.S./Canada/Mexico-
6081464) - 2014 - CRC - 10/4/13
10-86 Vehicle Care
Once the destination has been
reached:
1. Shift the vehicle to P (Park).
2. Reinstall the shift lever boot byinserting the front edge and
pressing the rear of the trim
plate until it snaps into place.
3. Start the engine and let it idle for more than three minutes before
driving the vehicle.
{Caution
Too much or too little fluid can
damage the transmission. Be
sure that the transmission fluid is
at the proper level before towing
with all four wheels on the
ground.
{Caution
Do not tow a vehicle with the front
drive wheels on the ground if one
of the front tires is a compact
spare tire. Towing with two
different tire sizes on the front of
the vehicle can cause severe
damage to the transmission.
Dolly Towing (All-Wheel-Drive
Vehicles)
All-wheel-drive vehicles should not
be towed with two wheels on the
ground. To properly tow these
vehicles, they should be placed on
a platform trailer with all four wheels
off of the ground or dinghy towed
from the front. See “Dinghy Towing”
earlier in this section.
Dolly Towing
(Front-Wheel-Drive Vehicles)
To tow the vehicle from the front
with the rear wheels on the ground:
1. Put the front wheels on a dolly.
2. Move the shift lever to P (Park).
See Shifting Into Park on
page 9-19.
3. Set the parking brake.
4. Secure the vehicle to the dolly.
Page 347 of 416
Black plate (87,1)Cadillac SRX Owner Manual (GMNA-Localizing-U.S./Canada/Mexico-
6081464) - 2014 - CRC - 10/4/13
Vehicle Care 10-87
5. Follow the dolly manufacturer'sinstructions for preparing the
vehicle and dolly for towing.
6. Release the parking brake.
Towing the Vehicle from
the Rear
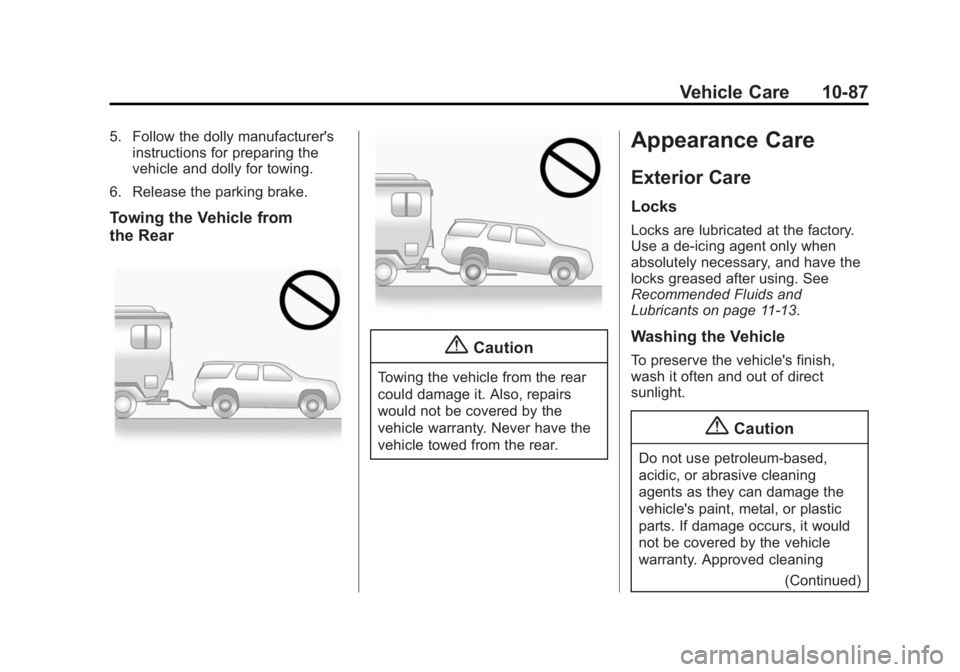
{Caution
Towing the vehicle from the rear
could damage it. Also, repairs
would not be covered by the
vehicle warranty. Never have the
vehicle towed from the rear.
Appearance Care
Exterior Care
Locks
Locks are lubricated at the factory.
Use a de-icing agent only when
absolutely necessary, and have the
locks greased after using. See
Recommended Fluids and
Lubricants on page 11-13.
Washing the Vehicle
To preserve the vehicle's finish,
wash it often and out of direct
sunlight.
{Caution
Do not use petroleum-based,
acidic, or abrasive cleaning
agents as they can damage the
vehicle's paint, metal, or plastic
parts. If damage occurs, it would
not be covered by the vehicle
warranty. Approved cleaning (Continued)
Page 348 of 416
Black plate (88,1)Cadillac SRX Owner Manual (GMNA-Localizing-U.S./Canada/Mexico-
6081464) - 2014 - CRC - 10/4/13
10-88 Vehicle Care
Caution (Continued)
products can be obtained from
your dealer. Follow all
manufacturer directions regarding
correct product usage, necessary
safety precautions, and
appropriate disposal of any
vehicle care product.
{Caution
Avoid using high-pressure
washes closer than 30 cm (12 in)
to the surface of the vehicle. Use
of power washers exceeding
8,274 kPa (1,200 psi) can result
in damage or removal of paint
and decals.
The
esymbol is on any
underhood compartment electrical
center that should not be power washed. This could cause damage
that would not be covered by the
vehicle warranty.
If using an automatic car wash,
follow the car wash instructions. The
windshield wiper and rear window
wiper, if equipped, must be off.
Remove any accessories that may
be damaged or interfere with the car
wash equipment.
Rinse the vehicle well, before
washing and after, to remove all
cleaning agents completely. If they
are allowed to dry on the surface,
they could stain.
Dry the finish with a soft, clean
chamois or an all-cotton towel to
avoid surface scratches and water
spotting.
Finish Care
Application of aftermarket clearcoat
sealant/wax materials is not
recommended. If painted surfaces
are damaged, see your dealer to
have the damage assessed and
repaired. Foreign materials such as
calcium chloride and other salts, ice
melting agents, road oil and tar, tree
sap, bird droppings, chemicals from
industrial chimneys, etc., can
damage the vehicle's finish if they
remain on painted surfaces. Wash
the vehicle as soon as possible.
If necessary, use non-abrasive
cleaners that are marked safe for
painted surfaces to remove foreign
matter.
Occasional hand waxing or mild
polishing should be done to remove
residue from the paint finish. See
your dealer for approved cleaning
products.
Do not apply waxes or polishes to
uncoated plastic, vinyl, rubber,
decals, simulated wood, or flat paint
as damage can occur.
Page 350 of 416
Black plate (90,1)Cadillac SRX Owner Manual (GMNA-Localizing-U.S./Canada/Mexico-
6081464) - 2014 - CRC - 10/4/13
10-90 Vehicle Care
.Solvents, alcohols, fuels,
or other harsh cleaners.
.Ice scrapers or other hard items.
.Aftermarket appearance caps or
covers while the lamps are
illuminated, due to excessive
heat generated.
{Caution
Failure to clean lamps properly
can cause damage to the lamp
cover that would not be covered
by the vehicle warranty.
{Caution
Using wax on low gloss black
finish stripes can increase the
gloss level and create a
non-uniform finish. Clean low
gloss stripes with soap and
water only.
Air Intakes
Clear debris from the air intakes,
between the hood and windshield
when washing the vehicle.
Windshield and Wiper Blades
Clean the outside of the windshield
with glass cleaner.
Clean rubber blades using a lint-free
cloth or paper towel soaked with
windshield washer fluid or a mild
detergent. Wash the windshield
thoroughly when cleaning the
blades. Bugs, road grime, sap, and
a buildup of vehicle wash/wax
treatments may cause wiper
streaking.
Replace the wiper blades if they are
worn or damaged. Damage can be
caused by extreme dusty
conditions, sand, salt, heat, sun,
snow, and ice.
Weatherstrips
Apply Dielectric silicone grease on
weatherstrips to make them last
longer, seal better, and not stick or
squeak. Lubricate weatherstrips at
least once a year. Hot, dry climates
may require more frequent
application. Black marks from
rubber material on painted surfaces
can be removed by rubbing with a
clean cloth. SeeRecommended
Fluids and Lubricants on
page 11-13.
Tires
Use a stiff brush with tire cleaner to
clean the tires.
{Caution
Using petroleum-based tire
dressing products on the vehicle
may damage the paint finish and/
or tires. When applying a tire
dressing, always wipe off any
overspray from all painted
surfaces on the vehicle.
Page 351 of 416

Black plate (91,1)Cadillac SRX Owner Manual (GMNA-Localizing-U.S./Canada/Mexico-
6081464) - 2014 - CRC - 10/4/13
Vehicle Care 10-91
Wheels and Trim—Aluminum
or Chrome
Use a soft, clean cloth with mild
soap and water to clean the wheels.
After rinsing thoroughly with clean
water, dry with a soft, clean towel.
A wax may then be applied.
{Caution
Chrome wheels and other chrome
trim may be damaged if the
vehicle is not washed after driving
on roads that have been sprayed
with magnesium, calcium,
or sodium chloride. These
chlorides are used on roads for
conditions such as ice and dust.
Always wash the chrome with
soap and water after exposure.
{Caution
To avoid surface damage, do not
use strong soaps, chemicals,
abrasive polishes, cleaners,
brushes, or cleaners that contain
acid on aluminum or
chrome-plated wheels. Use only
approved cleaners. Also, never
drive a vehicle with aluminum or
chrome-plated wheels through an
automatic car wash that uses
silicone carbide tire cleaning
brushes. Damage could occur
and the repairs would not be
covered by the vehicle warranty.
Steering, Suspension, and
Chassis Components
Visually inspect steering,
suspension, and chassis
components for damaged, loose,
or missing parts or signs of wear at
least once a year. Inspect power steering for proper
hook-up, binding, leaks, cracks,
chafing, etc.
Visually check constant velocity joint
boots and axle seals for leaks.
Body Component Lubrication
Lubricate all key lock cylinders,
hood hinges, liftgate hinges, and the
fuel door hinge unless the
components are plastic. Applying
silicone grease on weatherstrips
with a clean cloth will make them
last longer, seal better, and not stick
or squeak.
Underbody Maintenance
At least twice a year, Spring and
Fall, use plain water to flush dirt and
debris from the vehicle's underbody.
Your dealer or an underbody car
washing system can do this. If not
removed, rust and corrosion can
develop.
Page 353 of 416
Black plate (93,1)Cadillac SRX Owner Manual (GMNA-Localizing-U.S./Canada/Mexico-
6081464) - 2014 - CRC - 10/4/13
Vehicle Care 10-93
.Do not use laundry detergents or
dishwashing soaps with
degreasers. For liquid cleaners,
use approximately 20 drops per
3.8 L (1 gal) of water.
A concentrated soap solution will
leave a residue that creates
streaks and attracts dirt. Do not
use solutions that contain strong
or caustic soap.
.Do not heavily saturate the
upholstery when cleaning.
.Do not use solvents or cleaners
containing solvents.
Interior Glass
To clean, use a terry cloth fabric
dampened with water. Wipe droplets
left behind with a clean dry cloth.
Commercial glass cleaners may be
used, if necessary, after cleaning
the interior glass with plain water.
{Caution
To prevent scratching, never use
abrasive cleaners on automotive
glass. Abrasive cleaners or
aggressive cleaning may damage
the rear window defogger.
Cleaning the windshield with water
during the first three to six months
of ownership will reduce tendency
to fog.
Speaker Covers
Vacuum around a speaker cover
gently, so that the speaker will not
be damaged. Clean spots with just
water and mild soap.
Coated Moldings
Coated moldings should be cleaned.
.When lightly soiled, wipe with a
sponge or soft lint-free cloth
dampened with water.
.When heavily soiled, use warm
soapy water.
Fabric/Carpet/Suede
Start by vacuuming the surface
using a soft brush attachment. If a
rotating brush attachment is being
used during vacuuming, only use it
on the floor carpet. Before cleaning,
gently remove as much of the soil
as possible using one of the
following techniques:
.Gently blot liquids with a paper
towel. Continue blotting until no
more soil can be removed.
.For solid soils, remove as much
as possible prior to vacuuming.
To clean:
1. Saturate a clean lint-free colorfast cloth with water.
Microfiber cloth is recommended
to prevent lint transfer to the
fabric or carpet.
2. Remove excess moisture by gently wringing until water does
not drip from the cleaning cloth.