headlamp CADILLAC SRX 2015 2.G Owner's Manual
[x] Cancel search | Manufacturer: CADILLAC, Model Year: 2015, Model line: SRX, Model: CADILLAC SRX 2015 2.GPages: 417, PDF Size: 4.59 MB
Page 284 of 417

Black plate (25,1)Cadillac SRX Owner Manual (GMNA-Localizing-U.S./Canada/Mexico-
7707476) - 2015 - crc - 4/8/14
Vehicle Care 10-25
To remove the wiper blade:
1. Lift the wiper arm away from thewindow.
2. Push the release lever (2) to disengage the hook and push
the wiper arm (1) out of the
blade assembly (3).
3. Push the new blade assembly securely on the wiper arm until
the release lever clicks into
place.
4. Replace the wiper cover.
Headlamp Aiming
Headlamp aim has been preset and
should need no further adjustment.
If the vehicle is damaged in a crash,
the headlamp aim may be affected.
If adjustment to the headlamps is
necessary, see your dealer.
Bulb Replacement
For the proper type of replacement
bulbs, see Replacement Bulbs on
page 10-32.
For any bulb changing procedure
not listed in this section, contact
your dealer.
Halogen Bulbs
{Warning
Halogen bulbs have pressurized
gas inside and can burst if you
drop or scratch the bulb. You or
others could be injured. Be sure
to read and follow the instructions
on the bulb package.
Page 285 of 417

Black plate (26,1)Cadillac SRX Owner Manual (GMNA-Localizing-U.S./Canada/Mexico-
7707476) - 2015 - crc - 4/8/14
10-26 Vehicle Care
High Intensity Discharge
(HID) Lighting
{Warning
The high intensity discharge
lighting system operates at a very
high voltage. If you try to service
any of the system components,
you could be seriously injured.
Have your dealer or a qualified
technician service them.
After an HID headlamp bulb has
been replaced, the beam might be a
slightly different shade than it was
originally. This is normal.
Headlamps
Base Headlamp Assembly (Rear
View Passenger Side)
1. Low-Beam Headlamp/Daytime Running Lamp (DRL)
2. High-Beam Headlamp
3. Turn Signal Lamp
Uplevel Headlamp Assembly (Rear
View Driver Side)
1. High/Low-Beam Headlamp (To be replaced at dealer only)
2. Daytime Running Lamp (DRL)
3. Turn Signal Lamp
Driver Side
The removal of the underhood
electrical center cover is required for
the replacement of one of these
bulbs:
1. Open the hood. See Hood on
page 10-4.
Page 286 of 417

Black plate (27,1)Cadillac SRX Owner Manual (GMNA-Localizing-U.S./Canada/Mexico-
7707476) - 2015 - crc - 4/8/14
Vehicle Care 10-27
{Warning
Liquids from environment or
spillage and/or tools placed on
top of or used in the underhood
electrical center while the cover is
removed can pose a risk of
electrical shock/burn to anyone in
the vicinity. These conditions can
also cause damage to electrical
components on the vehicle. Keep
liquids and tools away from the
underhood electrical center when
the cover is removed.
2. Unlatch the three clips and lift upthe underhood electrical center
cover to remove.
Passenger Side
The removal of the air filter/cleaner
assembly and base is required for
the replacement of one of these
bulbs:
1. Open the hood. See Hood on
page 10-4.
2. Remove the air cleaner/filter cover. See Engine Air Cleaner/
Filter on page 10-10. 3. Lift the air cleaner/filter base to
disengage from the three pins.
Low-Beam Headlamps/Daytime
Running Lamps (DRL),
High-Beam Headlamps (Base)
1. From the back side of theheadlamp assembly, remove the
top cap to replace the low-beam
headlamp/DRL bulb.
Page 287 of 417

Black plate (28,1)Cadillac SRX Owner Manual (GMNA-Localizing-U.S./Canada/Mexico-
7707476) - 2015 - crc - 4/8/14
10-28 Vehicle Care
2. From the back side of theheadlamp assembly, remove the
bottom cap to replace the
high-beam headlamp bulb.
3. Disconnect the electrical connector.
4. Remove the bulb socket from the headlamp assembly.
5. Replace the bulb in the bulb socket.
6. Install the bulb socket in the headlamp assembly.
7. Connect the electrical connector. 8. Install the cap with the down
arrow pointing down in the back
of the headlamp assembly.
9. For the driver side, reinstall the underhood electrical center
cover by latching three clips.
10. For the passenger side, reinstall the air filter/cleaner
assembly base by pushing to
seat. Verify the base is seated
securely, then install the engine
air filter/cleaner assembly.High/Low-Beam Headlamps
(Uplevel)
The high/low-beam headlamps on
the uplevel are High Intensity
Discharge (HID) and should be
replaced at the dealer.
Daytime Running Lamp (DRL)
(Uplevel)
1. From the back side of theheadlamp assembly, remove the
bottom cap to replace the
DRL bulb.
2. Disconnect electrical connector.
3. Remove the DRL bulb socket from the headlamp assembly.
4. Replace the bulb in the bulb socket.
5. Install the bulb socket in the headlamp assembly.
Page 288 of 417
Black plate (29,1)Cadillac SRX Owner Manual (GMNA-Localizing-U.S./Canada/Mexico-
7707476) - 2015 - crc - 4/8/14
Vehicle Care 10-29
6. Connect the electrical connector.
7. Install the cap with the downarrow pointing down in the back
of the headlamp assembly.
8. For the driver side, reinstall the underhood electrical center
cover by latching three clips.
9. For the passenger side, reinstall the air filter/cleaner assembly
base by pushing to seat. Verify
the base is seated securely, then
install the engine air filter/
cleaner assembly.
Front Turn Signal Lamp (Base
and Uplevel)
To replace the front turn
signal lamp:
1. Remove the turn signal lamp
bulb socket from the headlamp
assembly.
2. Remove the turn signal lamp bulb from the socket.
3. Replace the bulb in the bulb socket. 4. Install the bulb socket in the
headlamp assembly.
5. For the driver side, reinstall the underhood electrical center
cover by latching the three clips.
6. For the passenger side, reinstall the air filter/cleaner assembly
base by pushing to seat. Verify
the base is seated securely, then
install the engine air filter/
cleaner assembly.
Turn Signal Lamps
To replace one of these bulbs:
1. Open the liftgate. See Liftgate
on page 2-14.
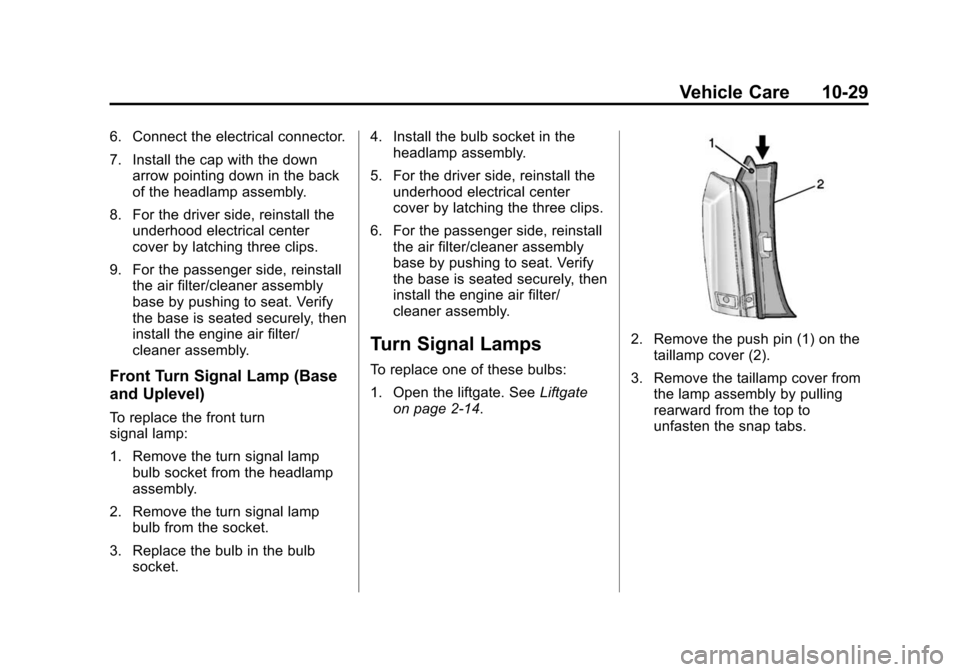
2. Remove the push pin (1) on the taillamp cover (2).
3. Remove the taillamp cover from the lamp assembly by pulling
rearward from the top to
unfasten the snap tabs.
Page 291 of 417
Black plate (32,1)Cadillac SRX Owner Manual (GMNA-Localizing-U.S./Canada/Mexico-
7707476) - 2015 - crc - 4/8/14
10-32 Vehicle Care
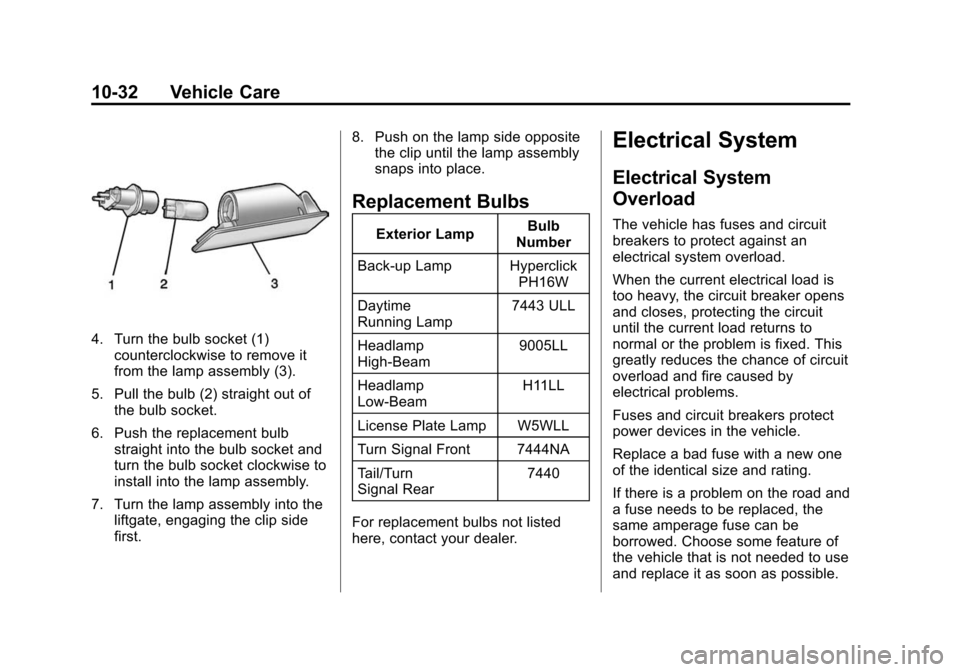
4. Turn the bulb socket (1)counterclockwise to remove it
from the lamp assembly (3).
5. Pull the bulb (2) straight out of the bulb socket.
6. Push the replacement bulb straight into the bulb socket and
turn the bulb socket clockwise to
install into the lamp assembly.
7. Turn the lamp assembly into the liftgate, engaging the clip side
first. 8. Push on the lamp side opposite
the clip until the lamp assembly
snaps into place.
Replacement Bulbs
Exterior Lamp Bulb
Number
Back-up Lamp Hyperclick PH16W
Daytime
Running Lamp 7443 ULL
Headlamp
High-Beam 9005LL
Headlamp
Low-Beam H11LL
License Plate Lamp W5WLL
Turn Signal Front 7444NA
Tail/Turn
Signal Rear 7440
For replacement bulbs not listed
here, contact your dealer.
Electrical System
Electrical System
Overload
The vehicle has fuses and circuit
breakers to protect against an
electrical system overload.
When the current electrical load is
too heavy, the circuit breaker opens
and closes, protecting the circuit
until the current load returns to
normal or the problem is fixed. This
greatly reduces the chance of circuit
overload and fire caused by
electrical problems.
Fuses and circuit breakers protect
power devices in the vehicle.
Replace a bad fuse with a new one
of the identical size and rating.
If there is a problem on the road and
a fuse needs to be replaced, the
same amperage fuse can be
borrowed. Choose some feature of
the vehicle that is not needed to use
and replace it as soon as possible.
Page 292 of 417
Black plate (33,1)Cadillac SRX Owner Manual (GMNA-Localizing-U.S./Canada/Mexico-
7707476) - 2015 - crc - 4/8/14
Vehicle Care 10-33
Headlamp Wiring
An electrical overload may cause
the lamps to go on and off, or in
some cases to remain off. Have the
headlamp wiring checked right away
if the lamps go on and off or
remain off.
Windshield Wipers
If the wiper motor overheats due to
heavy snow or ice, the windshield
wipers will stop until the motor cools
and will then restart.
Although the circuit is protected
from electrical overload, overload
due to heavy snow or ice may
cause wiper linkage damage.
Always clear ice and heavy snow
from the windshield before using the
windshield wipers.
If the overload is caused by an
electrical problem and not snow or
ice, be sure to get it fixed.
Fuses and Circuit
Breakers
The wiring circuits in the vehicle are
protected from short circuits by a
combination of fuses and circuit
breakers. This greatly reduces the
chance of damage caused by
electrical problems.
To check a fuse, look at the
silver-colored band inside the fuse.
If the band is broken or melted,
replace the fuse. Be sure to replace
a bad fuse with a new one of the
identical size and rating.
Fuses of the same amperage can
be temporarily borrowed from
another fuse location, if a fuse goes
out. Replace the fuse as soon as
possible.
To identify and check fuses, circuit
breakers, and relays, seeEngine
Compartment Fuse Block on
page 10-33, Instrument Panel Fuse
Block on page 10-36, and Rear
Compartment Fuse Block on
page 10-38.
Engine Compartment
Fuse Block
To remove the fuse block cover,
press the clips on the cover and lift
it straight up.
{Caution
Spilling liquid on any electrical
component on the vehicle may
damage it. Always keep the
covers on any electrical
component.
Page 294 of 417
Black plate (35,1)Cadillac SRX Owner Manual (GMNA-Localizing-U.S./Canada/Mexico-
7707476) - 2015 - crc - 4/8/14
Vehicle Care 10-35
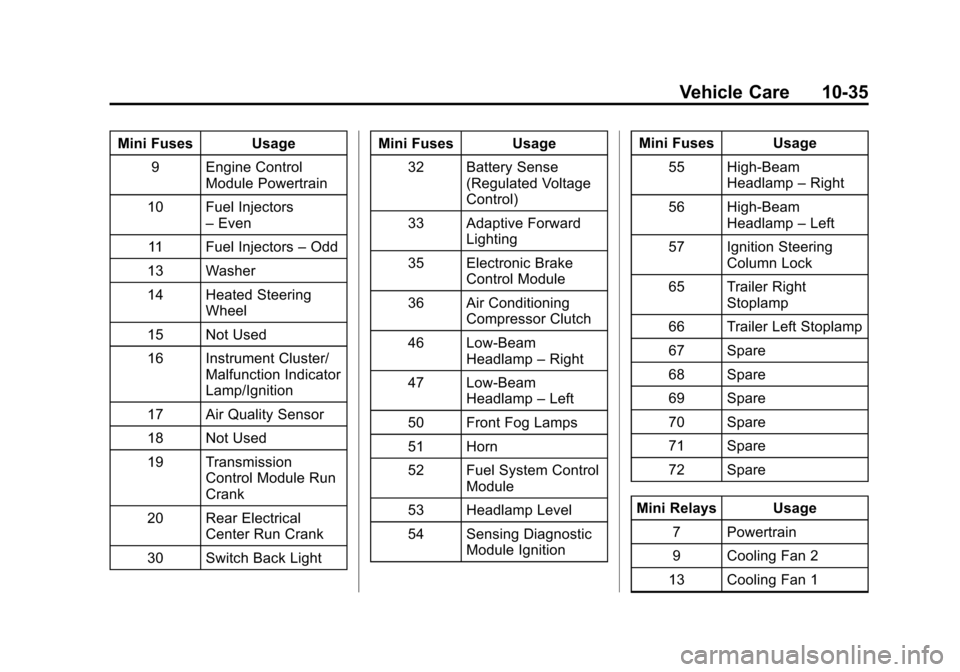
Mini Fuses Usage9 Engine Control Module Powertrain
10 Fuel Injectors –Even
11 Fuel Injectors –Odd
13 Washer
14 Heated Steering Wheel
15 Not Used
16 Instrument Cluster/ Malfunction Indicator
Lamp/Ignition
17 Air Quality Sensor
18 Not Used
19 Transmission Control Module Run
Crank
20 Rear Electrical Center Run Crank
30 Switch Back Light Mini Fuses Usage
32 Battery Sense (Regulated Voltage
Control)
33 Adaptive Forward Lighting
35 Electronic Brake Control Module
36 Air Conditioning Compressor Clutch
46 Low-Beam Headlamp –Right
47 Low-Beam Headlamp –Left
50 Front Fog Lamps
51 Horn
52 Fuel System Control Module
53 Headlamp Level
54 Sensing Diagnostic Module Ignition Mini Fuses Usage
55 High-Beam Headlamp –Right
56 High-Beam Headlamp –Left
57 Ignition Steering Column Lock
65 Trailer Right Stoplamp
66 Trailer Left Stoplamp
67 Spare
68 Spare
69 Spare
70 Spare
71 Spare
72 Spare
Mini Relays Usage 7 Powertrain
9 Cooling Fan 2
13 Cooling Fan 1
Page 320 of 417
Black plate (61,1)Cadillac SRX Owner Manual (GMNA-Localizing-U.S./Canada/Mexico-
7707476) - 2015 - crc - 4/8/14
Vehicle Care 10-61
Replace wheels, wheel bolts, wheel
nuts, or Tire Pressure Monitor
System (TPMS) sensors with new
GM original equipment parts.
{Warning
Using the wrong replacement
wheels, wheel bolts, or wheel
nuts can be dangerous. It could
affect the braking and handling of
the vehicle. Tires can lose air,
and cause loss of control, causing
a crash. Always use the correct
wheel, wheel bolts, and wheel
nuts for replacement.
{Caution
The wrong wheel can also cause
problems with bearing life, brake
cooling, speedometer or
odometer calibration, headlamp
aim, bumper height, vehicle(Continued)
Caution (Continued)
ground clearance, and tire or tire
chain clearance to the body and
chassis.
Used Replacement Wheels
{Warning
Replacing a wheel with a used
one is dangerous. How it has
been used or how far it has been
driven may be unknown. It could
fail suddenly and cause a crash.
When replacing wheels, use a
new GM original equipment
wheel.
Tire Chains
{Warning
Do not use tire chains. There is
not enough clearance. Tire chains
used on a vehicle without the
proper amount of clearance can
cause damage to the brakes,
suspension, or other vehicle
parts. The area damaged by the
tire chains could cause loss of
control and a crash.
Use another type of traction
device only if its manufacturer
recommends it for the vehicle's
tire size combination and road
conditions. Follow that
manufacturer's instructions. To
avoid vehicle damage, drive slow
and readjust or remove the
traction device if it contacts the
vehicle. Do not spin the wheels.
If traction devices are used, install
them on the front tires.
Page 365 of 417

Black plate (10,1)Cadillac SRX Owner Manual (GMNA-Localizing-U.S./Canada/Mexico-
7707476) - 2015 - crc - 4/8/14
11-10 Service and Maintenance
Battery
The battery supplies power to start
the engine and operate any
additional electrical accessories.
.To avoid break-down or failure to
start the vehicle, maintain a
battery with full cranking power.
.Trained dealer technicians have
the diagnostic equipment to test
the battery and ensure that the
connections and cables are
corrosion-free.
Belts
.Belts may need replacing if they
squeak or show signs of
cracking or splitting.
.Trained dealer technicians have
access to tools and equipment
to inspect the belts and
recommend adjustment or
replacement when necessary. Brakes
Brakes stop the vehicle and are
crucial to safe driving.
.Signs of brake wear may include
chirping, grinding, or squealing
noises, or difficulty stopping.
.Trained dealer technicians have
access to tools and equipment
to inspect the brakes and
recommend quality parts
engineered for the vehicle.
Fluids
Proper fluid levels and approved
fluids protect the vehicle’s systems
and components. See
Recommended Fluids and
Lubricants on page 11-13 for GM
approved fluids.
.Engine oil and windshield
washer fluid levels should be
checked at every fuel fill.
.Instrument cluster lights may
come on to indicate that fluids
may be low and need to be
filled. Hoses
Hoses transport fluids and should
be regularly inspected to ensure
that there are no cracks or leaks.
With a multi-point inspection, your
dealer can inspect the hoses and
advise if replacement is needed.
Lamps
Properly working headlamps,
taillamps, and brake lamps are
important to see and be seen on
the road.
.Signs that the headlamps need
attention include dimming, failure
to light, cracking, or damage.
The brake lamps need to be
checked periodically to ensure
that they light when braking.
.With a multi-point inspection,
your dealer can check the lamps
and note any concerns.