turn signal CADILLAC SRX 2015 2.G Owner's Manual
[x] Cancel search | Manufacturer: CADILLAC, Model Year: 2015, Model line: SRX, Model: CADILLAC SRX 2015 2.GPages: 417, PDF Size: 4.59 MB
Page 200 of 417

Black plate (9,1)Cadillac SRX Owner Manual (GMNA-Localizing-U.S./Canada/Mexico-
7707476) - 2015 - crc - 4/8/14
Driving and Operating 9-9
keeps the battery charged to restart
the vehicle and to signal for help
with the headlamps. Do this as little
as possible to save fuel.
If the Vehicle Is Stuck
Slowly and cautiously spin the
wheels to free the vehicle when
stuck in sand, mud, ice, or snow.
If stuck too severely for the traction
system to free the vehicle, turn the
traction system off and use the
rocking method. SeeTraction
Control/Electronic Stability Control
on page 9-30.
{Warning
If the vehicle's tires spin at high
speed, they can explode, and you
or others could be injured. The
vehicle can overheat, causing an
engine compartment fire or other
damage. Spin the wheels as little
as possible and avoid going
above 56 km/h (35 mph).
Rocking the Vehicle to Get
it Out
Turn the steering wheel left and
right to clear the area around the
front wheels. Turn off any traction
system. Shift back and forth
between R (Reverse) and a low
forward gear, spinning the wheels
as little as possible. To prevent
transmission wear, wait until the
wheels stop spinning before shifting
gears. Release the accelerator
pedal while shifting, and press
lightly on the accelerator pedal
when the transmission is in gear.
Slowly spinning the wheels in the
forward and reverse directions
causes a rocking motion that could
free the vehicle. If that does not get
the vehicle out after a few tries, it
might need to be towed out. If the
vehicle does need to be towed out,
see Towing the Vehicle on
page 10-83.
Vehicle Load Limits
It is very important to know how
much weight the vehicle can
carry. This weight is called the
vehicle capacity weight and
includes the weight of all
occupants, cargo and all
nonfactory-installed options.
Two labels on the vehicle show
how much weight it may
properly carry, the Tire and
Loading Information label and
the Certification label.
{Warning
Do not load the vehicle any
heavier than the Gross
Vehicle Weight Rating
(GVWR), or either the
maximum front or rear Gross
Axle Weight Rating (GAWR).
This can cause systems to
break and change the way the
(Continued)
Page 206 of 417
Black plate (15,1)Cadillac SRX Owner Manual (GMNA-Localizing-U.S./Canada/Mexico-
7707476) - 2015 - crc - 4/8/14
Driving and Operating 9-15
Ignition Positions
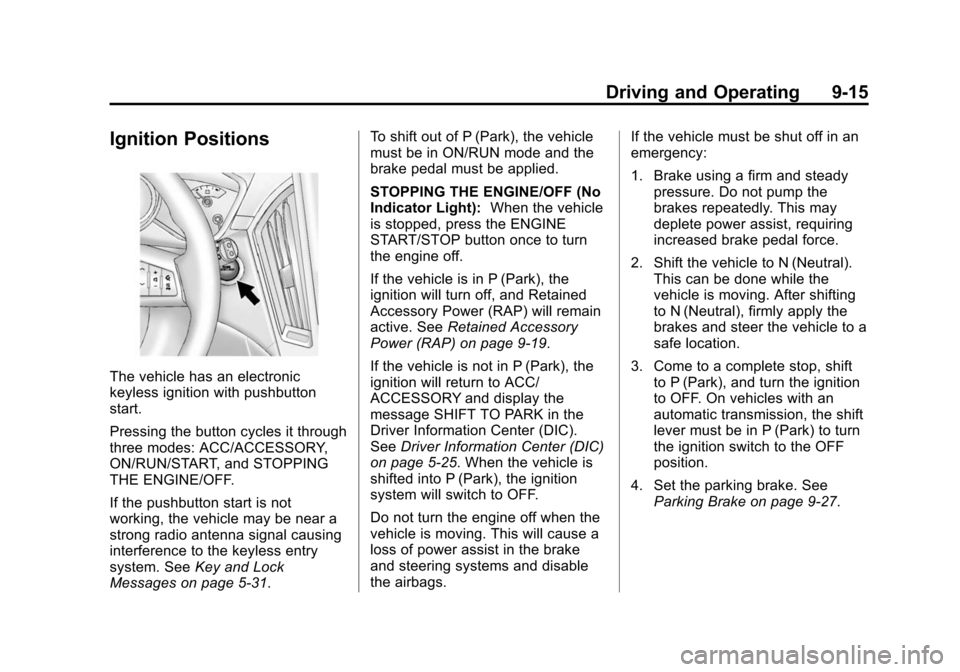
The vehicle has an electronic
keyless ignition with pushbutton
start.
Pressing the button cycles it through
three modes: ACC/ACCESSORY,
ON/RUN/START, and STOPPING
THE ENGINE/OFF.
If the pushbutton start is not
working, the vehicle may be near a
strong radio antenna signal causing
interference to the keyless entry
system. SeeKey and Lock
Messages on page 5-31. To shift out of P (Park), the vehicle
must be in ON/RUN mode and the
brake pedal must be applied.
STOPPING THE ENGINE/OFF (No
Indicator Light):
When the vehicle
is stopped, press the ENGINE
START/STOP button once to turn
the engine off.
If the vehicle is in P (Park), the
ignition will turn off, and Retained
Accessory Power (RAP) will remain
active. See Retained Accessory
Power (RAP) on page 9-19.
If the vehicle is not in P (Park), the
ignition will return to ACC/
ACCESSORY and display the
message SHIFT TO PARK in the
Driver Information Center (DIC).
See Driver Information Center (DIC)
on page 5-25. When the vehicle is
shifted into P (Park), the ignition
system will switch to OFF.
Do not turn the engine off when the
vehicle is moving. This will cause a
loss of power assist in the brake
and steering systems and disable
the airbags. If the vehicle must be shut off in an
emergency:
1. Brake using a firm and steady
pressure. Do not pump the
brakes repeatedly. This may
deplete power assist, requiring
increased brake pedal force.
2. Shift the vehicle to N (Neutral). This can be done while the
vehicle is moving. After shifting
to N (Neutral), firmly apply the
brakes and steer the vehicle to a
safe location.
3. Come to a complete stop, shift to P (Park), and turn the ignition
to OFF. On vehicles with an
automatic transmission, the shift
lever must be in P (Park) to turn
the ignition switch to the OFF
position.
4. Set the parking brake. See Parking Brake on page 9-27.
Page 243 of 417
Black plate (52,1)Cadillac SRX Owner Manual (GMNA-Localizing-U.S./Canada/Mexico-
7707476) - 2015 - crc - 4/8/14
9-52 Driving and Operating
happens, Automatic Braking may
engage the Electric Parking Brake
(EPB) to hold the vehicle at a stop.
To release the EPB, press the EPB
button. A firm press of the
accelerator pedal will also release
Automatic Braking and the EPB.
{Warning
Automatic Braking may
automatically brake the vehicle
suddenly in situations where it is
unexpected and undesired.
It could respond to a turning
vehicle ahead, guardrails, signs,
and other non-moving objects. To
override Automatic Braking, firmly
press the accelerator pedal, if it is
safe to do so.
Automatic Braking can be disabled
or reduced through vehicle
personalization. See the “Auto
Collision Preparation” portion of
“Collision/Detection Systems” under
Vehicle Personalization on
page 5-38.
{Warning
Using the Automatic Collision
Preparation System while towing
a trailer could cause you to lose
control of the vehicle and crash.
Turn the system off when towing
a trailer.
Side Blind Zone
Alert (SBZA)
If equipped, the SBZA system is a
lane-changing aid that assists
drivers with avoiding crashes that
occur with vehicles in the side blind
zone (or spot) areas. The SBZA
warning display will light up in the
corresponding outside side mirror
and will flash if the turn signal is on.
{Warning
SBZA does not alert the driver to
vehicles rapidly approaching
outside of the side blind zones,
pedestrians, bicyclists,
or animals. It may not provide
alerts when changing lanes under
all driving conditions. Failure to
use proper care when changing
lanes may result in injury, death,
or vehicle damage. Before
making a lane change, always
check mirrors, glance over your
shoulder, and use the turn
signals.
Page 244 of 417

Black plate (53,1)Cadillac SRX Owner Manual (GMNA-Localizing-U.S./Canada/Mexico-
7707476) - 2015 - crc - 4/8/14
Driving and Operating 9-53
SBZA Detection Zones
The SBZA sensor covers a zone of
approximately one lane over from
both sides of the vehicle, or 3.5 m
(11 ft). The height of the zone is
approximately between 0.5 m (1.5 ft)
and 2 m (6 ft) off the ground. This
zone starts at approximately the
middle of the vehicle and goes back
5 m (16 ft).
How the System Works
The SBZA symbol lights up in the
side mirrors when the system
detects a vehicle in the next laneover that is in the side blind zone.
This indicates it may be unsafe to
change lanes. Before making a lane
change, check the SBZA display,
check mirrors, glance over your
shoulder, and use the turn signals.
Left Side Mirror
DisplayRight Side Mirror Display
When the vehicle is started, both
outside mirror SBZA displays will
briefly come on to indicate the
system is operating. When the
vehicle is moving forward, the left or
right side mirror display will light up
if a vehicle is detected in that blind
zone. If the turn signal is activated
in the same direction of a detected
vehicle, this display will flash as an
extra warning not to change lanes. SBZA can be disabled through
vehicle personalization. See
“Collision/Detection Systems”
under
Vehicle Personalization on
page 5-38. If SBZA is disabled by
the driver, the SBZA mirror displays
will not light up.
When the System Does Not
Seem to Work Properly
SBZA displays may not come on
when passing a vehicle quickly or
when towing a trailer. The SBZA
detection zones that extend back
from the side of the vehicle do not
move further back when a trailer is
towed. Use caution while changing
lanes when towing a trailer. SBZA
may alert to objects attached to the
vehicle, such as a trailer, bicycle,
or object extending out to either side
of the vehicle. This is normal system
operation; the vehicle does not need
service.
SBZA may not always alert the
driver to vehicles in the side blind
zone, especially in wet conditions.
The system does not need to be
Page 245 of 417

Black plate (54,1)Cadillac SRX Owner Manual (GMNA-Localizing-U.S./Canada/Mexico-
7707476) - 2015 - crc - 4/8/14
9-54 Driving and Operating
serviced. The system may light up
due to guardrails, signs, trees,
shrubs, and other non-moving
objects. This is normal system
operation; the vehicle does not need
service.
SBZA may not operate when the
SBZA sensors in the left or right
corners of the rear bumper are
covered with mud, dirt, snow, ice,
or slush, or in heavy rainstorms. For
cleaning instructions, see "Washing
the Vehicle" underExterior Care on
page 10-86. If the DIC still displays
the system unavailable message
after cleaning both sides of the
vehicle toward the rear corners of
the vehicle, see your dealer.
If the SBZA displays do not light up
when vehicles are in the blind zone
and the system is clean, the system
may need service. Take the vehicle
to your dealer. When SBZA is disabled for any
reason other than the driver turning
it off, the Side Blind Zone Alert On
option will not be available on the
personalization menu.
Radio Frequency Information
See
Radio Frequency Statement on
page 13-12.
Lane Departure
Warning (LDW)
If equipped, LDW may help avoid
crashes due to unintentional lane
departures. It may provide an alert if
the vehicle is crossing a lane
without using a turn signal in that
direction. LDW uses a camera
sensor to detect the lane markings
at speeds of 56 km/h (35 mph) or
greater.
{Warning
The LDW system does not steer
the vehicle. The LDW system
may not:
.Provide enough time to avoid
a crash.
.Detect lane markings under
poor weather or visibility
conditions. This can occur if
the windshield or headlamps
are blocked by dirt, snow,
or ice; if they are not in
proper condition; or if the sun
shines directly into the
camera.
.Detect road edges.
.Detect lanes on winding or
hilly roads.
If LDW only detects lane
markings on one side of the road,
it will only warn you when
departing the lane on the side
where it has detected a lane (Continued)
Page 246 of 417

Black plate (55,1)Cadillac SRX Owner Manual (GMNA-Localizing-U.S./Canada/Mexico-
7707476) - 2015 - crc - 4/8/14
Driving and Operating 9-55
Warning (Continued)
marking. Always keep your
attention on the road and
maintain proper vehicle position
within the lane, or vehicle
damage, injury, or death could
occur. Always keep the
windshield, headlamps, and
camera sensors clean and in
good repair. Do not use LDW in
bad weather conditions.
How the System Works
The LDW camera sensor is on the
windshield ahead of the rearview
mirror.
To turn LDW on and off, press
@
near the shift lever. The control
indicator will light when LDW is on.
When LDW is on,@is green if
LDW is available to warn of a lane
departure. If the vehicle crosses a
detected lane marking without using
the turn signal in that direction,
@
changes to amber and flashes.
Additionally, there will be three
beeps, or the driver seat will pulse
three times, on the right or left,
depending on the lane departure
direction.
When the System Does Not
Seem to Work Properly
The system may not detect lanes as
well when there are:
.Close vehicles ahead.
.Sudden lighting changes, such
as when driving through tunnels.
.Banked roads. If the LDW system is not functioning
properly when lane markings are
clearly visible, cleaning the
windshield may help.
LDW alerts may occur due to tar
marks, shadows, cracks in the road,
temporary or construction lane
markings, or other road
imperfections. This is normal system
operation; the vehicle does not need
service. Turn LDW off if these
conditions continue.
Page 252 of 417
Black plate (61,1)Cadillac SRX Owner Manual (GMNA-Localizing-U.S./Canada/Mexico-
7707476) - 2015 - crc - 4/8/14
Driving and Operating 9-61
Towing a trailer requires a certain
amount of experience. The
combination you are driving is
longer and not as responsive as the
vehicle itself. Get acquainted with
the handling and braking of the rig
before setting out for the open road.
Before starting, check all trailer hitch
parts and attachments, safety
chains, electrical connectors, lamps,
tires, and mirrors. If the trailer has
electric brakes, start the
combination moving and then apply
the trailer brake controller by hand
to be sure the brakes work.
During the trip, check occasionally
to be sure that the load is secure
and the lamps and any trailer
brakes still work.
Towing with a Stability Control
System
When towing, the sound of the
stability control system might be
heard. The system is reacting to the
vehicle movement caused by thetrailer, which mainly occurs during
cornering. This is normal when
towing heavier trailers.
Following Distance
Stay at least twice as far behind the
vehicle ahead as you would when
driving the vehicle without a trailer.
This can help to avoid situations
that require heavy braking and
sudden turns.
Passing
More passing distance is needed
when towing a trailer. Because the
rig is longer, it is necessary to go
farther beyond the passed vehicle
before returning to the lane.
Backing Up
Hold the bottom of the steering
wheel with one hand. To move the
trailer to the left, move your hand to
the left. To move the trailer to the
right, move your hand to the right.
Always back up slowly and,
if possible, have someone
guide you.
Making Turns
{Caution
Making very sharp turns while
trailering could cause the trailer to
come in contact with the vehicle.
The vehicle could be damaged.
Avoid making very sharp turns
while trailering.
When turning with a trailer, make
wider turns than normal so the
trailer will not strike soft shoulders,
curbs, road signs, trees or other
objects. Use the turn signal well in
advance and avoid jerky or sudden
maneuvers.
Turn Signals When Towing a
Trailer
The turn signal indicators on the
instrument cluster flash whenever
signaling a turn or lane change.
Properly hooked up, the trailer
Page 260 of 417
Black plate (1,1)Cadillac SRX Owner Manual (GMNA-Localizing-U.S./Canada/Mexico-
7707476) - 2015 - crc - 4/8/14
Vehicle Care 10-1
Vehicle Care
General Information
General Information . . . . . . . . . . 10-2
California Proposition65 Warning . . . . . . . . . . . . . . . . . 10-2
California Perchlorate Materials Requirements . . . . 10-3
Accessories and Modifications . . . . . . . . . . . . . . . 10-3
Vehicle Checks
Doing Your OwnService Work . . . . . . . . . . . . . . . 10-3
Hood . . . . . . . . . . . . . . . . . . . . . . . . 10-4
Engine Compartment Overview . . . . . . . . . . . . . . . . . . . 10-5
Engine Cover . . . . . . . . . . . . . . . . 10-6
Engine Oil . . . . . . . . . . . . . . . . . . . 10-7
Engine Oil Life System . . . . . . 10-9
Automatic Transmission Fluid . . . . . . . . . . . . . . . . . . . . . . 10-10
Engine Air Cleaner/Filter . . . . 10-10
Cooling System . . . . . . . . . . . . 10-12
Engine Coolant . . . . . . . . . . . . . 10-13
Engine Overheating . . . . . . . . 10-16
Power Steering Fluid . . . . . . . 10-18
Washer Fluid . . . . . . . . . . . . . . . 10-18 Brakes . . . . . . . . . . . . . . . . . . . . . 10-19
Brake Fluid . . . . . . . . . . . . . . . . . 10-20
Battery . . . . . . . . . . . . . . . . . . . . . 10-21
All-Wheel Drive . . . . . . . . . . . . . 10-22
Starter Switch Check . . . . . . . 10-22
Automatic Transmission Shift
Lock Control Function
Check . . . . . . . . . . . . . . . . . . . . . 10-23
Park Brake and P (Park) Mechanism Check . . . . . . . . 10-23
Wiper Blade Replacement . . . . . . . . . . . . . . 10-23Headlamp Aiming
Headlamp Aiming . . . . . . . . . . 10-25
Bulb Replacement
Bulb Replacement . . . . . . . . . . 10-25
Halogen Bulbs . . . . . . . . . . . . . . 10-25
High Intensity Discharge(HID) Lighting . . . . . . . . . . . . . 10-26
Headlamps . . . . . . . . . . . . . . . . . 10-26
Turn Signal Lamps . . . . . . . . . 10-29
Back-Up Lamps . . . . . . . . . . . . 10-30
License Plate Lamp . . . . . . . . 10-31
Replacement Bulbs . . . . . . . . . 10-32
Electrical System
Electrical System Overload . . . . . . . . . . . . . . . . . . 10-32
Fuses and Circuit Breakers . . . . . . . . . . . . . . . . . . 10-33
Engine Compartment Fuse
Block . . . . . . . . . . . . . . . . . . . . . 10-33
Instrument Panel Fuse Block . . . . . . . . . . . . . . . . . . . . . 10-36
Rear Compartment Fuse Block . . . . . . . . . . . . . . . . . . . . . 10-38
Wheels and Tires
Tires . . . . . . . . . . . . . . . . . . . . . . . . 10-41
All-Season Tires . . . . . . . . . . . . 10-42
Winter Tires . . . . . . . . . . . . . . . . 10-42
Summer Tires . . . . . . . . . . . . . . 10-42
Tire Sidewall Labeling . . . . . . 10-43
Tire Designations . . . . . . . . . . . 10-45
Tire Terminology andDefinitions . . . . . . . . . . . . . . . . 10-45
Tire Pressure . . . . . . . . . . . . . . . 10-48
Tire Pressure for High-Speed Operation . . . . . . . . . . . . . . . . . 10-49
Tire Pressure Monitor System . . . . . . . . . . . . . . . . . . . 10-50
Tire Pressure Monitor Operation . . . . . . . . . . . . . . . . . 10-51
Tire Inspection . . . . . . . . . . . . . . 10-54
Page 285 of 417

Black plate (26,1)Cadillac SRX Owner Manual (GMNA-Localizing-U.S./Canada/Mexico-
7707476) - 2015 - crc - 4/8/14
10-26 Vehicle Care
High Intensity Discharge
(HID) Lighting
{Warning
The high intensity discharge
lighting system operates at a very
high voltage. If you try to service
any of the system components,
you could be seriously injured.
Have your dealer or a qualified
technician service them.
After an HID headlamp bulb has
been replaced, the beam might be a
slightly different shade than it was
originally. This is normal.
Headlamps
Base Headlamp Assembly (Rear
View Passenger Side)
1. Low-Beam Headlamp/Daytime Running Lamp (DRL)
2. High-Beam Headlamp
3. Turn Signal Lamp
Uplevel Headlamp Assembly (Rear
View Driver Side)
1. High/Low-Beam Headlamp (To be replaced at dealer only)
2. Daytime Running Lamp (DRL)
3. Turn Signal Lamp
Driver Side
The removal of the underhood
electrical center cover is required for
the replacement of one of these
bulbs:
1. Open the hood. See Hood on
page 10-4.
Page 288 of 417
Black plate (29,1)Cadillac SRX Owner Manual (GMNA-Localizing-U.S./Canada/Mexico-
7707476) - 2015 - crc - 4/8/14
Vehicle Care 10-29
6. Connect the electrical connector.
7. Install the cap with the downarrow pointing down in the back
of the headlamp assembly.
8. For the driver side, reinstall the underhood electrical center
cover by latching three clips.
9. For the passenger side, reinstall the air filter/cleaner assembly
base by pushing to seat. Verify
the base is seated securely, then
install the engine air filter/
cleaner assembly.
Front Turn Signal Lamp (Base
and Uplevel)
To replace the front turn
signal lamp:
1. Remove the turn signal lamp
bulb socket from the headlamp
assembly.
2. Remove the turn signal lamp bulb from the socket.
3. Replace the bulb in the bulb socket. 4. Install the bulb socket in the
headlamp assembly.
5. For the driver side, reinstall the underhood electrical center
cover by latching the three clips.
6. For the passenger side, reinstall the air filter/cleaner assembly
base by pushing to seat. Verify
the base is seated securely, then
install the engine air filter/
cleaner assembly.
Turn Signal Lamps
To replace one of these bulbs:
1. Open the liftgate. See Liftgate
on page 2-14.
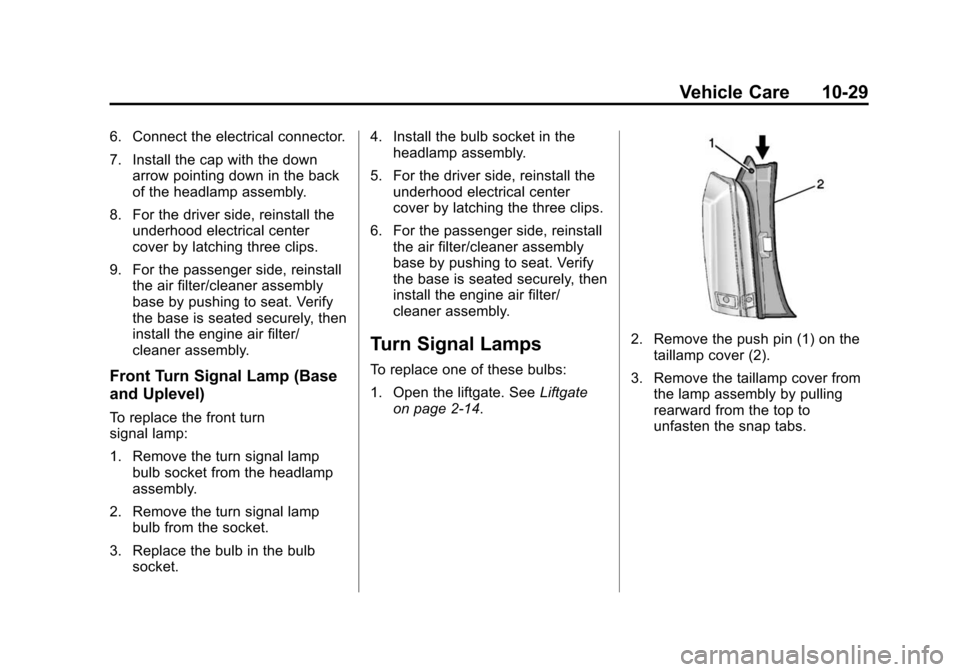
2. Remove the push pin (1) on the taillamp cover (2).
3. Remove the taillamp cover from the lamp assembly by pulling
rearward from the top to
unfasten the snap tabs.