brake CADILLAC SRX 2015 2.G Owners Manual
[x] Cancel search | Manufacturer: CADILLAC, Model Year: 2015, Model line: SRX, Model: CADILLAC SRX 2015 2.GPages: 417, PDF Size: 4.59 MB
Page 2 of 417

Black plate (1,1)Cadillac SRX Owner Manual (GMNA-Localizing-U.S./Canada/Mexico-
7707476) - 2015 - crc - 4/8/14
2015 Cadillac SRX Owner ManualM
In Brief. . . . . . . . . . . . . . . . . . . . . . . . 1-1
Instrument Panel . . . . . . . . . . . . . . 1-2
Initial Drive Information . . . . . . . . 1-4
Vehicle Features . . . . . . . . . . . . . 1-15
Performance and Maintenance . . . . . . . . . . . . . . . . 1-19
Keys, Doors, and Windows . . . . . . . . . . . . . . . . . . . . 2-1
Keys and Locks . . . . . . . . . . . . . . . 2-1
Doors . . . . . . . . . . . . . . . . . . . . . . . . 2-14
Vehicle Security . . . . . . . . . . . . . . 2-17
Exterior Mirrors . . . . . . . . . . . . . . . 2-20
Interior Mirrors . . . . . . . . . . . . . . . . 2-22
Windows . . . . . . . . . . . . . . . . . . . . . 2-23
Roof . . . . . . . . . . . . . . . . . . . . . . . . . . 2-26
Seats and Restraints . . . . . . . . . 3-1
Head Restraints . . . . . . . . . . . . . . . 3-2
Front Seats . . . . . . . . . . . . . . . . . . . . 3-3
Rear Seats . . . . . . . . . . . . . . . . . . . 3-10
Safety Belts . . . . . . . . . . . . . . . . . . 3-12
Airbag System . . . . . . . . . . . . . . . . 3-20
Child Restraints . . . . . . . . . . . . . . 3-32 Storage
. . . . . . . . . . . . . . . . . . . . . . . 4-1
Storage Compartments . . . . . . . . 4-1
Additional Storage Features . . . 4-3
Roof Rack System . . . . . . . . . . . . 4-11
Instruments and Controls . . . . 5-1
Controls . . . . . . . . . . . . . . . . . . . . . . . 5-2
Warning Lights, Gauges, and
Indicators . . . . . . . . . . . . . . . . . . . . 5-8
Information Displays . . . . . . . . . . 5-25
Vehicle Messages . . . . . . . . . . . . 5-27
Vehicle Personalization . . . . . . . 5-38
Universal Remote System . . . . 5-45
Lighting . . . . . . . . . . . . . . . . . . . . . . . 6-1
Exterior Lighting . . . . . . . . . . . . . . . 6-1
Interior Lighting . . . . . . . . . . . . . . . . 6-7
Lighting Features . . . . . . . . . . . . . . 6-8
Infotainment System . . . . . . . . . 7-1
Introduction . . . . . . . . . . . . . . . . . . . . 7-1 Climate Controls
. . . . . . . . . . . . . 8-1
Climate Control Systems . . . . . . 8-1
Air Vents . . . . . . . . . . . . . . . . . . . . . . . 8-7
Maintenance . . . . . . . . . . . . . . . . . . . 8-8
Driving and Operating . . . . . . . . 9-1
Driving Information . . . . . . . . . . . . . 9-2
Starting and Operating . . . . . . . 9-14
Engine Exhaust . . . . . . . . . . . . . . 9-21
Automatic Transmission . . . . . . 9-22
Drive Systems . . . . . . . . . . . . . . . . 9-26
Brakes . . . . . . . . . . . . . . . . . . . . . . . 9-26
Ride Control Systems . . . . . . . . 9-30
Cruise Control . . . . . . . . . . . . . . . . 9-33
Driver Assistance Systems . . . 9-43
Fuel . . . . . . . . . . . . . . . . . . . . . . . . . . 9-56
Trailer Towing . . . . . . . . . . . . . . . . 9-60
Conversions and Add-Ons . . . 9-67
Vehicle Care . . . . . . . . . . . . . . . . . 10-1
General Information . . . . . . . . . . 10-2
Vehicle Checks . . . . . . . . . . . . . . . 10-3
Headlamp Aiming . . . . . . . . . . . 10-25
Bulb Replacement . . . . . . . . . . 10-25
Electrical System . . . . . . . . . . . . 10-32
Wheels and Tires . . . . . . . . . . . 10-41
Page 5 of 417
Black plate (4,1)Cadillac SRX Owner Manual (GMNA-Localizing-U.S./Canada/Mexico-
7707476) - 2015 - crc - 4/8/14
iv Introduction
Danger, Warnings, and
Cautions
Warning messages found on vehicle
labels and in this manual describe
hazards and what to do to avoid or
reduce them.
{Danger
Danger indicates a hazard with a
high level of risk which will result
in serious injury or death.
{Warning
Warning indicates a hazard that
could result in injury or death.
{Caution
Caution indicates a hazard that
could result in property or vehicle
damage.
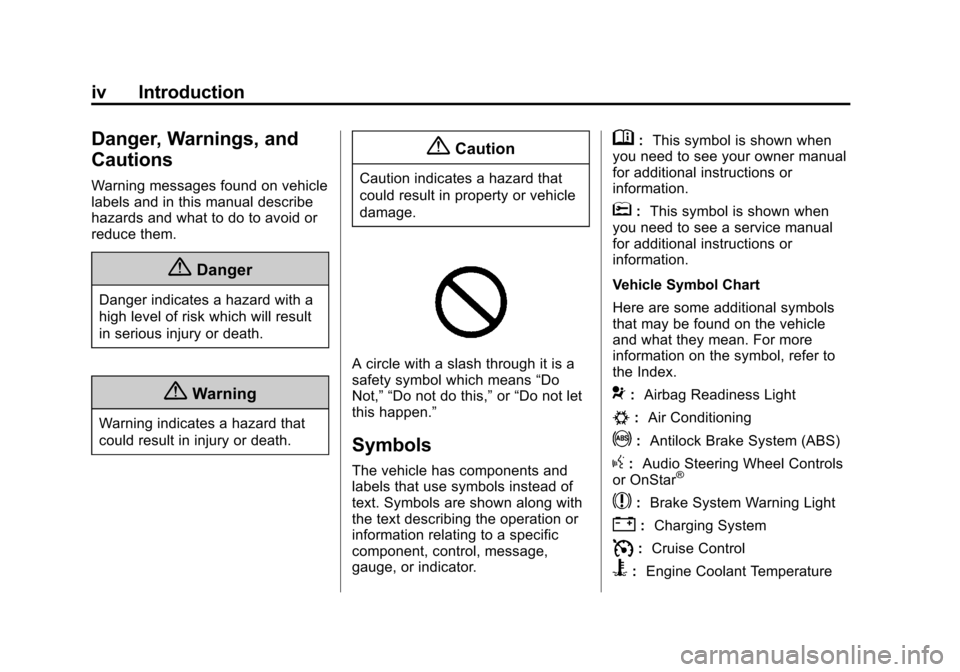
A circle with a slash through it is a
safety symbol which means“Do
Not,” “Do not do this,” or“Do not let
this happen.”
Symbols
The vehicle has components and
labels that use symbols instead of
text. Symbols are shown along with
the text describing the operation or
information relating to a specific
component, control, message,
gauge, or indicator.
M: This symbol is shown when
you need to see your owner manual
for additional instructions or
information.
*: This symbol is shown when
you need to see a service manual
for additional instructions or
information.
Vehicle Symbol Chart
Here are some additional symbols
that may be found on the vehicle
and what they mean. For more
information on the symbol, refer to
the Index.
9: Airbag Readiness Light
#:Air Conditioning
!:Antilock Brake System (ABS)
g:Audio Steering Wheel Controls
or OnStar®
$: Brake System Warning Light
":Charging System
I:Cruise Control
B: Engine Coolant Temperature
Page 8 of 417
Black plate (1,1)Cadillac SRX Owner Manual (GMNA-Localizing-U.S./Canada/Mexico-
7707476) - 2015 - crc - 4/8/14
In Brief 1-1
In Brief
Instrument Panel
Instrument Panel . . . . . . . . . . . . . . 1-2
Initial Drive Information
Initial Drive Information . . . . . . . . 1-4
Remote Keyless Entry (RKE)System . . . . . . . . . . . . . . . . . . . . . . 1-4
Remote Vehicle Start . . . . . . . . . 1-4
Door Locks . . . . . . . . . . . . . . . . . . . 1-5
Liftgate . . . . . . . . . . . . . . . . . . . . . . . . 1-6
Windows . . . . . . . . . . . . . . . . . . . . . . 1-6
Seat Adjustment . . . . . . . . . . . . . . 1-7
Memory Features . . . . . . . . . . . . . 1-8
Heated and Ventilated Seats . . . . . . . . . . . . . . . . . . . . . . . . 1-8
Head Restraint Adjustment . . . . 1-9
Safety Belts . . . . . . . . . . . . . . . . . . . 1-9
Passenger Sensing System . . . . . . . . . . . . . . . . . . . . . 1-10
Mirror Adjustment . . . . . . . . . . . . 1-10 Steering Wheel
Adjustment . . . . . . . . . . . . . . . . . 1-11
Throttle and Brake Pedal Adjustment . . . . . . . . . . . . . . . . . 1-11
Interior Lighting . . . . . . . . . . . . . . 1-11
Exterior Lighting . . . . . . . . . . . . . 1-12
Windshield Wiper/Washer . . . . 1-12
Climate Controls . . . . . . . . . . . . . 1-14
Transmission . . . . . . . . . . . . . . . . 1-15
Vehicle Features
Infotainment System . . . . . . . . . 1-15
Steering Wheel Controls . . . . . 1-15
Cruise Control . . . . . . . . . . . . . . . 1-15
Driver Information
Center (DIC) . . . . . . . . . . . . . . . 1-16
Forward Collision Alert (FCA)
System . . . . . . . . . . . . . . . . . . . . . 1-16
Lane Departure Warning (LDW) . . . . . . . . . . . . . 1-16
Side Blind Zone Alert (SBZA) . . . . . . . . . . . . . . . 1-17 Rear Vision
Camera (RVC) . . . . . . . . . . . . . 1-17
Rear Cross Traffic Alert (RCTA) System . . . . . . . . . . . . 1-17
Parking Assist . . . . . . . . . . . . . . . 1-17
Rear Automatic Braking (RAB)
System . . . . . . . . . . . . . . . . . . . . . 1-17
Active Emergency Braking System . . . . . . . . . . . . . . . . . . . . . 1-18
Storage Compartments . . . . . . 1-18
Power Outlets . . . . . . . . . . . . . . . 1-18
Universal Remote System . . . 1-18
Performance and Maintenance
Traction Control/Electronic Stability Control . . . . . . . . . . . . 1-19
Tire Pressure Monitor . . . . . . . . 1-19
Engine Oil Life System . . . . . . 1-20
Driving for Better Fuel
Economy . . . . . . . . . . . . . . . . . . . 1-20
Roadside Service . . . . . . . . . . . . 1-21
OnStar
®. . . . . . . . . . . . . . . . . . . . . 1-21
Page 10 of 417

Black plate (3,1)Cadillac SRX Owner Manual (GMNA-Localizing-U.S./Canada/Mexico-
7707476) - 2015 - crc - 4/8/14
In Brief 1-3
1.Air Vents on page 8-7.
2. Turn Signal Lever. See Turn and
Lane-Change Signals on
page 6-6.
3. Cruise Control on page 9-33.
Forward Collision Alert (FCA)
System on page 9-48.
4. Instrument Cluster on page 5-9.
5. Steering Wheel Controls on
page 5-2.
Driver Information Center (DIC)
Controls. See Driver Information
Center (DIC) on page 5-25.
6. Windshield Wiper/Washer on
page 5-3.
Rear Window Wiper/Washer on
page 5-4.
7. Infotainment on page 7-1.
8. Light Sensor. See Twilight
Sentinel on page 6-4.
9. Dual Automatic Climate Control
System on page 8-1. 10.
Exterior Lamp Controls on
page 6-1.
Front Fog Lamps on page 6-6
(If Equipped).
Instrument Panel Illumination
Control on page 6-7.
11. Hood Release. See Hood on
page 10-4.
12. Data Link Connector (DLC) (Out of View). See Malfunction
Indicator Lamp on page 5-15.
13. Steering Wheel Adjustment on
page 5-2.
14. Horn on page 5-3.
15. Pedal Adjust Switch (Out of View) (If Equipped). See
Adjustable Throttle and Brake
Pedal on page 9-14.
16. ENGINE START/STOP Button. SeeIgnition Positions on
page 9-15.
17. Hazard Warning Flashers on
page 6-5. 18.
Heated and Ventilated Front
Seats on page 3-8 (If
Equipped).
19. CD Player. See Infotainment
on page 7-1.
Blu-Ray
®Optical Drive (If
Equipped). See Infotainment
on page 7-1.
20. Parking Brake on page 9-27.
21. Shift Lever. See Automatic
Transmission on page 9-22.
22. Lane Departure Warning Button (If Equipped). See Lane
Departure Warning (LDW) on
page 9-54.
Parking Assist (If Equipped).
See Driver Assistance Systems
on page 9-43.
eco Button (If Equipped). See
Fuel Economy Mode on
page 9-25.
23. Front Storage on page 4-2.
24. Traction Control/Electronic
Stability Control on page 9-30.
Page 15 of 417
Black plate (8,1)Cadillac SRX Owner Manual (GMNA-Localizing-U.S./Canada/Mexico-
7707476) - 2015 - crc - 4/8/14
1-8 In Brief
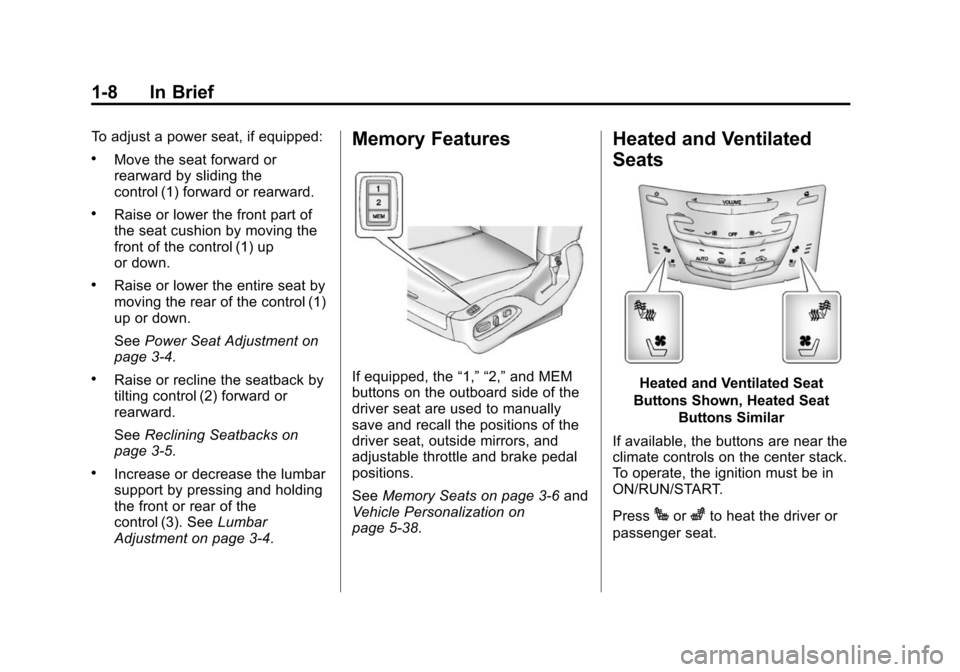
To adjust a power seat, if equipped:
.Move the seat forward or
rearward by sliding the
control (1) forward or rearward.
.Raise or lower the front part of
the seat cushion by moving the
front of the control (1) up
or down.
.Raise or lower the entire seat by
moving the rear of the control (1)
up or down.
SeePower Seat Adjustment on
page 3-4.
.Raise or recline the seatback by
tilting control (2) forward or
rearward.
See Reclining Seatbacks on
page 3-5.
.Increase or decrease the lumbar
support by pressing and holding
the front or rear of the
control (3). See Lumbar
Adjustment on page 3-4.
Memory Features
If equipped, the “1,” “2,”and MEM
buttons on the outboard side of the
driver seat are used to manually
save and recall the positions of the
driver seat, outside mirrors, and
adjustable throttle and brake pedal
positions.
See Memory Seats on page 3-6 and
Vehicle Personalization on
page 5-38.
Heated and Ventilated
Seats
Heated and Ventilated Seat
Buttons Shown, Heated Seat Buttons Similar
If available, the buttons are near the
climate controls on the center stack.
To operate, the ignition must be in
ON/RUN/START.
Press
Jorzto heat the driver or
passenger seat.
Page 18 of 417
Black plate (11,1)Cadillac SRX Owner Manual (GMNA-Localizing-U.S./Canada/Mexico-
7707476) - 2015 - crc - 4/8/14
In Brief 1-11
Steering Wheel
Adjustment
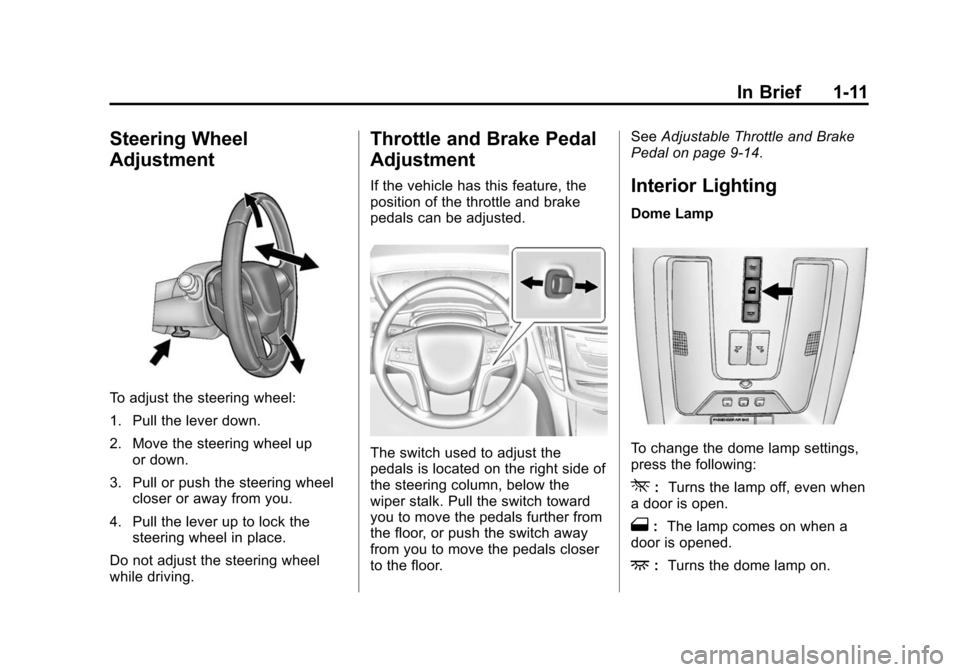
To adjust the steering wheel:
1. Pull the lever down.
2. Move the steering wheel upor down.
3. Pull or push the steering wheel closer or away from you.
4. Pull the lever up to lock the steering wheel in place.
Do not adjust the steering wheel
while driving.
Throttle and Brake Pedal
Adjustment
If the vehicle has this feature, the
position of the throttle and brake
pedals can be adjusted.
The switch used to adjust the
pedals is located on the right side of
the steering column, below the
wiper stalk. Pull the switch toward
you to move the pedals further from
the floor, or push the switch away
from you to move the pedals closer
to the floor. See
Adjustable Throttle and Brake
Pedal on page 9-14.
Interior Lighting
Dome Lamp
To change the dome lamp settings,
press the following:
*: Turns the lamp off, even when
a door is open.
1: The lamp comes on when a
door is opened.
+: Turns the dome lamp on.
Page 24 of 417
Black plate (17,1)Cadillac SRX Owner Manual (GMNA-Localizing-U.S./Canada/Mexico-
7707476) - 2015 - crc - 4/8/14
In Brief 1-17
change to amber and flash. In
addition, the driver seat will pulse or
beeps will sound.
SeeLane Departure Warning (LDW)
on page 9-54.
Side Blind Zone
Alert (SBZA)
If equipped, SBZA will detect
vehicles in the next lane over in the
vehicle's side blind zone area.
When this happens, the SBZA
display will light up in the
corresponding outside side mirror
and will flash if the turn signal is on.
See Side Blind Zone Alert (SBZA)
on page 9-52.
Rear Vision
Camera (RVC)
If equipped, RVC displays a view of
the area behind the vehicle on the
center stack display when the
vehicle is shifted into R (Reverse) to
aid with parking and low-speed
backing maneuvers. See
Assistance Systems for Parking
or Backing on page 9-44.
Rear Cross Traffic Alert
(RCTA) System
If equipped, when backing, the
RCTA system uses a triangle with
an arrow displayed on the RVC
screen to warn of traffic behind your
vehicle that may cross your
vehicle's path. In addition, beeps
will sound, or the driver seat will
pulse.
See Assistance Systems for Parking
or Backing on page 9-44
Parking Assist
If equipped, Rear Parking
Assist (RPA) uses sensors on the
rear bumper to assist with parking
and avoiding objects while in
R (Reverse). It operates at speeds
less than 8 km/h (5 mph). RPA may
display a warning triangle on the
Rear Vision Camera screen and a
graphic on the instrument cluster to
provide the object distance. In addition, multiple beeps or seat
pulses may occur if very close to an
object.
The vehicle may also have the Front
Parking Assist system.
See
Assistance Systems for Parking
or Backing on page 9-44.
Rear Automatic Braking
(RAB) System
If the vehicle has Adaptive Cruise
Control (ACC) it also has the Rear
Automatic Braking (RAB) system,
which is designed to help avoid or
reduce the harm caused by backing
crashes. If the system detects the
vehicle is backing too fast to avoid a
crash with a detected object behind
your vehicle in your path, it may
automatically brake hard to a stop.
See Assistance Systems for Parking
or Backing on page 9-44
Page 25 of 417
Black plate (18,1)Cadillac SRX Owner Manual (GMNA-Localizing-U.S./Canada/Mexico-
7707476) - 2015 - crc - 4/8/14
1-18 In Brief
Active Emergency
Braking System
If the vehicle has Adaptive Cruise
Control (ACC) it also has the Active
Emergency Braking System, which
includes Intelligent Brake
Assist (IBA) and the Automatic
Collision Preparation (ACP) System.
These systems can provide a boost
to braking or automatically brake the
vehicle to help avoid or lessen the
severity of crashes when driving in a
forward gear.
SeeActive Emergency Braking
System on page 9-50.
Storage Compartments
The glove box is air conditioned and
can be used to store items at a
lower temperature. Move the slide
control to open or close the opening
to adjust the air flow. See Glove Box
on page 4-1.
Power Outlets
The accessory power outlets can be
used to plug in electrical equipment,
such as a cell phone or MP3 player.
The vehicle may have up to five
accessory power outlets.
The accessory power outlets are:
.Below the climate control system
inside the front storage bin.
.Inside the center floor console.
.On the rear of the center floor
console. For vehicles with a rear
climate control system, there will
be two accessory power outlets
on the rear of the center floor
console.
.In the rear cargo area.
These are powered while the
vehicle is in ON/RUN/START or
ACC/ACCESSORY mode, or until
the driver door is opened within
10 minutes of turning off the vehicle.
The power outlet located in the rear
cargo area is powered at all times. See
Power Outlets on page 5-6.
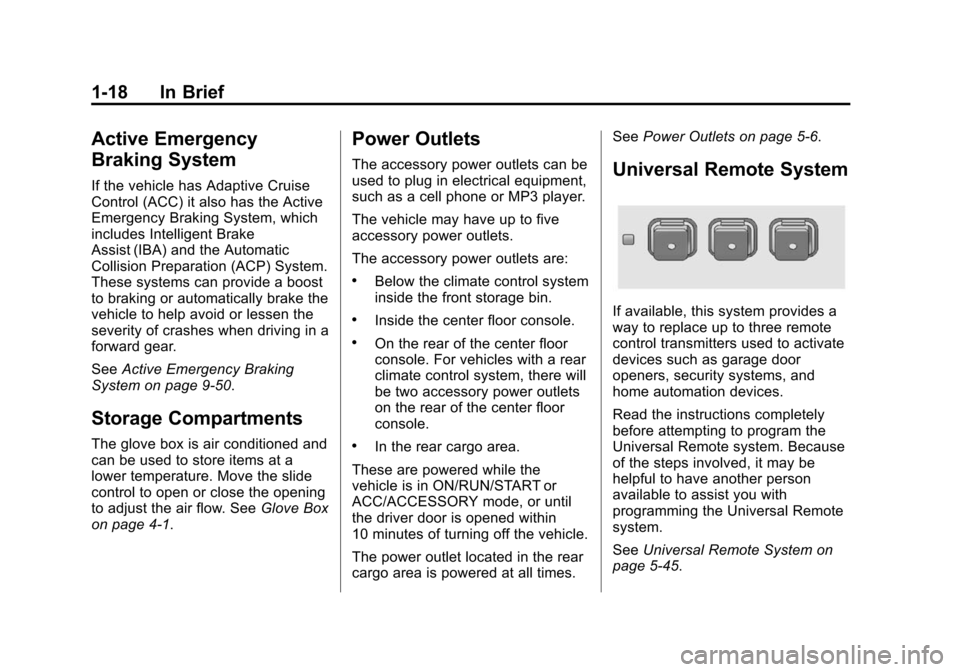
Universal Remote System
If available, this system provides a
way to replace up to three remote
control transmitters used to activate
devices such as garage door
openers, security systems, and
home automation devices.
Read the instructions completely
before attempting to program the
Universal Remote system. Because
of the steps involved, it may be
helpful to have another person
available to assist you with
programming the Universal Remote
system.
SeeUniversal Remote System on
page 5-45.
Page 27 of 417
Black plate (20,1)Cadillac SRX Owner Manual (GMNA-Localizing-U.S./Canada/Mexico-
7707476) - 2015 - crc - 4/8/14
1-20 In Brief
tire pressures are getting low and
the tires need to be inflated to the
proper pressure.
The TPMS does not replace normal
monthly tire maintenance. Maintain
the correct tire pressures.
SeeTire Pressure Monitor System
on page 10-50.
Engine Oil Life System
The engine oil life system calculates
engine oil life based on vehicle use
and displays the CHANGE ENGINE
OIL SOON message when it is time
to change the engine oil and filter.
The oil life system should be reset
to 100% only following an oil
change.
Resetting the Oil Life System
1. Using the DIC controls on the right side of the steering wheel,
display REMAINING OIL LIFE
on the DIC. See Driver
Information Center (DIC) on
page 5-25. When remaining oil
life is low, the CHANGE ENGINE OIL SOON message
will appear on the display. See
Engine Oil Messages on
page 5-31.
2. Press SEL on the DIC controls and hold SEL down for a few
seconds to clear the CHANGE
ENGINE OIL SOON message
and reset the oil life at 100%.
Be careful not to reset the oil life
display accidentally at any time
other than after the oil is
changed. It cannot be reset
accurately until the next oil
change.
The oil life system can also be reset
as follows:
1. Turn the ignition on with the engine off.
2. Fully press and release the accelerator pedal three times
within five seconds.
If the CHANGE ENGINE OIL
SOON message is not on, the
system is reset. See
Engine Oil Life System on
page 10-9.
Driving for Better Fuel
Economy
Driving habits can affect fuel
mileage. Here are some driving tips
to get the best fuel economy
possible.
.Avoid fast starts and accelerate
smoothly.
.Brake gradually and avoid
abrupt stops.
.Avoid idling the engine for long
periods of time.
.When road and weather
conditions are appropriate, use
cruise control.
.Always follow posted speed
limits or drive more slowly when
conditions require.
.Keep vehicle tires properly
inflated.
.Combine several trips into a
single trip.
Page 37 of 417
Black plate (8,1)Cadillac SRX Owner Manual (GMNA-Localizing-U.S./Canada/Mexico-
7707476) - 2015 - crc - 4/8/14
2-8 Keys, Doors, and Windows
6. Remove the transmitter from thetransmitter pocket and press the
transmitter
KorQbutton.
To program additional
transmitters, repeat Steps 4–6.
When all additional transmitters
are programmed, press and hold
the ENGINE START/STOP
button for 12 seconds to exit
programming mode.
Starting the Vehicle with a Low
Transmitter Battery
When the vehicle is started, if the
transmitter battery is weak, the DIC
may display NO REMOTE
DETECTED or NO REMOTE KEY
WAS DETECTED PLACE KEY IN
TRANSMITTER POCKET THEN
START YOUR VEHICLE. The
REPLACE BATTERY IN REMOTE
KEY message may also be
displayed at this time.
To start the vehicle:
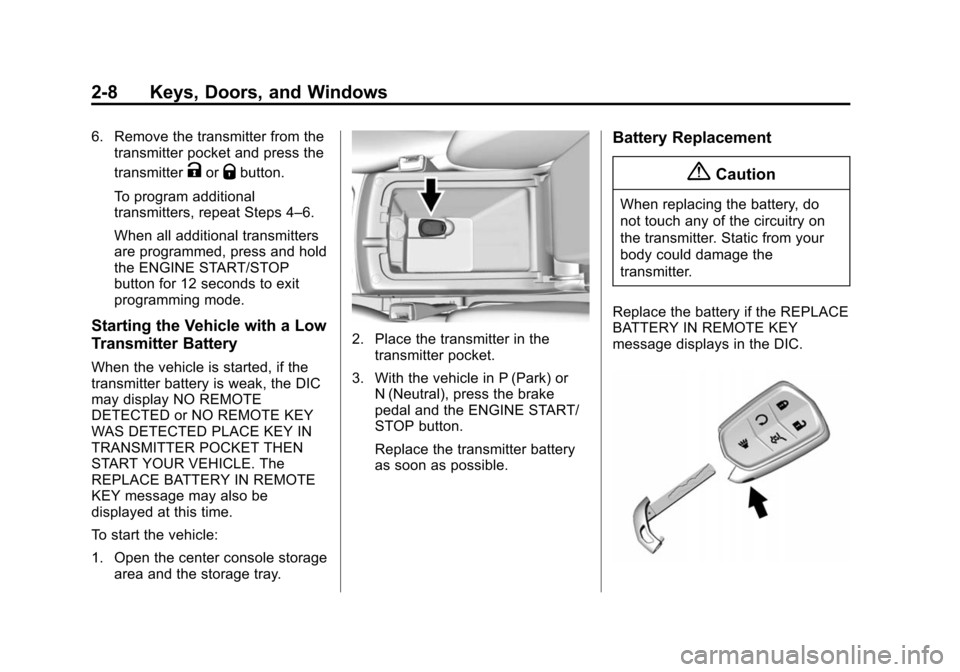
1. Open the center console storage area and the storage tray.
2. Place the transmitter in thetransmitter pocket.
3. With the vehicle in P (Park) or N (Neutral), press the brake
pedal and the ENGINE START/
STOP button.
Replace the transmitter battery
as soon as possible.
Battery Replacement
{Caution
When replacing the battery, do
not touch any of the circuitry on
the transmitter. Static from your
body could damage the
transmitter.
Replace the battery if the REPLACE
BATTERY IN REMOTE KEY
message displays in the DIC.