display CADILLAC SRX 2015 2.G Owners Manual
[x] Cancel search | Manufacturer: CADILLAC, Model Year: 2015, Model line: SRX, Model: CADILLAC SRX 2015 2.GPages: 417, PDF Size: 4.59 MB
Page 2 of 417

Black plate (1,1)Cadillac SRX Owner Manual (GMNA-Localizing-U.S./Canada/Mexico-
7707476) - 2015 - crc - 4/8/14
2015 Cadillac SRX Owner ManualM
In Brief. . . . . . . . . . . . . . . . . . . . . . . . 1-1
Instrument Panel . . . . . . . . . . . . . . 1-2
Initial Drive Information . . . . . . . . 1-4
Vehicle Features . . . . . . . . . . . . . 1-15
Performance and Maintenance . . . . . . . . . . . . . . . . 1-19
Keys, Doors, and Windows . . . . . . . . . . . . . . . . . . . . 2-1
Keys and Locks . . . . . . . . . . . . . . . 2-1
Doors . . . . . . . . . . . . . . . . . . . . . . . . 2-14
Vehicle Security . . . . . . . . . . . . . . 2-17
Exterior Mirrors . . . . . . . . . . . . . . . 2-20
Interior Mirrors . . . . . . . . . . . . . . . . 2-22
Windows . . . . . . . . . . . . . . . . . . . . . 2-23
Roof . . . . . . . . . . . . . . . . . . . . . . . . . . 2-26
Seats and Restraints . . . . . . . . . 3-1
Head Restraints . . . . . . . . . . . . . . . 3-2
Front Seats . . . . . . . . . . . . . . . . . . . . 3-3
Rear Seats . . . . . . . . . . . . . . . . . . . 3-10
Safety Belts . . . . . . . . . . . . . . . . . . 3-12
Airbag System . . . . . . . . . . . . . . . . 3-20
Child Restraints . . . . . . . . . . . . . . 3-32 Storage
. . . . . . . . . . . . . . . . . . . . . . . 4-1
Storage Compartments . . . . . . . . 4-1
Additional Storage Features . . . 4-3
Roof Rack System . . . . . . . . . . . . 4-11
Instruments and Controls . . . . 5-1
Controls . . . . . . . . . . . . . . . . . . . . . . . 5-2
Warning Lights, Gauges, and
Indicators . . . . . . . . . . . . . . . . . . . . 5-8
Information Displays . . . . . . . . . . 5-25
Vehicle Messages . . . . . . . . . . . . 5-27
Vehicle Personalization . . . . . . . 5-38
Universal Remote System . . . . 5-45
Lighting . . . . . . . . . . . . . . . . . . . . . . . 6-1
Exterior Lighting . . . . . . . . . . . . . . . 6-1
Interior Lighting . . . . . . . . . . . . . . . . 6-7
Lighting Features . . . . . . . . . . . . . . 6-8
Infotainment System . . . . . . . . . 7-1
Introduction . . . . . . . . . . . . . . . . . . . . 7-1 Climate Controls
. . . . . . . . . . . . . 8-1
Climate Control Systems . . . . . . 8-1
Air Vents . . . . . . . . . . . . . . . . . . . . . . . 8-7
Maintenance . . . . . . . . . . . . . . . . . . . 8-8
Driving and Operating . . . . . . . . 9-1
Driving Information . . . . . . . . . . . . . 9-2
Starting and Operating . . . . . . . 9-14
Engine Exhaust . . . . . . . . . . . . . . 9-21
Automatic Transmission . . . . . . 9-22
Drive Systems . . . . . . . . . . . . . . . . 9-26
Brakes . . . . . . . . . . . . . . . . . . . . . . . 9-26
Ride Control Systems . . . . . . . . 9-30
Cruise Control . . . . . . . . . . . . . . . . 9-33
Driver Assistance Systems . . . 9-43
Fuel . . . . . . . . . . . . . . . . . . . . . . . . . . 9-56
Trailer Towing . . . . . . . . . . . . . . . . 9-60
Conversions and Add-Ons . . . 9-67
Vehicle Care . . . . . . . . . . . . . . . . . 10-1
General Information . . . . . . . . . . 10-2
Vehicle Checks . . . . . . . . . . . . . . . 10-3
Headlamp Aiming . . . . . . . . . . . 10-25
Bulb Replacement . . . . . . . . . . 10-25
Electrical System . . . . . . . . . . . . 10-32
Wheels and Tires . . . . . . . . . . . 10-41
Page 21 of 417
Black plate (14,1)Cadillac SRX Owner Manual (GMNA-Localizing-U.S./Canada/Mexico-
7707476) - 2015 - crc - 4/8/14
1-14 In Brief
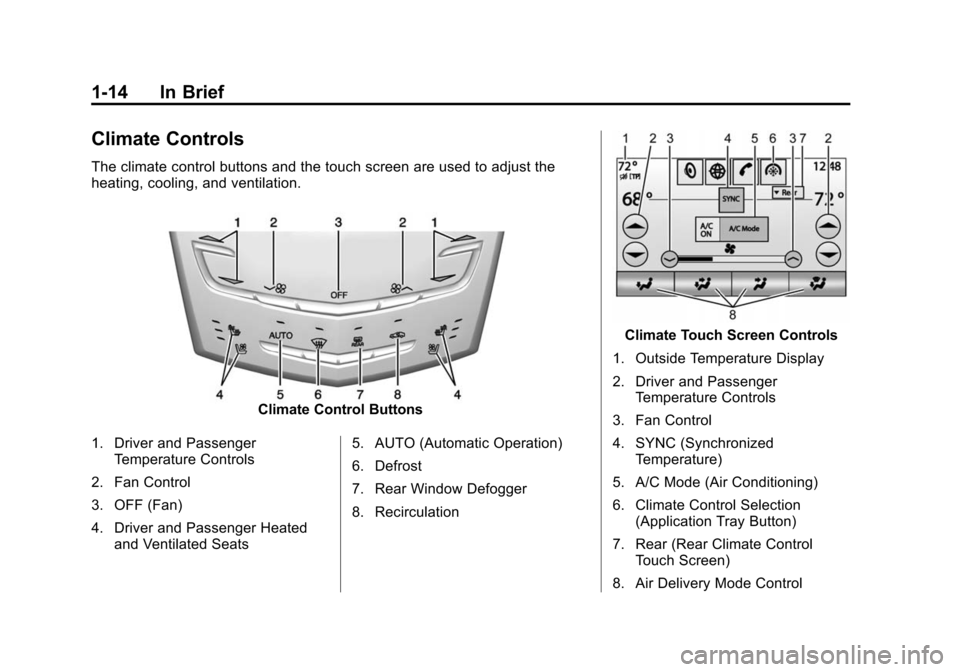
Climate Controls
The climate control buttons and the touch screen are used to adjust the
heating, cooling, and ventilation.
Climate Control Buttons
1. Driver and Passenger Temperature Controls
2. Fan Control
3. OFF (Fan)
4. Driver and Passenger Heated and Ventilated Seats 5. AUTO (Automatic Operation)
6. Defrost
7. Rear Window Defogger
8. Recirculation
Climate Touch Screen Controls
1. Outside Temperature Display
2. Driver and Passenger Temperature Controls
3. Fan Control
4. SYNC (Synchronized Temperature)
5. A/C Mode (Air Conditioning)
6. Climate Control Selection (Application Tray Button)
7. Rear (Rear Climate Control Touch Screen)
8. Air Delivery Mode Control
Page 23 of 417

Black plate (16,1)Cadillac SRX Owner Manual (GMNA-Localizing-U.S./Canada/Mexico-
7707476) - 2015 - crc - 4/8/14
1-16 In Brief
SET−:Press the control down
briefly to set the speed and activate
cruise control or to decrease vehicle
speed if the cruise control is already
activated.
*: Press to disengage cruise
control without erasing the set
speed from memory.
See Cruise Control on page 9-33 or
Adaptive Cruise Control on
page 9-35 (if equipped).
Driver Information
Center (DIC)
The DIC display is in the instrument
cluster. It shows the status of many
vehicle systems.
yorz:Move SEL up or down to
go to the previous or next selection.
SorT: Press to move between
the interactive display zones in the
cluster. Press
Sto go back to the
previous menu.
SEL: Press to open a menu or
select a menu item. Press and hold
to reset values on certain screens.
See Driver Information Center (DIC)
on page 5-25.
Forward Collision Alert
(FCA) System
If equipped, FCA may help avoid or
reduce the harm caused by
front-end crashes. FCA provides a
green indicator,
V, when a vehicle
is detected ahead. This indicator
displays amber if you follow a
vehicle much too closely. When
approaching a vehicle ahead too
quickly, FCA provides a flashing red
alert on the windshield and rapidly
beeps or pulses the driver seat.
See Forward Collision Alert (FCA)
System on page 9-48.
Lane Departure
Warning (LDW)
If equipped, LDW may help avoid
unintentional lane departures at
speeds of 56 km/h (35 mph) or
greater. LDW uses a camera sensor
to detect the lane markings. The
LDW light,
@, is green if a lane
marking is detected. If the vehicle
departs the lane, the light will
Page 24 of 417
Black plate (17,1)Cadillac SRX Owner Manual (GMNA-Localizing-U.S./Canada/Mexico-
7707476) - 2015 - crc - 4/8/14
In Brief 1-17
change to amber and flash. In
addition, the driver seat will pulse or
beeps will sound.
SeeLane Departure Warning (LDW)
on page 9-54.
Side Blind Zone
Alert (SBZA)
If equipped, SBZA will detect
vehicles in the next lane over in the
vehicle's side blind zone area.
When this happens, the SBZA
display will light up in the
corresponding outside side mirror
and will flash if the turn signal is on.
See Side Blind Zone Alert (SBZA)
on page 9-52.
Rear Vision
Camera (RVC)
If equipped, RVC displays a view of
the area behind the vehicle on the
center stack display when the
vehicle is shifted into R (Reverse) to
aid with parking and low-speed
backing maneuvers. See
Assistance Systems for Parking
or Backing on page 9-44.
Rear Cross Traffic Alert
(RCTA) System
If equipped, when backing, the
RCTA system uses a triangle with
an arrow displayed on the RVC
screen to warn of traffic behind your
vehicle that may cross your
vehicle's path. In addition, beeps
will sound, or the driver seat will
pulse.
See Assistance Systems for Parking
or Backing on page 9-44
Parking Assist
If equipped, Rear Parking
Assist (RPA) uses sensors on the
rear bumper to assist with parking
and avoiding objects while in
R (Reverse). It operates at speeds
less than 8 km/h (5 mph). RPA may
display a warning triangle on the
Rear Vision Camera screen and a
graphic on the instrument cluster to
provide the object distance. In addition, multiple beeps or seat
pulses may occur if very close to an
object.
The vehicle may also have the Front
Parking Assist system.
See
Assistance Systems for Parking
or Backing on page 9-44.
Rear Automatic Braking
(RAB) System
If the vehicle has Adaptive Cruise
Control (ACC) it also has the Rear
Automatic Braking (RAB) system,
which is designed to help avoid or
reduce the harm caused by backing
crashes. If the system detects the
vehicle is backing too fast to avoid a
crash with a detected object behind
your vehicle in your path, it may
automatically brake hard to a stop.
See Assistance Systems for Parking
or Backing on page 9-44
Page 26 of 417

Black plate (19,1)Cadillac SRX Owner Manual (GMNA-Localizing-U.S./Canada/Mexico-
7707476) - 2015 - crc - 4/8/14
In Brief 1-19
Performance and
Maintenance
Traction Control/
Electronic Stability
Control
The Traction Control System (TCS)
limits wheel spin. The system turns
on automatically when the vehicle is
started.
The StabiliTrak system assists with
directional control of the vehicle in
difficult driving conditions. The
system turns on automatically when
the vehicle is started.
.To turn off traction control, press
and release
gon the center
stack.
iilluminates in the
instrument cluster. The
appropriate message is
displayed in the DIC. See Ride
Control System Messages on
page 5-35.
.Press and releasegagain to
turn traction control back on.
i
goes out in the instrument
cluster. The appropriate
message is displayed in the DIC.
See Ride Control System
Messages on page 5-35.
.To turn off both traction control
and StabiliTrak, press and hold
gon the center stack untilg
andiilluminate in the
instrument cluster. The
appropriate message is
displayed in the DIC. See Ride
Control System Messages on
page 5-35.
.Pressgagain to turn on both
systems.
gandigo out in the
instrument cluster. The
appropriate message is
displayed in the DIC. See Ride
Control System Messages on
page 5-35.
See Traction Control/Electronic
Stability Control on page 9-30.
Tire Pressure Monitor
This vehicle may have a Tire
Pressure Monitor System (TPMS).
The low tire pressure warning light
alerts to a significant loss in
pressure of one of the vehicle's
tires. If the warning light comes on,
stop as soon as possible and inflate
the tires to the recommended
pressure shown on the Tire and
Loading Information label. See
Vehicle Load Limits on page 9-9.
The warning light will remain on until
the tire pressure is corrected.
The low tire pressure warning light
may come on in cool weather when
the vehicle is first started, and then
turn off as the vehicle is driven. This
may be an early indicator that the
Page 27 of 417
Black plate (20,1)Cadillac SRX Owner Manual (GMNA-Localizing-U.S./Canada/Mexico-
7707476) - 2015 - crc - 4/8/14
1-20 In Brief
tire pressures are getting low and
the tires need to be inflated to the
proper pressure.
The TPMS does not replace normal
monthly tire maintenance. Maintain
the correct tire pressures.
SeeTire Pressure Monitor System
on page 10-50.
Engine Oil Life System
The engine oil life system calculates
engine oil life based on vehicle use
and displays the CHANGE ENGINE
OIL SOON message when it is time
to change the engine oil and filter.
The oil life system should be reset
to 100% only following an oil
change.
Resetting the Oil Life System
1. Using the DIC controls on the right side of the steering wheel,
display REMAINING OIL LIFE
on the DIC. See Driver
Information Center (DIC) on
page 5-25. When remaining oil
life is low, the CHANGE ENGINE OIL SOON message
will appear on the display. See
Engine Oil Messages on
page 5-31.
2. Press SEL on the DIC controls and hold SEL down for a few
seconds to clear the CHANGE
ENGINE OIL SOON message
and reset the oil life at 100%.
Be careful not to reset the oil life
display accidentally at any time
other than after the oil is
changed. It cannot be reset
accurately until the next oil
change.
The oil life system can also be reset
as follows:
1. Turn the ignition on with the engine off.
2. Fully press and release the accelerator pedal three times
within five seconds.
If the CHANGE ENGINE OIL
SOON message is not on, the
system is reset. See
Engine Oil Life System on
page 10-9.
Driving for Better Fuel
Economy
Driving habits can affect fuel
mileage. Here are some driving tips
to get the best fuel economy
possible.
.Avoid fast starts and accelerate
smoothly.
.Brake gradually and avoid
abrupt stops.
.Avoid idling the engine for long
periods of time.
.When road and weather
conditions are appropriate, use
cruise control.
.Always follow posted speed
limits or drive more slowly when
conditions require.
.Keep vehicle tires properly
inflated.
.Combine several trips into a
single trip.
Page 35 of 417
Black plate (6,1)Cadillac SRX Owner Manual (GMNA-Localizing-U.S./Canada/Mexico-
7707476) - 2015 - crc - 4/8/14
2-6 Keys, Doors, and Windows
Keyless Liftgate Opening
Press the touch pad on the liftgate
handle to open the liftgate if the
RKE transmitter is within 1 m (3 ft).
Programming Transmitters to
the Vehicle
Only RKE transmitters programmed
to the vehicle will work. If a
transmitter is lost or stolen, a
replacement can be purchased and
programmed through your dealer.
The vehicle can be reprogrammed
so that lost or stolen transmitters no
longer work. Each vehicle can have
up to eight transmitters matched
to it.
Programming with a Recognized
Transmitter
A new transmitter can be
programmed to the vehicle when
there is one recognized transmitter.
To program, the vehicle must be off
and all of the transmitters, both
currently recognized and new, must
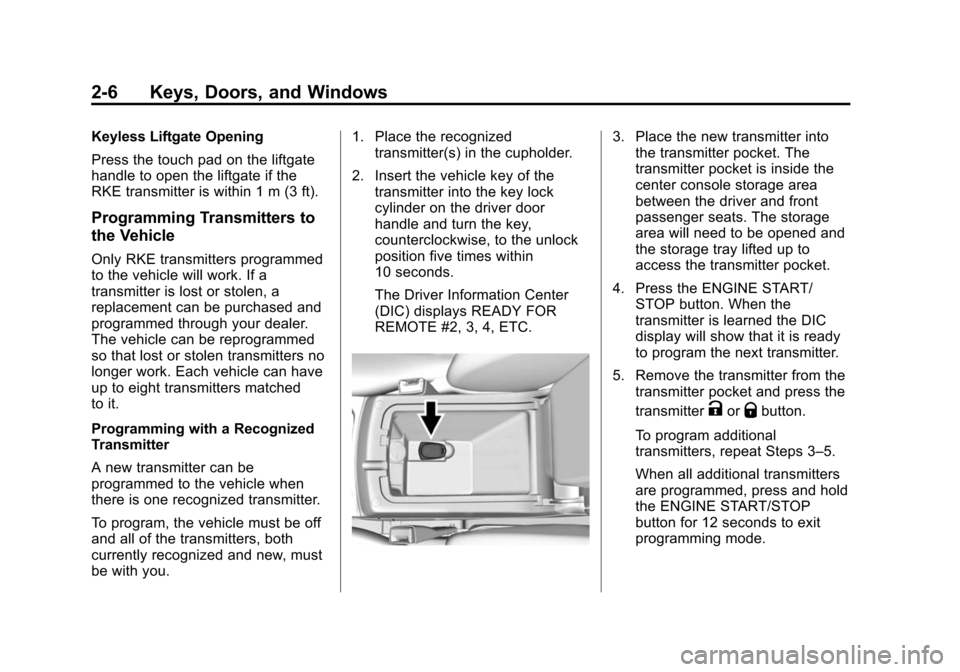
be with you.1. Place the recognized
transmitter(s) in the cupholder.
2. Insert the vehicle key of the transmitter into the key lock
cylinder on the driver door
handle and turn the key,
counterclockwise, to the unlock
position five times within
10 seconds.
The Driver Information Center
(DIC) displays READY FOR
REMOTE #2, 3, 4, ETC.
3. Place the new transmitter intothe transmitter pocket. The
transmitter pocket is inside the
center console storage area
between the driver and front
passenger seats. The storage
area will need to be opened and
the storage tray lifted up to
access the transmitter pocket.
4. Press the ENGINE START/ STOP button. When the
transmitter is learned the DIC
display will show that it is ready
to program the next transmitter.
5. Remove the transmitter from the transmitter pocket and press the
transmitter
KorQbutton.
To program additional
transmitters, repeat Steps 3–5.
When all additional transmitters
are programmed, press and hold
the ENGINE START/STOP
button for 12 seconds to exit
programming mode.
Page 36 of 417
Black plate (7,1)Cadillac SRX Owner Manual (GMNA-Localizing-U.S./Canada/Mexico-
7707476) - 2015 - crc - 4/8/14
Keys, Doors, and Windows 2-7
Programming without a
Recognized Transmitter
If there are no currently recognized
transmitters available, follow this
procedure to program up to eight
transmitters. This feature is not
available in Canada. This procedure
will take approximately 30 minutes
to complete. The vehicle must be off
and all of the transmitters you wish
to program must be with you.
1. Insert the vehicle key of thetransmitter into the key lock
cylinder on the driver door
handle and turn the key,
counterclockwise, to the unlock
position five times within
10 seconds.
The Driver Information Center
(DIC) displays REMOTE LEARN
PENDING, PLEASE WAIT. 2. Wait for 10 minutes until the DIC
displays PRESS ENGINE
START BUTTON TO LEARN
and then press the ENGINE
START/STOP button.
The DIC displays will again
show REMOTE LEARN
PENDING, PLEASE WAIT.
3. Repeat Step 2 two additional times. After the third time all
previously known transmitters
will no longer work with the
vehicle. Remaining transmitters
can be relearned during the next
steps.
The DIC display should now
show READY FOR REMOTE
# 1.
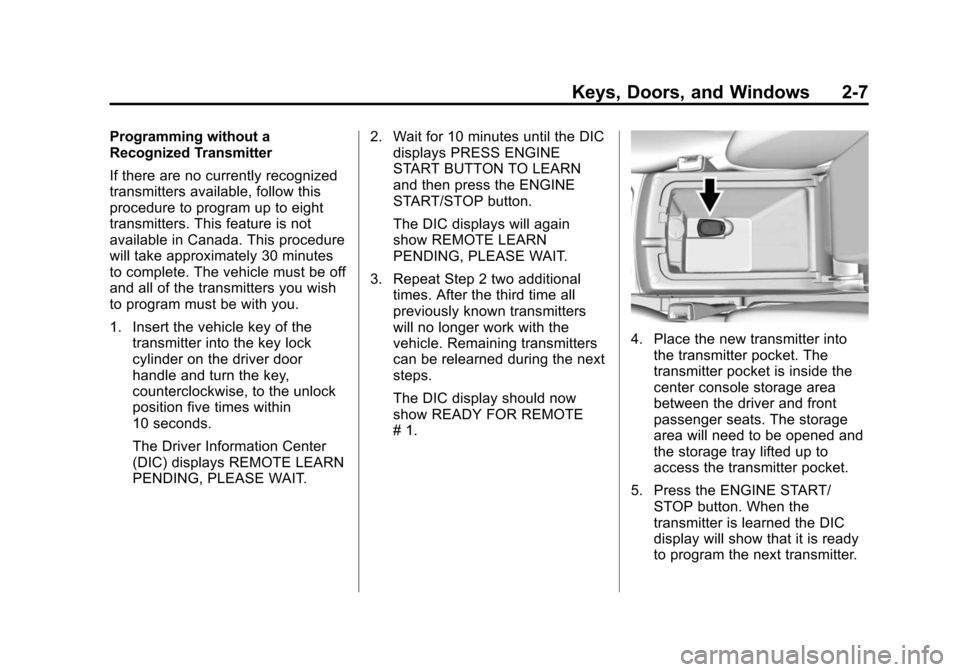
4. Place the new transmitter intothe transmitter pocket. The
transmitter pocket is inside the
center console storage area
between the driver and front
passenger seats. The storage
area will need to be opened and
the storage tray lifted up to
access the transmitter pocket.
5. Press the ENGINE START/ STOP button. When the
transmitter is learned the DIC
display will show that it is ready
to program the next transmitter.
Page 37 of 417
Black plate (8,1)Cadillac SRX Owner Manual (GMNA-Localizing-U.S./Canada/Mexico-
7707476) - 2015 - crc - 4/8/14
2-8 Keys, Doors, and Windows
6. Remove the transmitter from thetransmitter pocket and press the
transmitter
KorQbutton.
To program additional
transmitters, repeat Steps 4–6.
When all additional transmitters
are programmed, press and hold
the ENGINE START/STOP
button for 12 seconds to exit
programming mode.
Starting the Vehicle with a Low
Transmitter Battery
When the vehicle is started, if the
transmitter battery is weak, the DIC
may display NO REMOTE
DETECTED or NO REMOTE KEY
WAS DETECTED PLACE KEY IN
TRANSMITTER POCKET THEN
START YOUR VEHICLE. The
REPLACE BATTERY IN REMOTE
KEY message may also be
displayed at this time.
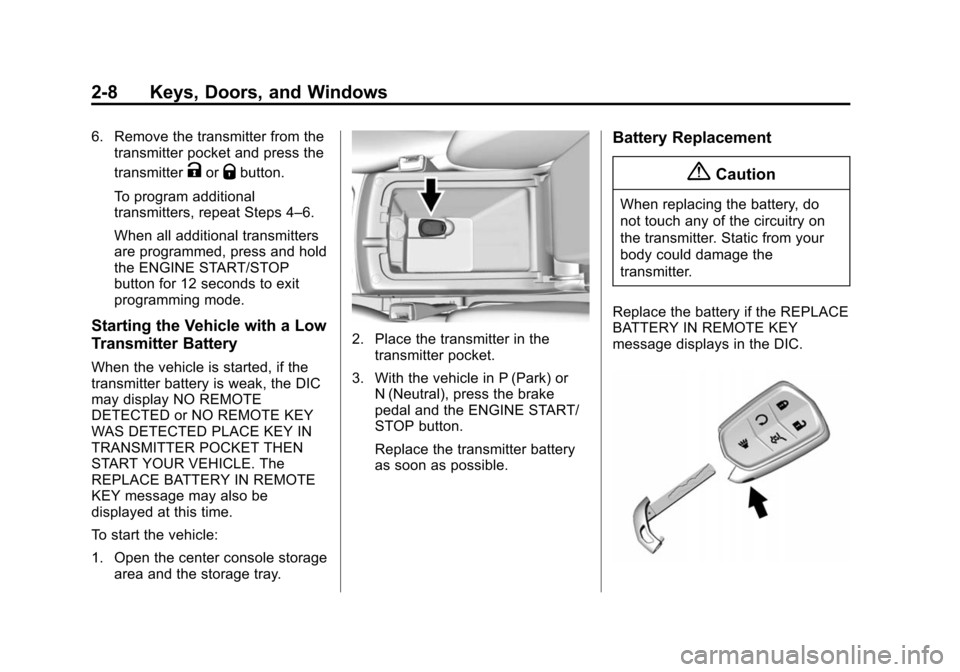
To start the vehicle:
1. Open the center console storage area and the storage tray.
2. Place the transmitter in thetransmitter pocket.
3. With the vehicle in P (Park) or N (Neutral), press the brake
pedal and the ENGINE START/
STOP button.
Replace the transmitter battery
as soon as possible.
Battery Replacement
{Caution
When replacing the battery, do
not touch any of the circuitry on
the transmitter. Static from your
body could damage the
transmitter.
Replace the battery if the REPLACE
BATTERY IN REMOTE KEY
message displays in the DIC.
Page 53 of 417
Black plate (24,1)Cadillac SRX Owner Manual (GMNA-Localizing-U.S./Canada/Mexico-
7707476) - 2015 - crc - 4/8/14
2-24 Keys, Doors, and Windows
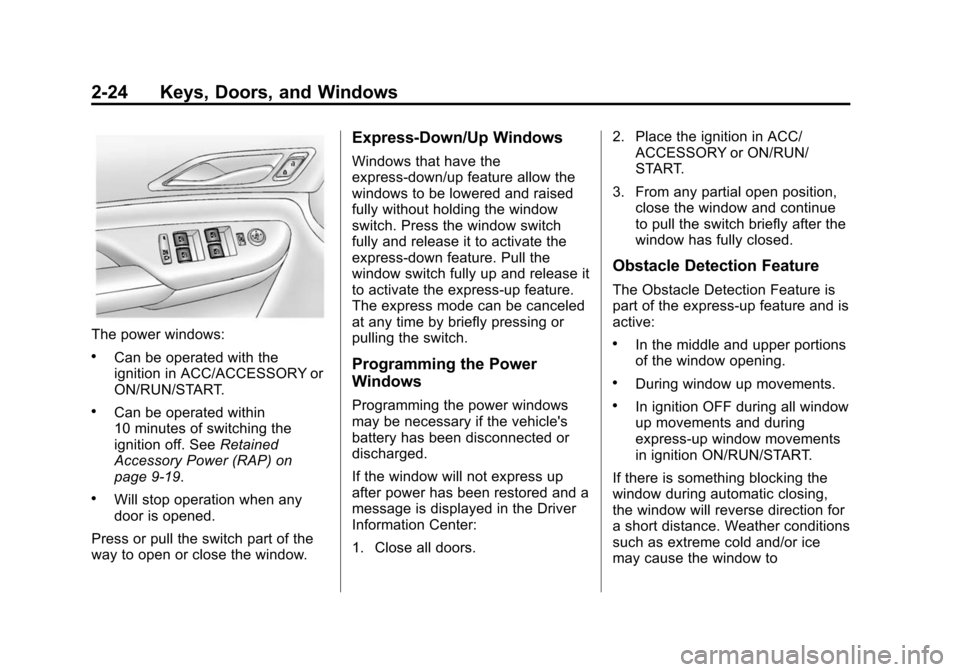
The power windows:
.Can be operated with the
ignition in ACC/ACCESSORY or
ON/RUN/START.
.Can be operated within
10 minutes of switching the
ignition off. SeeRetained
Accessory Power (RAP) on
page 9-19.
.Will stop operation when any
door is opened.
Press or pull the switch part of the
way to open or close the window.
Express-Down/Up Windows
Windows that have the
express-down/up feature allow the
windows to be lowered and raised
fully without holding the window
switch. Press the window switch
fully and release it to activate the
express-down feature. Pull the
window switch fully up and release it
to activate the express-up feature.
The express mode can be canceled
at any time by briefly pressing or
pulling the switch.
Programming the Power
Windows
Programming the power windows
may be necessary if the vehicle's
battery has been disconnected or
discharged.
If the window will not express up
after power has been restored and a
message is displayed in the Driver
Information Center:
1. Close all doors. 2. Place the ignition in ACC/
ACCESSORY or ON/RUN/
START.
3. From any partial open position, close the window and continue
to pull the switch briefly after the
window has fully closed.
Obstacle Detection Feature
The Obstacle Detection Feature is
part of the express-up feature and is
active:
.In the middle and upper portions
of the window opening.
.During window up movements.
.In ignition OFF during all window
up movements and during
express-up window movements
in ignition ON/RUN/START.
If there is something blocking the
window during automatic closing,
the window will reverse direction for
a short distance. Weather conditions
such as extreme cold and/or ice
may cause the window to