warning CADILLAC SRX 2016 2.G Owners Manual
[x] Cancel search | Manufacturer: CADILLAC, Model Year: 2016, Model line: SRX, Model: CADILLAC SRX 2016 2.GPages: 319, PDF Size: 3.29 MB
Page 277 of 319
Cadillac SRX Owner Manual (GMNA-Localizing-MidEast-9369636) - 2016 -
crc - 6/1/15
276 Vehicle Care
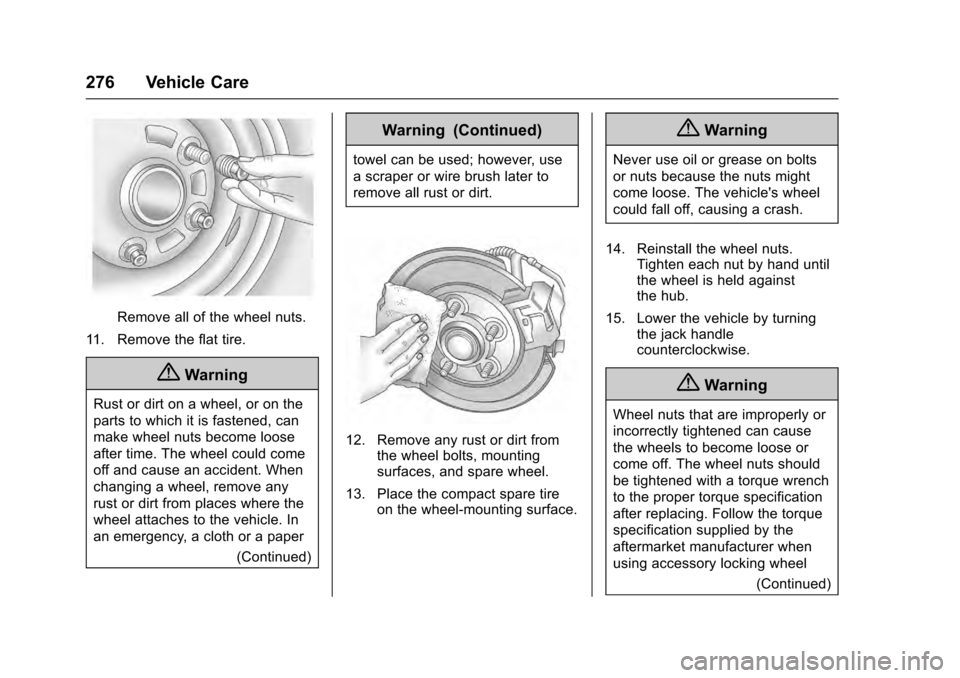
Remove all of the wheel nuts.
11. Remove the flat tire.
{Warning
Rust or dirt on a wheel, or on the
parts to which it is fastened, can
make wheel nuts become loose
after time. The wheel could come
off and cause an accident. When
changing a wheel, remove any
rust or dirt from places where the
wheel attaches to the vehicle. In
an emergency, a cloth or a paper (Continued)
Warning (Continued)
towel can be used; however, use
a scraper or wire brush later to
remove all rust or dirt.
12. Remove any rust or dirt fromthe wheel bolts, mounting
surfaces, and spare wheel.
13. Place the compact spare tire on the wheel-mounting surface.
{Warning
Never use oil or grease on bolts
or nuts because the nuts might
come loose. The vehicle's wheel
could fall off, causing a crash.
14. Reinstall the wheel nuts. Tighten each nut by hand until
the wheel is held against
the hub.
15. Lower the vehicle by turning the jack handle
counterclockwise.
{Warning
Wheel nuts that are improperly or
incorrectly tightened can cause
the wheels to become loose or
come off. The wheel nuts should
be tightened with a torque wrench
to the proper torque specification
after replacing. Follow the torque
specification supplied by the
aftermarket manufacturer when
using accessory locking wheel
(Continued)
Page 278 of 319
Cadillac SRX Owner Manual (GMNA-Localizing-MidEast-9369636) - 2016 -
crc - 6/1/15
Vehicle Care 277
Warning (Continued)
nuts. SeeCapacities and
Specifications 0305 for original
equipment wheel nut torque
specifications.
Caution
Improperly tightened wheel nuts
can lead to brake pulsation and
rotor damage. To avoid expensive
brake repairs, evenly tighten the
wheel nuts in the proper
sequence and to the proper
torque specification. See
Capacities and Specifications
0 305 for the wheel nut torque
specification.
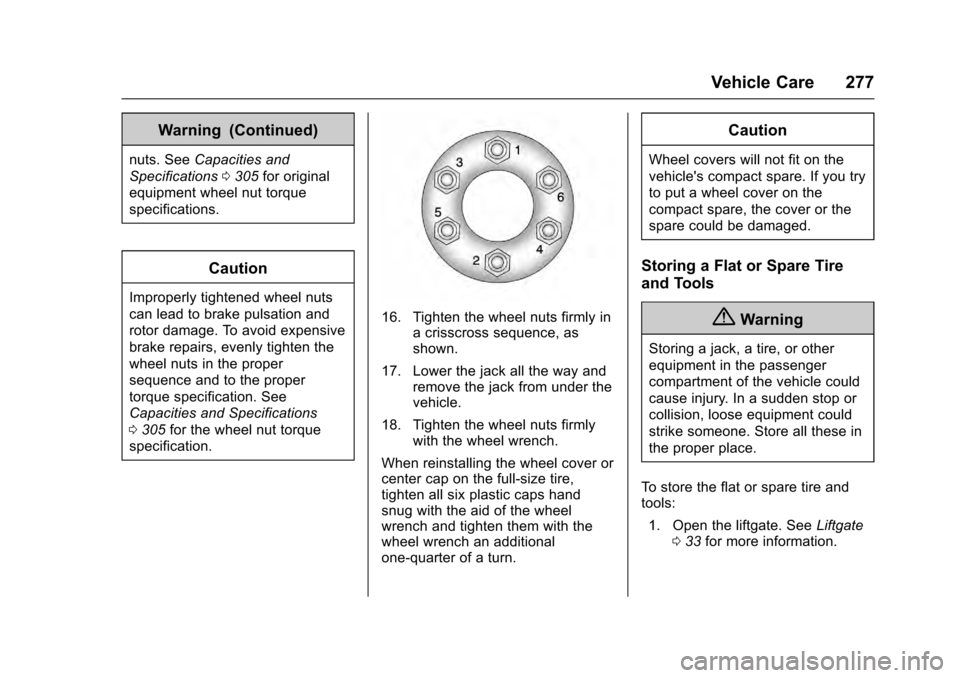
16. Tighten the wheel nuts firmly in a crisscross sequence, as
shown.
17. Lower the jack all the way and remove the jack from under the
vehicle.
18. Tighten the wheel nuts firmly with the wheel wrench.
When reinstalling the wheel cover or
center cap on the full-size tire,
tighten all six plastic caps hand
snug with the aid of the wheel
wrench and tighten them with the
wheel wrench an additional
one-quarter of a turn.
Caution
Wheel covers will not fit on the
vehicle's compact spare. If you try
to put a wheel cover on the
compact spare, the cover or the
spare could be damaged.
Storing a Flat or Spare Tire
and Tools
{Warning
Storing a jack, a tire, or other
equipment in the passenger
compartment of the vehicle could
cause injury. In a sudden stop or
collision, loose equipment could
strike someone. Store all these in
the proper place.
To store the flat or spare tire and
tools: 1. Open the liftgate. See Liftgate
0 33 for more information.
Page 279 of 319
Cadillac SRX Owner Manual (GMNA-Localizing-MidEast-9369636) - 2016 -
crc - 6/1/15
278 Vehicle Care
2. Put back all tools as they werestored in the rear storage
compartment and put the
compartment cover back on.
3. Install the cargo cover. For more information, see Cargo
Management System 094.
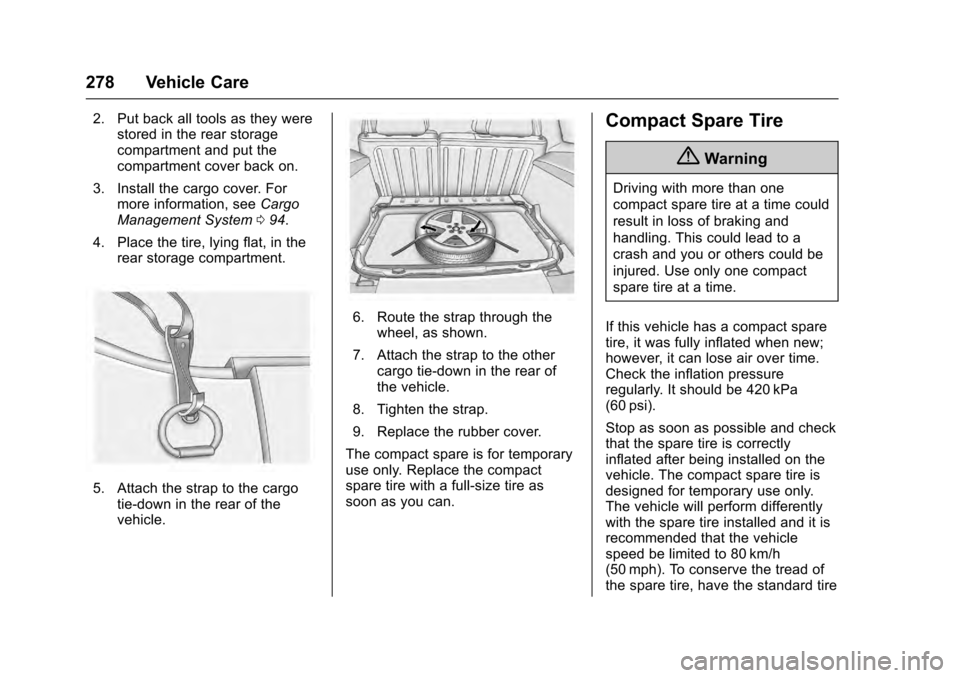
4. Place the tire, lying flat, in the rear storage compartment.
5. Attach the strap to the cargo
tie-down in the rear of the
vehicle.
6. Route the strap through thewheel, as shown.
7. Attach the strap to the other cargo tie-down in the rear of
the vehicle.
8. Tighten the strap.
9. Replace the rubber cover.
The compact spare is for temporary
use only. Replace the compact
spare tire with a full-size tire as
soon as you can.
Compact Spare Tire
{Warning
Driving with more than one
compact spare tire at a time could
result in loss of braking and
handling. This could lead to a
crash and you or others could be
injured. Use only one compact
spare tire at a time.
If this vehicle has a compact spare
tire, it was fully inflated when new;
however, it can lose air over time.
Check the inflation pressure
regularly. It should be 420 kPa
(60 psi).
Stop as soon as possible and check
that the spare tire is correctly
inflated after being installed on the
vehicle. The compact spare tire is
designed for temporary use only.
The vehicle will perform differently
with the spare tire installed and it is
recommended that the vehicle
speed be limited to 80 km/h
(50 mph). To conserve the tread of
the spare tire, have the standard tire
Page 280 of 319
Cadillac SRX Owner Manual (GMNA-Localizing-MidEast-9369636) - 2016 -
crc - 6/1/15
Vehicle Care 279
repaired or replaced as soon as
convenient and return the spare tire
to the storage area.
When using a compact spare tire,
the ABS and Traction Control
systems may engage until the spare
tire is recognized by the vehicle,
especially on slippery roads. Adjust
driving to reduce possible
wheel slip.
Caution
When the compact spare is
installed, do not take the vehicle
through an automatic car wash
with guide rails. The compact
spare can get caught on the rails
which can damage the tire, wheel,
and other parts of the vehicle.Do not use the compact spare on
other vehicles.
Do not mix the compact spare tire or
wheel with other wheels or tires.
They will not fit. Keep the spare tire
and its wheel together.
Caution
Tire chains will not fit the compact
spare. Using them can damage
the vehicle and the chains. Do not
use tire chains on the compact
spare.
Jump Starting
For more information about the
vehicle battery, see
Battery0239.
If the vehicle battery has run down,
you may want to use another
vehicle and some jumper cables to
start your vehicle. Be sure to use
the following steps to do it safely.
{Warning
Batteries can hurt you. They can
be dangerous because: . They contain acid that can
burn you.
. They contain gas that can
explode or ignite.
. They contain enough
electricity to burn you.
If you do not follow these steps
exactly, some or all of these
things can hurt you.
Page 282 of 319

Cadillac SRX Owner Manual (GMNA-Localizing-MidEast-9369636) - 2016 -
crc - 6/1/15
Vehicle Care 281
3. Turn off the ignition on bothvehicles. Unplug unnecessary
accessories plugged into the
cigarette lighter or the
accessory power outlet. Turn
off the radio and all lamps that
are not needed. This will avoid
sparks, helping save both
batteries and the radio.
4. Open the hood on the other vehicle and locate the
positive (+) and negative (−)
terminal locations on that
vehicle.
Open the hood on your vehicle
and find the remote positive (+)
and remote negative (−) jump
starting terminals.
{Warning
An electric fan can start up even
when the engine is not running
and can injure you. Keep hands,
clothing, and tools away from any
underhood electric fan.
{Warning
Using an open flame near a
battery can cause battery gas to
explode. People have been hurt
doing this, and some have been
blinded. Use a flashlight if you
need more light.
Be sure the battery has enough
water. You do not need to add
water to the battery installed in
your new vehicle. But if a battery
has filler caps, be sure the right
amount of fluid is there. If it is low,
add water to take care of that
first. If you do not, explosive gas
could be present.
Battery fluid contains acid that
can burn you. Do not get it on
you. If you accidentally get it in
your eyes or on your skin, flush
the place with water and get
medical help immediately.
{Warning
Fans or other moving engine
parts can injure you badly. Keep
your hands away from moving
parts once the engine is running.
5. Check that the jumper cables do not have loose or missing
insulation. If they do, you could
get a shock. The vehicles
could also be damaged.
Before you connect the cables,
here are some basic things you
should know. Positive (+) will
go to positive (+) or to a remote
positive (+) terminal if the
vehicle has one. Negative (−)
will go to a heavy, unpainted
metal engine part or to a
remote negative (−) terminal if
the vehicle has one.
Do not connect positive (+) to
negative (−) or you will get a
short that would damage the
battery and maybe other parts.
Do not connect the negative (−)
Page 295 of 319
Cadillac SRX Owner Manual (GMNA-Localizing-MidEast-9369636) - 2016 -
crc - 6/1/15
294 Vehicle Care
Caution (Continued)
the appearance and feel of
leather or soft trim, and are not
recommended.
Do not use cleaners that increase
gloss, especially on the instrument
panel. Reflected glare can decrease
visibility through the windshield
under certain conditions.
Caution
Use of air fresheners may cause
permanent damage to plastics
and painted surfaces. If an air
freshener comes in contact with
any plastic or painted surface in
the vehicle, blot immediately and
clean with a soft cloth dampened
with a mild soap solution.
Damage caused by air fresheners
would not be covered by the
vehicle warranty.
Cargo Cover and
Convenience Net
Wash with warm water and mild
detergent. Do not use chlorine
bleach. Rinse with cold water, and
then dry completely.
Care of Safety Belts
Keep belts clean and dry.
{Warning
Do not bleach or dye safety belts.
It may severely weaken them. In
a crash, they might not be able to
provide adequate protection.
Clean safety belts only with mild
soap and lukewarm water.
Floor Mats
{Warning
If a floor mat is the wrong size or
is not properly installed, it can
interfere with the pedals.
Interference with the pedals can (Continued)
Warning (Continued)
cause unintended acceleration
and/or increased stopping
distance which can cause a crash
and injury. Make sure the floor
mat does not interfere with the
pedals.
Use the following guidelines for
proper floor mat usage.
. The original equipment floor
mats were designed for your
vehicle. If the floor mats need
replacing, it is recommended
that certified floor mats be
purchased. Non-certified floor
mats may not fit properly and
may interfere with the pedals.
Always check that the floor mats
do not interfere with the pedals.
. Do not use a floor mat if the
vehicle is not equipped with a
floor mat retainer on the driver
side floor.
. Use the floor mat with the
correct side up. Do not turn
it over.
Page 297 of 319
Cadillac SRX Owner Manual (GMNA-Localizing-MidEast-9369636) - 2016 -
crc - 6/1/15
296 Service and Maintenance
Service and
Maintenance
General Information
General Information . . . . . . . . . . 296
Maintenance Schedule
Maintenance Schedule . . . . . . . 297
Recommended Fluids,
Lubricants, and Parts
Recommended Fluids andLubricants . . . . . . . . . . . . . . . . . . . 301
Maintenance Replacement Parts . . . . . . . . . . . . . . . . . . . . . . . . 302
Maintenance Records
Maintenance Records . . . . . . . . 303
General Information
Caution
Maintenance intervals, checks,
inspections, recommended fluids,
and lubricants are necessary to
keep this vehicle in good working
condition. Damage caused by
failure to follow scheduled
maintenance might not be
covered by the vehicle warranty.
As the vehicle owner, you are
responsible for the scheduled
maintenance in this section. We
recommend having your dealer
perform these services. Proper
vehicle maintenance helps to keep
the vehicle in good working
condition, improves fuel economy,
and reduces vehicle emissions for
better air quality.
Because of all the different ways
people use vehicles, maintenance
needs vary. The vehicle might need
more frequent checks and services.
Please read the information under Scheduled Maintenance. To keep
the vehicle in good condition, see
your dealer.
The maintenance schedule is for
vehicles that:
.
Carry passengers and cargo
within recommended limits on
the Tire and Loading Information
label. See Vehicle Load Limits
0 168.
. Are driven on reasonable road
surfaces within legal driving
limits.
. Use the recommended fuel. See
Fuel 0209.
{Warning
Performing maintenance work can
be dangerous. Some jobs can
cause serious injury. Perform
maintenance work only if you
have the required know-how and
the proper tools and equipment.
If in doubt, see your dealer to
have a qualified technician do the
work. See Doing Your Own
Service Work 0223.
Page 310 of 319

Cadillac SRX Owner Manual (GMNA-Localizing-MidEast-9369636) - 2016 -
crc - 6/1/15
Index 309
IndexA
Accessories andModifications . . . . . . . . . . . . . . . . . . 222
Accessory Power . . . . . . . . . . . . . . . 175
Adaptive Cruise Control . . . . . . . . 190
Adaptive Forward Lighting (AFL) . . . . . . . . . . . . . . . . . 146
Adaptive Forward Lighting (AFL) Light . . . . . . . . . . . . . . . . . . . . 122
Add-On Electrical Equipment . . . 220
Adjustable Throttle and
Brake Pedal . . . . . . . . . . . . . . . . . . . 172
Adjustments Lumbar, Front Seats . . . . . . . . . . . . 50
Thigh Support . . . . . . . . . . . . . . . . . . 50
Air Cleaner/Filter, Engine . . . . . . . 229
Air Filter, Passenger Compartment . . . . . . . . . . . . . . . . . 160
Air Vents . . . . . . . . . . . . . . . . . . . . . . . 159
Airbag System
Check . . . . . . . . . . . . . . . . . . . . . . . . . . 72
How Does an AirbagRestrain? . . . . . . . . . . . . . . . . . . . . . 67
What Makes an Airbag
Inflate? . . . . . . . . . . . . . . . . . . . . . . . . 67
What Will You See after an Airbag Inflates? . . . . . . . . . . . . . . . 68 Airbag System (cont'd)
When Should an Airbag
Inflate? . . . . . . . . . . . . . . . . . . . . . . . . 66
Where Are the Airbags? . . . . . . . . 65
Airbags Adding Equipment to theVehicle . . . . . . . . . . . . . . . . . . . . . . . . 71
Light On-Off . . . . . . . . . . . . . . . . . . .113
On-Off Light . . . . . . . . . . . . . . . . . . .113
On-Off Switch . . . . . . . . . . . . . . . . . . 69
Readiness Light . . . . . . . . . . . . . . .112
Servicing Airbag-Equipped Vehicles . . . . . . . . . . . . . . . . . . . . . . . 71
System Check . . . . . . . . . . . . . . . . . . 64
Alarm Vehicle Security . . . . . . . . . . . . . . . . 37
Alert Side Blind Zone (SBZA) . . . . . . 206
All-Season Tires . . . . . . . . . . . . . . . . 259
All-Wheel Drive . . . . . . . . . . . . 182, 240
Antilock Brake System (ABS) . . . 182 Warning Light . . . . . . . . . . . . . . . . . .118
Appearance Care
Exterior . . . . . . . . . . . . . . . . . . . . . . . 287
Interior . . . . . . . . . . . . . . . . . . . . . . . . 291
Armrest Storage . . . . . . . . . . . . . . . . . 91
Ashtrays . . . . . . . . . . . . . . . . . . . . . . . . 107
Page 311 of 319

Cadillac SRX Owner Manual (GMNA-Localizing-MidEast-9369636) - 2016 -
crc - 6/1/15
310 Index
Assistance Systems forDriving . . . . . . . . . . . . . . . . . . . . . . . . 202
Assistance Systems for Parking and Backing . . . . . . . . . . 198
Automatic Dimming Mirrors . . . . . . . . . . . . . . . . 41
Door Locks . . . . . . . . . . . . . . . . . . . . . 32
Transmission . . . . . . . . . . . . . . . . . 178
Transmission Fluid . . . . . . . . . . . 229
Automatic Transmission Manual Mode . . . . . . . . . . . . . . . . . 180
Shift Lock Control Function
Check . . . . . . . . . . . . . . . . . . . . . . . 240
B
Battery . . . . . . . . . . . . . . . . . . . . . . . . . 239Exterior Lighting Battery
Saver . . . . . . . . . . . . . . . . . . . . . . . 151
Jump Starting . . . . . . . . . . . . . . . . . 279
Load Management . . . . . . . . . . . . 150
Power Protection . . . . . . . . . . . . . 151
Voltage and Charging Messages . . . . . . . . . . . . . . . . . . . 126
Blade Replacement, Wiper . . . . . 241
Brake Pedal and Adjustable
Throttle . . . . . . . . . . . . . . . . . . . . . . 172
System Warning Light . . . . . . . . .116
Brakes . . . . . . . . . . . . . . . . . . . . . . . . . . 237 Brakes (cont'd)
Antilock . . . . . . . . . . . . . . . . . . . . . . . 182
Assist . . . . . . . . . . . . . . . . . . . . . . . . . 185
Fluid . . . . . . . . . . . . . . . . . . . . . . . . . . 238
Parking . . . . . . . . . . . . . . . . . . . . . . . 183
System Messages . . . . . . . . . . . . 126
Braking . . . . . . . . . . . . . . . . . . . . . . . . . 163
Break-In, New Vehicle . . . . . . . . . . 172
Bulb Replacement . . . . . . . . . . . . . . 249 Back-up Lamps . . . . . . . . . . . . . . . 248
Halogen Bulbs . . . . . . . . . . . . . . . . 243
Headlamp Aiming . . . . . . . . . . . . . 243
Headlamps . . . . . . . . . . . . . . 243, 244
High Intensity Discharge(HID) Lighting . . . . . . . . . . . . . . . 243
License Plate Lamps . . . . . . . . . 248
Turn Signal Lamps . . . . . . . . . . . 247
Buying New Tires . . . . . . . . . . . . . . . 268
C
Capacities and
Specifications . . . . . . . . . . . . . . . . . 305
Carbon Monoxide Engine Exhaust . . . . . . . . . . . . . . . 177
Liftgate . . . . . . . . . . . . . . . . . . . . . . . . . 33
Winter Driving . . . . . . . . . . . . . . . . 166
Cargo Cover . . . . . . . . . . . . . . . . . . . . . . . . . . . 92
Management System . . . . . . . . . . . 94 Cargo (cont'd)
Tie-Downs . . . . . . . . . . . . . . . . . . . . . . 94
Cargo Lamp . . . . . . . . . . . . . . . . . . . . 149
Cargo Net . . . . . . . . . . . . . . . . . . . . . . . 97
Caution, Danger, and Warning . . . . 2
Center Console Storage . . . . . . . . . 92
Chains, Tire . . . . . . . . . . . . . . . . . . . . 270
Charging System Light . . . . . . . . . 114
Check Malfunction IndicatorEngine Light . . . . . . . . . . . . . . . . .115
Child Restraints Infants and Young Children . . . . . 74
Lower Anchors and Tethersfor Children . . . . . . . . . . . . . . . . . . . 79
Older Children . . . . . . . . . . . . . . . . . . 73
Securing . . . . . . . . . . . . . . . . . . . . 84, 86
Systems . . . . . . . . . . . . . . . . . . . . . . . . 76
Cigarette Lighter . . . . . . . . . . . . . . . . 107
Circuit Breakers . . . . . . . . . . . . . . . . 250
Cleaning Exterior Care . . . . . . . . . . . . . . . . . 287
Interior Care . . . . . . . . . . . . . . . . . . 291
Climate Control Systems Dual Automatic . . . . . . . . . . . . . . . 153
Rear . . . . . . . . . . . . . . . . . . . . . . . . . . 157
Clock . . . . . . . . . . . . . . . . . . . . . . . . . . . 105
Cluster, Instrument . . . . . . . . . . . . . 108
Page 312 of 319

Cadillac SRX Owner Manual (GMNA-Localizing-MidEast-9369636) - 2016 -
crc - 6/1/15
Index 311
Compact Spare Tire . . . . . . . . . . . . 278
CompartmentsStorage . . . . . . . . . . . . . . . . . . . . . . . . . 90
Control Traction and ElectronicStability . . . . . . . . . . . . . . . . . . . . . 186
Control of a Vehicle . . . . . . . . . . . . . 163
Convenience Net . . . . . . . . . . . . . . . . 99
Convex Mirrors . . . . . . . . . . . . . . . . . . 40
Coolant Engine . . . . . . . . . . . . . . . . . . . . . . . . 231
Engine Temperature Gauge . . . 111
Engine Temperature
Warning Light . . . . . . . . . . . . . . . 120
Cooling System . . . . . . . . . . . . . . . . . 231 Engine Messages . . . . . . . . . . . . 128
Courtesy Lamps . . . . . . . . . . . . . . . . 149
Cover Cargo . . . . . . . . . . . . . . . . . . . . . . . . . . . 92
Engine . . . . . . . . . . . . . . . . . . . . . . . . 225
Cruise Control . . . . . . . . . . . . . . . . . . 188
Light . . . . . . . . . . . . . . . . . . . . . . . . . . 122
Messages . . . . . . . . . . . . . . . . . . . . 127
Cruise Control, Adaptive . . . . . . . . 190
Cupholders . . . . . . . . . . . . . . . . . . . . . . 91D
Danger, Warning, and Caution . . . . 2
Data Recorders, Event . . . . . . . . . 307
Daytime Running Lamps (DRL) . . . . . . . . . . . . . . . . . . 145
Defensive Driving . . . . . . . . . . . . . . . 163
Delayed Locking . . . . . . . . . . . . . . . . . 32
Distracted Driving . . . . . . . . . . . . . . . 162
Dome Lamps . . . . . . . . . . . . . . . . . . . 149
Door Ajar Messages . . . . . . . . . . . . . . . 128
Delayed Locking . . . . . . . . . . . . . . . . 32
Locks . . . . . . . . . . . . . . . . . . . . . . . . . . . 31
Power Locks . . . . . . . . . . . . . . . . . . . . 32
Rear Seat Pass-Through . . . . . . . 56
Drive Belt Routing, Engine . . . . . . 306
Drive Systems All-Wheel Drive . . . . . . . . . . 182, 240
Driver Assistance Systems . . . . . 198
Driver Information
Center (DIC) . . . . . . . . . . . . . . . . . . 123
Driving Assistance Systems . . . . . . . . . . 202
Characteristics andTowing Tips . . . . . . . . . . . . . . . . . 212
Defensive . . . . . . . . . . . . . . . . . . . . . 163
For Better Fuel Economy . . . . . . . 23
Hill and Mountain Roads . . . . . . 166 Driving (cont'd)
If the Vehicle is Stuck . . . . . . . . . 167
Loss of Control . . . . . . . . . . . . . . . 164
Off-Road Recovery . . . . . . . . . . . 164
Vehicle Load Limits . . . . . . . . . . . 168
Wet Roads . . . . . . . . . . . . . . . . . . . 165
Winter . . . . . . . . . . . . . . . . . . . . . . . . 166
Dual Automatic Climate Control System . . . . . . . . . . . . . . . . 153
E
ECO Button . . . . . . . . . . . . . . . . . . . . 181
Economy ModeFuel . . . . . . . . . . . . . . . . . . . . . . . . . . 181
Electric Parking Brake Light . . . . 117
Electrical Equipment, Add-On . . . . . . . . . . . . . . . . . . . . . . . 220
Electrical System Engine Compartment Fuse
Block . . . . . . . . . . . . . . . . . . . . . . . . 250
Fuses and Circuit Breakers . . . 250
Instrument Panel Fuse Block . . . . . . . . . . . . . . . . . . . . . . . . 253
Overload . . . . . . . . . . . . . . . . . . . . . 249
Rear Compartment Fuse
Block . . . . . . . . . . . . . . . . . . . . . . . . 255
Engine Air Cleaner/Filter . . . . . . . . . . . . . 229