wiper blades CADILLAC STS 2009 1.G Owners Manual
[x] Cancel search | Manufacturer: CADILLAC, Model Year: 2009, Model line: STS, Model: CADILLAC STS 2009 1.GPages: 514, PDF Size: 2.73 MB
Page 168 of 514
x(Delay Adjustment):Use this band to set the
length of the delay between wipes when using the delay
feature. The closer the band is moved toward mist,
the longer the delay. The windshield wiper lever must
be in delay for this feature to work.
6(Low Speed):For slow, steady wiping cycles.
1(High Speed):For rapid wiping cycles.
If the windshield wipers are in use for about six seconds
while you are driving, the exterior lamps will come on
automatically if the exterior lamp control is in AUTO.
SeeWiper Activated Headlamps on page 3-36for
more information.
Clear snow and ice from the wiper blades before using
them. If the blades are frozen to the windshield, loosen or
thaw them. If they become damaged, install new blades.
For more information, seeWindshield Wiper Blade
Replacement on page 5-52.
Heavy snow or ice can overload the wiper motor.
A circuit breaker will stop the motor until it cools down.
For STS-V, the vehicle is equipped with a feature
that disables the wiper system when the hood is open
and the vehicle is stopped. Opening the hood will
automatically park the wipers if they are not parked.
Rainsense™ II Wipers
For vehicles with this feature, the moisture sensor is
mounted on the interior side of the windshield behind the
rearview mirror. It is used to automatically operate the
wipers by monitoring the amount of moisture build-up
on the windshield. Wipes occur as needed to clear the
windshield depending on driving conditions and the
sensitivity setting. In light rain or snow, fewer wipes will
occur. In heavy rain or snow, wipes will occur more
frequently. The Rainsense wipers operate in a delay
mode as well as a continuous low or high speed as
needed. If the system is left on for long periods of time,
occasional wipes may occur without any moisture on
the windshield. This is normal and indicates that the
Rainsense system is activated.
To activate the Rainsense system, turn the wiper band
to delay mode and select one of the four sensitivity levels
indicated on the wiper stalk. The position closest to off is
the lowest sensitivity setting, level one. This allows more
rain or snow to collect on the windshield between wipes.
Turning the wiper band away from you to higher
sensitivity levels increases the sensitivity of the system
and frequency of wipes. The highest sensitivity setting,
level four, is closest to low. A single wipe occurs each
time the wiper stalk is turned to a higher sensitivity level
to indicate that the sensitivity level has been increased.
3-14
Page 307 of 514
Before Leaving on a Long Trip
To prepare your vehicle for a long trip, consider having
it serviced by your dealer/retailer before departing.
Things to check on your own include:
Windshield Washer Fluid:Reservoir full? Windows
clean — inside and outside?
Wiper Blades:In good shape?
Fuel, Engine Oil, Other Fluids:All levels checked?
Lamps:Do they all work and are lenses clean?
Tires:Are treads good? Are tires in�ated to
recommended pressure?
Weather and Maps:Safe to travel? Have
up-to-date maps?
Highway Hypnosis
Always be alert and pay attention to your surroundings
while driving. If you become tired or sleepy, �nd a
safe place to park your vehicle and rest.
Other driving tips include:
Keep the vehicle well ventilated.
Keep interior temperature cool.
Keep your eyes moving — scan the road ahead
and to the sides.
Check the rearview mirror and vehicle instruments
often.
4-19
Page 328 of 514
Tire Inspection and Rotation...........................5-71
When It Is Time for New Tires.......................5-73
Buying New Tires.........................................5-74
Different Size Tires and Wheels......................5-76
Uniform Tire Quality Grading..........................5-77
Wheel Alignment and Tire Balance..................5-79
Wheel Replacement......................................5-79
Tire Chains..................................................5-81
Lifting the Vehicle (STS-V).............................5-82
If a Tire Goes Flat........................................5-84
Tire Sealant and Compressor Kit
(Without Selector Switch)............................5-87
Tire Sealant and Compressor Kit
(With Selector Switch)................................5-96
Tire Sealant and Compressor Kit Storage.......5-104
Changing a Flat Tire...................................5-104
Removing the Spare Tire and Tools..............5-106
Removing the Flat Tire and Installing
the Spare Tire.........................................5-107
Storing a Flat or Spare Tire and Tools...........5-112
Compact Spare Tire....................................5-114
Appearance Care..........................................5-115
Interior Cleaning.........................................5-115
Fabric/Carpet..............................................5-116
Leather......................................................5-117
Instrument Panel, Vinyl, and Other
Plastic Surfaces.......................................5-117Wood Panels..............................................5-117
Speaker Covers..........................................5-118
Care of Safety Belts....................................5-118
Weatherstrips.............................................5-118
Washing Your Vehicle..................................5-118
Cleaning Exterior Lamps/Lenses....................5-119
Finish Care................................................5-119
Windshield and Wiper Blades.......................5-120
Aluminum or Chrome-Plated Wheels
and Trim................................................5-120
Tires.........................................................5-121
Sheet Metal Damage...................................5-121
Finish Damage...........................................5-121
Underbody Maintenance...............................5-121
Chemical Paint Spotting...............................5-122
Vehicle Identi�cation.....................................5-122
Vehicle Identi�cation Number (VIN)................5-122
Service Parts Identi�cation Label...................5-122
Electrical System..........................................5-123
Add-On Electrical Equipment.........................5-123
Headlamp Wiring........................................5-123
Windshield Wiper Fuses...............................5-123
Power Windows and Other Power Options......5-123
Fuses and Circuit Breakers..........................5-123
Underhood Fuse Block................................5-124
Rear Underseat Fuse Block..........................5-128
Capacities and Speci�cations........................5-134
Section 5 Service and Appearance Care
5-2
Page 378 of 514
Back-Up Lamps
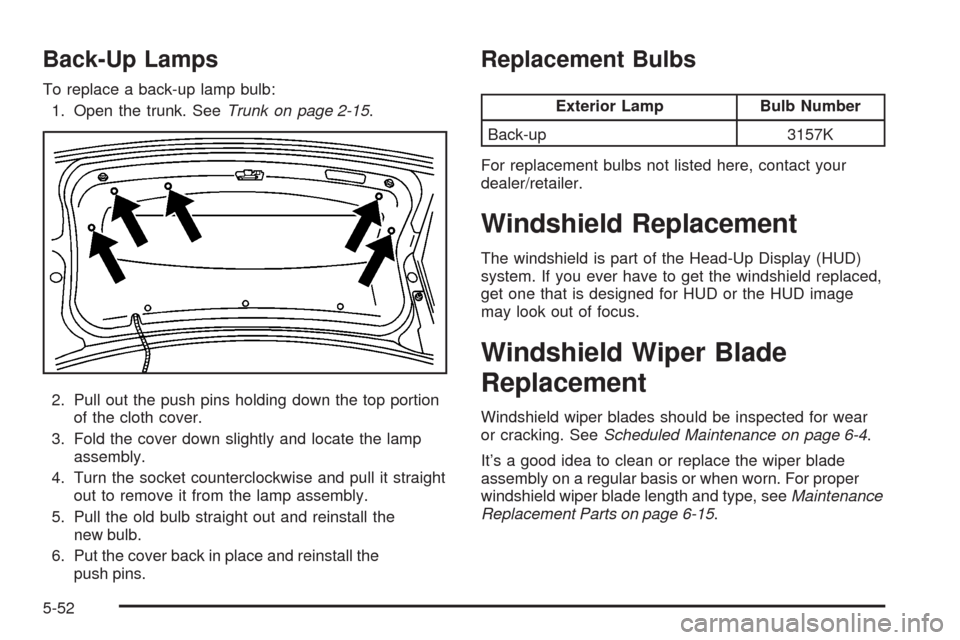
To replace a back-up lamp bulb:
1. Open the trunk. SeeTrunk on page 2-15.
2. Pull out the push pins holding down the top portion
of the cloth cover.
3. Fold the cover down slightly and locate the lamp
assembly.
4. Turn the socket counterclockwise and pull it straight
out to remove it from the lamp assembly.
5. Pull the old bulb straight out and reinstall the
new bulb.
6. Put the cover back in place and reinstall the
push pins.
Replacement Bulbs
Exterior Lamp Bulb Number
Back-up 3157K
For replacement bulbs not listed here, contact your
dealer/retailer.
Windshield Replacement
The windshield is part of the Head-Up Display (HUD)
system. If you ever have to get the windshield replaced,
get one that is designed for HUD or the HUD image
may look out of focus.
Windshield Wiper Blade
Replacement
Windshield wiper blades should be inspected for wear
or cracking. SeeScheduled Maintenance on page 6-4.
It’s a good idea to clean or replace the wiper blade
assembly on a regular basis or when worn. For proper
windshield wiper blade length and type, seeMaintenance
Replacement Parts on page 6-15.
5-52
Page 379 of 514
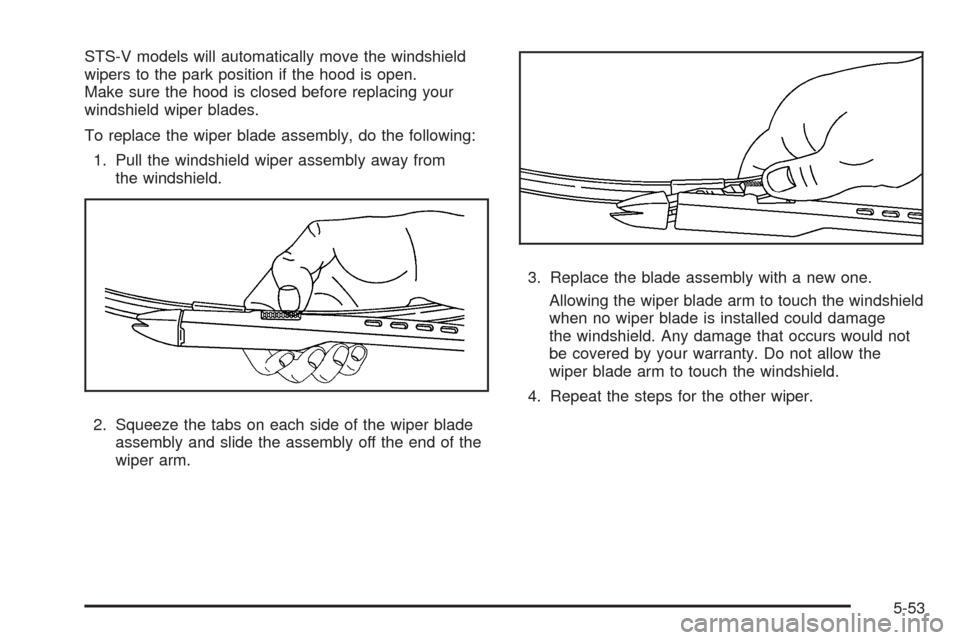
STS-V models will automatically move the windshield
wipers to the park position if the hood is open.
Make sure the hood is closed before replacing your
windshield wiper blades.
To replace the wiper blade assembly, do the following:
1. Pull the windshield wiper assembly away from
the windshield.
2. Squeeze the tabs on each side of the wiper blade
assembly and slide the assembly off the end of the
wiper arm.3. Replace the blade assembly with a new one.
Allowing the wiper blade arm to touch the windshield
when no wiper blade is installed could damage
the windshield. Any damage that occurs would not
be covered by your warranty. Do not allow the
wiper blade arm to touch the windshield.
4. Repeat the steps for the other wiper.
5-53
Page 446 of 514
Windshield and Wiper Blades
Clean the outside of the windshield with glass cleaner.
Clean the rubber blades using a lint free cloth or paper
towel soaked with windshield washer �uid or a mild
detergent. Wash the windshield thoroughly when
cleaning the blades. Bugs, road grime, sap, and a
buildup of vehicle wash/wax treatments may cause
wiper streaking. Replace the wiper blades if they are
worn or damaged.
Wipers can be damaged by:
Extreme dusty conditions
Sand and salt
Heat and sun
Snow and ice, without proper removal
Aluminum or Chrome-Plated Wheels
and Trim
Your vehicle may have either aluminum or
chrome-plated wheels.
Keep the wheels clean using a soft clean cloth with mild
soap and water. Rinse with clean water. After rinsing
thoroughly, dry with a soft clean towel. A wax may then
be applied.Notice:Chrome wheels and other chrome trim
may be damaged if the vehicle is not washed after
driving on roads that have been sprayed with
magnesium, calcium or sodium chloride. These
chlorides are used on roads for conditions such
as ice and dust. Always wash the vehicle’s chrome
with soap and water after exposure.
Notice:Using strong soaps, chemicals, abrasive
polishes, cleaners, brushes, or cleaners that contain
acid on aluminum or chrome-plated wheels, could
damage the surface of the wheel(s). The repairs
would not be covered by the warranty. Use only
approved cleaners on aluminum or chrome-plated
wheels.
The surface of these wheels is similar to the painted
surface of your vehicle. Do not use strong soaps,
chemicals, abrasive polishes, abrasive cleaners,
cleaners with acid, or abrasive cleaning brushes
on them because you could damage the surface.
Do not use chrome polish on aluminum wheels.
Notice:Using chrome polish on aluminum wheels
could damage the wheels. The repairs would not
be covered by the warranty. Use chrome polish on
chrome wheels only.
Use chrome polish only on chrome-plated wheels, but
avoid any painted surface of the wheel, and buff off
immediately after application.
5-120
Page 467 of 514

When the CHANGE ENGINE OIL SOON message
appears, the following services, checks, and inspections
are required:
❑Change engine oil and �lter. SeeEngine Oil on
page 5-18. Reset oil life system. SeeEngine Oil Life
System on page 5-21.An Emission Control Service.
❑Visually check for any leaks or damage.
See footnote (k).
❑Inspect engine air cleaner �lter. If necessary, replace
�lter. SeeEngine Air Cleaner/Filter on page 5-23.
See footnote (m).
❑Check tires for in�ation pressures and wear. SeeTires
on page 5-54. If tire rotation is recommended for the
vehicle, rotate tires. SeeTire Inspection and Rotation
on page 5-71and “Tire Wear Inspection” inAt Least
Once a Month on page 6-11.❑Inspect brake system.See footnote (a).
❑Check engine coolant and windshield washer �uid
levels. If the vehicle has the 4.4L V8 supercharged
engine, check intercooler �uid level. Add �uid as
needed.
❑Perform any needed additional services. See
“Additional Required Services” in this section.
❑Inspect suspension and steering components.
See footnote (b).
❑Inspect engine cooling system.See footnote (c).
❑Inspect wiper blades.See footnote (d).
❑Inspect restraint system components.
See footnote (e).
❑Lubricate body components.See footnote (f).
6-5
Page 470 of 514
Maintenance Footnotes
(a)Visually inspect brake lines and hoses for proper
hook-up, binding, leaks, cracks, chafing, etc. Inspect disc
brake pads for wear and rotors for surface condition.
Inspect other brake parts, including calipers, parking
brake, etc.
(b)Visually inspect front and rear suspension and
steering system for damaged, loose, or missing parts or
signs of wear. Inspect power steering lines and hoses
for proper hook-up, binding, leaks, cracks, chafing, etc.
(c)Visually inspect hoses and have them replaced if they
are cracked, swollen, or deteriorated. Inspect all pipes,
fittings, and clamps; replace with genuine parts as
needed. To help ensure proper operation, a pressure test
of the cooling system and pressure cap and cleaning the
outside of the radiator and air conditioning condenser is
recommended at least once a year.
(d)Inspect wiper blades for wear, cracking, or
contamination. Clean the windshield and wiper blades,
if contaminated. Replace wiper blades that are worn
or damaged. See Windshield Wiper Blade Replacement
on page 5-52 and Windshield and Wiper Blades on
page 5-120 for more information.(e)Make sure the safety belt reminder light and safety
belt assemblies are working properly. Look for any other
loose or damaged safety belt system parts. If you see
anything that might keep a safety belt system from doing
its job, have it repaired. Have any torn or frayed safety
belts replaced. Also see Checking the Restraint Systems
on page 1-66.
(f)Lubricate all key lock cylinders. Lubricate all
hinges and latches, including those for the hood, rear
compartment, glove box door, and console door. More
frequent lubrication may be required when exposed to a
corrosive environment. Applying silicone grease on
weatherstrips with a clean cloth will make them last
longer, seal better, and not stick or squeak.
(g)If driving regularly under dusty conditions, the filter
may require replacement more often.
(h)Change automatic transmission fluid and filter if the
vehicle is mainly driven under one or more of these
conditions:
�In heavy city traffic where the outside temperature
regularly reaches 90°F (32°C) or higher.
�In hilly or mountainous terrain.
�When doing frequent trailer towing.
�Uses such as limousine service.
�Uses such as high performance operation.
6-8
Page 477 of 514

Maintenance Replacement Parts
Replacement parts identi�ed below by name, part number, or speci�cation can be obtained from your dealer/retailer.
Part GM Part Number ACDelco Part Number
Engine Air Cleaner/Filter Element
3.6L and 4.6L Engines 25798271 A2944C
4.4L (V-Series) Engine 15813300 A3078C
Engine Oil Filter
3.6L Engine 25177917 PF2129
4.4L (V-Series) Engine 89017527
1PF261
4.6L Engine 89017342 PF61
Passenger Compartment Air Filter 88957450 CF13C
Spark Plugs
3.6L Engine 92220447 41-990
4.4L (V-Series) Engine 12592619 41-991
4.6L Engine 12571535 41-987
Wiper Blades
Driver Side – 22 in (56.5 cm) 88958361 —
Passenger Side – 21 in (53.0 cm) 88958359 —
1Notice: If the vehicle is an STS-V model, the engine uses a special oil �lter. The use of any other engine
oil �lter could lead to �lter failure and result in severe engine damage. Damage caused by use of the
wrong engine oil �lter would not be covered by the vehicle warranty.
6-15
Page 501 of 514
A
Accessories and Modi�cations............................ 5-3
Accessory Power Outlets.................................3-46
Adaptive Cruise Control...................................3-20
Adding Equipment to Your Airbag-Equipped
Vehicle.......................................................1-64
Additives, Fuel................................................. 5-7
Add-On Electrical Equipment...........................5-113
Air Cleaner/Filter, Engine.................................5-23
Air Conditioning..............................................3-48
Airbag
Passenger Status Indicator...........................3-59
Readiness Light..........................................3-58
Airbag System................................................1-51
Adding Equipment to Your
Airbag-Equipped Vehicle............................1-64
How Does an Airbag Restrain?......................1-57
Passenger Sensing System...........................1-59
Servicing Your Airbag-Equipped Vehicle..........1-64
What Makes an Airbag In�ate?......................1-57
What Will You See After an Airbag
In�ates?..................................................1-58
When Should an Airbag In�ate?....................1-56
Where Are the Airbags?...............................1-53
All-Wheel Drive...............................................5-47
All-Wheel-Drive (AWD) System.........................4-12
Antenna, Backglass.......................................3-134
Antenna, XM™ Satellite Radio Antenna
System.....................................................3-134Antilock Brake System (ABS)............................. 4-4
Antilock Brake, System Warning Light................3-63
Appearance Care
Aluminum or Chrome-Plated Wheels.............5-110
Care of Safety Belts...................................5-108
Chemical Paint Spotting..............................5-112
Cleaning Exterior Lamps/Lenses..................5-109
Fabric/Carpet............................................5-106
Finish Care...............................................5-109
Finish Damage..........................................5-111
Instrument Panel, Vinyl, and Other
Plastic Surfaces
.....................................5-107
Interior Cleaning........................................5-105
Leather....................................................5-107
Sheet Metal Damage..................................5-111
Speaker Covers.........................................5-108
Tires........................................................5-111
Underbody Maintenance.............................5-111
Washing Your Vehicle.................................5-108
Weatherstrips............................................5-108
Windshield and Wiper Blades......................5-110
Wood Panels............................................5-107
Appointments, Scheduling Service.....................7-10
Ashtray.........................................................3-47
Audio System.................................................3-97
Audio Steering Wheel Controls....................3-131
Backglass Antenna.....................................3-134
Navigation/Radio System, see Navigation
Manual.................................................3-116
Radio Personalization.................................3-126
1