CADILLAC STS 2011 1.G Owners Manual
Manufacturer: CADILLAC, Model Year: 2011, Model line: STS, Model: CADILLAC STS 2011 1.GPages: 528, PDF Size: 4.96 MB
Page 151 of 528
Black plate (45,1)Cadillac STS Owner Manual - 2011
The SBZA detection zones do not change if the vehicle
is towing a trailer. So be extra careful when changing
lanes while towing a trailer.
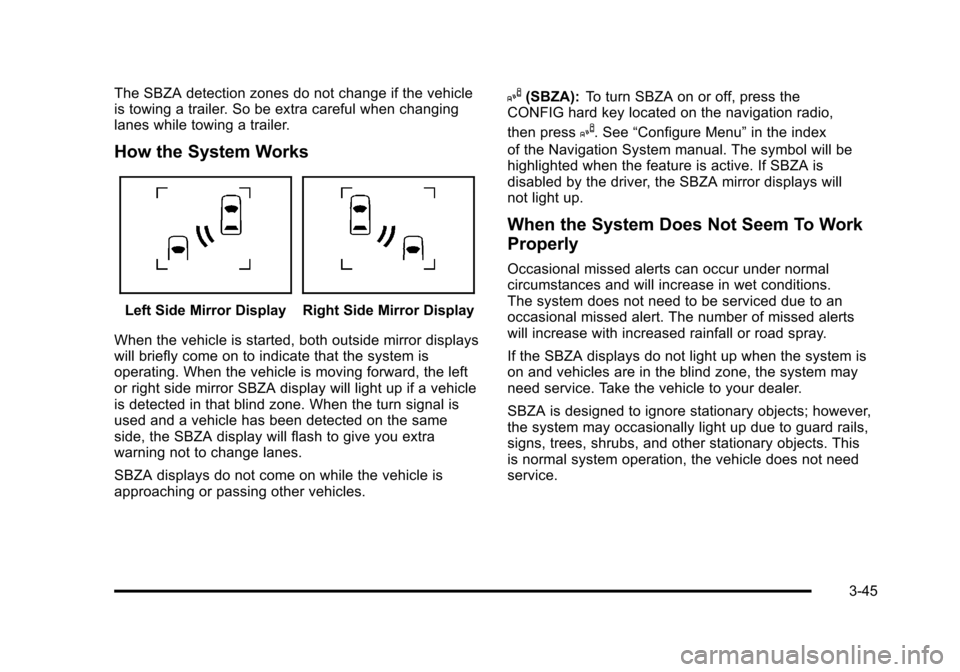
How the System Works
Left Side Mirror DisplayRight Side Mirror Display
When the vehicle is started, both outside mirror displays
will briefly come on to indicate that the system is
operating. When the vehicle is moving forward, the left
or right side mirror SBZA display will light up if a vehicle
is detected in that blind zone. When the turn signal is
used and a vehicle has been detected on the same
side, the SBZA display will flash to give you extra
warning not to change lanes.
SBZA displays do not come on while the vehicle is
approaching or passing other vehicles.
I(SBZA): To turn SBZA on or off, press the
CONFIG hard key located on the navigation radio,
then press
I. See “Configure Menu” in the index
of the Navigation System manual. The symbol will be
highlighted when the feature is active. If SBZA is
disabled by the driver, the SBZA mirror displays will
not light up.
When the System Does Not Seem To Work
Properly
Occasional missed alerts can occur under normal
circumstances and will increase in wet conditions.
The system does not need to be serviced due to an
occasional missed alert. The number of missed alerts
will increase with increased rainfall or road spray.
If the SBZA displays do not light up when the system is
on and vehicles are in the blind zone, the system may
need service. Take the vehicle to your dealer.
SBZA is designed to ignore stationary objects; however,
the system may occasionally light up due to guard rails,
signs, trees, shrubs, and other stationary objects. This
is normal system operation, the vehicle does not need
service.
3-45
Page 152 of 528
Black plate (46,1)Cadillac STS Owner Manual - 2011
SBZA does not operate when the left or right corners of
the rear bumper are covered with mud, dirt, snow, ice,
slush, or in heavy rainstorms. For cleaning instructions,
seeWashing Your Vehicle
on page 6‑109. If the DIC
still displays the SIDE BLIND ZONE SYSTEM
UNAVAILABLE message after cleaning the bumper,
see your dealer.
The SBZA displays may remain on if a trailer is
attached to the vehicle, or a bicycle or object is
extending out to either side of the vehicle.
When SBZA is disabled for any reason other than the
driver turning it off, the driver will not be able to turn
SBZA back on using the DIC. The SIDE BLIND ZONE
ALERT ON option will not be selectable if the conditions
for normal system operation are not met. Until normal
operating conditions for SBZA are met, you should not
rely upon SBZA while driving.
SBZA Error Messages
The following messages may appear in the DIC:
SIDE BLIND ZONE ALERT SYSTEM OFF: This
message indicates that the system has been turned off.
SIDE BLIND ZONE SYSTEM UNAVAILABLE: This
message indicates that the SBZA system is disabled
because the sensor is blocked and cannot detect
vehicles in the blind zone. The sensor may be blocked by mud, dirt, snow, ice, slush, or even heavy
rainstorms. This message may also activate during
heavy rain or due to road spray. The vehicle does not
need service. For cleaning, see
Washing Your Vehicle
on page 6‑109.
SERVICE SIDE BLIND ZONE ALERT SYSTEM: If this
message appears, both SBZA displays will remain on
indicating there is a problem with the SBZA system.
If these displays remain on after continued driving, the
system needs service. Take the vehicle to your dealer.
FCC Information
See Radio Frequency Statementon page 8‑20for
information regarding Part 15 of the Federal
Communications Commission (FCC) rules and
Industry Canada Standards RSS-210/220/310.
Frequency of operation: 24.05GHz –24.25GHz
Field Strength: Not greater than 2.5V/m peak
(0.25V/m average) at a distance of 3m
The manufacturer is not responsible for any radio or TV
interference caused by unauthorized modifications to
this equipment. Such modifications could void the user's
authority to operate the equipment.
3-46
Page 153 of 528
Black plate (47,1)Cadillac STS Owner Manual - 2011
Lane Departure Warning (LDW)
If the vehicle has the LDW system. Read this entire
section before using the system.
{WARNING:
The Lane Departure Warning (LDW) system does
not steer the vehicle and is only an aid to help you
stay in your driving lane. The LDW system
may not:
.Provide you with enough time to avoid a lane
change collision.
.Be loud enough for you to hear the warning
beeps.
.Work properly under bad weather conditions
or if the windshield is not kept clean.
.Detect lane markings and will not detect road
edges.
.Warn you that your vehicle is crossing a lane
marking if the system does not detect the lane
marking.(Continued)
WARNING: (Continued)
LDW will indicate the system is working whenever
it detects either the left or right lane marking. So if
you depart on the side of the lane that LDW is not
detecting, LDW will not warn you.
If you do not carefully maintain your vehicle
position within the lane, vehicle damage, injury,
or death could occur. Even with LDW, always
keep your attention on the road and maintain
proper vehicle position within the lane. Always
keep the windshield clean and do not use LDW in
bad weather conditions.
When the vehicle crosses a detected lane marking, the
LDW symbol will flash and you will hear three beeps.
LDW will not warn you if the turn signal is on or if the
vehicle makes a sharp maneuver. Before making a lane
change, check the vehicle's mirrors, glance over your
shoulder for vehicles and hazards, and turn on the turn
signal before changing lanes.
3-47
Page 154 of 528
Black plate (48,1)Cadillac STS Owner Manual - 2011
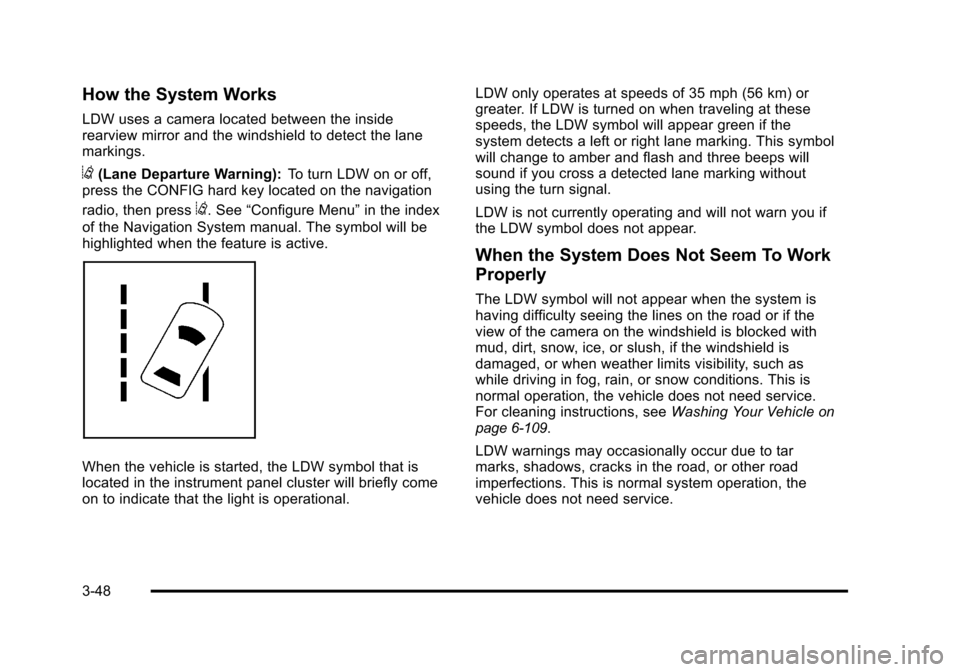
How the System Works
LDW uses a camera located between the inside
rearview mirror and the windshield to detect the lane
markings.
@(Lane Departure Warning):To turn LDW on or off,
press the CONFIG hard key located on the navigation
radio, then press
@. See “Configure Menu” in the index
of the Navigation System manual. The symbol will be
highlighted when the feature is active.
When the vehicle is started, the LDW symbol that is
located in the instrument panel cluster will briefly come
on to indicate that the light is operational. LDW only operates at speeds of 35 mph (56 km) or
greater. If LDW is turned on when traveling at these
speeds, the LDW symbol will appear green if the
system detects a left or right lane marking. This symbol
will change to amber and flash and three beeps will
sound if you cross a detected lane marking without
using the turn signal.
LDW is not currently operating and will not warn you if
the LDW symbol does not appear.
When the System Does Not Seem To Work
Properly
The LDW symbol will not appear when the system is
having difficulty seeing the lines on the road or if the
view of the camera on the windshield is blocked with
mud, dirt, snow, ice, or slush, if the windshield is
damaged, or when weather limits visibility, such as
while driving in fog, rain, or snow conditions. This is
normal operation, the vehicle does not need service.
For cleaning instructions, see
Washing Your Vehicle
on
page 6‑109.
LDW warnings may occasionally occur due to tar
marks, shadows, cracks in the road, or other road
imperfections. This is normal system operation, the
vehicle does not need service.
3-48
Page 155 of 528
Black plate (49,1)Cadillac STS Owner Manual - 2011
LDW Error Message
SERVICE LANE DEPARTURE SYSTEM:This
message may appear in the DIC to indicate that LDW is
not working properly. If this message remains on after
continued driving, the system needs service. Take the
vehicle to your dealer. See DIC Warnings and
Messages
on page 4‑76for more information.
LANE DEPARTURE SYSTEM UNAVAILABLE : This
message may appear in the DIC if LDW does not
activate due to a temporary condition. See DIC
Warnings and Messages
on page 4‑76for more
information.
Universal Home Remote
System
See Radio Frequency Statementon page 8‑20for
information regarding Part 15 of the Federal
Communications Commission (FCC) rules and
Industry Canada Standards RSS-210/220/310.
Universal Home Remote System
Operation (With Three Round LED)
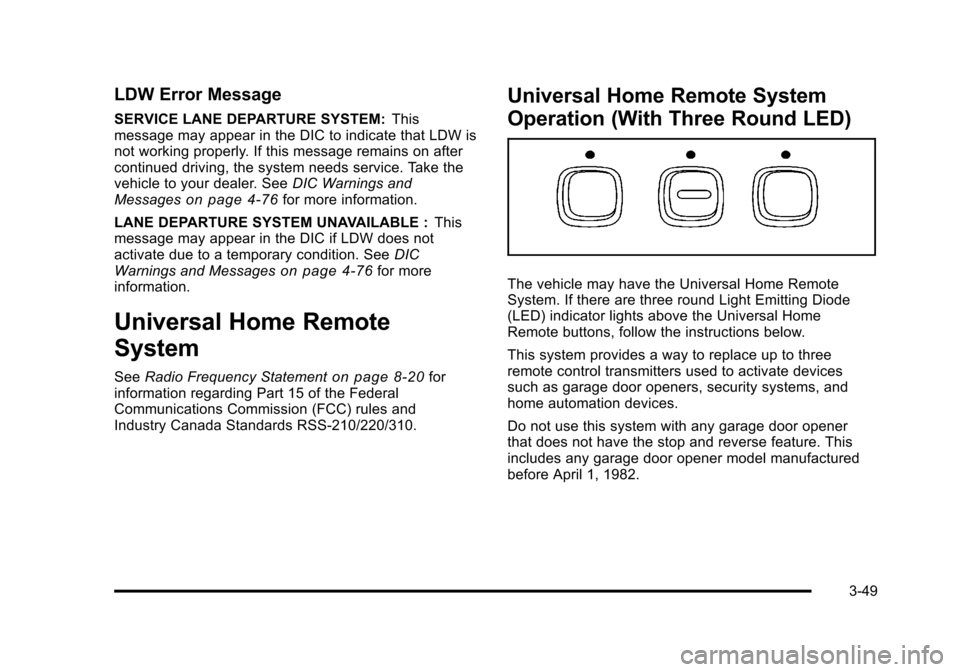
The vehicle may have the Universal Home Remote
System. If there are three round Light Emitting Diode
(LED) indicator lights above the Universal Home
Remote buttons, follow the instructions below.
This system provides a way to replace up to three
remote control transmitters used to activate devices
such as garage door openers, security systems, and
home automation devices.
Do not use this system with any garage door opener
that does not have the stop and reverse feature. This
includes any garage door opener model manufactured
before April 1, 1982.
3-49
Page 156 of 528
Black plate (50,1)Cadillac STS Owner Manual - 2011
Read the instructions completely before attempting to
program the transmitter. Because of the steps involved,
it may be helpful to have another person available to
assist you in programming the transmitter.
Be sure to keep the original remote control transmitter
for use in other vehicles, as well as, for future
programming. Only the original remote control
transmitter is needed for Fixed Code programming.
The programmed buttons should be erased when the
vehicle is sold or the lease ends. See“Erasing
Universal Home Remote Buttons” later in this section.
Park the vehicle outside of the garage when
programming a garage door. Be sure that people and
objects are clear of the garage door or gate that is
being programmed.Programming Universal Home
Remote —Rolling Code
For questions or help programming the Universal Home
Remote System, call 1-866-572-2728 or go to
learcar2u.com.
Most garage door openers sold after 1996 are Rolling
Code units.
Programming a garage door opener involves
time-sensitive actions, so read the entire procedure
before starting. Otherwise, the device will time out and
the procedure will have to be repeated.
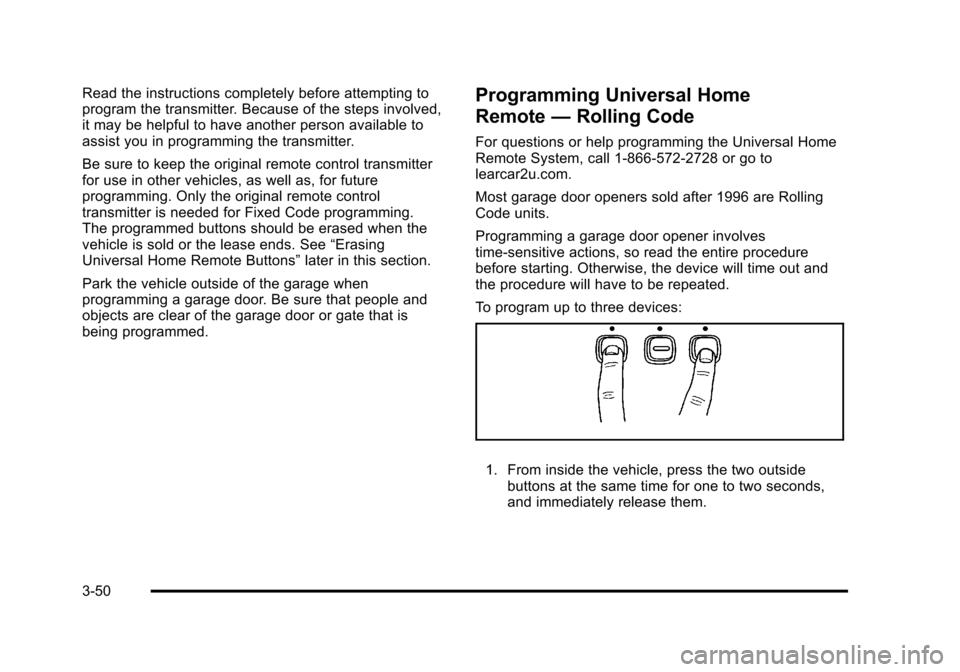
To program up to three devices:
1. From inside the vehicle, press the two outside
buttons at the same time for one to two seconds,
and immediately release them.
3-50
Page 157 of 528
Black plate (51,1)Cadillac STS Owner Manual - 2011
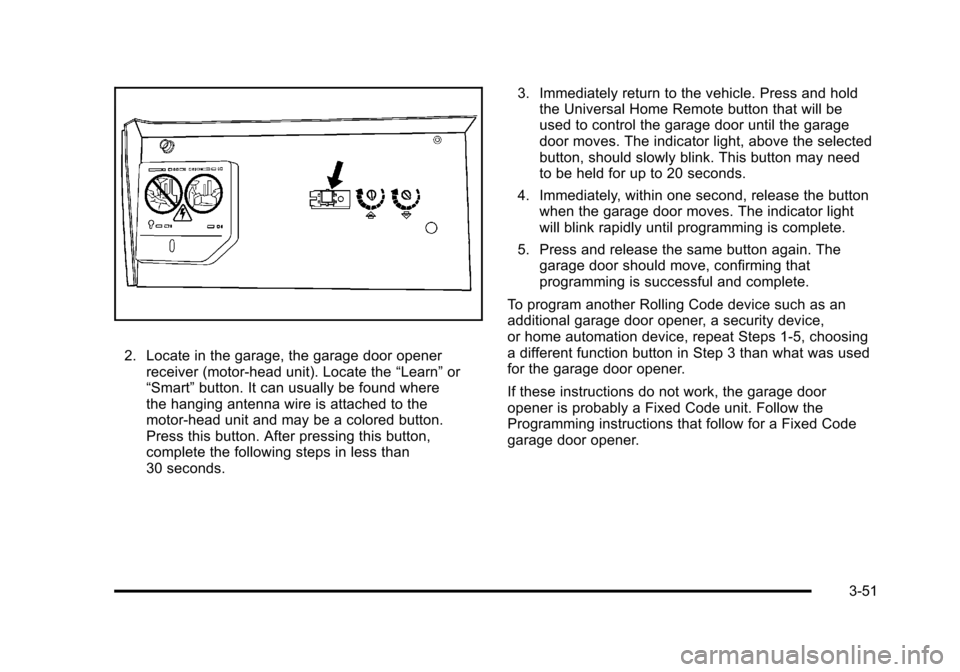
2. Locate in the garage, the garage door openerreceiver (motor-head unit). Locate the “Learn”or
“Smart” button. It can usually be found where
the hanging antenna wire is attached to the
motor-head unit and may be a colored button.
Press this button. After pressing this button,
complete the following steps in less than
30 seconds. 3. Immediately return to the vehicle. Press and hold
the Universal Home Remote button that will be
used to control the garage door until the garage
door moves. The indicator light, above the selected
button, should slowly blink. This button may need
to be held for up to 20 seconds.
4. Immediately, within one second, release the button when the garage door moves. The indicator light
will blink rapidly until programming is complete.
5. Press and release the same button again. The garage door should move, confirming that
programming is successful and complete.
To program another Rolling Code device such as an
additional garage door opener, a security device,
or home automation device, repeat Steps 1-5, choosing
a different function button in Step 3 than what was used
for the garage door opener.
If these instructions do not work, the garage door
opener is probably a Fixed Code unit. Follow the
Programming instructions that follow for a Fixed Code
garage door opener.
3-51
Page 158 of 528
Black plate (52,1)Cadillac STS Owner Manual - 2011
Programming Universal Home
Remote—Fixed Code
For questions or help programming the Universal Home
Remote System, call 1-866-572-2728 or go to
learcar2u.com.
Most garage door openers sold before 1996 are Fixed
Code units.
Programming a garage door opener involves
time-sensitive actions, so read the entire procedure
before starting. Otherwise, the device will time out and
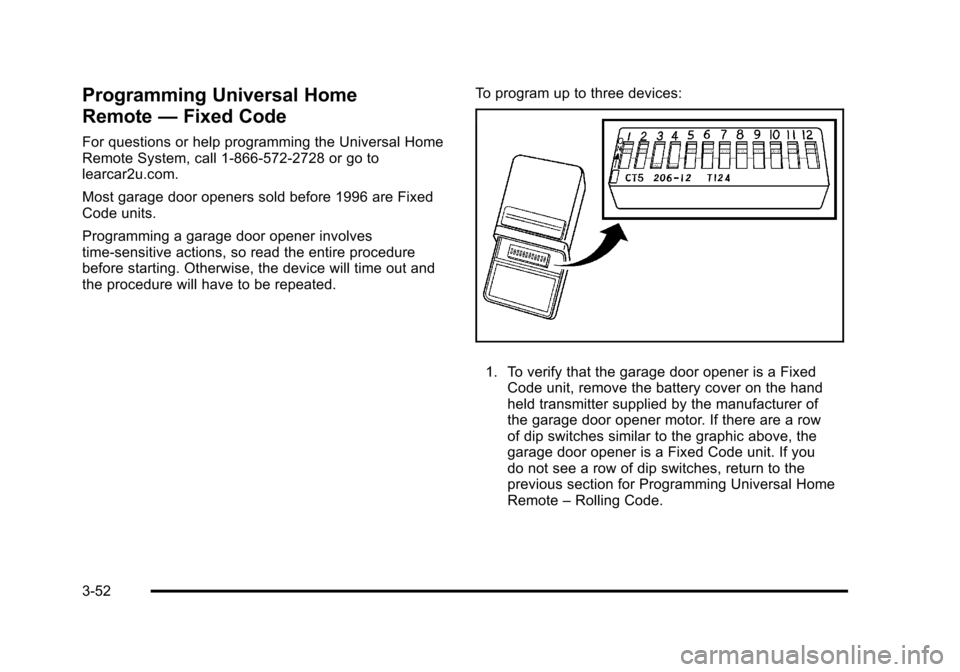
the procedure will have to be repeated. To program up to three devices:
1. To verify that the garage door opener is a Fixed
Code unit, remove the battery cover on the hand
held transmitter supplied by the manufacturer of
the garage door opener motor. If there are a row
of dip switches similar to the graphic above, the
garage door opener is a Fixed Code unit. If you
do not see a row of dip switches, return to the
previous section for Programming Universal Home
Remote –Rolling Code.
3-52
Page 159 of 528
Black plate (53,1)Cadillac STS Owner Manual - 2011
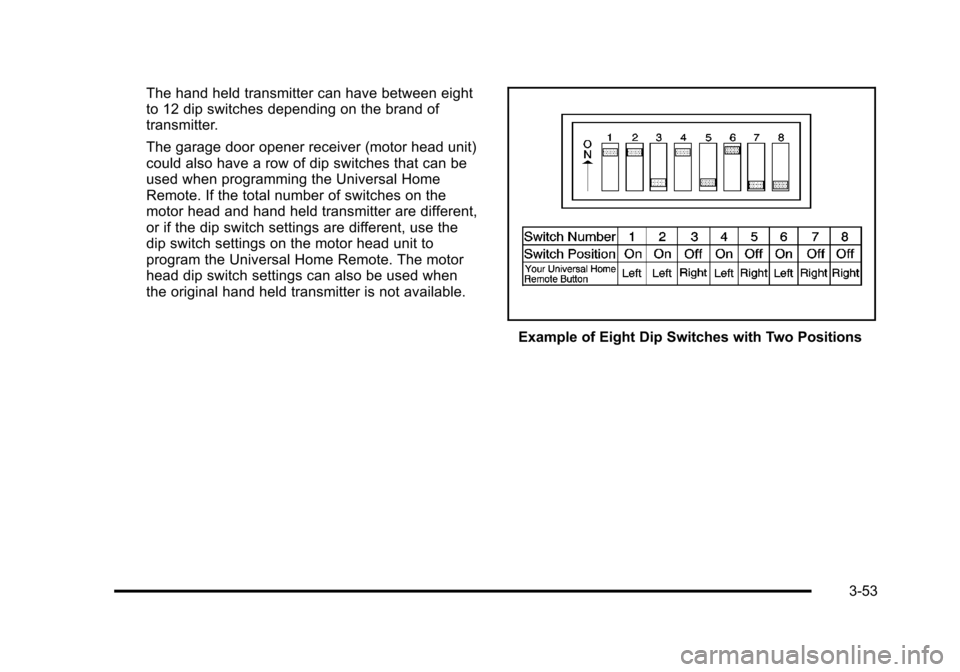
The hand held transmitter can have between eight
to 12 dip switches depending on the brand of
transmitter.
The garage door opener receiver (motor head unit)
could also have a row of dip switches that can be
used when programming the Universal Home
Remote. If the total number of switches on the
motor head and hand held transmitter are different,
or if the dip switch settings are different, use the
dip switch settings on the motor head unit to
program the Universal Home Remote. The motor
head dip switch settings can also be used when
the original hand held transmitter is not available.
Example of Eight Dip Switches with Two Positions
3-53
Page 160 of 528

Black plate (54,1)Cadillac STS Owner Manual - 2011
Example of Eight Dip Switches with Three PositionsThe panel of switches might not appear exactly as
they do in the examples above, but they should be
similar.
The switch positions on your hand-held transmitter
could be labeled, as follows:
.A switch in the up position could be labeled as
“Up,” “+,” or“On.”
.A switch in the down position could be labeled
as “Down,” “−,” or“Off.”
.A switch in the middle position could be labeled
as “Middle,” “0,” or“Neutral.” 2. Write down the eight to 12 switch settings from left
to right as follows:
.When a switch is in the up position, write “Left.”
.When a switch is in the down position, write
“Right.”
.If a switch is set between the up and down
position, write“Middle.”
The switch settings written down in Step 2 will
now become the button strokes to be entered
into the Universal Home Remote in Step 4. Be
sure to enter the switch settings written down
in Step 2, in order from left to right, into the
Universal Home Remote, when completing
Step 4.
3. From inside your vehicle, first firmly press all three buttons at the same time for about three seconds.
Release the buttons to put the Universal Home
Remote into programming mode.
3-54