window CADILLAC STS V 2007 1.G Owner's Manual
[x] Cancel search | Manufacturer: CADILLAC, Model Year: 2007, Model line: STS V, Model: CADILLAC STS V 2007 1.GPages: 560, PDF Size: 2.92 MB
Page 112 of 560
9/Acc. (OFF/ACCESSORY):When this button
is pressed, the engine will turn off even if the shifter
is not in PARK (P). If the shifter is in PARK (P), the
ignition mode will change to RAP, if all doors are
closed. The ignition mode will change to off, if a
front door is opened. SeeRetained Accessory
Power (RAP) on page 112for more information.
If the shifter is not in PARK (P), the ignition mode
will change to Acc. SeeShifting Into Park (P) on
page 122.
When the engine is off, press this button to place
the vehicle in accessory mode. ACCESSORY
ACTIVE will display on the Driver Information
Center (DIC). This mode allows you to use things
like the radio and the windshield wipers while the
engine is off. Use accessory mode if you must have
your vehicle in motion while the engine is off, for
example, if your vehicle is being towed. If the door
is open while in accessory mode, the key in
reminder chime will sound continuously.
If the push-button start is not working, your vehicle
may be near a strong radio antenna signal causing
interference to the keyless access system. SeeDIC
Warnings and Messages on page 264for more
information.After being in Acc. for about 20 minutes, the vehicle
will automatically enter RAP or will turn off,
depending on if the doors are opened or closed.
Retained Accessory Power (RAP)
The following accessories on your vehicle may be
used for up to 20 minutes after the engine is
turned off:
Radio
Power Windows
Audio Steering Wheel Controls
Power to these accessories stops after 20 minutes
or if one of the front doors is opened. If you
want power for another 20 minutes, close all the
doors and press to Acc. to place the vehicle
in accessory mode. Press the button again and
the vehicle will return to RAP.
112
Page 125 of 560
Engine Exhaust
{CAUTION:
Engine exhaust can kill. It contains the
gas carbon monoxide (CO), which you
cannot see or smell. It can cause
unconsciousness and death.
You might have exhaust coming in if:
The exhaust system sounds strange
or different.
Your vehicle gets rusty underneath.
Your vehicle was damaged in a
collision.
Your vehicle was damaged when
driving over high points on the road
or over road debris.
CAUTION: (Continued)
CAUTION: (Continued)
Repairs were not done correctly.
Your vehicle or the exhaust system
has been modi�ed improperly.
If you ever suspect exhaust is coming into
your vehicle:
Drive it only with all the windows
down to blow out any CO; and
Have your vehicle �xed immediately.
125
Page 128 of 560
Mirror Operation
O
(On/Off):Press and hold the button, located
on the lower left side of the mirror face, for about
three seconds to turn the automatic dimming
feature on or off. The indicator light will illuminate
when this feature is active. The automatic dimming
feature is active each time the vehicle is started.
Cleaning the Mirror
When cleaning the mirror, use a paper towel or
similar material dampened with glass cleaner.
Do not spray glass cleaner directly on the mirror
as that may cause the liquid cleaner to enter
the mirror housing.
Automatic Dimming Rearview Mirror
with OnStar
®and Compass
Your vehicle may have an automatic dimming
rearview mirror with a compass display. The mirror
also contains OnStar
®controls. For more
information seeOnStar®System on page 132.
The mirror includes an eight-point compass display
in the upper right corner of the mirror face.
When on, the compass automatically calibrates as
the vehicle is driven.
Mirror Operation
O
(On/Off):Press and hold the button, located
on the lower left side of the mirror face, for about
three seconds to turn the automatic dimming
feature on or off. The indicator light will illuminate
when this feature is active. The automatic dimming
feature is active each time the vehicle is started.
Compass Operation
Press the on/off button once to turn the compass
on or off.
When the ignition and the compass feature are
on, the compass will show two character boxes
for about two seconds. After two seconds,
the mirror will display the compass heading.
Compass Calibration
If after two seconds, the display does not show a
compass heading (for example, N for North),
there may be a strong magnetic �eld interfering
with the compass. Such interference may be
caused by a magnetic antenna mount, magnetic
note pad holder or a similar magnetic item. If
the letter C should ever appear in the compass
window, the compass may need calibration.
128
Page 129 of 560
The mirror can be calibrated by driving the vehicle
in circles at 5 mph (8 km/h) or less until the
display reads a direction.
The compass can be placed in calibration mode
manually by pressing and holding the on/off button
untilaCisshown in the compass display.
Compass Variance
The zone is set to zone eight upon leaving the
factory. It will be necessary to adjust the compass
to compensate for compass variance if you live
outside zone eight. Under certain circumstances,
as during a long distance cross-country trip, it
will be necessary to adjust for compass variance.
Compass variance is the difference between
earth’s magnetic north and true geographic north.
If not adjusted to account for compass variance,
your compass could give false readings.
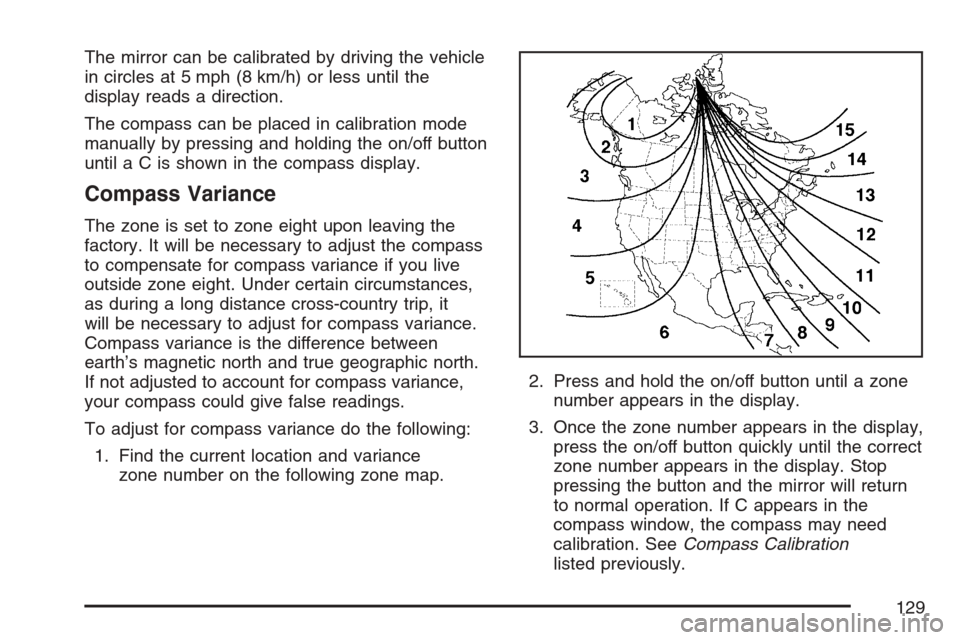
To adjust for compass variance do the following:
1. Find the current location and variance
zone number on the following zone map.2. Press and hold the on/off button until a zone
number appears in the display.
3. Once the zone number appears in the display,
press the on/off button quickly until the correct
zone number appears in the display. Stop
pressing the button and the mirror will return
to normal operation. If C appears in the
compass window, the compass may need
calibration. SeeCompass Calibration
listed previously.
129
Page 130 of 560
Cleaning the Mirror
When cleaning the mirror, use a paper towel or
similar material dampened with glass cleaner.
Do not spray glass cleaner directly on the mirror
as that may cause the liquid cleaner to enter
the mirror housing.
Outside Power Heated Mirrors
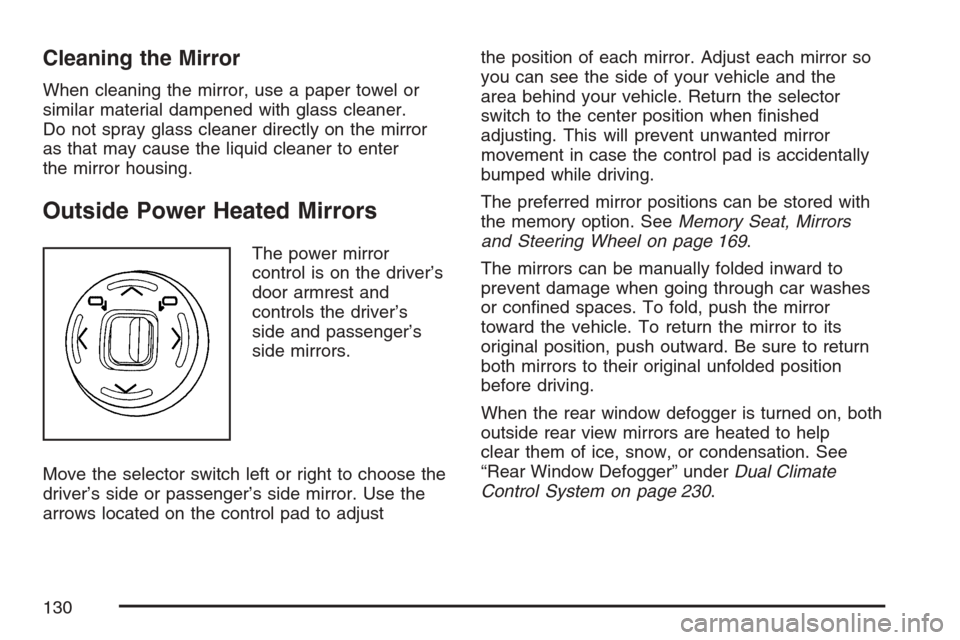
The power mirror
control is on the driver’s
door armrest and
controls the driver’s
side and passenger’s
side mirrors.
Move the selector switch left or right to choose the
driver’s side or passenger’s side mirror. Use the
arrows located on the control pad to adjustthe position of each mirror. Adjust each mirror so
you can see the side of your vehicle and the
area behind your vehicle. Return the selector
switch to the center position when �nished
adjusting. This will prevent unwanted mirror
movement in case the control pad is accidentally
bumped while driving.
The preferred mirror positions can be stored with
the memory option. SeeMemory Seat, Mirrors
and Steering Wheel on page 169.
The mirrors can be manually folded inward to
prevent damage when going through car washes
or con�ned spaces. To fold, push the mirror
toward the vehicle. To return the mirror to its
original position, push outward. Be sure to return
both mirrors to their original unfolded position
before driving.
When the rear window defogger is turned on, both
outside rear view mirrors are heated to help
clear them of ice, snow, or condensation. See
“Rear Window Defogger” underDual Climate
Control System on page 230.
130
Page 153 of 560
Programmable Modes
Mode 1:ON
Mode 2:OFF
Before your vehicle was shipped from the factory,
it was programmed to Mode 1. The mode to
which the vehicle was programmed may have
been changed since it left the factory.
To program the vehicle to a different mode, use
the following procedure:
1. Enter the PERSONAL SETTINGS MENU by
following the instructions listed previously
under “Entering the Personal Settings Menu.”
2. Turn the tune/select knob until REMOTE
START is highlighted.
3. Press the tune/select knob to switch back and
forth between on and off.
When REMOTE START is on, a check mark will
appear next to the feature name. You can
then choose to activate any or all of the following
features by turning the tune/select knob to
highlight the feature, then pressing the knob to
turn it on.CLIMATE CONTROL:The climate control system
will engage when the vehicle is started using
the remote start feature. It will be at the same
climate control setting that was last used by the
driver using that keyless entry transmitter.
REAR WINDOW DEFOG:If this feature is active,
the rear defogger will engage when the vehicle
is started using the remote start feature.
SEAT TEMP (Temperature) CONTROL:If your
vehicle has this feature and this feature is
active, the seats will be heated or cooled when
the vehicle is started using the remote start
feature.
The mode you selected is now set. You can either
exit the programming mode by following the
instructions later in this section or program the
next feature available on your vehicle by pressing
the F6 (BACK) button, located on the radio, to
return to the PERSONAL SETTINGS MENU.
153
Page 167 of 560
FRONT PASS (Passenger) WINDOW LOCK
This feature allows you to choose whether or
not to have the front passenger window
deactivated as part of the window lockout button.
If you would like the front passenger window
to be deactivated when the window lockout button
is pushed, turn this feature on. If this feature is
left off, the window lockout button located on the
door will deactivate only the rear windows.
SeePower Windows on page 105for more
information.
Programmable Modes
Mode 1:ON
Mode 2:OFF
Before your vehicle was shipped from the factory,
it was programmed to Mode 2. The mode to
which the vehicle was programmed may have
been changed since it left the factory.
To program the vehicle to a different mode, use
the following procedure:
1. Enter the PERSONAL SETTINGS MENU by
following the instructions listed previously
under “Entering the Personal Settings Menu.”2. Turn the tune/select knob until FRONT PASS
WINDOW LOCK is highlighted.
3. Press the tune/select knob to switch back and
forth between on and off.
When the mode is turned on, a check mark
will appear next to the feature name.
The mode you selected is now set. You can either
exit the programming mode by following the
instructions later in this section or program the
next feature available on your vehicle.
CHIME VOLUME HIGH
This feature allows you to adjust the volume level
of the vehicle’s warning chimes. The chime
volume cannot be turned off, only adjusted.
Programmable Modes
Mode 1:NORMAL
Mode 2:HIGH
Before your vehicle was shipped from the factory,
it was programmed to Mode 1. The mode to
which the vehicle was programmed may have
been changed since it left the factory.
167
Page 191 of 560
The mist and wash cycles operate as normal and
are not affected by the Rainsense™ function.
The Rainsense™ system can be overridden at any
time by manually turning the wiper band to low
or high speed.
When Rainsense™ is active, the headlamps will
turn on automatically. The headlamps will turn
off again once the wipers turn off if it is light
enough outside. If it is dark, they will remain on.
SeeWiper Activated Headlamps on page 215.
Notice:Do not place stickers or other items
on the exterior glass surface directly in front of
the moisture sensor. Doing this could cause
the moisture sensor to malfunction.
Windshield Washer
K(Washer Fluid):The lever on the right side
of the steering column also controls the windshield
washer. There is a button at the end of the
lever. To spray washer �uid on the windshield,
press the button and hold it. The washer will spray
until you release the button. The wipers will
continue to clear the window for about six seconds
after the button is released and then stop or
return to your preset speed.
{CAUTION:
In freezing weather, do not use your
washer until the windshield is warmed.
Otherwise the washer �uid can form ice
on the windshield, blocking your vision.
If the �uid in the windshield washer �uid reservoir
is low, the message CHECK WASHER FLUID
will appear on the Driver Information Center (DIC)
display. It will take 60 seconds after the bottle
is re�lled for this message to turn off. For
information on the correct washer �uid mixture to
use, seeWindshield Washer Fluid on page 404
andRecommended Fluids and Lubricants on
page 516.
191
Page 215 of 560
Disabling and Resetting IntelliBeam™ at
the Rearview Mirror
IntelliBeam™ can be disabled and reset to the
original factory setting by using the controls on the
inside rearview mirror.
AUTO
3(IntelliBeam™ On/Off):To disable the
system, press this button on the inside rearview
mirror. The IntelliBeam™ indicator turns off
and does not come back on until the IntelliBeam™
button is pressed again.
When IntelliBeam™ has turned on the high-beams,
pull or push the high-beam stalk. This disables
IntelliBeam™ and the IntelliBeam™ indicator
on the rearview mirror turns off. To re-enable
IntelliBeam™, press the IntelliBeam™ button on
the mirror.
A different sensitivity setting is available for dealer
diagnostics. This is done by pushing and holding
this button for 20 seconds until the light �ashes
three times. If you accidentally activate this, the
vehicle’s setting automatically resets each time the
ignition is turned off and then on again; otherwise,
refer to the text above for resetting the system.
Cleaning the IntelliBeam™ Light Sensor
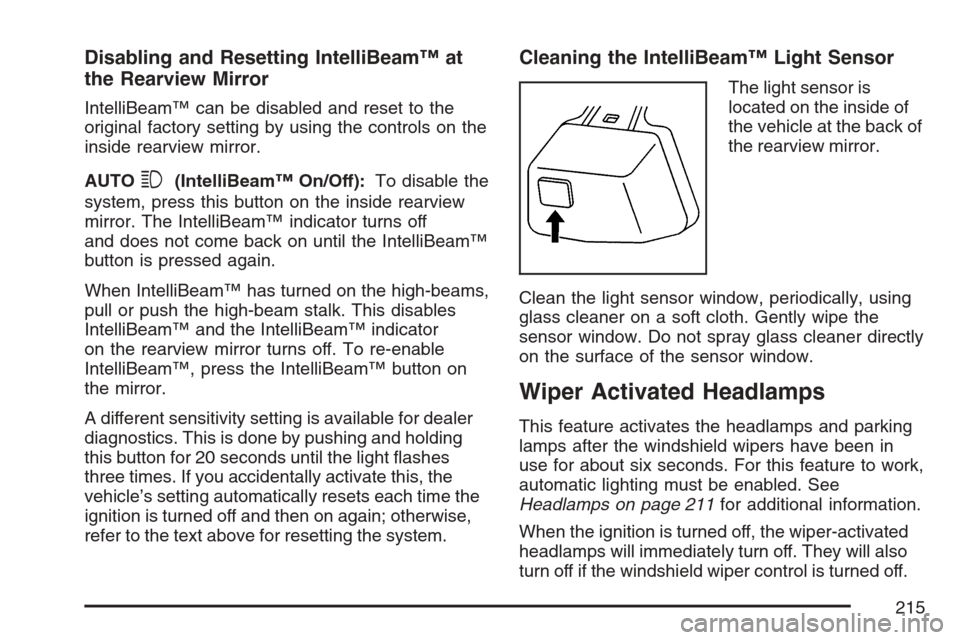
The light sensor is
located on the inside of
the vehicle at the back of
the rearview mirror.
Clean the light sensor window, periodically, using
glass cleaner on a soft cloth. Gently wipe the
sensor window. Do not spray glass cleaner directly
on the surface of the sensor window.
Wiper Activated Headlamps
This feature activates the headlamps and parking
lamps after the windshield wipers have been in
use for about six seconds. For this feature to work,
automatic lighting must be enabled. See
Headlamps on page 211for additional information.
When the ignition is turned off, the wiper-activated
headlamps will immediately turn off. They will also
turn off if the windshield wiper control is turned off.
215
Page 221 of 560
Reading Lamps
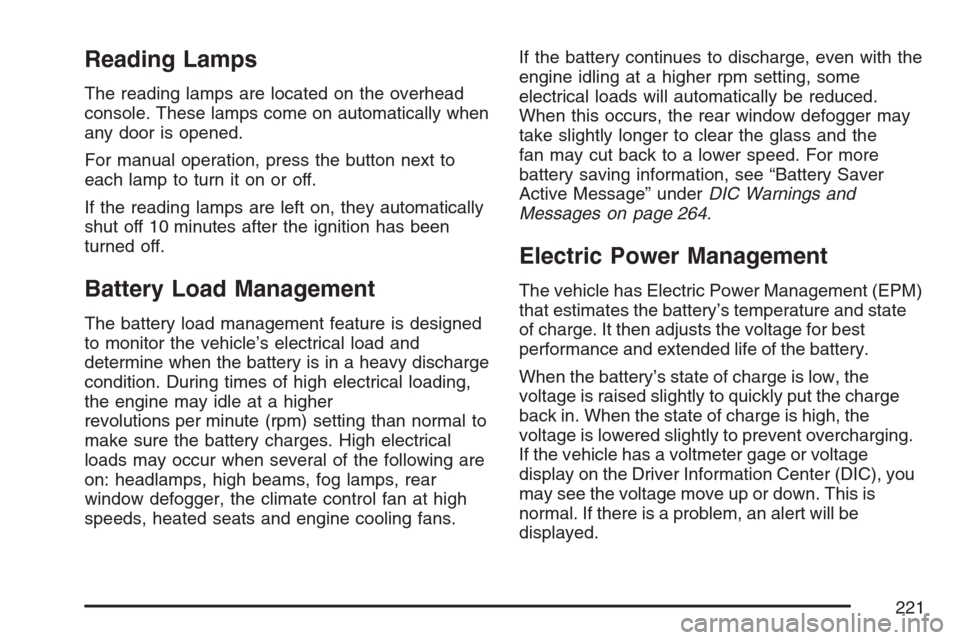
The reading lamps are located on the overhead
console. These lamps come on automatically when
any door is opened.
For manual operation, press the button next to
each lamp to turn it on or off.
If the reading lamps are left on, they automatically
shut off 10 minutes after the ignition has been
turned off.
Battery Load Management
The battery load management feature is designed
to monitor the vehicle’s electrical load and
determine when the battery is in a heavy discharge
condition. During times of high electrical loading,
the engine may idle at a higher
revolutions per minute (rpm) setting than normal to
make sure the battery charges. High electrical
loads may occur when several of the following are
on: headlamps, high beams, fog lamps, rear
window defogger, the climate control fan at high
speeds, heated seats and engine cooling fans.If the battery continues to discharge, even with the
engine idling at a higher rpm setting, some
electrical loads will automatically be reduced.
When this occurs, the rear window defogger may
take slightly longer to clear the glass and the
fan may cut back to a lower speed. For more
battery saving information, see “Battery Saver
Active Message” underDIC Warnings and
Messages on page 264.
Electric Power Management
The vehicle has Electric Power Management (EPM)
that estimates the battery’s temperature and state
of charge. It then adjusts the voltage for best
performance and extended life of the battery.
When the battery’s state of charge is low, the
voltage is raised slightly to quickly put the charge
back in. When the state of charge is high, the
voltage is lowered slightly to prevent overcharging.
If the vehicle has a voltmeter gage or voltage
display on the Driver Information Center (DIC), you
may see the voltage move up or down. This is
normal. If there is a problem, an alert will be
displayed.
221