Battery removal CADILLAC XT4 2020 Owner's Manual
[x] Cancel search | Manufacturer: CADILLAC, Model Year: 2020, Model line: XT4, Model: CADILLAC XT4 2020Pages: 372, PDF Size: 6.25 MB
Page 19 of 372

Cadillac XT4 Owner Manual (GMNA-Localizing-U.S./Canada/Mexico-
13527548) - 2020 - CRC - 9/5/19
18 KEYS, DOORS, AND WINDOWS
.Pull the door handle once to
unlock it. Pull the door handle
again to unlatch it.
Keyless Access
The RKE transmitter must be within
1 m (3 ft) of the door or liftgate being
opened. Press the button on the door
handle to open. See “Keyless Access”
in Remote Keyless Entry (RKE) System
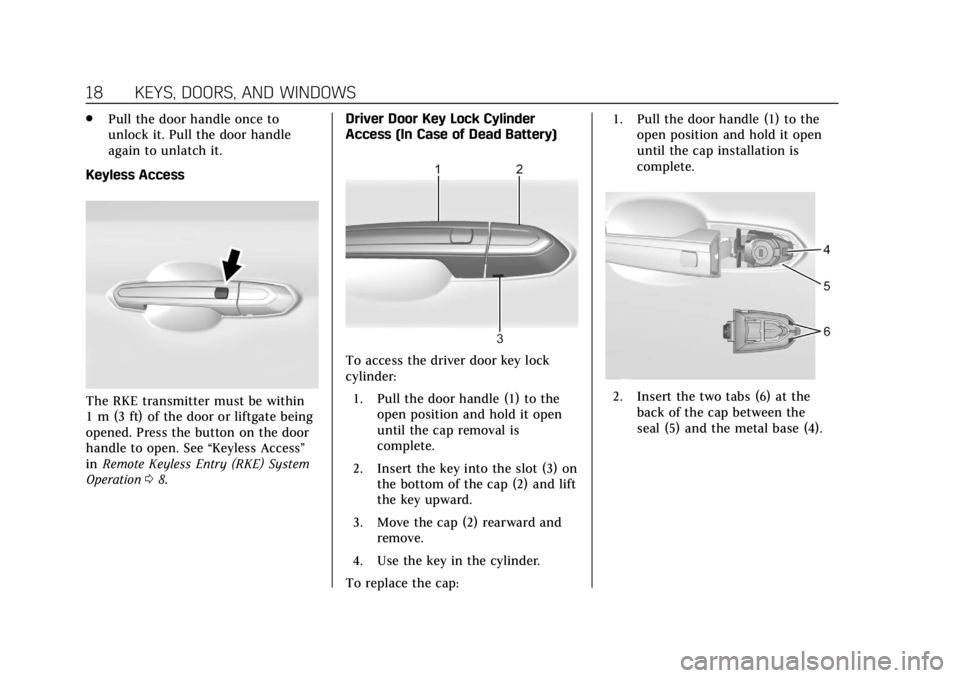
Operation 08. Driver Door Key Lock Cylinder
Access (In Case of Dead Battery)
To access the driver door key lock
cylinder:
1. Pull the door handle (1) to the open position and hold it open
until the cap removal is
complete.
2. Insert the key into the slot (3) on the bottom of the cap (2) and lift
the key upward.
3. Move the cap (2) rearward and remove.
4. Use the key in the cylinder.
To replace the cap: 1. Pull the door handle (1) to the
open position and hold it open
until the cap installation is
complete.
2. Insert the two tabs (6) at the
back of the cap between the
seal (5) and the metal base (4).
Page 256 of 372

Cadillac XT4 Owner Manual (GMNA-Localizing-U.S./Canada/Mexico-
13527548) - 2020 - CRC - 9/5/19
VEHICLE CARE 255
Caution
If the pressure cap is not tightly
installed, coolant loss and engine
damage may occur. Be sure the cap
is properly and tightly secured.
Automatic Coolant Service Fill
Instructions
This feature assists in filling and
removing air from the cooling system
after service of components or when
coolant is added after being too low.
To activate the fill and air removal
process:1. With a cold system, add coolant to the indicated mark on the
surge tank.
2. Replace the cap on the surge tank.
3. Connect the vehicle to a battery charger.
4. Turn the ignition to Service Mode. See Ignition Positions
0 172.
5. Turn off the air conditioning. 6. Set the parking brake.
7. At the same time, press the
accelerator and the brake for
automatic transmission vehicles
for two seconds, then release.
At the end of the cycle, check the
coolant level in the surge tank and
add coolant if it is low. Turn off the
vehicle, allow the Electronic Control
Module (ECM) to go to sleep, about
2 minutes, and repeat Steps 3-7.
Listen for pump activation and
movement of the control valves while
watching the level of the coolant in
the surge tank. If the tank empties,
turn the ignition off, carefully remove
the surge tank cap, refill to the
indicated mark, and repeat Steps 3-6.
The fill and air removal process will
run for approximately 10 minutes.
Engine Overheating
The vehicle has several indicators to
warn of the engine overheating.
There is an engine coolant
temperature gauge on the instrument cluster. See
Engine Coolant Temperature
Gauge 0112. The vehicle may also
display a message on the Driver
Information Center (DIC).
If the decision is made not to lift the
hood when this warning appears, get
service help right away. See Roadside
Service 0340.
If the decision is made to lift the
hood, make sure the vehicle is parked
on a level surface. Then check to see if
the engine cooling fan is running.
If the engine is overheating, the fan
should be running. If it is not, do not
continue to run the engine. Have the
vehicle serviced.
Caution
Do not run the engine if there is a
leak in the engine cooling system.
This can cause a loss of all coolant
and can damage the system and
vehicle. Have any leaks fixed
right away.
Page 309 of 372

Cadillac XT4 Owner Manual (GMNA-Localizing-U.S./Canada/Mexico-
13527548) - 2020 - CRC - 9/5/19
308 VEHICLE CARE
{Warning
Using a match near a battery can
cause battery gas to explode. People
have been hurt doing this, and
some have been blinded. Use a
flashlight if you need more light.
Battery fluid contains acid that can
burn you. Do not get it on you.
If you accidentally get it in your
eyes or on your skin, flush the place
with water and get medical help
immediately.
{Warning
Fans or other moving engine parts
can injure you badly. Keep your
hands away from moving parts
once the engine is running.
5. Connect one end of the red positive (+) cable to the remote
positive (+) terminal on the
discharged battery. 6. Connect the other end of the red
positive (+) cable to the
positive (+) terminal of the good
battery.
7. Connect one end of the black negative (–) cable to the
negative (–) terminal of the good
battery.
8. Connect the other end of the black negative (–) cable to the
remote negative (–) ground
terminal on the driver side shock
tower for the discharged battery.
9. Start the engine in the vehicle with the good battery and run
the engine at idle speed for at
least four minutes.
10. Try to start the vehicle that had the dead battery. If it will not
start after a few tries, it probably
needs service.
Caution
If the jumper cables are connected
or removed in the wrong order,
electrical shorting may occur and
damage the vehicle. The repairs
would not be covered by the vehicle
warranty. Always connect and
remove the jumper cables in the
correct order, making sure that the
cables do not touch each other or
other metal.
Jumper Cable Removal
Reverse the sequence exactly when
removing the jumper cables.
After starting the disabled vehicle and
removing the jumper cables, allow it
to idle for several minutes.