height adjustment CADILLAC XT4 2020 Owner's Manual
[x] Cancel search | Manufacturer: CADILLAC, Model Year: 2020, Model line: XT4, Model: CADILLAC XT4 2020Pages: 372, PDF Size: 6.25 MB
Page 26 of 372

Cadillac XT4 Owner Manual (GMNA-Localizing-U.S./Canada/Mexico-
13527548) - 2020 - CRC - 9/5/19
KEYS, DOORS, AND WINDOWS 25
2. Stop the liftgate movement atthe desired height by pressing
any liftgate button. Manually
adjust the liftgate position if
needed.
3. Press and hold
lnext to the
pull cup on the bottom of the
liftgate until the turn signals
flash and a beep sounds. This
indicates the setting has been
recorded.
The liftgate cannot be set below a
minimum programmable height.
If there is no light flash or sound,
then the height adjustment may be
too low.
Manual Operation
Select OFF to manually operate the
liftgate. See “Manual Liftgate ”at the
beginning of this section.
Caution
Attempting to move the liftgate too
quickly and with excessive force
may result in damage to the
vehicle. Operate the liftgate manually with a
smooth motion and moderate speed.
The system includes a feature which
limits the manual closing speed to
protect the components.
Hands-Free Operation
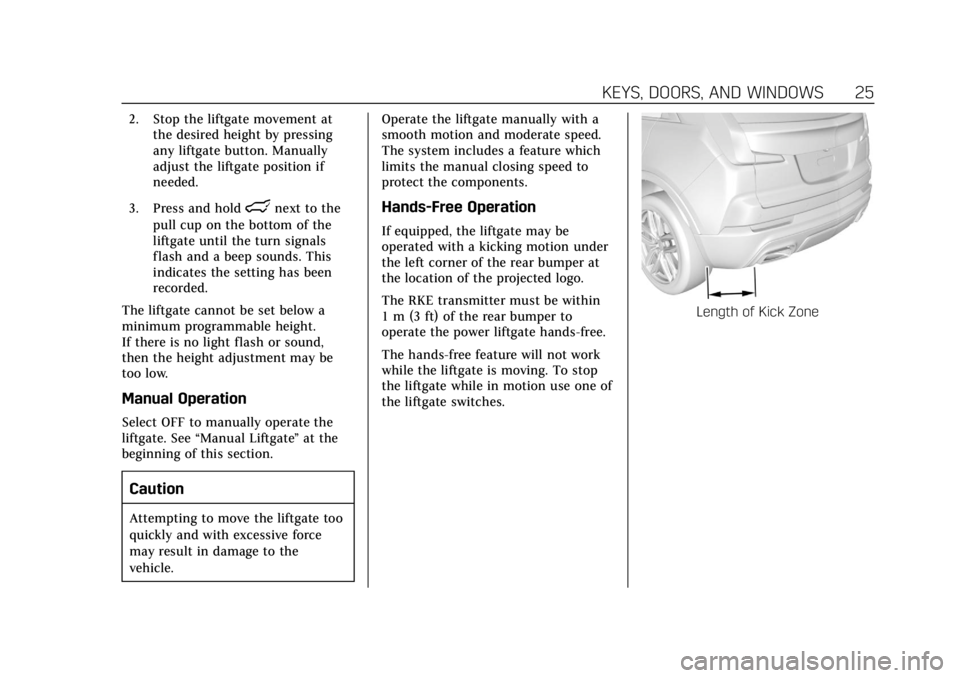
If equipped, the liftgate may be
operated with a kicking motion under
the left corner of the rear bumper at
the location of the projected logo.
The RKE transmitter must be within
1 m (3 ft) of the rear bumper to
operate the power liftgate hands-free.
The hands-free feature will not work
while the liftgate is moving. To stop
the liftgate while in motion use one of
the liftgate switches.
Length of Kick Zone
Page 58 of 372

Cadillac XT4 Owner Manual (GMNA-Localizing-U.S./Canada/Mexico-
13527548) - 2020 - CRC - 9/5/19
SEATS AND RESTRAINTS 57
Before a door is closed, be sure the
seat belt is out of the way. If a door is
slammed against a seat belt, damage
can occur to both the seat belt and
the vehicle.
Shoulder Belt Height Adjuster
The vehicle has a shoulder belt height
adjuster for the driver and front
outboard passenger seating positions.
Adjust the height so that the shoulder
portion of the belt is on the shoulder
and not falling off of it. The belt
should be close to, but not contacting,
the neck. Improper shoulder belt
height adjustment could reduce the
effectiveness of the seat belt in a
crash. SeeHow to Wear Seat Belts
Properly 053.
Press and hold the release button
while raising or lowering the height
adjuster to the desired position.
After the height adjuster is set to the
desired position, try to move it down
without pressing the release button to
make sure it has locked into position.
Seat Belt Pretensioners
This vehicle has seat belt
pretensioners for the front outboard
occupants. Although the seat belt
pretensioners cannot be seen, they are
part of the seat belt assembly. They
can help tighten the seat belts during
the early stages of a moderate to
severe frontal, near frontal, or rear crash if the threshold conditions for
pretensioner activation are met. Seat
belt pretensioners can also help
tighten the seat belts in a side crash
or a rollover event.
Pretensioners work only once. If the
pretensioners activate in a crash, the
pretensioners and probably other
parts of the vehicle's seat belt system
will need to be replaced. See
Replacing
Seat Belt System Parts after a Crash
0 59.
Do not sit on the outboard seat belt
while entering or exiting the vehicle or
at any time while sitting in the seat.
Sitting on the seat belt can damage
the webbing and hardware.
Rear Seat Belt Comfort Guides
Rear seat belt comfort guides may
provide added seat belt comfort for
older children who have outgrown
booster seats and for some adults.
When installed on a shoulder belt, the
comfort guide positions the shoulder
belt away from the neck and head.
The comfort guides for the second row
outboard seating positions of this
vehicle are provided in a package in
Page 87 of 372

Cadillac XT4 Owner Manual (GMNA-Localizing-U.S./Canada/Mexico-
13527548) - 2020 - CRC - 9/5/19
86 SEATS AND RESTRAINTS
{Warning
With head restraints that are not
installed and adjusted properly,
there is a greater chance that
occupants will suffer a neck/spinal
injury in a crash. Do not drive until
the head restraints for all occupants
are installed and adjusted properly.
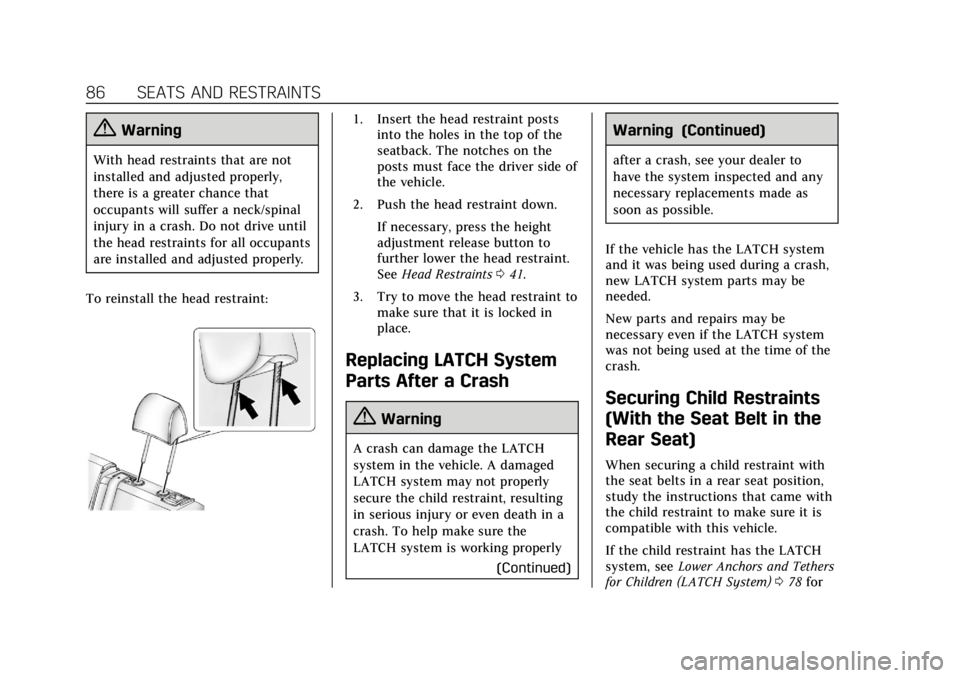
To reinstall the head restraint:
1. Insert the head restraint posts into the holes in the top of the
seatback. The notches on the
posts must face the driver side of
the vehicle.
2. Push the head restraint down.
If necessary, press the height
adjustment release button to
further lower the head restraint.
See Head Restraints 041.
3. Try to move the head restraint to make sure that it is locked in
place.
Replacing LATCH System
Parts After a Crash
{Warning
A crash can damage the LATCH
system in the vehicle. A damaged
LATCH system may not properly
secure the child restraint, resulting
in serious injury or even death in a
crash. To help make sure the
LATCH system is working properly
(Continued)
Warning (Continued)
after a crash, see your dealer to
have the system inspected and any
necessary replacements made as
soon as possible.
If the vehicle has the LATCH system
and it was being used during a crash,
new LATCH system parts may be
needed.
New parts and repairs may be
necessary even if the LATCH system
was not being used at the time of the
crash.
Securing Child Restraints
(With the Seat Belt in the
Rear Seat)
When securing a child restraint with
the seat belts in a rear seat position,
study the instructions that came with
the child restraint to make sure it is
compatible with this vehicle.
If the child restraint has the LATCH
system, see Lower Anchors and Tethers
for Children (LATCH System) 078 for
Page 292 of 372

Cadillac XT4 Owner Manual (GMNA-Localizing-U.S./Canada/Mexico-
13527548) - 2020 - CRC - 9/5/19
VEHICLE CARE 291
Wheel Alignment and Tire
Balance
The tires and wheels were aligned and
balanced at the factory to provide the
longest tire life and best overall
performance. Adjustments to wheel
alignment and tire balancing are not
necessary on a regular basis. Consider
an alignment check if there is unusual
tire wear or the vehicle is significantly
pulling to one side or the other. Some
slight pull to the left or right,
depending on the crown of the road
and/or other road surface variations
such as troughs or ruts, is normal.
If the vehicle is vibrating when driving
on a smooth road, the tires and
wheels may need to be rebalanced.
See your dealer for proper diagnosis.
Wheel Replacement
Replace any wheel that is bent,
cracked, or badly rusted or corroded.
If wheel nuts keep coming loose, the
wheel, wheel bolts, and wheel nuts
should be replaced. If the wheel leaksair, replace it. Some aluminum wheels
can be repaired. See your dealer if any
of these conditions exist.
Your dealer will know the kind of
wheel that is needed.
Each new wheel should have the same
load-carrying capacity, diameter,
width, offset, and be mounted the
same way as the one it replaces.
Replace wheels, wheel bolts, wheel
nuts, or Tire Pressure Monitor System
(TPMS) sensors with new GM original
equipment parts.
{Warning
Using the wrong replacement
wheels, wheel bolts, or wheel nuts
can be dangerous. It could affect
the braking and handling of the
vehicle. Tires can lose air, and
cause loss of control, causing a
crash. Always use the correct wheel,
wheel bolts, and wheel nuts for
replacement.
Caution
The wrong wheel can also cause
problems with bearing life, brake
cooling, speedometer or odometer
calibration, headlamp aim, bumper
height, vehicle ground clearance,
and tire or tire chain clearance to
the body and chassis.
Used Replacement Wheels
{Warning
Replacing a wheel with a used one
is dangerous. How it has been used
or how far it has been driven may
be unknown. It could fail suddenly
and cause a crash. When replacing
wheels, use a new GM original
equipment wheel.