display CADILLAC XT5 2017 1.G Workshop Manual
[x] Cancel search | Manufacturer: CADILLAC, Model Year: 2017, Model line: XT5, Model: CADILLAC XT5 2017 1.GPages: 339, PDF Size: 2.75 MB
Page 157 of 339
Cadillac XT5 Owner Manual (GMNA-Localizing-MidEast-10260744) - 2017 -
crc - 1/14/16
Instruments and Controls 157
Passive Door Lock
This allows passive locking to be
turned on or off and selects
feedback. SeeRemote Keyless
Entry (RKE) System Operation 026.
Select Off, On with Horn
Chirp, or On.
Remote Left in Vehicle Alert
This feature sounds an alert when
the RKE transmitter is left in the
vehicle.
Select Off or On.
Bluetooth
Select and the following may
display:
. Pair New Device
. Device Management
. Ringtones
. Voice Mail Numbers
. Text Message Alerts Pair New Device
Select to pair a new device. See
“Pairing”
in“Infotainment Controls”
under “Bluetooth” in the infotainment
manual.
Device Management
Select to connect to a different
phone source, disconnect a phone,
or delete a phone.
Ringtones
Touch to change the ring tone for
the specific phone. The phone does
not need to be connected to change
the ring tone.
Voice Mail Numbers
This feature displays the voice mail
number for all connected phones.
To change the voice mail number,
select EDIT or press the EDIT
button. Type a new number, then
select SAVE or press the SAVE
button. Text Message Alerts
This feature allows text messages
to be received. See
“Text
Messaging” under“Phone” in the
infotainment manual.
Select Off or On.
Apple CarPlay™
Select and the following may
display:
. Apple CarPlay
. Manage Apple CarPlay Devices
Apple CarPlay
This feature allows Apple devices to
be connected to the infotainment
system through a USB port. See
“Apple CarPlay and Android Auto”
under “Phone” in the infotainment
manual.
Select Off or On.
Manage Apple CarPlay Devices
Select to manage Apple devices.
Apple CarPlay must be on for this
feature to be accessed. See “Apple
CarPlay and Android Auto” under
“Phone” in the infotainment manual.
Page 158 of 339
Cadillac XT5 Owner Manual (GMNA-Localizing-MidEast-10260744) - 2017 -
crc - 1/14/16
158 Instruments and Controls
Android Auto
Select and the following may
display:
.Android Auto
. Manage Android Auto Devices
Android Auto
This feature allows Android devices
to be connected to the infotainment
system through a USB port.
Select Off or On.
Manage Android Auto Devices
Select to manage Android devices.
Android Auto must be on for this
feature to be accessed.
Voice
Select and the following may
display:
. Confidence Threshold
. Prompt Length
. Audio Feedback Speed
. Display “What Can I Say?” TipsConfidence Threshold
This feature allows the adjustment
of the sensitivity of the speech
recognition system.
Select Confirm More or
Confirm Less.
Prompt Length
This feature adjusts the voice
prompt length.
Select Short or Long.
Audio Feedback Speed
This feature adjusts the audio
feedback speed.
Select Slow, Medium, or Fast.
Display
“What Can I Say?” Tips
This feature gives voice
command tips.
Select Off or On.
Display
Select and the following may
display:
. Proximity Sensing
. Mode .
Calibrate Touchscreen
. Turn Display Off
Proximity Sensing
When on, certain screen buttons
and features will become visible
when a hand approaches the
screen.
Select Off, On, or On - Map Only.
Mode
Select to change the display screen
for day or night driving.
Select Auto, Day, or Night.
Calibrate Touchscreen
Select to calibrate the touchscreen,
then follow the prompts.
Turn Display Off
Select to turn the display off. Touch
anywhere on the display area or any
faceplate button to turn the
display on.Rear Camera
This allows for Rear Parking Assist
Symbols and Guidance Lines to be
turned off or on.
Page 159 of 339
Cadillac XT5 Owner Manual (GMNA-Localizing-MidEast-10260744) - 2017 -
crc - 1/14/16
Instruments and Controls 159
Select Off or On for the desired
feature.
SeeAssistance Systems for Parking
or Backing 0220.
Return to Factory Settings
Select and the following may
display:
.
Restore Vehicle Settings
. Clear All Private Data
. Restore Radio Settings
Restore Vehicle Settings
This allows selection of restoring
vehicle settings.
Select Restore or Cancel. Clear All Private Data
This allows selection to clear all
private information from the vehicle.
Select Delete or Cancel.
Restore Radio Settings
This allows selection to restore
radio settings.
Select Restore or Cancel.
Software Information
Touch to view the version of the
infotainment system software.
Universal Remote
System
Universal Remote System
Programming
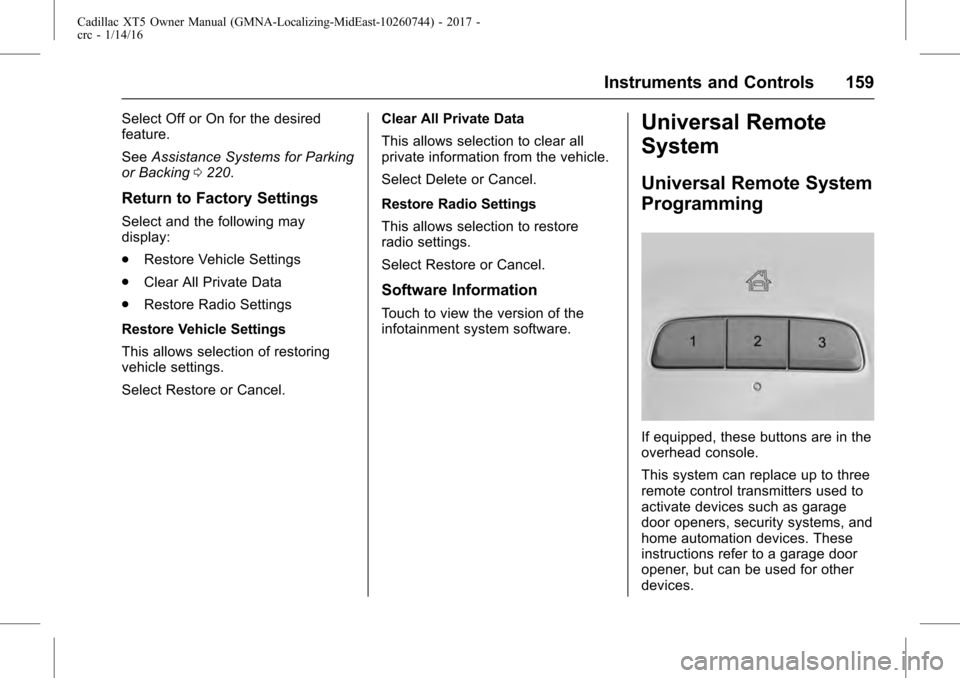
If equipped, these buttons are in the
overhead console.
This system can replace up to three
remote control transmitters used to
activate devices such as garage
door openers, security systems, and
home automation devices. These
instructions refer to a garage door
opener, but can be used for other
devices.
Page 167 of 339
Cadillac XT5 Owner Manual (GMNA-Localizing-MidEast-10260744) - 2017 -
crc - 1/14/16
Lighting 167
Turn and Lane-Change
Signals
Move the lever all the way up or
down to signal a turn.
An arrow on the instrument cluster
flashes in the direction of the turn or
lane change.
Raise or lower the lever until the
arrow starts to flash to signal a lane
change. Hold it there until the lane
change is completed. If the lever is
briefly pressed and released, the
turn signal flashes three times.
The turn and lane-change signal
can be turned off manually by
moving the lever back to its original
position.If after signaling a turn or lane
change, the arrow flashes rapidly or
does not come on, a signal bulb
may be burned out.
Replace any burned out bulbs. If a
bulb is not burned out, check the
fuse. See
Fuses and Circuit
Breakers 0271.
Cornering Lamps
If equipped with cornering lamps,
they automatically come on when all
of the following occur:
.
The low-beam headlamps
are on.
. The turn signals are activated or
the steering wheel is at a
calibrated angle.
. The vehicle speed is below the
calibrated speed.
Interior Lighting
Instrument Panel
Illumination Control
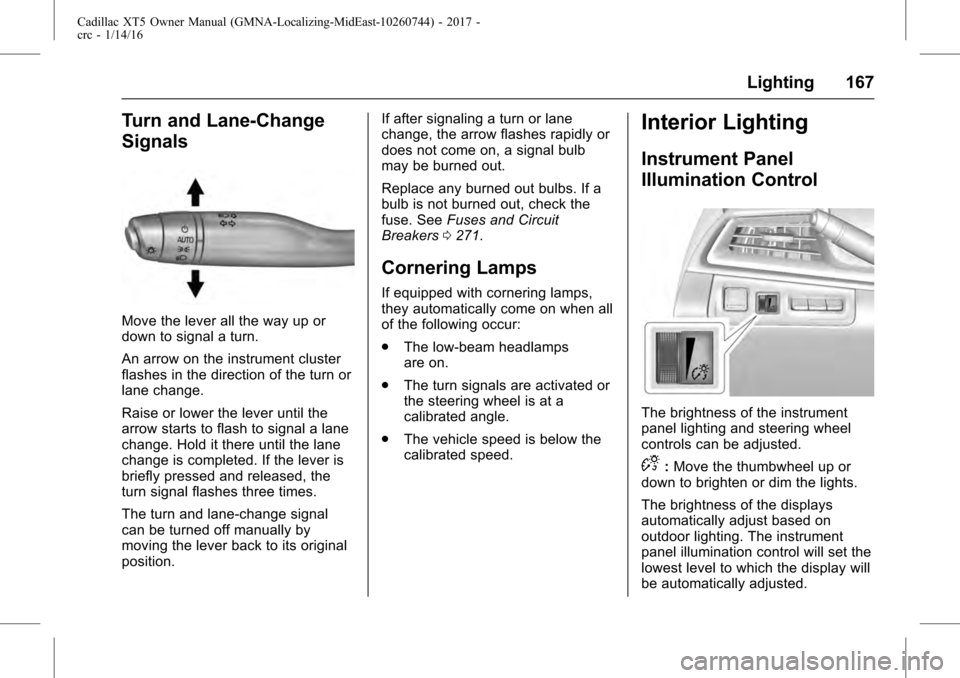
The brightness of the instrument
panel lighting and steering wheel
controls can be adjusted.
D:Move the thumbwheel up or
down to brighten or dim the lights.
The brightness of the displays
automatically adjust based on
outdoor lighting. The instrument
panel illumination control will set the
lowest level to which the display will
be automatically adjusted.
Page 172 of 339
Cadillac XT5 Owner Manual (GMNA-Localizing-MidEast-10260744) - 2017 -
crc - 1/14/16
172 Climate Controls
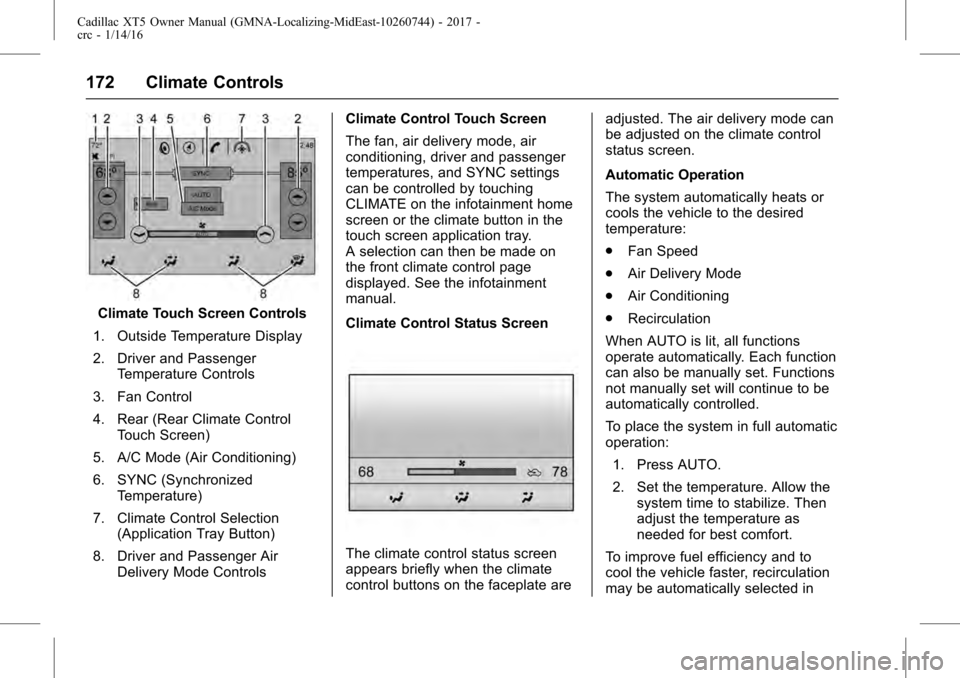
Climate Touch Screen Controls
1. Outside Temperature Display
2. Driver and Passenger Temperature Controls
3. Fan Control
4. Rear (Rear Climate Control Touch Screen)
5. A/C Mode (Air Conditioning)
6. SYNC (Synchronized Temperature)
7. Climate Control Selection (Application Tray Button)
8. Driver and Passenger Air Delivery Mode Controls Climate Control Touch Screen
The fan, air delivery mode, air
conditioning, driver and passenger
temperatures, and SYNC settings
can be controlled by touching
CLIMATE on the infotainment home
screen or the climate button in the
touch screen application tray.
A selection can then be made on
the front climate control page
displayed. See the infotainment
manual.
Climate Control Status Screen
The climate control status screen
appears briefly when the climate
control buttons on the faceplate are adjusted. The air delivery mode can
be adjusted on the climate control
status screen.
Automatic Operation
The system automatically heats or
cools the vehicle to the desired
temperature:
.
Fan Speed
. Air Delivery Mode
. Air Conditioning
. Recirculation
When AUTO is lit, all functions
operate automatically. Each function
can also be manually set. Functions
not manually set will continue to be
automatically controlled.
To place the system in full automatic
operation: 1. Press AUTO.
2. Set the temperature. Allow the system time to stabilize. Then
adjust the temperature as
needed for best comfort.
To improve fuel efficiency and to
cool the vehicle faster, recirculation
may be automatically selected in
Page 173 of 339
Cadillac XT5 Owner Manual (GMNA-Localizing-MidEast-10260744) - 2017 -
crc - 1/14/16
Climate Controls 173
warm weather. The recirculation
light will not come on. Press
@to
select recirculation; press it again to
select outside air.
English units can be changed to
metric units through the instrument
cluster. See “Cluster Application
Displays” underInstrument Cluster
(Uplevel Cluster) 0119 or
Instrument Cluster (Base
Cluster) 0117.
OFF : Press to turn the fan on or
off. The front and rear climate
displays turn off when the fan is
turned off. The temperature control
and air delivery mode can still be
adjusted.
w/x: The temperature can be
adjusted separately for the driver
and the passenger. Press to
increase or decrease the
temperature. Press and hold to
rapidly increase or decrease the
temperature.
The driver and passenger
temperatures can also be adjusted
by touching the buttons on the touch
screen. SYNC :
Touch SYNC on the touch
screen to link all climate zone
settings to the driver settings. Adjust
the driver side temperature control
to change the linked temperature.
When the front or rear passenger
settings are adjusted, the SYNC
indicator light turns off when the
temperatures are unlinked.
Rear : If equipped, touch Rear on
the front climate control touch
screen to open the rear climate
control screen. The rear climate
control settings can now be
adjusted from the front passenger
area. See Rear Climate Control
System 0176.
Manual OperationQ 9 R:Press the fan control
buttons or the touch screen fan
control, to increase or decrease the
fan speed. Press and hold the
buttons or the touch screen control
to adjust speed more quickly. The
fan speed setting displays. Pressing
either button cancels automatic fan
control and the fan can be
controlled manually. Press AUTO to
return to automatic operation. To turn off the fan and climate control
system, press and hold the fan
down button or touch screen fan
control until it is off.
Air Delivery Mode Control :
When
the climate information is displayed,
touch the desired air delivery mode
on the touch screen to change the
direction of the airflow. The selected
air delivery mode button is lit.
Touching any of the air delivery
buttons cancels automatic air
delivery control and the direction of
the airflow can be controlled
manually. Press AUTO to return to
automatic operation.
To change the current mode, select
one of the following:Y: Air is directed to the instrument
panel outlets.
\: Air is divided between the
instrument panel outlets and the
floor outlets.
[: Air is directed to the floor
outlets.
-: Clears the windows of fog or
moisture. Air is directed to the
windshield and floor outlets.
Page 176 of 339
Cadillac XT5 Owner Manual (GMNA-Localizing-MidEast-10260744) - 2017 -
crc - 1/14/16
176 Climate Controls
Rear Climate Control System
If equipped, the rear climate control system is on the rear of the center
console. The settings can be adjusted with the rear climate control buttons
and the touch screen.
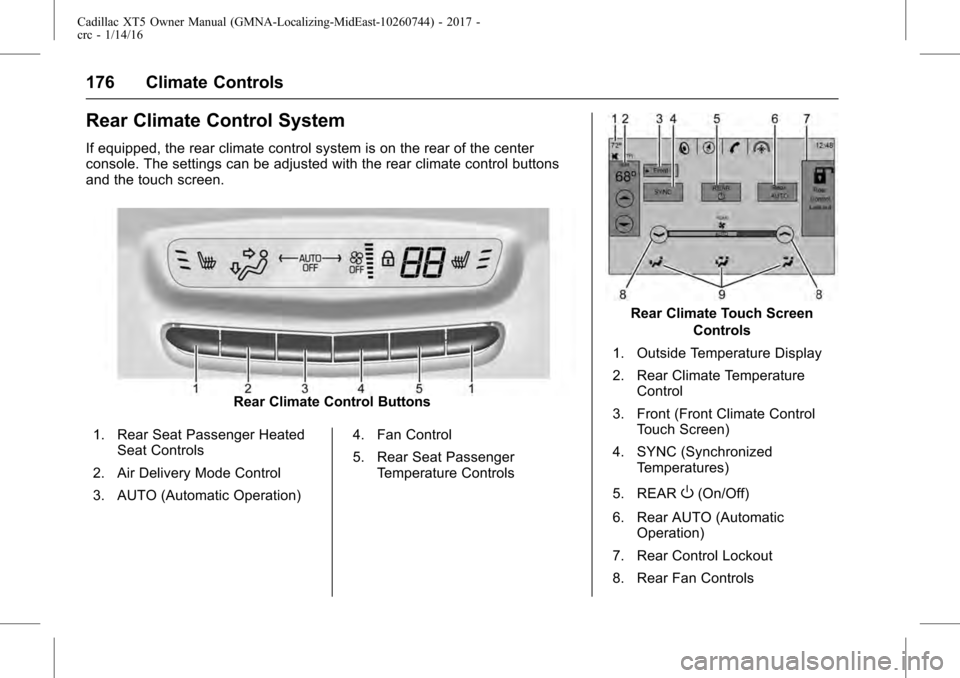
Rear Climate Control Buttons
1. Rear Seat Passenger Heated Seat Controls
2. Air Delivery Mode Control
3. AUTO (Automatic Operation) 4. Fan Control
5. Rear Seat Passenger
Temperature Controls
Rear Climate Touch Screen
Controls
1. Outside Temperature Display
2. Rear Climate Temperature Control
3. Front (Front Climate Control Touch Screen)
4. SYNC (Synchronized Temperatures)
5. REAR
O(On/Off)
6. Rear AUTO (Automatic Operation)
7. Rear Control Lockout
8. Rear Fan Controls
Page 177 of 339
Cadillac XT5 Owner Manual (GMNA-Localizing-MidEast-10260744) - 2017 -
crc - 1/14/16
Climate Controls 177
9. Air Delivery Mode Control
Rear : Touch Rear on the front
climate control touch screen to open
the rear climate control screen. The
rear climate control settings can
now be adjusted from the front
passenger area.
REAR
O: Touch REAROon the
touch screen to turn the rear climate
control on or off.
SYNC : Touch SYNC on the touch
screen to match the rear climate
control temperature to the front
climate control driver temperature.
The SYNC button will be lit.
Rear Control Lockout : Touch to
lock or unlock control of the rear
climate control system from the rear
seat passengers. When locked, the
rear climate control can only be
adjusted from the front seat.
Automatic Operation
AUTO : Press to turn on or off. The
air delivery is controlled
automatically. The AUTO indicator
appears on the display. If the air delivery mode or fan speed is
manually adjusted, this cancels full
automatic operation.
Manual Operation
]:
Press the rear fan control up or
down to increase or decrease the
airflow to the rear panel outlets. The
rear climate airflow can also be
adjusted by touching
ªor«on
the front climate touch screen.
Temperature Controls : Press up
or down to adjust the rear
passenger temperature. The rear
passenger temperature can also be
adjusted by touching
Qfor warmer
air or
Rfor cooler air on the rear
climate touch screen.
Air Delivery Mode Control : Press
up or down to select the desired air
delivery mode. The air delivery
mode can also be changed by
touching
[,\, orYon the rear
climate touch screen. This changes
the direction of the airflow in the
rear seating area. If the rear floor air delivery mode is
selected, the rear fan speed
indicator will change when adjusted,
but the airflow amount directed to
the floor will not. This is normal
operation for the system.
To activate the rear floor air delivery
mode, touch
[on the front climate
control touch screen.
Page 193 of 339
Cadillac XT5 Owner Manual (GMNA-Localizing-MidEast-10260744) - 2017 -
crc - 1/14/16
Driving and Operating 193
engine starts. SeeStarting the
Engine 0193. The ignition will then
remain in ON/RUN.
Service Only Mode
This power mode is available for
service and diagnostics, and Car
Wash Mode, see Automatic
Transmission 0198. And to verify
the proper operation of the
malfunction indicator lamp as may
be required for emission inspection
purposes. With the vehicle off, and
the brake pedal not applied,
pressing and holding ENGINE
START/STOP for more than
five seconds will place the vehicle in
Service Only Mode. The instruments
and audio systems will operate as
they do in ON/RUN, but the vehicle
will not be able to be driven. The
engine will not start in Service Only
Mode. Press ENGINE START/STOP
again to turn the vehicle off.
Starting the Engine
Place the transmission in the proper
gear, P (Park) or N (Neutral). To
restart the engine when the vehicle
is already moving, use N (Neutral).
Caution
Do not try to shift to P (Park) if the
vehicle is moving. If you do, you
could damage the transmission.
Shift to P (Park) only when the
vehicle is stopped.
Caution
If you add electrical parts or
accessories, you could change
the way the engine operates. Any
resulting damage would not be
covered by the vehicle warranty.
See Add-On Electrical
Equipment 0248.
To start the vehicle: 1. With the Keyless Access system, the RKE transmitter
must be in the vehicle. Press
ENGINE START/STOP with the
brake pedal applied. When the
engine begins cranking, let go
of the button. The idle speed
will go down as the engine warms up. Do not race the
engine immediately after
starting it.
If the RKE transmitter is not in
the vehicle, if there is
interference, or if the RKE
battery is low, a Driver
Information Center (DIC)
message will display. See
Key
and Lock Messages 0144 and
Remote Keyless Entry (RKE)
System Operation 026.
Caution
Cranking the engine for long
periods of time, by pressing
ENGINE START/STOP
immediately after cranking has
ended, can overheat and damage
the cranking motor, and drain the
battery. Wait at least 15 seconds
between each try, to let the
cranking motor cool down.
2. If the engine does not start after five to 10 seconds,
especially in very cold weather
(below −18 °C or 0 °F), it could
Page 194 of 339
Cadillac XT5 Owner Manual (GMNA-Localizing-MidEast-10260744) - 2017 -
crc - 1/14/16
194 Driving and Operating
be flooded with too much
gasoline. Try pushing the
accelerator pedal all the way to
the floor and hold it there, then
press ENGINE START/STOP
for up to a maximum of
15 seconds. Wait at least
15 seconds between each try,
to allow the cranking motor to
cool down. When the engine
starts, let go of the button and
the accelerator. If the vehicle
starts briefly but then stops
again, do the same thing. This
clears the extra gasoline from
the engine. Do not race the
engine immediately after
starting it. Operate the engine
and transmission gently until
the oil warms up and lubricates
all moving parts.
Stop/Start System
{Warning
Exiting the vehicle without first
shifting into P (Park) may cause
the vehicle to move. You or others(Continued)
Warning (Continued)
may be injured. Because the
vehicle has the auto engine stop/
start feature, the vehicle's engine
might seem to be shut off;
however, once the brake pedal is
released, the engine will start up
again.
Shift to P (Park) and turn the
ignition to LOCK/OFF, before
exiting the vehicle.
The vehicle has a fuel saving stop/
start system to shut off the engine to
help conserve fuel.
Auto Engine Stop/Start
When the brakes are applied and
the vehicle is at a complete stop,
the engine may turn off. When
stopped, the tachometer displays
AUTO STOP. See Tachometer
0 121. When the brake pedal is
released or the accelerator pedal is
pushed, the engine will restart.
Auto Stop may be deactivated if: .
A minimum vehicle speed is not
reached.
. The engine or transmission is
not at the required operating
temperature.
. The outside temperature is not
in the required operating range,
typically below −10 °C (14 °F) or
above 50 °C (122 °F).
. The transmission is in any gear
other than D (Drive).
. The battery is low.
. The battery has been
disconnected.
. The interior comfort level has not
reached the required level for
the climate control system or
defog settings. See Dual
Automatic Climate Control
System 0171.
. The Auto Stop time is greater
than two minutes.