Turn signal CADILLAC XT5 2018 Owner's Guide
[x] Cancel search | Manufacturer: CADILLAC, Model Year: 2018, Model line: XT5, Model: CADILLAC XT5 2018Pages: 380, PDF Size: 6.21 MB
Page 234 of 380

Cadillac XT5 Owner Manual (GMNA-Localizing-U.S./Canada/Mexico-
11349110) - 2018 - CRC - 9/28/17
DRIVING AND OPERATING 233
{Warning
LCA does not alert the driver to
vehicles outside of the system
detection zones, pedestrians,
bicyclists, or animals. It may not
provide alerts when changing lanes
under all driving conditions. Failure
to use proper care when changing
lanes may result in injury, death,
or vehicle damage. Before making a
lane change, always check mirrors,
glance over your shoulder, and use
the turn signals.
LCA Detection Zones
1. SBZA Detection Zone
2. LCA Detection Zone
The LCA sensor covers a zone of
approximately one lane over from
both sides of the vehicle, or 3.5 m
(11 ft). The height of the zone is
approximately between 0.5 m (1.5 ft)
and 2 m (6 ft) off the ground. The Side
Blind Zone Alert (SBZA) warning area
starts at approximately the middle of
the vehicle and goes back 5 m (16 ft).
Drivers are also warned of vehicles
rapidly approaching from up to 70 m
(230 ft) behind the vehicle.
How the System Works
The LCA symbol lights up in the side
mirrors when the system detects a
moving vehicle in the next lane over
that is in the side blind zone or
rapidly approaching that zone from
behind. A lit LCA symbol indicates it
may be unsafe to change lanes. Before
making a lane change, check the LCA
display, check mirrors, glance over
your shoulder, and use the turn
signals.
Left Side Mirror DisplayRight Side Mirror Display
When the vehicle is started, both
outside mirror LCA displays will
briefly come on to indicate the system
is operating. When the vehicle is in a
forward gear, the left or right side
mirror display will light up if a moving
vehicle is detected in the next lane
over in that blind zone or rapidly
approaching that zone. If the turn
signal is activated in the same
direction as a detected vehicle, this
display will flash as an extra warning
not to change lanes.
LCA can be disabled through vehicle
personalization. See Vehicle
Personalization 0148. If LCA is
disabled by the driver, the LCA mirror
displays will not light up.
Page 235 of 380
Cadillac XT5 Owner Manual (GMNA-Localizing-U.S./Canada/Mexico-
11349110) - 2018 - CRC - 9/28/17
234 DRIVING AND OPERATING
When the System Does Not
Seem to Work Properly
The LCA system requires some driving
for the system to calibrate to
maximum performance. This
calibration may occur more quickly if
the vehicle is driving on a straight
highway road with traffic and roadside
objects (e.g., guardrails, barriers).
LCA displays may not come on when
passing a vehicle quickly, for a
stopped vehicle, or when towing a
trailer. The LCA detection zones that
extend back from the side of the
vehicle do not move further back
when a trailer is towed. Use caution
while changing lanes when towing a
trailer. LCA may alert to objects
attached to the vehicle, such as a
trailer, bicycle, or object extending out
to either side of the vehicle. Attached
objects may also interfere with the
detection of vehicles. This is normal
system operation; the vehicle does not
need service.
LCA may not always alert the driver to
vehicles in the next lane over,
especially in wet conditions or when
driving on sharp curves. The systemdoes not need to be serviced. The
system may light up due to guardrails,
signs, trees, shrubs, and other
non-moving objects. This is normal
system operation; the vehicle does not
need service.
LCA may not operate when the LCA
sensors in the left or right corners of
the rear bumper are covered with
mud, dirt, snow, ice, or slush, or in
heavy rainstorms. For cleaning
instructions, see "Washing the
Vehicle" under
Exterior Care0319.
If the DIC still displays the system
unavailable message after cleaning
both sides of the vehicle toward the
rear corners of the vehicle, see your
dealer.
If the LCA displays do not light up
when moving vehicles are in the side
blind zone or are rapidly approaching
this zone and the system is clean, the
system may need service. Take the
vehicle to your dealer.
Radio Frequency Information
See Radio Frequency Statement 0353.
Lane Departure
Warning (LDW)
If equipped, LDW may help avoid
crashes due to unintentional lane
departures. It may provide a warning
if the vehicle is crossing a detected
lane marking without using a turn
signal in the lane departure direction.
Since this system is part of the Lane
Keep Assist (LKA) system, read the
entire LKA section before using this
feature.
Lane Keep Assist (LKA)
If equipped, LKA may help avoid
crashes due to unintentional lane
departures. It may assist by gently
turning the steering wheel if the
vehicle approaches a detected lane
marking without using a turn signal in
that direction. It may also provide a
Lane Departure Warning (LDW)
system alert as the lane marking is
crossed. The LKA system will not
assist or provide an LDW alert if it
detects that you are actively steering.
Override LKA by turning the steering
Page 236 of 380
Cadillac XT5 Owner Manual (GMNA-Localizing-U.S./Canada/Mexico-
11349110) - 2018 - CRC - 9/28/17
DRIVING AND OPERATING 235
wheel. LKA uses a camera to detect
lane markings between 60 km/h
(37 mph) and 180 km/h (112 mph).
{Warning
The LKA system does not
continuously steer the vehicle.
It may not keep the vehicle in the
lane or give a Lane Departure
Warning (LDW) alert, even if a lane
marking is detected.
The LKA and LDW systems
may not:. Provide an alert or enough
steering assist to avoid a lane
departure or crash.
. Detect lane markings under
poor weather or visibility
conditions. This can occur if
the windshield or headlamps
are blocked by dirt, snow,
or ice, if they are not in
proper condition, or if the sun
shines directly into the
camera.
(Continued)
Warning (Continued)
.Detect road edges.
. Detect lanes on winding or
hilly roads.
If LKA only detects lane markings
on one side of the road, it will only
assist or provide an LDW alert
when approaching the lane on the
side where it has detected a lane
marking. Even with LKA and LDW,
you must steer the vehicle. Always
keep your attention on the road and
maintain proper vehicle position
within the lane, or vehicle damage,
injury, or death could occur. Always
keep the windshield, headlamps,
and camera sensors clean and in
good repair. Do not use LKA in bad
weather conditions.
{Warning
Using LKA while towing a trailer or
on slippery roads could cause loss
of control of the vehicle and a
crash. Turn the system off.
How the System Works
The LKA camera sensor is on the
windshield ahead of the rearview
mirror.
To turn LKA on and off, press
A
on the steering wheel.
When on,
Ais green if LKA is
available to assist and provide LDW
alerts. It may assist by gently turning
the steering wheel and display
A
as amber if the vehicle approaches a
detected lane marking without using a
turn signal in that direction. It may
also provide an LDW alert by
flashing
Aamber as the lane
marking is crossed. Additionally, there
may be three beeps, or the driver seat
Page 243 of 380
Cadillac XT5 Owner Manual (GMNA-Localizing-U.S./Canada/Mexico-
11349110) - 2018 - CRC - 9/28/17
242 DRIVING AND OPERATING
Making TurnsCaution
Making very sharp turns while
trailering could cause the trailer to
come in contact with the vehicle.
The vehicle could be damaged.
Avoid making very sharp turns
while trailering.
When turning with a trailer, make
wider turns than normal so the trailer
will not strike soft shoulders, curbs,
road signs, trees, or other objects. Use
the turn signal well in advance and
avoid jerky or sudden maneuvers.
Turn Signals When Towing a
Trailer
The turn signal indicators on the
instrument cluster flash whenever
signaling a turn or lane change.
Properly hooked up, the trailer lamps
also flash, telling other drivers the
vehicle is turning, changing lanes,
or stopping. When towing a trailer, the arrows on
the instrument cluster flash for turns
even if the bulbs on the trailer are
burned out. Check occasionally to be
sure the trailer bulbs are still working.
Driving on Grades
Reduce speed and shift to a lower gear
before starting down a long or steep
downgrade. If the transmission is not
shifted down, the brakes might have
to be used so much that they would
get hot and no longer work well.
The vehicle can tow in D (Drive). Use
a lower gear if the transmission shifts
too often.
When towing at high altitude on steep
uphill grades, engine coolant boils at a
lower temperature than at normal
altitudes. If the engine is turned off
immediately after towing at high
altitude on steep uphill grades, the
vehicle could show signs similar to
engine overheating. To avoid this, let
the engine run while parked,
preferably on level ground, with the
transmission in P (Park) for a few
minutes before turning the engine off.
If the overheat warning comes on, see
Engine Overheating
0261.
Parking on Hills
{Warning
Parking the vehicle on a hill with
the trailer attached can be
dangerous. If something goes
wrong, the rig could start to move.
People can be injured, and both the
vehicle and the trailer can be
damaged. When possible, always
park the rig on a flat surface.
If parking the rig on a hill: 1. Press the brake pedal, but do not shift into P (Park) yet. Turn the
wheels into the curb if facing
downhill or into traffic if facing
uphill.
2. Have someone place chocks under the trailer wheels.
3. When the wheel chocks are in place, release the brake pedal
until the chocks absorb the load.
Page 247 of 380
Cadillac XT5 Owner Manual (GMNA-Localizing-U.S./Canada/Mexico-
11349110) - 2018 - CRC - 9/28/17
246 DRIVING AND OPERATING
To reinstall the hitch cover:1. Hold the cover at a 45 degree angle to the vehicle and push the
upper tabs in the hitch cover
into the slots in the fascia.
2. Move the bottom of the cover forward until the lower tabs line
up with the lower fascia slots.
3. Snap the hitch cover into place by pushing the upper corners
forward.
4. Reinstall the two bolts on the lower tabs by turning clockwise.
Safety Chains
Always attach chains between the
vehicle and the trailer. Cross the safety
chains under the tongue of the trailer
to help prevent the tongue from
contacting the road if it becomes
separated from the hitch. Always leave
just enough slack so the rig can turn.
Never allow safety chains to drag on
the ground.
Trailer Brakes
A loaded trailer that weighs more than
454 kg (1,000 lb) needs to have its own
brake system that is adequate for the
weight of the trailer. Be sure to read
and follow the instructions for the
trailer brakes so they are installed,
adjusted, and maintained properly.
Because the vehicle has antilock
brakes, do not tap into the vehicle's
brake system. If you do, both brake
systems will not work well, or at all.
Trailer Wiring Harness
Basic Trailer Wiring
The trailer wiring harness, with a
seven-pin connector, is located at the
rear of the vehicle and is tied to the
vehicle's frame. The harness connector
can be plugged into a seven-pin
universal heavy-duty trailer connector
available through your dealer.
Use only a round, seven-wire
connector with flat blade terminals
meeting SAE J2863 specifications for
proper electrical connectivity. The seven-wire harness contains the
following trailer circuits:
.
Yellow/Gray: Stop/Turn Signal Left
. Green/Violet: Stop/Turn Signal
Right
. Gray/Brown: Parking Lamps
. White/Green: Back-up Lamps
. Red/Green: Battery Feed
. Black: Ground
. Blue: Electric Brakes*
*The fuse for this circuit is installed in
the engine compartment fuse block,
but the wires are not connected. They
should be connected by your dealer or
a qualified service center.
If the back-up lamp circuit is not
functional, contact your dealer.
Page 250 of 380
Cadillac XT5 Owner Manual (GMNA-Localizing-U.S./Canada/Mexico-
11349110) - 2018 - CRC - 9/28/17
VEHICLE CARE 249
Vehicle Care
General Information
General Information . . . . . . . . . . . . . 250
California Proposition65 Warning . . . . . . . . . . . . . . . . . . . . . 250
California Perchlorate Materials Requirements . . . . . . . . . . . . . . . . . . . 251
Accessories and Modifications . . . . . . . . . . . . . . . . . . . 251
Vehicle Checks
Doing Your OwnService Work . . . . . . . . . . . . . . . . . . . . 251
Hood . . . . . . . . . . . . . . . . . . . . . . . . . . . . . . 252
Engine Compartment Overview . . . . . . . . . . . . . . . . . . . . . . . . . 253
Engine Oil . . . . . . . . . . . . . . . . . . . . . . . . . 254
Engine Oil Life System . . . . . . . . . . . 256
Automatic Transmission Fluid . . . . . . . . . . . . . . . . . . . . . . . . . . . . . 257
Engine Air Cleaner/Filter . . . . . . . . . 257
Cooling System . . . . . . . . . . . . . . . . . . . 258
Engine Overheating . . . . . . . . . . . . . . 261
Washer Fluid . . . . . . . . . . . . . . . . . . . . . 263
Brakes . . . . . . . . . . . . . . . . . . . . . . . . . . . . . 263
Brake Fluid . . . . . . . . . . . . . . . . . . . . . . . 264
Battery - North America . . . . . . . . . 265
All-Wheel Drive . . . . . . . . . . . . . . . . . . 266 Starter Switch Check . . . . . . . . . . . . . 266
Park Brake and P (Park)
Mechanism Check . . . . . . . . . . . . . . 266
Wiper Blade Replacement . . . . . . . 267
Windshield Replacement . . . . . . . . 268
Gas Strut(s) . . . . . . . . . . . . . . . . . . . . . . . 268
Headlamp Aiming
Headlamp Aiming . . . . . . . . . . . . . . . . 269
Bulb Replacement
Bulb Replacement . . . . . . . . . . . . . . . . 270
Halogen Bulbs . . . . . . . . . . . . . . . . . . . . 270
LED Lighting . . . . . . . . . . . . . . . . . . . . . 270
Headlamps and Front Turn Signal . . . . . . . . . . . . . . . . . . . . . . . . . . . . 270
Back-Up Lamps . . . . . . . . . . . . . . . . . . . 271
Electrical System
Electrical System Overload . . . . . . 271
Fuses and Circuit Breakers . . . . . . 272
Engine Compartment Fuse Block . . . . . . . . . . . . . . . . . . . . . . . . . . . . 272
Instrument Panel Fuse Block . . . . 275
Rear Compartment Fuse Block . . . . . . . . . . . . . . . . . . . . . . . . . . . . 277
Wheels and Tires
Tires . . . . . . . . . . . . . . . . . . . . . . . . . . . . . . . 279
All-Season Tires . . . . . . . . . . . . . . . . . . 280
Winter Tires . . . . . . . . . . . . . . . . . . . . . . 280
Summer Tires . . . . . . . . . . . . . . . . . . . . 281 Tire Sidewall Labeling . . . . . . . . . . . 281
Tire Designations . . . . . . . . . . . . . . . . . 283
Tire Terminology and
Definitions . . . . . . . . . . . . . . . . . . . . . . 284
Tire Pressure . . . . . . . . . . . . . . . . . . . . . . 286
Tire Pressure for High-Speed
Operation . . . . . . . . . . . . . . . . . . . . . . . . 288
Tire Pressure Monitor System . . . 288
Tire Pressure Monitor Operation . . . . . . . . . . . . . . . . . . . . . . . . 289
Tire Inspection . . . . . . . . . . . . . . . . . . . 293
Tire Rotation . . . . . . . . . . . . . . . . . . . . . 293
When It Is Time for New Tires . . . . . . . . . . . . . . . . . . . . . . . . . . . . . 294
Buying New Tires . . . . . . . . . . . . . . . . 295
Different Size Tires and Wheels . . . . . . . . . . . . . . . . . . . . . . . . . . 296
Uniform Tire Quality Grading . . . 297
Wheel Alignment and Tire Balance . . . . . . . . . . . . . . . . . . . . . . . . . . 298
Wheel Replacement . . . . . . . . . . . . . . 298
Tire Chains . . . . . . . . . . . . . . . . . . . . . . . 299
If a Tire Goes Flat . . . . . . . . . . . . . . . . 300
Tire Sealant and Compressor Kit . . . . . . . . . . . . . . . . . 301
Storing the Tire Sealant and Compressor Kit . . . . . . . . . . . . . . . . . 307
Tire Changing . . . . . . . . . . . . . . . . . . . . . 308
Compact Spare Tire . . . . . . . . . . . . . . 313
Page 271 of 380
Cadillac XT5 Owner Manual (GMNA-Localizing-U.S./Canada/Mexico-
11349110) - 2018 - CRC - 9/28/17
270 VEHICLE CARE
Bulb Replacement
For the proper type of replacement
bulbs, or any bulb changing procedure
not listed in this section, contact your
dealer.
Halogen Bulbs
{Warning
Halogen bulbs have pressurized gas
inside and can burst if you drop or
scratch the bulb. You or others
could be injured. Be sure to read
and follow the instructions on the
bulb package.
LED Lighting
This vehicle has several LED lamps.
For replacement of any LED lighting
assembly, contact your dealer.
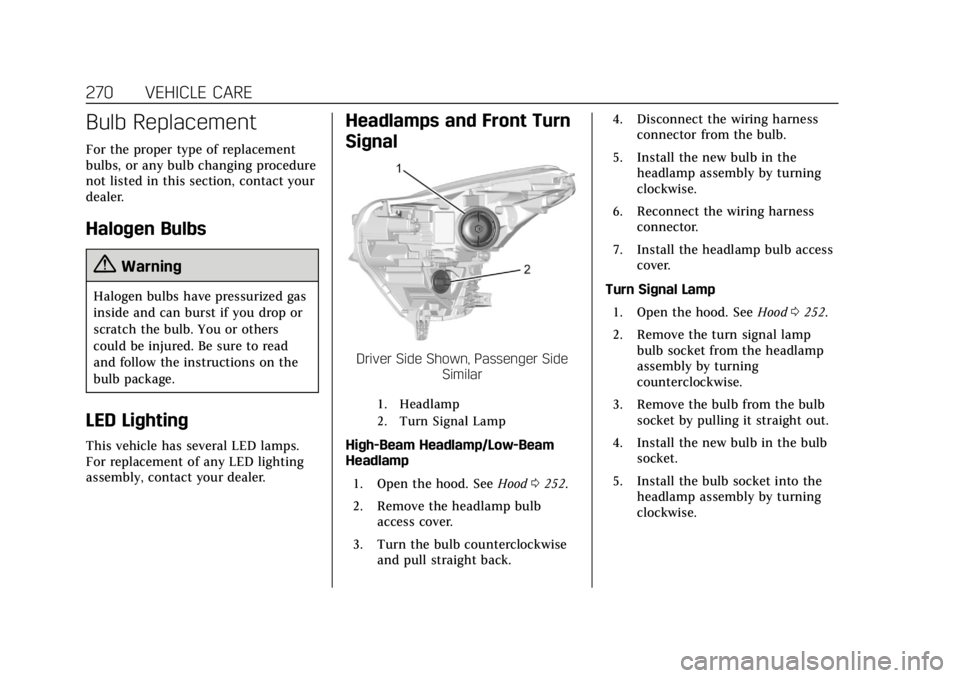
Headlamps and Front Turn
Signal
Driver Side Shown, Passenger SideSimilar
1. Headlamp
2. Turn Signal Lamp
High-Beam Headlamp/Low-Beam
Headlamp
1. Open the hood. See Hood0252.
2. Remove the headlamp bulb access cover.
3. Turn the bulb counterclockwise and pull straight back. 4. Disconnect the wiring harness
connector from the bulb.
5. Install the new bulb in the headlamp assembly by turning
clockwise.
6. Reconnect the wiring harness connector.
7. Install the headlamp bulb access cover.
Turn Signal Lamp 1. Open the hood. See Hood0252.
2. Remove the turn signal lamp bulb socket from the headlamp
assembly by turning
counterclockwise.
3. Remove the bulb from the bulb socket by pulling it straight out.
4. Install the new bulb in the bulb socket.
5. Install the bulb socket into the headlamp assembly by turning
clockwise.
Page 275 of 380
Cadillac XT5 Owner Manual (GMNA-Localizing-U.S./Canada/Mexico-
11349110) - 2018 - CRC - 9/28/17
274 VEHICLE CARE
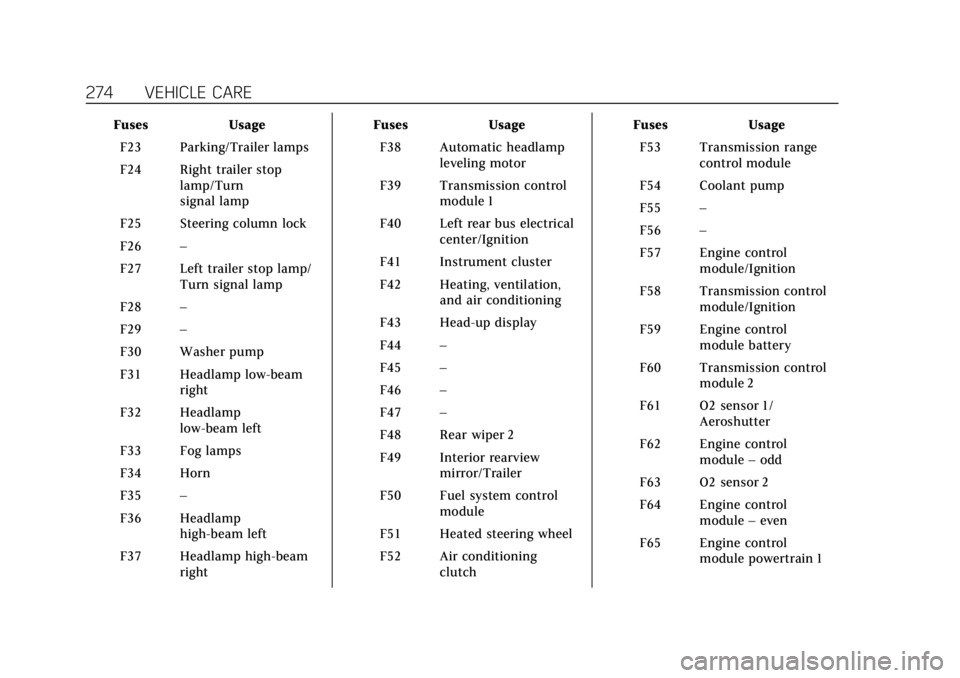
FusesUsage
F23 Parking/Trailer lamps
F24 Right trailer stop lamp/Turn
signal lamp
F25 Steering column lock
F26 –
F27 Left trailer stop lamp/ Turn signal lamp
F28 –
F29 –
F30 Washer pump
F31 Headlamp low-beam right
F32 Headlamp low-beam left
F33 Fog lamps
F34 Horn
F35 –
F36 Headlamp high-beam left
F37 Headlamp high-beam right Fuses
Usage
F38 Automatic headlamp leveling motor
F39 Transmission control module 1
F40 Left rear bus electrical center/Ignition
F41 Instrument cluster
F42 Heating, ventilation, and air conditioning
F43 Head-up display
F44 –
F45 –
F46 –
F47 –
F48 Rear wiper 2
F49 Interior rearview mirror/Trailer
F50 Fuel system control module
F51 Heated steering wheel
F52 Air conditioning clutch Fuses
Usage
F53 Transmission range control module
F54 Coolant pump
F55 –
F56 –
F57 Engine control module/Ignition
F58 Transmission control module/Ignition
F59 Engine control module battery
F60 Transmission control module 2
F61 O2 sensor 1/ Aeroshutter
F62 Engine control module–odd
F63 O2 sensor 2
F64 Engine control module–even
F65 Engine control module powertrain 1
Page 292 of 380
Cadillac XT5 Owner Manual (GMNA-Localizing-U.S./Canada/Mexico-
11349110) - 2018 - CRC - 9/28/17
VEHICLE CARE 291
light and the DIC message should
go off after successfully
completing the sensor matching
process. See "TPMS Sensor
Matching Process" later in this
section.
. One or more TPMS sensors are
missing or damaged. The
malfunction light and the DIC
message should go off when the
TPMS sensors are installed and
the sensor matching process is
performed successfully. See your
dealer for service.
. Replacement tires or wheels do
not match the original equipment
tires or wheels. Tires and wheels
other than those recommended
could prevent the TPMS from
functioning properly. See Buying
New Tires 0295.
. Operating electronic devices or
being near facilities using radio
wave frequencies similar to the
TPMS could cause the TPMS
sensors to malfunction. If the TPMS is not functioning
properly it cannot detect or signal a
low tire pressure condition. See your
dealer for service if the TPMS
malfunction light and DIC message
comes on and stays on.
Tire Fill Alert (If Equipped)
This feature provides visual and
audible alerts outside the vehicle to
help when inflating an underinflated
tire to the recommended cold tire
pressure.
When the low tire pressure warning
light comes on:
1. Park the vehicle in a safe, level place.
2. Set the parking brake firmly.
3. Place the vehicle in P (Park).
4. Add air to the tire that is underinflated. The turn signal
lamp will flash.
When the recommended
pressure is reached, the horn
sounds once and the turn signal
lamp will stop flashing and
briefly turn solid. Repeat these steps for all
underinflated tires that have
illuminated the low tire pressure
warning light.
If the tire is overinflated by more than
35 kPa (5 psi), the horn will sound
multiple times and the turn signal
lamp will continue to flash for
eight seconds after filling stops. To
release and correct the pressure, while
the turn signal lamp is still flashing,
briefly press the center of the valve
stem. When the recommended
pressure is reached, the horn
sounds once.
If the turn signal lamp does not flash
within 15 seconds after starting to
inflate the tire, the tire fill alert has
not been activated or is not working.
If the hazard warning flashers are on,
the tire fill alert visual feedback will
not work properly.
The TPMS will not activate the tire fill
alert properly under the following
conditions:
.
There is interference from an
external device or transmitter.
Page 293 of 380
Cadillac XT5 Owner Manual (GMNA-Localizing-U.S./Canada/Mexico-
11349110) - 2018 - CRC - 9/28/17
292 VEHICLE CARE
.The air pressure from the inflation
device is not sufficient to inflate
the tire.
. There is a malfunction in
the TPMS.
. There is a malfunction in the horn
or turn signal lamps.
. The identification code of the
TPMS sensor is not registered to
the system.
. The battery of the TPMS sensor
is low.
If the tire fill alert does not operate
due to TPMS interference, move the
vehicle about 1 m (3 ft) back or
forward and try again. If the tire fill
alert feature is not working, use a tire
pressure gauge.
TPMS Sensor Matching Process
Each TPMS sensor has a unique
identification code. The identification
code needs to be matched to a new
tire/wheel position after rotating the
vehicle’s tires or replacing one or more
of the TPMS sensors. The TPMS
sensor matching process should also
be performed after replacing a spare tire with a road tire containing the
TPMS sensor. The malfunction light
and the DIC message should go off at
the next ignition cycle. The sensors
are matched to the tire/wheel
positions, using a TPMS relearn tool,
in the following order: driver side
front tire, passenger side front tire,
passenger side rear tire, and driver
side rear. See your dealer for
service or to purchase a relearn tool.
A TPMS relearn tool can also be
purchased. See Tire Pressure Monitor
Sensor Activation Tool at
www.gmtoolsandequipment.com or
call 1-800-GM TOOLS
(1-800-468-6657).
There are two minutes to match the
first tire/wheel position, and
five minutes overall to match all four
tire/wheel positions. If it takes longer,
the matching process stops and must
be restarted.
The TPMS sensor matching process is:
1. Set the parking brake.
2. Place the vehicle in Service Mode. See Ignition Positions
0 188. 3. Make sure the Tire Pressure info
display option is turned on. The
info displays on the DIC can be
turned on and off through the
Options menu. See Driver
Information Center (DIC) 0141.
4. Use the five-way DIC control on the right side of the steering
wheel to scroll to the Tire
Pressure screen under the DIC
info page. See Driver Information
Center (DIC) 0141.
5. Press and hold SEL in the center of the five-way DIC control.
The horn sounds twice to signal
the receiver is in relearn mode
and the TIRE LEARNING ACTIVE
message displays on the DIC
screen.
6. Start with the driver side front tire.
7. Place the relearn tool against the tire sidewall, near the valve stem.
Then press the button to activate
the TPMS sensor. A horn chirp
confirms that the sensor