parking brake CADILLAC XT5 2018 Owner's Guide
[x] Cancel search | Manufacturer: CADILLAC, Model Year: 2018, Model line: XT5, Model: CADILLAC XT5 2018Pages: 380, PDF Size: 6.21 MB
Page 233 of 380
Cadillac XT5 Owner Manual (GMNA-Localizing-U.S./Canada/Mexico-
11349110) - 2018 - CRC - 9/28/17
232 DRIVING AND OPERATING
some very low speed pedestrian
crashes or reduce pedestrian injury.
FPB can automatically brake to
detected pedestrians between 8 km/h
(5 mph) and 80 km/h (50 mph).
Automatic braking levels may be
reduced under certain conditions,
such as higher speeds.
If this happens, Automatic Braking
may engage the Electric Parking Brake
(EPB) to hold the vehicle at a stop.
Release the EPB. A firm press of the
accelerator pedal will also release
Automatic Braking and the EPB.
{Warning
FPB may alert or automatically
brake the vehicle suddenly in
situations where it is unexpected
and undesired. It could falsely alert
or brake for objects similar in shape
or size to pedestrians, including
shadows. This is normal operation
and the vehicle does not need
service. To override Automatic
Braking, firmly press the accelerator
pedal, if it is safe to do so.Automatic Braking can be disabled
through vehicle personalization. See
“Front Pedestrian Detection
”in
“Collision/Detection Systems” under
Vehicle Personalization 0148.
{Warning
Using the Front Pedestrian Braking
system while towing a trailer could
cause you to lose control of the
vehicle and crash. Turn the system
to Alert or Off when towing a
trailer.
Cleaning the System
If FPB does not seem to operate
properly, cleaning the outside of the
windshield in front of the rearview
mirror may correct the issue.
Side Blind Zone
Alert (SBZA)
If equipped, the SBZA system is a
lane-changing aid that assists drivers
with avoiding crashes that occur with
moving vehicles in the side blind zone
(or spot) areas. When the vehicle is in a forward gear, the left or right side
mirror display will light up if a moving
vehicle is detected in that blind zone.
If the turn signal is activated and a
vehicle is also detected on the same
side, the display will flash as an extra
warning not to change lanes. Since
this system is part of the Lane Change
Alert (LCA) system, read the entire
LCA section before using this feature.
Lane Change Alert (LCA)
If equipped, the LCA system is a
lane-changing aid that assists drivers
with avoiding lane change crashes
that occur with moving vehicles in the
side blind zone (or spot) areas or with
vehicles rapidly approaching these
areas from behind. The LCA warning
display will light up in the
corresponding outside side mirror and
will flash if the turn signal is on.
Page 243 of 380
Cadillac XT5 Owner Manual (GMNA-Localizing-U.S./Canada/Mexico-
11349110) - 2018 - CRC - 9/28/17
242 DRIVING AND OPERATING
Making TurnsCaution
Making very sharp turns while
trailering could cause the trailer to
come in contact with the vehicle.
The vehicle could be damaged.
Avoid making very sharp turns
while trailering.
When turning with a trailer, make
wider turns than normal so the trailer
will not strike soft shoulders, curbs,
road signs, trees, or other objects. Use
the turn signal well in advance and
avoid jerky or sudden maneuvers.
Turn Signals When Towing a
Trailer
The turn signal indicators on the
instrument cluster flash whenever
signaling a turn or lane change.
Properly hooked up, the trailer lamps
also flash, telling other drivers the
vehicle is turning, changing lanes,
or stopping. When towing a trailer, the arrows on
the instrument cluster flash for turns
even if the bulbs on the trailer are
burned out. Check occasionally to be
sure the trailer bulbs are still working.
Driving on Grades
Reduce speed and shift to a lower gear
before starting down a long or steep
downgrade. If the transmission is not
shifted down, the brakes might have
to be used so much that they would
get hot and no longer work well.
The vehicle can tow in D (Drive). Use
a lower gear if the transmission shifts
too often.
When towing at high altitude on steep
uphill grades, engine coolant boils at a
lower temperature than at normal
altitudes. If the engine is turned off
immediately after towing at high
altitude on steep uphill grades, the
vehicle could show signs similar to
engine overheating. To avoid this, let
the engine run while parked,
preferably on level ground, with the
transmission in P (Park) for a few
minutes before turning the engine off.
If the overheat warning comes on, see
Engine Overheating
0261.
Parking on Hills
{Warning
Parking the vehicle on a hill with
the trailer attached can be
dangerous. If something goes
wrong, the rig could start to move.
People can be injured, and both the
vehicle and the trailer can be
damaged. When possible, always
park the rig on a flat surface.
If parking the rig on a hill: 1. Press the brake pedal, but do not shift into P (Park) yet. Turn the
wheels into the curb if facing
downhill or into traffic if facing
uphill.
2. Have someone place chocks under the trailer wheels.
3. When the wheel chocks are in place, release the brake pedal
until the chocks absorb the load.
Page 244 of 380
Cadillac XT5 Owner Manual (GMNA-Localizing-U.S./Canada/Mexico-
11349110) - 2018 - CRC - 9/28/17
DRIVING AND OPERATING 243
4. Reapply the brake pedal. Thenapply the parking brake and shift
into P (Park).
5. Release the brake pedal.
Leaving After Parking on a Hill
1. Apply and hold the brake pedal while you:
.Start the engine.
. Shift into a gear.
. Release the parking brake.
2. Let up on the brake pedal.
3. Drive slowly until the trailer is clear of the chocks.
4. Stop and have someone pick up and store the chocks.
Maintenance When Trailer
Towing
The vehicle needs service more often
when pulling a trailer. See the
Maintenance Schedule 0330. Things
that are especially important in trailer
operation are automatic transmission
fluid, engine oil, axle lubricant, belts, cooling system, and brake system.
Inspect these before and during
the trip.
Check periodically to see that all hitch
nuts and bolts are tight.
Engine Cooling When Trailer
Towing
The cooling system may temporarily
overheat during severe operating
conditions. See
Engine Overheating
0 261.
Trailer Towing
Before pulling a trailer, there are three
important considerations that have to
do with weight:
.
The weight of the trailer.
. The weight of the trailer tongue.
. The total weight on the vehicle's
tires.
Weight of the Trailer
How heavy can a trailer safely be?
It depends on how the rig is used. For
example, speed, altitude, road grades,
outside temperature and how much
the vehicle is used to pull a trailer are
all important. It can depend on any
special equipment on the vehicle, and
the amount of tongue weight the
vehicle can carry. See “Weight of the
Trailer Tongue ”later in this section.
Maximum trailer weight is calculated
assuming the tow vehicle has the
driver, a front seat passenger, and all
the required towing equipment. Cargo
in the tow vehicle must be subtracted
from the maximum trailer weight.
Use the following chart to determine
how much the vehicle can weigh,
based upon the vehicle model and
options.
Page 247 of 380
Cadillac XT5 Owner Manual (GMNA-Localizing-U.S./Canada/Mexico-
11349110) - 2018 - CRC - 9/28/17
246 DRIVING AND OPERATING
To reinstall the hitch cover:1. Hold the cover at a 45 degree angle to the vehicle and push the
upper tabs in the hitch cover
into the slots in the fascia.
2. Move the bottom of the cover forward until the lower tabs line
up with the lower fascia slots.
3. Snap the hitch cover into place by pushing the upper corners
forward.
4. Reinstall the two bolts on the lower tabs by turning clockwise.
Safety Chains
Always attach chains between the
vehicle and the trailer. Cross the safety
chains under the tongue of the trailer
to help prevent the tongue from
contacting the road if it becomes
separated from the hitch. Always leave
just enough slack so the rig can turn.
Never allow safety chains to drag on
the ground.
Trailer Brakes
A loaded trailer that weighs more than
454 kg (1,000 lb) needs to have its own
brake system that is adequate for the
weight of the trailer. Be sure to read
and follow the instructions for the
trailer brakes so they are installed,
adjusted, and maintained properly.
Because the vehicle has antilock
brakes, do not tap into the vehicle's
brake system. If you do, both brake
systems will not work well, or at all.
Trailer Wiring Harness
Basic Trailer Wiring
The trailer wiring harness, with a
seven-pin connector, is located at the
rear of the vehicle and is tied to the
vehicle's frame. The harness connector
can be plugged into a seven-pin
universal heavy-duty trailer connector
available through your dealer.
Use only a round, seven-wire
connector with flat blade terminals
meeting SAE J2863 specifications for
proper electrical connectivity. The seven-wire harness contains the
following trailer circuits:
.
Yellow/Gray: Stop/Turn Signal Left
. Green/Violet: Stop/Turn Signal
Right
. Gray/Brown: Parking Lamps
. White/Green: Back-up Lamps
. Red/Green: Battery Feed
. Black: Ground
. Blue: Electric Brakes*
*The fuse for this circuit is installed in
the engine compartment fuse block,
but the wires are not connected. They
should be connected by your dealer or
a qualified service center.
If the back-up lamp circuit is not
functional, contact your dealer.
Page 248 of 380
Cadillac XT5 Owner Manual (GMNA-Localizing-U.S./Canada/Mexico-
11349110) - 2018 - CRC - 9/28/17
DRIVING AND OPERATING 247
Electric Trailer Brake Control Wiring
Provisions
These wiring provisions for an electric
trailer brake controller are included
with the vehicle as part of the trailer
wiring package. The instrument panel
contains blunt cut wires above the
parking brake assembly for the electric
trailer brake controller. The harness
contains the following wires:
.Blue: To Trailer
. Red/Black or Red/Blue:
Battery Feed
. White/Blue: Brake Apply Signal
. Black: Ground
The electric trailer brake controller
should be installed by your dealer or a
qualified service center.Trailer Sway Control (TSC)
Vehicles with StabiliTrak have a
Trailer Sway Control (TSC) feature.
Trailer sway is unintended side-to-side
motion of a trailer while being towed.
If the vehicle is towing a trailer and
the TSC detects that sway is
increasing, the vehicle brakes are
selectively applied at each wheel, to
help reduce excessive trailer sway.
If the vehicle is equipped with the
Integrated Trailer Brake Control
(ITBC) system, and the trailer has the
electric actuated brake system,
StabiliTrak may also apply the trailer
brakes.
If TSC is enabled, the Traction Control
System (TCS)/StabiliTrak warning
light will flash on the instrument
cluster. Vehicle speed must be
reduced. If trailer sway continues,
StabiliTrak can reduce engine torque
to help slow the vehicle. See Traction
Control/Electronic Stability Control
0 205.{Warning
Even if the vehicle is equipped with
TSC, trailer sway could result in
loss of control and the vehicle could
crash. If excessive trailer sway is
detected, slow down to a safe speed.
Check the trailer and vehicle to help
correct possible causes. These could
include an improperly or overloaded
trailer, unrestrained cargo, improper
trailer hitch configuration, excessive
vehicle-trailer speed, or improperly
inflated or incorrect vehicle or
trailer tires. See Towing Equipment
0 245 for trailer ratings and hitch
setup recommendations.
Adding non-dealer accessories can
affect the vehicle performance. See
Accessories and Modifications 0251.
Page 267 of 380
Cadillac XT5 Owner Manual (GMNA-Localizing-U.S./Canada/Mexico-
11349110) - 2018 - CRC - 9/28/17
266 VEHICLE CARE
Warning (Continued)
California to cause cancer.WASH
HANDS AFTER HANDLING. For
more information go to
www.P65Warnings.ca.gov/
passenger-vehicle.
See California Proposition 65 Warning
0 250 and the back cover.
Vehicle Storage
{Warning
Batteries have acid that can burn
you and gas that can explode. You
can be badly hurt if you are not
careful. See Jump Starting - North
America 0314 for tips on working
around a battery without
getting hurt.
Infrequent Usage: Remove the black,
negative (−) cable from the battery to
keep the battery from running down. Extended Storage: Remove the black,
negative (−) cable from the battery or
use a battery trickle charger.
All-Wheel Drive
Transfer Case
Under normal driving conditions,
transfer case fluid does not require
maintenance unless there is a fluid
leak or unusual noise. If required,
have the transfer case serviced by
your dealer.
Starter Switch Check
{Warning
When you are doing this inspection,
the vehicle could move suddenly.
If the vehicle moves, you or others
could be injured.
1. Before starting this check, be sure there is enough room
around the vehicle.
2. Apply both the parking brake and the regular brake. Do not use the accelerator pedal,
and be ready to turn off the
engine immediately if it starts.
3. Try to start the engine in each gear. The vehicle should start
only in P (Park) or N (Neutral).
If the vehicle starts in any other
position, contact your dealer for
service.
Park Brake and P (Park)
Mechanism Check
{Warning
When you are doing this check, the
vehicle could begin to move. You or
others could be injured and
property could be damaged. Make
sure there is room in front of the
vehicle in case it begins to roll. Be
ready to apply the regular brake at
once should the vehicle begin
to move.
Page 268 of 380
Cadillac XT5 Owner Manual (GMNA-Localizing-U.S./Canada/Mexico-
11349110) - 2018 - CRC - 9/28/17
VEHICLE CARE 267
Park on a fairly steep hill, with the
vehicle facing downhill. Keeping your
foot on the regular brake, set the
parking brake.
.To check the parking brake's
holding ability: With the engine
running and the transmission in
N (Neutral), slowly remove foot
pressure from the regular brake
pedal. Do this until the vehicle is
held by the parking brake only.
. To check the P (Park) mechanism's
holding ability: With the engine
running, shift to P (Park). Then
release the parking brake followed
by the regular brake.
Contact your dealer if service is
required.Wiper Blade Replacement
Windshield wiper blades should be
inspected for wear or cracking.
It is a good idea to clean or replace
the wiper blade assembly on a regular
basis or when worn. For proper
windshield wiper blade length and
type, see Maintenance Replacement
Parts 0338.
Caution
Allowing the wiper arm to touch
the windshield when no wiper blade
is installed could damage the
windshield. Any damage that occurs
would not be covered by the vehicle
warranty. Do not allow the wiper
arm to touch the windshield.
Front Wiper Blade Replacement
To replace the wiper blade assembly:
1. Pull the windshield wiper assembly away from the
windshield.
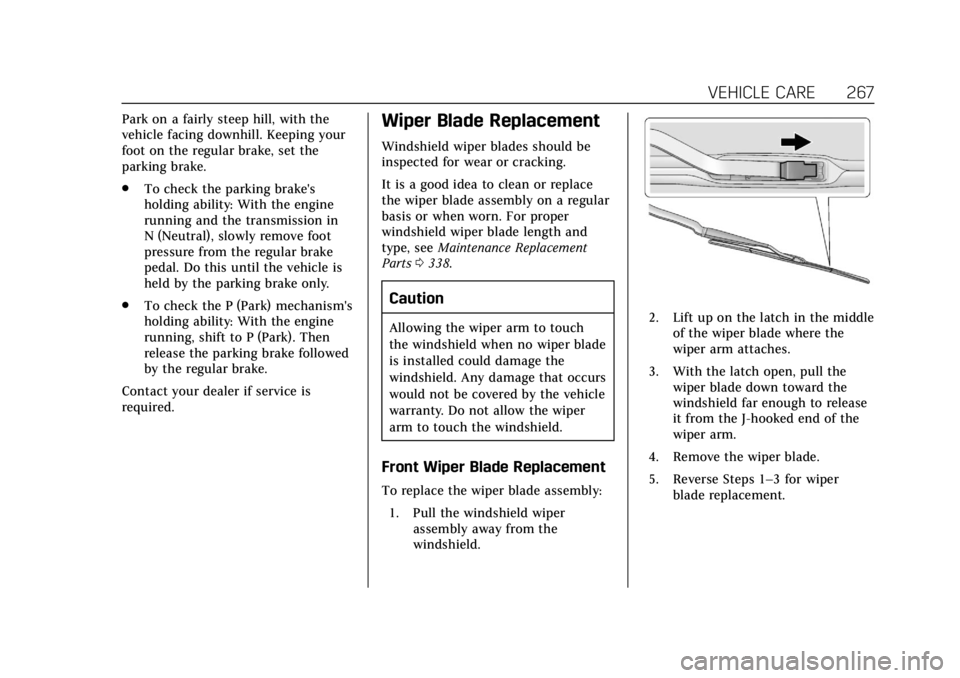
2. Lift up on the latch in the middleof the wiper blade where the
wiper arm attaches.
3. With the latch open, pull the wiper blade down toward the
windshield far enough to release
it from the J-hooked end of the
wiper arm.
4. Remove the wiper blade.
5. Reverse Steps 1–3 for wiper blade replacement.
Page 292 of 380
Cadillac XT5 Owner Manual (GMNA-Localizing-U.S./Canada/Mexico-
11349110) - 2018 - CRC - 9/28/17
VEHICLE CARE 291
light and the DIC message should
go off after successfully
completing the sensor matching
process. See "TPMS Sensor
Matching Process" later in this
section.
. One or more TPMS sensors are
missing or damaged. The
malfunction light and the DIC
message should go off when the
TPMS sensors are installed and
the sensor matching process is
performed successfully. See your
dealer for service.
. Replacement tires or wheels do
not match the original equipment
tires or wheels. Tires and wheels
other than those recommended
could prevent the TPMS from
functioning properly. See Buying
New Tires 0295.
. Operating electronic devices or
being near facilities using radio
wave frequencies similar to the
TPMS could cause the TPMS
sensors to malfunction. If the TPMS is not functioning
properly it cannot detect or signal a
low tire pressure condition. See your
dealer for service if the TPMS
malfunction light and DIC message
comes on and stays on.
Tire Fill Alert (If Equipped)
This feature provides visual and
audible alerts outside the vehicle to
help when inflating an underinflated
tire to the recommended cold tire
pressure.
When the low tire pressure warning
light comes on:
1. Park the vehicle in a safe, level place.
2. Set the parking brake firmly.
3. Place the vehicle in P (Park).
4. Add air to the tire that is underinflated. The turn signal
lamp will flash.
When the recommended
pressure is reached, the horn
sounds once and the turn signal
lamp will stop flashing and
briefly turn solid. Repeat these steps for all
underinflated tires that have
illuminated the low tire pressure
warning light.
If the tire is overinflated by more than
35 kPa (5 psi), the horn will sound
multiple times and the turn signal
lamp will continue to flash for
eight seconds after filling stops. To
release and correct the pressure, while
the turn signal lamp is still flashing,
briefly press the center of the valve
stem. When the recommended
pressure is reached, the horn
sounds once.
If the turn signal lamp does not flash
within 15 seconds after starting to
inflate the tire, the tire fill alert has
not been activated or is not working.
If the hazard warning flashers are on,
the tire fill alert visual feedback will
not work properly.
The TPMS will not activate the tire fill
alert properly under the following
conditions:
.
There is interference from an
external device or transmitter.
Page 293 of 380
Cadillac XT5 Owner Manual (GMNA-Localizing-U.S./Canada/Mexico-
11349110) - 2018 - CRC - 9/28/17
292 VEHICLE CARE
.The air pressure from the inflation
device is not sufficient to inflate
the tire.
. There is a malfunction in
the TPMS.
. There is a malfunction in the horn
or turn signal lamps.
. The identification code of the
TPMS sensor is not registered to
the system.
. The battery of the TPMS sensor
is low.
If the tire fill alert does not operate
due to TPMS interference, move the
vehicle about 1 m (3 ft) back or
forward and try again. If the tire fill
alert feature is not working, use a tire
pressure gauge.
TPMS Sensor Matching Process
Each TPMS sensor has a unique
identification code. The identification
code needs to be matched to a new
tire/wheel position after rotating the
vehicle’s tires or replacing one or more
of the TPMS sensors. The TPMS
sensor matching process should also
be performed after replacing a spare tire with a road tire containing the
TPMS sensor. The malfunction light
and the DIC message should go off at
the next ignition cycle. The sensors
are matched to the tire/wheel
positions, using a TPMS relearn tool,
in the following order: driver side
front tire, passenger side front tire,
passenger side rear tire, and driver
side rear. See your dealer for
service or to purchase a relearn tool.
A TPMS relearn tool can also be
purchased. See Tire Pressure Monitor
Sensor Activation Tool at
www.gmtoolsandequipment.com or
call 1-800-GM TOOLS
(1-800-468-6657).
There are two minutes to match the
first tire/wheel position, and
five minutes overall to match all four
tire/wheel positions. If it takes longer,
the matching process stops and must
be restarted.
The TPMS sensor matching process is:
1. Set the parking brake.
2. Place the vehicle in Service Mode. See Ignition Positions
0 188. 3. Make sure the Tire Pressure info
display option is turned on. The
info displays on the DIC can be
turned on and off through the
Options menu. See Driver
Information Center (DIC) 0141.
4. Use the five-way DIC control on the right side of the steering
wheel to scroll to the Tire
Pressure screen under the DIC
info page. See Driver Information
Center (DIC) 0141.
5. Press and hold SEL in the center of the five-way DIC control.
The horn sounds twice to signal
the receiver is in relearn mode
and the TIRE LEARNING ACTIVE
message displays on the DIC
screen.
6. Start with the driver side front tire.
7. Place the relearn tool against the tire sidewall, near the valve stem.
Then press the button to activate
the TPMS sensor. A horn chirp
confirms that the sensor
Page 296 of 380
Cadillac XT5 Owner Manual (GMNA-Localizing-U.S./Canada/Mexico-
11349110) - 2018 - CRC - 9/28/17
VEHICLE CARE 295
The rubber in tires ages over time.
This also applies to the spare tire,
if the vehicle has one, even if it is
never used. Multiple factors including
temperatures, loading conditions, and
inflation pressure maintenance affect
how fast aging takes place. GM
recommends that tires, including the
spare if equipped, be replaced after six
years, regardless of tread wear. The
tire manufacture date is the last four
digits of the DOT Tire Identification
Number (TIN) which is molded into
one side of the tire sidewall. The first
two digits represent the week (01–52)
and the last two digits, the year. For
example, the third week of the year
2010 would have a four-digit DOT
date of 0310.
Vehicle Storage
Tires age when stored normally
mounted on a parked vehicle. Park a
vehicle that will be stored for at least
a month in a cool, dry, clean area
away from direct sunlight to slow
aging. This area should be free of
grease, gasoline, or other substances
that can deteriorate rubber.Parking for an extended period can
cause flat spots on the tires that may
result in vibrations while driving.
When storing a vehicle for at least a
month, remove the tires or raise the
vehicle to reduce the weight from the
tires.
Buying New Tires
GM has developed and matched
specific tires for the vehicle. The
original equipment tires installed
were designed to meet General
Motors Tire Performance Criteria
Specification (TPC Spec) system
rating. When replacement tires are
needed, GM strongly recommends
buying tires with the same TPC
Spec rating.
GM's exclusive TPC Spec system
considers over a dozen critical
specifications that impact the
overall performance of the vehicle,
including brake system
performance, ride and handling,
traction control, and tire pressure
monitoring performance. GM's
TPC Spec number is molded onto
the tire's sidewall near the tire
size. If the tires have an all-season
tread design, the TPC Spec
number will be followed by MS for
mud and snow. See
Tire Sidewall
Labeling 0281.
GM recommends replacing worn
tires in complete sets of four.
Uniform tread depth on all tires
will help to maintain the
performance of the vehicle.
Braking and handling performance
may be adversely affected if all the
tires are not replaced at the same
time. If proper rotation and
maintenance have been done, all
four tires should wear out at
about the same time. See Tire
Rotation 0293. However, if it is
necessary to replace only one axle
set of worn tires, place the new
tires on the rear axle.
Winter tires with the same speed
rating as the original equipment
tires may not be available for H, V,